1
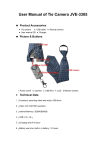
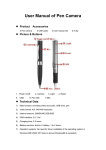
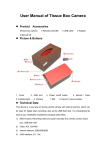
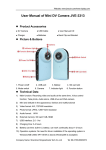
User Manual of Bottle Hidden Camera JVE-3306A Product Accessories ● Bottle hidden camera ● remote control ● User manual CD ● charger ● USB cable Picture & Buttons 1. Power on/off (left: on/right: off) 2. USB slot 3. Camera 4. LED Technical Data 1) 2) 3) Main function: recording video and audio at the same time, USB drive. Video format: AVI, 640*480 resolution Internal Memory: 2GB/4GB/8GB 4) USB interface: 2.0(Hs) 5) 6) 7) Charging time: 3-4 hours Battery use time: built-in Li battery, can work continually 2-3 hours Operation systems: No need for driver installation if the operating system is Windows ME/ 2000/ XP/ VISTA or above (windows98 is excepted) 8) Various usages: USB drive, industry of business, education, security, media, police, travel, entertainment, etc. Operation Switch on Under power-off mode, press the switch button to the left side Recording video and audio Press the remote control for 2 seconds, the red light turns on, later the green blinks, indicating it comes to recording mode. Press the remote control once, the green light turns to red, the video file is saved and the camera back to standby mode. Switch off Push power on/off button to the right side under standby mode or recording mode, all lights turn off and the device will stop working. Attention: Under recording mode, the file cannot be saved if turning off the camera direct. Charging Connect the device to computer via USB cable under power off mode, the green light keeps blinking while being charged. The green light keeps on when it is fully charged. If the device if of low electricity, the green light blinks slowly. Attention: The device has a function of memorize by using built-in high-capacity polymer lithium battery. In the first 5 times please charge the battery fully after you have used out the battery. By doing so, you can access the maximum capacity of the battery, reaching the standard working hours. Playback video Connect the camera to computer via USB cable and play back video on computer. Please make sure there is a playback software in the computer before connecting. Setting time When using the device for the first time, you can reset the time as follows: 1) Connect the camera with computer 2) Create a new “PHTIME.txt” file 3) Edit time as format: 2009-12-12 12:12:12 4) Copy the file to the root of the disk of the camera 5) When starting the camera again next time, the time will be reset. Attention 1) Power off the camera when you donot use it to save the power. 2) If it’s lack of electricity while recording, the file will be saved before the device turns off. 3) When taking video continually, the system will automatically generate a new video file after each operation. 4) Under a bright environment, keep camera vertical, stable and keep certain distance from the scene you want to record in order to achieve a best effect . 5) Connect to computer: The time for computer with different system or configuration to identify the hardware is slightly different. During this period, please wait for a moment. If computer can’t identify, please make sure your operating system, drivers and USB interface cable in good work order, then connect again.