1
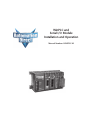
WinPLC and
Serial I/O Module
Installation and Operation
Manual Number: H2-WPLC-M
Notes
WARNING Thank you for purchasing automation equipment from Automationdirect.com®, doing business as,
AutomationDirect. We want your new automation equipment to operate safely. Anyone who installs or
uses this equipment should read this publication (and any other relevant publications) before installing or
operating the equipment.
To minimize the risk of potential safety problems, you should follow all applicable local and national codes
that regulate the installation and operation of your equipment. These codes vary from area to area and
usually change with time. It is your responsibility to determine which codes should be followed, and to
verify that the equipment, installation, and operation is in compliance with the latest revision of these
codes.
At a minimum, you should follow all applicable sections of the National Fire Code, National Electrical
Code, and the codes of the National Electrical Manufacturer's Association (NEMA). There may be local
regulatory or government offices that can also help determine which codes and standards are necessary for
safe installation and operation.
Equipment damage or serious injury to personnel can result from the failure to follow all applicable codes
and standards. We do not guarantee the products described in this publication are suitable for your
particular application, nor do we assume any responsibility for your product design, installation, or
operation.
Our products are not fault-tolerant and are not designed, manufactured or intended for use or resale as online control equipment in hazardous environments requiring fail-safe performance, such as in the
operation of nuclear facilities, aircraft navigation or communication systems, air traffic control, direct life
support machines, or weapons systems, in which the failure of the product could lead directly to death,
personal injury, or severe physical or environmental damage ("High Risk Activities"). AutomationDirect
specifically disclaims any expressed or implied warranty of fitness for High Risk Activities.
For additional warranty and safety information, see the Terms and Conditions section of our catalog. If
you have any questions concerning the installation or operation of this equipment, or if you need
additional information, please call us at 770-844-4200.
This publication is based on information that was available at the time it was printed. At
AutomationDirect we constantly strive to improve our products and services, so we reserve the right to
make changes to the products and/or publications at any time without notice and without any obligation.
This publication may also discuss features that may not be available in certain revisions of the product.
Trademarks
This publication may contain references to products produced and/or offered by other companies. The
product and company names may be trademarked and are the sole property of their respective owners.
AutomationDirect disclaims any proprietary interest in the marks and names of others.
Copyright 2010, Automationdirect.com Incorporated
All Rights Reserved
No part of this manual shall be copied, reproduced, or transmitted in any way without the prior, written
consent of Automationdirect.com Incorporated. AutomationDirect retains the exclusive rights to all
information included in this document.
AVERTISSEMENT Nous vous remercions d'avoir acheté l'équipement d'automatisation de Automationdirect.comMC, en faisant des
affaires comme, AutomationDirect. Nous tenons à ce que votre nouvel équipement d'automatisation fonctionne en
toute sécurité. Toute personne qui installe ou utilise cet équipement doit lire la présente publication (et toutes les
autres publications pertinentes) avant de l'installer ou de l'utiliser.
Afin de réduire au minimum le risque d'éventuels problèmes de sécurité, vous devez respecter tous les codes locaux et
nationaux applicables régissant l'installation et le fonctionnement de votre équipement. Ces codes diffèrent d'une
région à l'autre et, habituellement, évoluent au fil du temps. Il vous incombe de déterminer les codes à respecter et
de vous assurer que l'équipement, l'installation et le fonctionnement sont conformes aux exigences de la version la
plus récente de ces codes.
Vous devez, à tout le moins, respecter toutes les sections applicables du Code national de prévention des incendies,
du Code national de l'électricité et des codes de la National Electrical Manufacturer's Association (NEMA). Des
organismes de réglementation ou des services gouvernementaux locaux peuvent également vous aider à déterminer
les codes ainsi que les normes à respecter pour assurer une installation et un fonctionnement sûrs.
L'omission de respecter la totalité des codes et des normes applicables peut entraîner des dommages à l'équipement
ou causer de graves blessures au personnel. Nous ne garantissons pas que les produits décrits dans cette publication
conviennent à votre application particulière et nous n'assumons aucune responsabilité à l'égard de la conception, de
l'installation ou du fonctionnement de votre produit.
Nos produits ne sont pas insensibles aux défaillances et ne sont ni conçus ni fabriqués pour l'utilisation ou la revente
en tant qu'équipement de commande en ligne dans des environnements dangereux nécessitant une sécurité absolue,
par exemple, l'exploitation d'installations nucléaires, les systèmes de navigation aérienne ou de communication, le
contrôle de la circulation aérienne, les équipements de survie ou les systèmes d'armes, pour lesquels la défaillance du
produit peut provoquer la mort, des blessures corporelles ou de graves dommages matériels ou environnementaux
(«activités à risque élevé»). La société AutomationDirect nie toute garantie expresse ou implicite d'aptitude à
l'emploi en ce qui a trait aux activités à risque élevé.
Pour des renseignements additionnels touchant la garantie et la sécurité, veuillez consulter la section Modalités et
conditions de notre documentation. Si vous avez des questions au sujet de l'installation ou du fonctionnement de cet
équipement, ou encore si vous avez besoin de renseignements supplémentaires, n'hésitez pas à nous téléphoner au
770-844-4200.
Cette publication s'appuie sur l'information qui était disponible au moment de l'impression. À la société
AutomationDirect, nous nous efforçons constamment d'améliorer nos produits et services. C'est pourquoi nous
nous réservons le droit d'apporter des modifications aux produits ou aux publications en tout temps, sans préavis ni
quelque obligation que ce soit. La présente publication peut aussi porter sur des caractéristiques susceptibles de ne
pas être offertes dans certaines versions révisées du produit.
Marques de commerce
La présente publication peut contenir des références à des produits fabriqués ou offerts par d'autres entreprises. Les
désignations des produits et des entreprises peuvent être des marques de commerce et appartiennent exclusivement à
leurs propriétaires respectifs. AutomationDirect nie tout intérêt dans les autres marques et désignations.
Copyright 2010, Automationdirect.com Incorporated
Tous droits réservés
Nulle partie de ce manuel ne doit être copiée, reproduite ou transmise de quelque façon que ce soit sans le
consentement préalable écrit de la société Automationdirect.com Incorporated. AutomationDirect conserve les
droits exclusifs à l'égard de tous les renseignements contenus dans le présent document.
DL205 WINPLC USER MANUAL
Please include the Manual Number and the Manual Issue, both shown below,
when communicating with Technical Support regarding this publication.
Manual Number:
H2-WPLC-M
Issue:
4th Edition
Issue Date:
5/11
Publication History
Issue
Date
1st Edition
4/99
Original edition
Description of Changes
2nd Edition
12/99
Described T&D ESP usage and added H2-SERIO Chapter 3
3rd Edition
4th Edition
3/01
5/11
QuarkXPress conversion and added Workbench Chapter 2
Added H2-SERIO-4 and made minor updates throughout manual.
Notes
TABLE OF CONTENTS
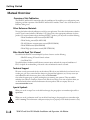
Chapter 1: Getting Started . . . . . . . . . . . . . . . . . . . . . . . . . . . . . . . . . .1–1
Manual Overview . . . . . . . . . . . . . . . . . . . . . . . . . . . . . . . . . . . . . . . . . . . . . . . . . . .1–2
Overview of this Publication . . . . . . . . . . . . . . . . . . . . . . . . . . . . . . . . . . . . . . . . . . .1–2
Other Reference Materials . . . . . . . . . . . . . . . . . . . . . . . . . . . . . . . . . . . . . . . . . . . . .1–2
Who Should Read This Manual . . . . . . . . . . . . . . . . . . . . . . . . . . . . . . . . . . . . . . . . .1–2
Technical Support . . . . . . . . . . . . . . . . . . . . . . . . . . . . . . . . . . . . . . . . . . . . . . . . . . .1–2
Special Symbols . . . . . . . . . . . . . . . . . . . . . . . . . . . . . . . . . . . . . . . . . . . . . . . . . . . .1–2
WinPLC Overview . . . . . . . . . . . . . . . . . . . . . . . . . . . . . . . . . . . . . . . . . . . . . . . . . . . .1–3
Features Depend on Software Implementation . . . . . . . . . . . . . . . . . . . . . . . . . . . . .1–3
The WinPLC LEDs . . . . . . . . . . . . . . . . . . . . . . . . . . . . . . . . . . . . . . . . . . . . . . . . . . . .1–4
Inserting the H2-WPLCx into the DL205 Base
DL205 Power Wiring and Grounding
. . . . . . . . . . . . . . . . . . . . . . . . . . . . .1–4
. . . . . . . . . . . . . . . . . . . . . . . . . . . . . . . . . . . .1–5
10BaseT Network Cabling . . . . . . . . . . . . . . . . . . . . . . . . . . . . . . . . . . . . . . . . . . . . .1–6
10BaseT Connections . . . . . . . . . . . . . . . . . . . . . . . . . . . . . . . . . . . . . . . . . . . . . . . .1–6
10BaseT . . . . . . . . . . . . . . . . . . . . . . . . . . . . . . . . . . . . . . . . . . . . . . . . . . . . . . . . . .1–6
Maximum Ethernet Cable Length . . . . . . . . . . . . . . . . . . . . . . . . . . . . . . . . . . . . . . .1–7
H2-WPLC-xx Serial Port Pinouts . . . . . . . . . . . . . . . . . . . . . . . . . . . . . . . . . . . . . . . . .1–7
Power Budget for the DL205 with H2-WPLC1-xx . . . . . . . . . . . . . . . . . . . . . . . . . . .1–8
Managing your Power Resource . . . . . . . . . . . . . . . . . . . . . . . . . . . . . . . . . . . . . . . .1–8
WinPLC Power Specifications . . . . . . . . . . . . . . . . . . . . . . . . . . . . . . . . . . . . . . . . . .1–8
DL205 Module Power Requirements . . . . . . . . . . . . . . . . . . . . . . . . . . . . . . . . . . . . .1–9
Power Budget Calculation Example . . . . . . . . . . . . . . . . . . . . . . . . . . . . . . . . . . . . .1–10
Power Budget Calculation Worksheet . . . . . . . . . . . . . . . . . . . . . . . . . . . . . . . . . . .1–11
Locating the Ethernet Address Label . . . . . . . . . . . . . . . . . . . . . . . . . . . . . . . . . . .1–12
Ethernet Address . . . . . . . . . . . . . . . . . . . . . . . . . . . . . . . . . . . . . . . . . . . . . . . . . . .1–12
Table of Contents
Setting Up the WinPLC . . . . . . . . . . . . . . . . . . . . . . . . . . . . . . . . . . . . . . . . . . . . . .1–12
Diagnosing Network Cable Problems
. . . . . . . . . . . . . . . . . . . . . . . . . . . . . . . . . .1–13
Chapter 2: Workbench Utility Operation . . . . . . . . . . . . . . . . . . . . . . .2–1
WinPLC Workbench Overview . . . . . . . . . . . . . . . . . . . . . . . . . . . . . . . . . . . . . . . . .2–2
Configuring Your WinPLC . . . . . . . . . . . . . . . . . . . . . . . . . . . . . . . . . . . . . . . . . . . . .2–2
PC Setup . . . . . . . . . . . . . . . . . . . . . . . . . . . . . . . . . . . . . . . . . . . . . . . . . . . . . . . . .2–2
Catching the WinPLC: Using Workbench To Find Your WinPLC
Using its Ethernet (MAC) Address . . . . . . . . . . . . . . . . . . . . . . . . . . . . . . . . . . . . . .2–3
Setting the TCP/IP Communications . . . . . . . . . . . . . . . . . . . . . . . . . . . . . . . . . . . .2–4
Monitoring the I/O . . . . . . . . . . . . . . . . . . . . . . . . . . . . . . . . . . . . . . . . . . . . . . . . . .2–7
Discrete Input Modules . . . . . . . . . . . . . . . . . . . . . . . . . . . . . . . . . . . . . . . . . . . . . .2–8
Discrete Output Modules . . . . . . . . . . . . . . . . . . . . . . . . . . . . . . . . . . . . . . . . . . . .2–8
Analog Input Modules . . . . . . . . . . . . . . . . . . . . . . . . . . . . . . . . . . . . . . . . . . . . . . .2–9
Analog Output Modules . . . . . . . . . . . . . . . . . . . . . . . . . . . . . . . . . . . . . . . . . . . . .2–9
Test Applications Utility . . . . . . . . . . . . . . . . . . . . . . . . . . . . . . . . . . . . . . . . . . . . .2–10
Update OS Utility . . . . . . . . . . . . . . . . . . . . . . . . . . . . . . . . . . . . . . . . . . . . . . . . .2–10
Chapter 3: Serial I/O Module Installation and Operation
(Using T & D Ver. 6.0 or Later) . . . . . . . . . . . . . . . . . . . . . . . . . . . . . . .3–1
H2–SERIO(-4) Overview . . . . . . . . . . . . . . . . . . . . . . . . . . . . . . . . . . . . . . . . . . . . . .3–2
The Scope Of This Chapter . . . . . . . . . . . . . . . . . . . . . . . . . . . . . . . . . . . . . . . . . . .3–2
Add Serial Ports To Your WinPLC or EBC(100) . . . . . . . . . . . . . . . . . . . . . . . . . . . . .3–2
Setting Communication Parameters Using Think & Do . . . . . . . . . . . . . . . . . . . . . .3–3
Specifications . . . . . . . . . . . . . . . . . . . . . . . . . . . . . . . . . . . . . . . . . . . . . . . . . . . . . .3–3
H2-SERIO(-4) Wiring: RS-232 . . . . . . . . . . . . . . . . . . . . . . . . . . . . . . . . . . . . . . . . . . .3–4
H2-SERIO-4 Wiring: RS-422/485 . . . . . . . . . . . . . . . . . . . . . . . . . . . . . . . . . . . . . . . .3–4
Using Think & Do to Set Serial Port Parameters . . . . . . . . . . . . . . . . . . . . . . . . . . .3–5
Installing The H2-SERIO(-4) . . . . . . . . . . . . . . . . . . . . . . . . . . . . . . . . . . . . . . . . . . .3–5
Setting the WinPLC As the Runtime Target . . . . . . . . . . . . . . . . . . . . . . . . . . . . . . .3–5
Using Think & Do ConnectivityCenter to Set
Up the Serial I/O Module . . . . . . . . . . . . . . . . . . . . . . . . . . . . . . . . . . . . . . . . . . . .3–6
Adding The Serial I/O Module Driver . . . . . . . . . . . . . . . . . . . . . . . . . . . . . . . . . . . .3–6
Connecting To The WinPLC . . . . . . . . . . . . . . . . . . . . . . . . . . . . . . . . . . . . . . . . . . .3–7
ii
WinPLC and Serial I/O Module Installation and Operation, 4th Edition
Table of Contents
Setting The Serial Port Parameters . . . . . . . . . . . . . . . . . . . . . . . . . . . . . . . . . . . . . .3–8
Expand The Window Pane . . . . . . . . . . . . . . . . . . . . . . . . . . . . . . . . . . . . . . . . . . . .3–8
Appendix A: Using the ESP Utility to Set Up
the WinPLC When Using Think & Do Ver. 5.2 or 5.3 . . . . . . . . . . . . . .A–1
Using the Think & Do ESP Utility to Set Up the WinPLC . . . . . . . . . . . . . . . . . . . .A–2
Check Think & Do Version First . . . . . . . . . . . . . . . . . . . . . . . . . . . . . . . . . . . . . . . .A–2
TargetPicker . . . . . . . . . . . . . . . . . . . . . . . . . . . . . . . . . . . . . . . . . . . . . . . . . . . . . . .A–3
Ethernet or MAC Address . . . . . . . . . . . . . . . . . . . . . . . . . . . . . . . . . . . . . . . . . . . .A–3
WinPLC Name is Required . . . . . . . . . . . . . . . . . . . . . . . . . . . . . . . . . . . . . . . . . . . .A–4
IP Address is Required . . . . . . . . . . . . . . . . . . . . . . . . . . . . . . . . . . . . . . . . . . . . . . .A–4
Cycle Power After Assigning IP Address . . . . . . . . . . . . . . . . . . . . . . . . . . . . . . . . . .A–5
Select, Exit, You’re Connected . . . . . . . . . . . . . . . . . . . . . . . . . . . . . . . . . . . . . . . . .A–5
Appendix B: Serial I/O Module Installation / Operation
When Using T & D Ver. 5.2 or 5.3 . . . . . . . . . . . . . . . . . . . . . . . . . . . .B–1
H2–SERIO(-4) Overview . . . . . . . . . . . . . . . . . . . . . . . . . . . . . . . . . . . . . . . . . . . . . .B–2
The Scope Of This Appendix . . . . . . . . . . . . . . . . . . . . . . . . . . . . . . . . . . . . . . . . . .B–2
Add Serial Ports To Your WinPLC or EBC(100) . . . . . . . . . . . . . . . . . . . . . . . . . . . . .B–2
Setting Communication Parameters Using Think & Do . . . . . . . . . . . . . . . . . . . . . .B–3
Specifications . . . . . . . . . . . . . . . . . . . . . . . . . . . . . . . . . . . . . . . . . . . . . . . . . . . . . .B–3
H2-SERIO(-4) Wiring: RS-232 . . . . . . . . . . . . . . . . . . . . . . . . . . . . . . . . . . . . . . . . . . .B–4
H2-SERIO-4 Wiring: RS-422/485 . . . . . . . . . . . . . . . . . . . . . . . . . . . . . . . . . . . . . . . .B–4
Using Think & Do to Set Serial Port Parameters . . . . . . . . . . . . . . . . . . . . . . . . . . .B–5
Check Think & Do Version First . . . . . . . . . . . . . . . . . . . . . . . . . . . . . . . . . . . . . . . .B–5
New Project Using H2–SERIO Module . . . . . . . . . . . . . . . . . . . . . . . . . . . . . . . . . . .B–5
Connecting to the WinPLC . . . . . . . . . . . . . . . . . . . . . . . . . . . . . . . . . . . . . . . . . . .B–6
Setting Serial Port Parameters . . . . . . . . . . . . . . . . . . . . . . . . . . . . . . . . . . . . . . . . .B–8
Expand the Window Pane . . . . . . . . . . . . . . . . . . . . . . . . . . . . . . . . . . . . . . . . . . . .B–8
WinPLC and Serial I/O Module Installation and Operation, 4th Edition
iii
Notes
CHAPTER
GETTING STARTED
1
In This Chapter...
• Manual Overview
. . . . . . . . . . . . . . . . . . . . . . . . . . . . . . . . . . . .1–2
• WinPLC Overview
. . . . . . . . . . . . . . . . . . . . . . . . . . . . . . . . . . . .1–3
• The WinPLC LEDs . . . . . . . . . . . . . . . . . . . . . . . . . . . . . . . . . . . . .1–4
• Inserting the H2-WPLCx into the DL205 Base
. . . . . . . . . . . . . . .1–4
• DL205 Power Wiring and Grounding . . . . . . . . . . . . . . . . . . . . . .1–5
• 10BaseT Network Cabling . . . . . . . . . . . . . . . . . . . . . . . . . . . . . .1–6
• Maximum Ethernet Cable Length
. . . . . . . . . . . . . . . . . . . . . . . .1–7
• H2-WPLC-xx Serial Port Pinouts . . . . . . . . . . . . . . . . . . . . . . . . . .1–7
• Power Budget for the DL205 with H2-WPLC1-xx . . . . . . . . . . . . .1–8
• DL205 Module Power Requirements . . . . . . . . . . . . . . . . . . . . . .1–9
• Locating the Ethernet Address Label
• Setting Up the WinPLC
. . . . . . . . . . . . . . . . . . . . .1–12
. . . . . . . . . . . . . . . . . . . . . . . . . . . . . . .1–12
• Diagnosing Network Cable Problems . . . . . . . . . . . . . . . . . . . . .1–13
Getting Started
Manual Overview
Overview of this Publication
The WinPLC and Serial I/O manual describes the installation of the modules, port configuration, power
budgeting, and basic operation of the WinPLC and Serial I/O modules. There is also a brief discussion of
Ethernet cabling issues.
Other Reference Materials
You may find other technical publications useful for your application. For technical information related to
your PC-based control software or Windows® CE, please refer to the appropriate publication for those
products. For more information about the DirectLOGIC™ products, you may want to read the following:
• DL205 Installation and I/O manual (D2-INST-M)
• DL205 Analog manual (D2-ANLG-M)
• DL 205 Ethernet communications manual (HX-ECOM-M)
• DL205 ERM manual (H24-ERM-M)
• DL205 High speed counter manual (HX-CTRIO-M)
Who Should Read This Manual
You will find the WinPLC manual helpful if you have chosen to use the following:
• WinPLC running PC-based Control software
• Our DL205 I/O
You will find that a familiarity with Ethernet communications and with the setup and installation of
PLCs is helpful. An understanding of electrical codes and industrial control is essential.
Technical Support
We strive to make our manuals the best in the industry. We rely on your feedback to let us know if we are
reaching our goal. If you cannot find the solution to your particular application, or, if for any reason you
need additional technical assistance, please call us at 770-844-4200.
Our technical support group is glad to work with you in answering your questions. They are available
weekdays from 9:00 a.m. to 6:00 p.m. Eastern Time. We also encourage you to visit our website where you
can find technical and non-technical information about our products and our company. Visit us at
www.automationdirect.com.
Special Symbols
When you see the “notepad” icon in the left-hand margin, the paragraph to its immediate right will be a
special note.
When you see the “exclamation mark” icon in the left-hand margin, the paragraph to its immediate right
will be a warning. This information could prevent injury, loss of property, or even death (in extreme cases).
1–2
WinPLC and Serial I/O Module Installation and Operation, 4th Edition
Getting Started
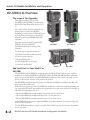
WinPLC Overview
The WinPLC (part number H2-WPLC1-xx) is an open-platform CPU running the Windows→ CE
operating system. It plugs into the CPU-slot of a DirectLOGIC DL205 base and “talks” across the
backplane to standard digital and analog input and output modules.
The Windows→ CE operating system is a familiar favorite for embedded systems in a wide variety of
applications. Using Windows→ CE in the WinPLC makes it a flexible control platform with the ability
to run PC-based Control software from a number of sources, as well as Visual Basic and Visual C
programs.
The operating system is resident in the module and does not require battery back-up. The user program is
backed by a five-year lithium battery.
The WinPLC’s operating characteristics will largely be determined by the PC-based Control software
running in it. The PC-based Control software provider chooses how to use the available features in their
implementation of the product.
Battery
DIP Switches
RS232C Port
Ethernet
10BaseT Port
Only two of the DIP switch toggles are functional:
SW0: Turn on to force the WinPLC to power up in RUN mode.
SW7: Turn on to “Force booter mode” if necessary for IPX communications.
Features Depend on Software Implementation
Support of the following features depends on your PC-based Control software implementation:
• the frequency of I/O updates
• the available support for RS232C serial communications
• the uses of the DIP switches
• the uses of the LEDs
If you are using the Visual Basic for CE or Visual C for CE version of the WinPLC, you will receive an
SDK (software development kit), a utility called WinPLC Workbench, and a Viewer. The SDK will
provide functions to access the features above, WinPLC Workbench will give you a means to set up the
WinPLC, and the Viewer will make it possible to load your Visual Basic for CE or Visual C for CE
programming the WinPLC.
WinPLC and Serial I/O Module Installation and Operation, 4th Edition
1–3
Getting Started
The WinPLC LEDs
The WinPLC module has four LED indicator lights. The green POWER and RUN LEDs are
individually addressable. Their exact meaning will depend on the PC-based Control software you are
using. The green LINK LED has a double function. It indicates that the unit is connected successfully to
an Ethernet network, and it indicates that there is activity on the network. The LINK LED will come on
intermittently to indicate that it sees Ethernet traffic. The LINK LED will blink faster to indicate an
increase in network activity. The red ERROR LED comes on steady to indicate that a hardware error has
occurred internal to the WinPLC.
POWER
RUN
LINK
ERROR
Inserting the H2-WPLCx into the DL205 Base
The H2-WPLC1 plugs into the “CPU” slot of any DL205 base.
• Locate the grooves on the inside top and bottom of the DL205 base.
• Align the module with the grooves and slide the module into the slot until the face of the
module is flush with the power supply.
• Push in the retaining clips to secure the module.
Align the H2-WPLC1
with the grooves in the
base and slide in.
Push the retaining
clips in to secure the
module to the
DL205 base
WARNING: To minimize the risk of electrical shock, personal injury, or equipment damage, always
disconnect the system power before installing or removing any system component.
1–4
WinPLC and Serial I/O Module Installation and Operation, 4th Edition
Getting Started
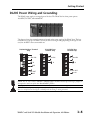
DL205 Power Wiring and Grounding
The DL205 power supply is an integral part of the base. The DL205 also has three power options:
12/24VDC, 125VDC, and 120/240VAC.
The diagram shows the terminal connections located on the power supply of the DL205 bases. The base
terminals can accept up to 16 AWG. You may be able to use larger wiring depending on the type of wire
used, but 16 AWG is the recommended size.
110/220 VAC Base Terminal
Strip
85 -- 264 VAC
G
+
LG
12/24 VDC Base
Terminal Strip
125 VDC Base
Terminal Strip
+
12 -- 24 VDC
-G
24 VDC OUT
0.3A
--
+
90 -- 264 VDC
-G
+
24 VDC OUT
0.2A
--
NOTE: You can connect either a 120 VAC or 240 VAC supply to the AC terminals. Special wiring or jumpers are
not required as with some of the other DirectLOGIC™ products.
WARNING: Once the power wiring is connected, install the plastic protective cover. When the cover is removed
there is a risk of electrical shock if you accidentally touch the wiring or wiring terminals.
WinPLC and Serial I/O Module Installation and Operation, 4th Edition
1–5
Getting Started
10BaseT Network Cabling
The H2–WPLC1–xx supports the Ethernet 10BaseT standard. The 10BaseT standard uses twisted pairs
of copper wire conductors.
10BaseT Connections
H2-WPLC-xx
The H2-WPLC1-xx has an eight-pin modular jack that
accepts RJ45 connector plugs. UTP (Unshielded TwistedPair) cable is rated according to its data-carrying ability
(bandwidth) and is given a “category” number. We
strongly recommend using a category 5 cable for all
Ethernet 10BaseT connections. For convenient and
reliable networking, we recommend that you purchase
commercially manufactured cables (cables with connectors
already attached).
RJ12 Serial Port
RS232
RJ45 for 10BaseT
10BaseT
To connect an H2-WPLC1-xx (or PC) to a hub or repeater, use a patch cable (sometimes called a
straight-through cable). The cable used to connect a PC directly to a WinPLC or to connect two hubs is
called a crossover cable.
8-pin RJ45 Connector
(8P8C)
The diagram below illustrates the standard wire positions in the RJ45 connector.
We recommend all WinPLC 10BaseT cables to be Category 5, UTP cable.
NOTE: See page 1-7 for 10BaseT distance limitations.
1 2 3 4 5 6 78
1
2
3
4
5
6
7
8
RJ45
1–6
Patch (Straight-through Cable
OR/WHT
OR
GRN/WHT
GRN/WHT
OR/WHT 1
OR
2
GRN/WHT
3
4
5
6
GRN/WHT
7
8
RJ45
Crossover Cable
TD+ 1
TD-- 2
RD+ 3
4
5
RD-- 6
7
8
RJ45
OR/WHT
OR
GRN/WHT
GRN
GRN/WHT
GRN TD+ 1
OR/WHT TD-- 2
RD+ 3
4
5
OR
RD-- 6
7
8
WinPLC and Serial I/O Module Installation and Operation, 4th Edition
RJ45
Getting Started
Maximum Ethernet Cable Length
The maximum distance per 10BaseT cable segment is 100 meters or 328 feet. Repeaters extend the
distance. Each cable segment attached to a repeater can be up to 100 meters. Two repeaters connected
together extend the total range to 300 meters.
10BaseT Distance Limitations
100 meters
(328 feet)
100 meters
(328 feet)
100 meters
(328 feet)
100 meters
(328 feet)
100 meters
(328 feet)
H2-WPLC-xx Serial Port Pinouts
1
2
3
4
5
6
Pin Assignments for:
H2-WPLC-xx serial port
0V
5V
RXD
TXD
RTS
0V
Power (–) Connection (GND)
Power (+) Connection
Receive Data (RS232C)
Transmit Data (RS232C)
Request to Send
Signal Ground (GND)
RJ12 (6P6C) Female
Modular Connector
WinPLC and Serial I/O Module Installation and Operation, 4th Edition
1–7
Getting Started
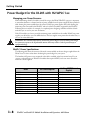
Power Budget for the DL205 with H2-WPLC1-xx
Managing your Power Resource
When determining which I/O modules you will be using in the DL205 WinPLC system, it is important
to remember that there is a limited amount of power available from the power supply. We have provided a
table showing the power available from the various DL205 base power supplies and a table showing the
maximum power consumed by the WinPLC and each of the I/O modules supported by the WinPLC.
Following these two tables is an example of a completed power budgeting worksheet and then a blank
worksheet you can use for your own calculations.
If the I/O modules you choose exceed the maximum power available from the smaller DL205 base power
supplies, you will need to use a D2-09B9-slot base. This base supplies more power than the other bases, as
you can see in the table below.
WARNING: It is extremely important to calculate the power budget. If you exceed the power budget,
the system may operate in an unpredictable manner which may result in a risk of personal injury or
equipment damage.
WinPLC Power Specifications
The following table shows the amount of electrical current available at the two voltages supplied from the
DL205 base. Use these values when calculating the power budget for your system.
The Auxiliary 24V power source mentioned in the table is available at the base terminal strip. You can
connect to external devices or DL205 I/O modules that require 24VDC, but be sure not to exceed the
maximum current supplied.
Bases
D2–03B–1
D2–04B–1
D2–06B–1
D2–09B–1
D2–03BDC1–1
D2–04BDC1–1
D2–06BDC1–1
D2–09BDC1–1
D2–06BDC2–1
D2–09BDC2–1
1–8
5V Current Supplied
2600 mA
2600 mA
2600 mA
2600 mA
2600 mA
2600 mA
2600 mA
2600 mA
2600 mA
2600 mA
Auxiliary 24VDC Current
Supplied
300 mA
300 mA
300 mA
300 mA
None
None
None
None
300 mA
300 mA
WinPLC and Serial I/O Module Installation and Operation, 4th Edition
Getting Started
DL205 Module Power Requirements
The chart below shows the maximum amount of electrical current required to power each of the DL205
WinPLC or I/O modules. Use these values when calculating the power budget for your system. The Power
Budget for the DL205 with H2--WPLC1--xx
Device
Power Consumed
24V Auxilliary
5V (mA)
(mA)
CPUs
D2–230
D2–240
D2–250–1
D2–260
Combination Modules
120
120
330
330
0
0
0
0
DC Input Modules
D2–08ND3
D2–16ND3–2
D2–32ND3(–2)
50
100
25
0
0
0
AC Input Modules
D2–08NA–1
D2–08NA–2
D2–16NA
50
100
100
0
0
0
DC Output Modules
D2–04TD1
D2–08TD1(–2)
D2–16TD1–2
D2–16TD2–2
D2–32TD1(–2)
60
100
200
200
350
20
0
80
0
0
AC Output Modules
D2–08TA
F2–08TA
D2–12TA
250
250
350
0
0
0
Relay Output Modules
D2–04TRS
D2–08TR
F2–08TRS
F2–08TR
D2–12TR
Device
Power Consumed
24V Auxilliary
5V (mA)
(mA)
250
250
670
670
450
D2–08CDR
200
0
50
100
110
60
100
100
40
40
40
40
30
60
100
100
90
35
35
90
110
80
5mA @ 10-30V
5mA @ 10-30V
90mA @ 12V*
5mA @ 10-30V
5mA @ 10-30V
60**
70mA @ 12V*
60
70mA @ 12V*
50mA*
140
50mA per channel
60mA per channel
80mA*
100
80
0
60
50
400
0
0
Analog Modules
F2–04AD–1
F2–04AD–1L
F2–04AD–2
F2–04AD–2L
F2–08AD–1
F2–08AD–2
F2–02DA–1
F2–02DA–1L
F2–02DA–2
F2–02DA–2L
F2–08DA–1
F2–08DA–2
F2–02DAS–1
F2–02DAS–2
F2–4AD2DA
F2–8AD4DA-1
F2–8AD4DA-2
F2–04RTD
F2–04THM
Misc. Modules
0
0
0
0
0
D2–08SIM
H2-CTRIO
*add an additional 20mA per loop
WinPLC and Serial I/O Module Installation and Operation, 4th Edition
1–9
Getting Started
Power Budget Calculation Example
The following example shows how to calculate the power budget for the DL205 system.
Base #
0
Module Type
5 VDC (mA)
Auxiliary
Power Source
24 VDC Output (mA)
Available Base Power
D2–09B–1
2600
300
H2-WPLCxx
D2–16ND3–2
D2–16NA
D2–16NA
F2–04AD–1
F2–02DA–1
D2–08TA
D2–08TD1
D2–08TR
+ 480
+ 100
+ 100
+ 100
+ 50
+ 40
+ 250
+ 100
+ 250
0
+0
+0
+0
+ 80
+ 60
+0
+0
+0
D2–HPP
+ 200
+0
CPU Slot
Slot 0
Slot 1
Slot 2
Slot 3
Slot 4
Slot 5
Slot 6
Slot 7
Other
Handheld Programmer
Total Power Required
Remaining Power Available
1670
2600–1670 = 930
140
300 – 140 = 160
1. Using the table on the previous page, fill in the information for the base power supply, the WinPLC1xx, I/O modules, and any other devices that will use system power including devices that use the 24
VDC output. Pay special attention to the current supplied by the base power supply. The 9-slot base has
a larger current capacity than the smaller bases.
2. Add the current columns starting with the row for the CPU slot and work your way down to the
“Other” category. Put the total in the row labeled “Maximum power required”.
3. Subtract the row labeled “Maximum power required” from the row labeled “Available Base Power”.
Place the difference in the row labeled “Remaining Power Available”.
4. If “Maximum Power Required” is greater than “Available Base Power” in either of the two columns, the
power budget will be exceeded. It will be unsafe to use this configuration, and you will need to
restructure your I/O.
1–10
WinPLC and Serial I/O Module Installation and Operation, 4th Edition
Getting Started
Power Budget Calculation Worksheet
This blank chart is provided for you to copy and use in your power budget calculations.
Base #
0
Module Type
5 VDC (mA)
Auxiliary
Power Source
24 VDC Output (mA)
Available Base Power
CPU Slot
Slot 0
Slot 1
Slot 2
Slot 3
Slot 4
Slot 5
Slot 6
Slot 7
Other
Total Power Required
Remaining Power Available
1. Using the table on the previous page, fill in the information for the base power supply, the WinPLC-xx,
I/O modules, and any other devices that will use system power including devices that use the 24 VDC
output. Pay special attention to the current supplied by the base power supply. The 9-slot base has a
larger current capacity than the smaller bases.
2. Add the current columns starting with the row for the CPU slot and work your way down to the
“Other” category. Put the total in the row labeled “Maximum power required”.
3. Subtract the row labeled “Maximum power required” from the row labeled “Available Base Power”.
Place the difference in the row labeled “Remaining Power Available”.
4. If “Maximum Power Required” is greater than “Available Base Power” in either of the two columns, the
power budget will be exceeded. It will be unsafe to use this configuration, and you will need to
restructure your I/O.
WinPLC and Serial I/O Module Installation and Operation, 4th Edition
1–11
Getting Started
Locating the Ethernet Address Label
Ethernet Address
A unique Ethernet Address is assigned to each
module at the factory and cannot be changed. It
is a twelve digit number (six pairs of hexadecimal
numbers) and is printed on a label permanently
attached to the WinPLC module.
Factory-assigned Ethernet Address
(MAC Address)
Setting Up the WinPLC
If you are using Think & Do Studio, Version 6.1 or later, use Chapter 2, Workbench Utility Operation, to
help you set up the WinPLC.
If you are using Think & Do, Version 5.2 or 5.3, use Appendix A, Using The ESP Utility To Set Up The
WinPLC When Using Think & Do vers. 5.2 or 5.3, to help you set up the WinPLC.
1–12
WinPLC and Serial I/O Module Installation and Operation, 4th Edition
Getting Started
Diagnosing Network Cable Problems
If you are experiencing communication problems, swapping cables is one of the simplest diagnostic
procedures you can perform. If the network operates correctly with a different cable, you have isolated and
cured the problem. If possible, use a short run of cable to test the network because problems with longer
cable runs can be more difficult to diagnose and are more often intermittent.
If you are unable to swap cables, verify the proper operation of all other network components. You
probably have a cable problem if you have verified that your:
• WinPLC module is working correctly.
• WinPLC module configuration is correct.
• PC-based Control program is correct.
• any hubs are working correctly.
• Windows configuration is correct.
• network adapter card is the correct type, and it is working correctly.
It is a good maintenance practice to test network cables periodically and maintain a permanent record of
cable characteristics. A number of cable test instruments are available to test 10BaseT networks. These
instruments will check the electrical characteristics of your cabling, including:
• Continuity — This is a check to make sure the communication pairs are wired correctly, and that
the wires are continuous from end to end.
• Attenuation — This refers to the amount of signal loss over the cable segment at the signal
frequency of interest. The 10BaseT specification allows for a maximum signal loss of 11.5
decibels (dB) for the entire link at the signal frequency used by 10Mbps Ethernet.
• Crosstalk — Crosstalk occurs when a signal in one pair of wires is electromagnetically coupled to
an adjacent pair.
NOTE: Any significant difference between the cable characteristics of the transmitter and receiver can cause
communication errors.
Ethernet devices continually monitor the “receive data” path for activity as a means of verifying their link
is working correctly. When the network is idle, each network device (including the WinPLC module)
sends a periodic link test signal to verify that the network is working. If the link test signal or other
network activity is not received periodically, the LINK LED on the WinPLC module is turned off.
WinPLC and Serial I/O Module Installation and Operation, 4th Edition
1–13
Getting Started
Notes
1–14
WinPLC and Serial I/O Module Installation and Operation, 4th Edition
WORKBENCH UTILITY
OPERATION
CHAPTER
2
In This Chapter...
• WinPLC Workbench Overview . . . . . . . . . . . . . . . . . . . . . . . . . . .2–2
• Configuring Your WinPLC . . . . . . . . . . . . . . . . . . . . . . . . . . . . . . .2–2
• Monitoring the I/O
. . . . . . . . . . . . . . . . . . . . . . . . . . . . . . . . . . .2–7
Note: This Chapter only applies if you are using the WinPLC with Think & Do Studio version 6.0 or later. Use
Appendix A if using the WinPLC with Think & Do versions 5.2 or 5.3.
Workbench Utility Operation
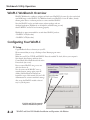
WinPLC Workbench Overview
WinPLC Workbench is a utility to configure and check out a WinPLC I/O system. It is also used to load
new ROM images on the WinPLC. Use Workbench with a new WinPLC to set its IP address, thereby
allowing other devices or software products to connect with the WinPLC.
Since the WinPLC may be used with various software packages and user
developed applications, Workbench can be helpful in troubleshooting to verify
that the WinPLC and its I/O are functioning properly.
Workbench is not recommended for use with these WinPLC products:
• H2-WPLC1-TD (obsolete)
• H2-WPLC2-TD (obsolete)
Configuring Your WinPLC
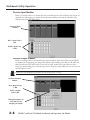
PC Setup
Copy Workbench files to a directory on your PC.
We recommend that you set up a Desktop or Start Button program menu
Shortcut.
Make sure your PC has TCP/IP and IPX/SPC Protocols installed. To check, click on your computer’s
Start button, select Settings and then select
Control Panel. Select Network and click on the
Protocols tab (see screen).
Direct-connect WinPLC using a cross over
cable (see Section 1).
You can connect to the WinPLC across a
network; however, setting up the proper IP
Address, SubNet Mask, and Gateway are
beyond the scope of this manual. See your LAN
Administrator for assistance with these settings.
Also, set up the WinPLC module so that it’s
easy to cycle the power.
IPX/SPX and TCP/IP protocols
must be installed on your PC
2–2
WinPLC and Serial I/O Module Installation and Operation, 4th Edition
Workbench Utility Operation
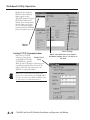
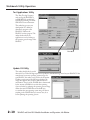
Catching the WinPLC: Using Workbench To Find Your WinPLC Using its
Ethernet (MAC) Address
The “Catch” feature can find a WinPLC by
its Ethernet Address (MAC Address). This
address is found on the WinPLC label and
is set at the factory and cannot be changed.
Catch is a robust way to locate the WinPLC
in order to setup the TCP/IP
communications. Most Workbench features
are not enabled until TCP/IP
communication has been established.
Factoryassigned
Ethernet
address (MAC
address)
Note: Since the Catch feature uses the IPX/SPX protocol, the PC and WinPLC must be on the same LAN to
work properly. Workbench must see the WinPLC while the WinPLC is in its boot-up state, which is indicated
by the flashing green RUN LED.
Follow these steps.
Click on “Catch”
Enter 12-character
Ethernet address here,
click on “Next”
Cycle power
Click on “OK”
WinPLC and Serial I/O Module Installation and Operation, 4th Edition
2–3
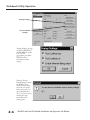
Workbench Utility Operation
Workbench has found your
WinPLC and it’s Ethernet
address appears in the
“WinPLC” window. The green
RUN LED should also be
flashing. If you have problems,
check to make sure you have
the correct Ethernet address
entered and that the IPX/SPX
protocol is loaded on your PC.
Ethernet
Address
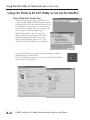
Setting TCP/IP Communications
Next, click on “TCP/IP
Settings” to bring up this
screen. Make sure “Enable
TCP/IP Setup” is selected.
Enable TCP/IP
Setup
TCP/IP Settings
NOTE: If the WinPLC has no IP address,
Workbench displays the PC’s IP address in
this field.
With “Specify an IP address” selected, you can
manually enter the IP address. Enter the IP
address, click “OK” and cycle power to the
WinPLC to activate the address.
Note: Unless you have detailed knowledge of IP
protocol, we recommend that your PC and WinPLC
have the same subnet mask. DNS and WINS settings
are optional (see your LAN administrator).
2–4
WinPLC and Serial I/O Module Installation and Operation, 4th Edition
Workbench Utility Operation
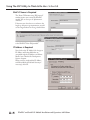
Scan for WinPLCs
Monitor I/O
Node Address Settings
Now that that the IP address is set, Workbench should be able find the WinPLC automatically if it is run
after the WinPLC is powered up and connected. If the WinPLC is connected after Workbench is
running, just click on “Scan for WinPLCs”.
The Workbench window now appears like above, showing information about the WinPLC module. In
addition, the “Monitor I/O” utility is now activated.
From this point Workbench is using TCP/IP protocol, and with the proper IP address setting you can
remotely attach to the WinPLC.
NOTE: While the Catch feature does allow you to capture the WinPLC, even without an IP address, the feature
cannot be routed between LANS.
The “Node Address Setttings”
selection allows you to enter
descriptive information for each
Win PLC module. For example,
you can assign the WinPLC a
module ID, name or description.
WinPLC and Serial I/O Module Installation and Operation, 4th Edition
2–5
Workbench Utility Operation
Startup Settings
Restore Default
Settings
“Startup Settings” are only
used by the H2-WPLC1
and H2-WPLC2 models
for C and VB
programming. See H24SDK-M for more
information on these
settings.
Selecting “Restore
Default Settings” returns
the WinPLC to its
factory default settings.
You must cycle power
before this occurs, so if
you accidentally select
“Yes”, you can recover by
resetting the setup
parameters before
cycling power.
2–6
WinPLC and Serial I/O Module Installation and Operation, 4th Edition
Workbench Utility Operation
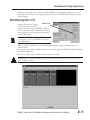
Following is a description of the utilities provided by Workbench. These programs allow you to monitor
and test your I/O modules and your programming connection to the WinPLC without having to write a
specific program.
Monitoring the I/O
Monitor I/O
“Monitor I/O” gives you a way to
read from and write to the I/O
modules in the base using your WinPLC. It allows
you to see the current state of the discrete and analog
inputs, toggle your discrete outputs and write values
to your analog outputs.
NOTE: The “Monitor I/O” utility uses TCP/IP protocol,
so it will not be active until the WinPLC is assigned a
valid TCP/IP address.
When you click here, Workbench scans the backplane and displays a graphical representation of the
modules it finds.
Slots containing specialty I/O modules which are not currently supported by Workbench will be displayed
but will be nonfunctional.
Click on a module to open a window with details about that module.
WARNING: Because this utility allows you to manipulate the actual I/O, be very careful not to cause personal
injury or equipment damage.
WinPLC and Serial I/O Module Installation and Operation, 4th Edition
2–7
Workbench Utility Operation
Discrete Input Modules
Below is an example where an 8 channel discrete input module has been selected. Notice that 8 blocks are
displayed, each representing one channel. For discrete input modules, points that are ON will be blue,
while points that are OFF will be black.
8 Channel Input
Module
Blue = Input Point is
ON
Black = Input Point
is OFF
Discrete Output Modules
Below is an example where a 16 channel discrete output module has been selected. Notice that 16 blocks
are displayed, each representing one channel. For discrete output modules, points that are ON will be red,
while points that are OFF will be black. To turn ON an ouput, double-click on the black box, which
brings up a window asking you to verify that you want to change the output. Make sure it is safe for you to
turn the output on or off.
NOTE: Some older WinPLCs will not allow the state of ouput points to change.
16 Channel Output
Module
Red = Output Point
is ON
Black = Output
Point is OFF
Dialog box appears to
verify that you are
changing an output.
2–8
WinPLC and Serial I/O Module Installation and Operation, 4th Edition
Workbench Utility Operation
Analog Input Modules
Below is an example where a 4 channel analog input module has been selected. Notice that 4 blocks are
illuminated, each representing one channel and displaying some non-zero digital value representing the
sensed value. The exact digital value depends on the module resolution and range. For example, a 12 bit
input module displays 4095 for a full-scale input.
4 Channel Analog
Input Module
Each block contains
the digital value for
that channel
Analog Output Modules
Below is an example where a 2 channel analog output module has been selected. Notice that 2 blocks are
illuminated red, each representing one channel and displaying a zero when the output is OFF. To turn ON
an output, double-click its block, which brings up a screen allowing you to enter a digital value
representing the portion of the full-scale output you desire. The full-scale digital value depends on the bit
resolution of the module. For example, set a 10V, 12 bit voltage module to 4095 for a 10V output signal.
Enter a value and click OK. A window pops up asking you to verify that you want to turn on/off an
output. Make sure it is safe to do so.
NOTE: Some older WinPLCs will not allow the state of ouput points to change.
4 Channel Analog
Output Module
Each red block has 0
(zero) displayed if
the output point is
OFF, or a digital
value if it is on.
Dialog box appears to
verify that you are
changing an output.
WinPLC and Serial I/O Module Installation and Operation, 4th Edition
2–9
Workbench Utility Operation
Test Applications Utility
The “Run Test App” feature is
only used by the H2-WPLC1
and H2-WPLC2 models for C
and VB programming. See H24SDK-M for more information.
This utility lets you test your
development PC’s ability to
download a program to the
WinLPLC and have the
WinPLC run that program. The
utility decides which test
application to run by looking at
the operating system image in the
WinPLC.
Test OS
Update OS Utility
This utility should only be used if
directed to by a Technical Support person to update the EEPROM image stored on your WinPLC. If the
manufacturer issues new operating system images for
your WinPLC, this utility can be used to do the update.
Clicking on any entry in the OS Images displays the
image’s description, date of release and other version
information. The size of the FLASH drive is determined
by the amount of ROM left over after the operating
system is loaded, so updating the operating system image
deletes the entire FLASH drive and rebuilds it to
accomodate the new operating system image. If there is
anything in the FLASH drive you want to save, do so
before updating the operating system.
2–10
WinPLC and Serial I/O Module Installation and Operation, 4th Edition
SERIAL I/O MODULE
INSTALLATION & OPERATION
(USING T & D VER. 6.0 OR
LATER)
CHAPTER
3
In This Chapter...
• H2–SERIO(-4) Overview . . . . . . . . . . . . . . . . . . . . . . . . . . . . . . . .3–2
• Specifications . . . . . . . . . . . . . . . . . . . . . . . . . . . . . . . . . . . . . . . .3–3
• H2-SERIO(-4) Wiring: RS-232 . . . . . . . . . . . . . . . . . . . . . . . . . . . .3–4
• H2-SERIO-4 Wiring: RS-422/485
. . . . . . . . . . . . . . . . . . . . . . . . .3–4
• Using Think & Do to Set Serial Port Parameters . . . . . . . . . . . . . .3–5
Note: This Chapter only applies if you are using the WinPLC with Think & Do Studio version 6.0 or later,
including Think & Do 8.0.
Use Appendix B if using the WinPLC with Think & Do versions 5.2 or 5.3.
Only Think & Do WinPLCs (H2-WPLC1-TD and H2-WPLC2-TD) support the H2-SERIO module.
Serial I/O Module Installation and Operation
H2–SERIO(-4) Overview
The Scope of This Chapter
This chapter introduces the use of the
H2-SERIO and H2-SERIO-4 modules using
the WinPLC with Think & Do, version 6.0 or
later). See Appendix B if you are using Think &
Do versions 5.2 or 5.3.
This chapter will not describe in detail how to
build a project or connect to a WinPLC.
Depending on which version of Think & Do you
are using, further information can be found in:
Chapter 2 of this manual, Workbench Utility
Operation
Appendix A of this manual, Using The ESP
Utility To Set Up The WinPLC
H2-SERIO
H2-SERIO-4
The Think & Do Learning Guide or
QuickStart Guide.
The basic steps in using this module are:
1. Install the Serial I/O module in the base.
2. Connect power to the base.
3. Bring up Think & Do.
4. Select the WinPLC as the target.
5. Connect to the WinPLC.
WinPLC
H2-SERIO
Add Serial Ports to Your WinPLC or EBC(100)
The H2-SERIO and H2-SERIO-4 modules plug into the DL205 I/O base and are 3 port serial I/O
modules for use with the H2-WPLC-x (WinPLC) and the H2-EBC/H2-EBC100. These additional
serial ports give the H2-WPLC-x and H2-EBC(100) the ability to connect with a wide range of serial
devices, such as barcode scanners, scales, printers and modems.
The H2-SERIO module has three RS-232C ports, while the H2-SERIO-4 module has two RS-232C
ports and one RS-422/485 port.
A WinPLC can support up to three H2-SERIO(-4) modules for a total of ten serial ports (including the
one on the WinPLC itself ). Port numbers are assigned from left to right across the base. For example, on
a WinPLC the onboard port is Com 1:
• The first H2-SERIO(-4) module would have ports Com 2, Com 3 and Com 4.
• The next H2-SERIO(-4) module would have Com 5, Com 6 and Com 7.
• The final H2-SERIO(-4) module would have Com 8, Com 9 and Com 0.
An H2-EBC100 can support up to eight H2-SERIO(-4) modules; the limits are the power budget and
number of slots in the base.
The H2-SERIO(-4) modules can reside in any slot of the DL205 base; they do not have to be installed
next to each other.
3–2
WinPLC and Serial I/O Module Installation and Operation, 4th Edition
Serial I/O Module Installation and Operation
Setting Communication Parameters Using Think & Do
Use I/O View to set baud rate, parity, data bits, and stop bits for each port. Choose from 1200 to 115,200
baud communication speeds. Think & Do allows each port to be designated as a MODBUS slave or a
generic serial device. Each port on the H2–SERIO(-4) module is capable of hardware handshaking.
Specifications
H2-SERIO / H2-SERIO-4 Specifications
H2-SERIO
Module Type
Approvals
Number of Serial Ports
per Module
Signals
H2-SERIO-4
Intelligent module for use with H2–WPLC-xx or H2-EBC(100)
cUL Listed, file number E185989
3 ports: all RS-232 (RJ12 jack)
3 ports: 2 RS-232 ports (RJ12 jack) and 1 RS422/485 5 position terminal strip
RS-232: CTS, RXD, TXD RTS, GND
RTS transmision delay times: 5, 50, 250 and
500 ms
RS-232: CTS, RXD, TXD RTS, GND
RTS transmision delay times: 5, 50, 250 and
500 ms
RS-422 (4 wire) : TX+, TX-, RX-, RX+, GND
RS-485 (2 wire): Data+, Data-, GND
Number of Modules
Supported per
H2-WinPLC-xx
Number of Modules
Supported per
H2-EBC(100)
3
8
RS-232 ports: Belden 9729 or equivalent
RS-422/RS-485 terminal: 16-28 AWG solid or
stranded conductor (1.5mm2)
Wire strip length: 0.24-0.27 inches (6-7 mm);
Screw torque: 1.7 in-ibs (0.2 Nm)
Recommended Cables
Belden 9729 or equivalent
Protocols Supported
Power Consumption
Baud Rates
Parity
Start and Stop Bits
Serial ASCII and Modbus RTU slave
Operating Environment
0 to 60°C (32°F to 140°F), 5% to 95% RH (non-condensing); No corrosive gases, Pollution level
2; Vibration: MIL STD 810C 514.2; Shock: MIL STD 810C 516.2
Storage Temperature
Firmware Note
The H2-EBC requires firmware version v2.1383 or later to support the H2-SERIO or H2-SERIO-4.
80 mA @ 5 VDC
1200, 2400, 4800, 9600, 19200, 38400, 57600, 115200
None, odd, even
1, 2
-20 to 70°C (-4°F to 158°F)
WinPLC and Serial I/O Module Installation and Operation, 4th Edition
3–3
Serial I/O Module Installation and Operation
H2-SERIO(-4) Wiring: RS-232
RS-232
6 pin RJ12 Phone
Type Jack – both ports
H2-SERIO(-4) RS-232 Pin
Descriptions
6
1
1
2
3
4
5
6
0V
CTS
RXD
TXD
RTS
0V
Power (-) connection (GND)
Clear to Send
Receive data (RS-232)
Transmit data (RS-232)
Request to Send
Signal Ground (GND)
NOTE: The serial port on-board the WinPLC has a different pinout from the H2–SERIO module. Refer to
page 1–7 for the WinPLC serial port pin assignments.
H2-SERIO-4 Wiring: RS-422/485
NOTE: Set DIP Switch
for desired operation
OFF
NO TERM
RS422
ON
120 OHM
RS485
Set DIP switch S2 on the H2-SERIO-4 to:
1. Activate or deactivate the internal 120Ω termination resistor.
2. Select RS-422 or RS-485 operation.
RS-422
SERIO-4
TX+
TX(D-) RX(D+) RX+
GND
Slave 1
Slave 2
Last Slave
RX+
RXTXTX+
GND
RX+
RXTXTX+
GND
RX+
RXTXTX+
GND
User Supplied
120Ω Termination
Resistor
(H2-SERIO-4 contains an optional 120Ω
termination resistor between RX+ and RX-; use
DIP switch S2 to activate or deactivate resistor.)
RS-485
SERIO-4
TX+
TX(D-) RX(D+) RX+
GND
Slave 1
Slave 2
Last Slave
DD+
GND
DD+
GND
DD+
GND
(H2-SERIO-4 contains an optional 120Ω
termination resistor between RX+ and RX-; use
DIP switch S2 to activate or deactivate resistor.)
3–4
WinPLC and Serial I/O Module Installation and Operation, 4th Edition
User Supplied
120Ω Termination
Resistor
Serial I/O Module Installation and Operation
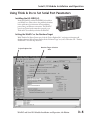
Using Think & Do to Set Serial Port Parameters
Installing the H2-SERIO(-4)
Install the WinPLC and the H2–SERIO(-4) module in
your DL205 base. Please refer to the guidelines elsewhere
in this publication for information about installation,
power wiring, and Ethernet connections. The WinPLC
must be recognized on the network to proceed, so use
Think & Do to establish your link to the WinPLC.
Setting the WinPLC as the Runtime Target
With Think & Do ProjectCenter open, click the “Project Explorer Bar”, and project information will
display in the main ProjectCenter window. In the “Runtime Target” area, select “Windows CE - Think &
Do WinPLC” from the drop-down list.
H2-SERIO Specifications
Project Explorer Bar
Runtime Target Selection
Area
WinPLC and Serial I/O Module Installation and Operation, 4th Edition
3–5
Serial I/O Module Installation and Operation
Using Think & Do ConnectivityCenter
to Set Up The Serial I/O Module
ConnectivityCenter is the Think & Do tool for
configuring I/O devices. See the Think & Do
Studio Learning Guide (Chapter 2) for more
detailed information on using ConnectivityCenter.
Open up the ConnectivityCenter.
Click here to open
ConnectivityCenter
From ProjectCenter
Drivers menu
This frame shows an initial
ConnectivityCenter screen with no
WinPLC connected.
Adding the Serial I/O Module
Driver
Again, see the Think & Do
Learning Guide or QuickStart
Guide for more information on
adding I/O drivers.
Either click on the “Drivers” menu
and select “Add”, or click on the
Add Driver toolbar button.
Select “Think & Do WinPLC
Backplane I/O” as the target.
3–6
WinPLC and Serial I/O Module Installation and Operation, 4th Edition
Serial I/O Module Installation and Operation
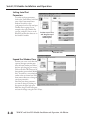
Connecting To The WinPLC
To connect to the WinPLC, click
“Configuration”, and select “Connect”.
Think & Do recognizes the DL205
base as you have configured it. The
WinPLC is displayed in the CPU slot,
and the Serial I/O module is displayed
where you have installed it.
Click on “Serial Driver”.
Configuration
Serial Driver
You will see a port configuration box for
each serial port Think & Do recognizes.
In our example to the right, Think &
Do sees four serial
ports. One is on the
WinPLC and the
other three are on the
Serial I/O module.
Notice that the ports
are numbered COM 1
through COM 4 in
Think & Do. COM 1
is on the WinPLC.
COM 2 through
COM 4 are on the
first Serial I/O module
in the base. Think &
Do counts the serial
ports from top to
bottom (on the Serial
I/O module) and from
left to right in terms of
slot position.
If you install additional Serial I/O modules at a later time, be aware that the order of the modules in
the base determines their COM numbers. If you install a Serial I/O module between an existing
Serial I/O module and the CPU, your port settings will remain the same, but the COM number will
change.
WinPLC and Serial I/O Module Installation and Operation, 4th Edition
3–7
Serial I/O Module Installation and Operation
Setting Serial Port
Parameters
To set the serial port parameters,
click on the “Serial Driver” in the left
pane of the ConnectivityCenter
window. You will see a port
configuration box for each serial port
Think & Do recognizes. In our
example to the right, Think & Do
sees four serial ports. One is on the
WinPLC and the other three are on
the Serial I/O module.
Position curser here,
and drag line up to
expand lower
window pane.
Module Info.
Expand the Window Pane
Position your cursor on the line that
separates the upper window panes
from the lower window pane. Move
this line up by dragging your mouse.
Click on the tab at the bottom of the
lower window pane marked “Module
Info.” You will see a screen that looks
similar to the one shown here. Pulldown menus allow you to change the
serial port parameters.
Select the port whose parameters
you want to change by clicking on
that port in the upper right pane.
Make the changes in the lower pane,
and save the changes using the Ctrl + S keys.
3–8
WinPLC and Serial I/O Module Installation and Operation, 4th Edition
USING THE ESP UTILITY
TO SET UP THE WINPLC
WHEN WHEN USING THINK
& DO VER. 5.2 OR 5.3
AHAPTER
PPENDIX
C
A
1
In This Appendix...
• Using the Think & Do ESP Utility to Set Up the WinPLC
. . . . . . .A–2
Note: This Appendix only applies if you are using the WinPLC with Think & Do versions 5.2 or 5.3. Use
Chapter 2 if using the WinPLC with Think & Do Studio version 6.0 or later.
Using The ESP Utility In Think & Do Vers. 5.2 or 5.3
Using the Think & Do ESP Utility to Set Up the WinPLC
Check Think & Do Version First
You will need Version 5.2 (or later) of Think & Do, to
recognize the H2–SERIO module. To determine whether
you have the right version, open the Project Binder. As the
Project Binder opens, you may notice a screen that tells
you which Version of Think & Do you are opening. That
screen disappears as the Project Binder opens.
After the Project Binder is open, you can click on
“Help,” and the bottom menu option, “About Project
Binder,” will tell you which Version you are using.
After you load Think &Do, Version 5.2 or 5.3, you
will notice a Think & Do ESP icon on your desktop.
If you double click this icon, you will start a utility that helps you establish
network parameters for the WinPLC.
Click on the “Think & Do Station” tab, then click on the “Select CE Station”
button to open the “TargetPicker”.
A–2
WinPLC and Serial I/O Module Installation and Operation, 4th Edition
Using The ESP Utility In Think & Do vers. 5.2 or 5.3
TargetPicker
A “TargetPicker” message box opens to notify you that no CE
targets are currently visible on the network.
Acknowledge this message by clicking OK, and the “Think
&Do ESP CE Station Selection” window will open. If you have
not already done so, install the WinPLC and connect power to
the DL205 base. See pages 1-4 through- 1-7 for important
wiring and installation information.
NOTE: The following link procedure assumes that you are directly connected from your Think & Do
Development System computer to your WinPLC. For more information about making this connection, consult the
Think &Do Software Learning Guide. If your WinPLC is connected via your office or plant network, please
consult your Network Administrator for appropriate network settings.
Click the “Reset using IPX” button on the Station Selection window. This will allow Think & Do to link
to the WinPLC target using its Ethernet address (MAC address). The IPX protocol must be loaded on
your Think & Do Development System Computer. For more information, consult the Think & Do
Software Learning Guide.
Ethernet or MAC Address
Enter the Ethernet (MAC) address found on the
WinPLC module (see page 1-12). This address
consists of six hexadecimal pairs of numbers.
Some digits are represented by the letters a
through f. All 0’s are zeroes. After typing the
Ethernet address, click OK.
Cycle power to the DL205 while you see the
“Waiting for booter” message box. The “Reset CE
Runtime using IPX protocol” dialog box will
appear next.
WinPLC and Serial I/O Module Installation and Operation, 4th Edition
A–3
Using The ESP Utility In Think & Do Vers. 5.2 or 5.3
WinPLC Name is Required
The “Reset CE Runtime using IPX protocol”
window requires you to name the WinPLC
module. You can use up to 15 alphanumeric
characters.
If the name you select does not conform to the
length or character usage requirements, you will
see the TargetPicker error message shown below
You can also assign an optional description
to the WinPLC in the field provided.
IP Address is Required
Now, click on the “IP Address”tab. Assign an
IP Address and Subnet Mask that are
compatible with the IP Address and Subnet
Mask of your Think & Do Development
System computer.
When you have completed the IP Address
and Subnet Mask (and default Gateway, if
necessary), click OK.
A–4
WinPLC and Serial I/O Module Installation and Operation, 4th Edition
Using The ESP Utility In Think & Do vers. 5.2 or 5.3
Cycle Power After Assigning IP Address
A TargetPicker message box will pop up to let you
know you must cycle power to make the new IP
address effective.
After you click OK and cycle power to the DL205,
the “Think & Do ESP CE Station Selection” window
will reappear (as shown below). Click on the button labeled Re-scan, and you should see the WinPLC
module listed by its MAC address, IP address, Name, and Description.
If you do not see your WinPLC module listed, check to be sure the power is on to the DL205. If the
power is on, recheck your IP addresses on the WinPLC and your Think & Do Development System
computer for compatibility. Also, make sure you have loaded the IP protocol on your Development System
computer and that you are using the appropriate connecting cable (straight-through or crossover).
Select, Exit, You’re Connected
If your module is listed on the window above but not
highlighted, click on the module information and
click the button labeled Select. Then, click Exit.
You will return to the initial Think & Do ESP
window which will now show your Think & Do and
Windows CE Version numbers as well as memory
usage information. At this point, you are successfully
linked to the WinPLC. You can continue to develop
your project or download it to the WinPLC using the
methods described in the Think & Do Software
Learning Guide.
WinPLC and Serial I/O Module Installation and Operation, 4th Edition
A–5
Getting Started
Notes
A–6
WinPLC and Serial I/O Module Installation and Operation, 4th Edition
SERIAL I/O MODULE
INSTALLATION / OPERATION
WHEN USING T&D VER. 5.2
OR 5.3
APPENDIX
B
In This Appendix...
• H2–SERIO(-4) Overview . . . . . . . . . . . . . . . . . . . . . . . . . . . . . . . .B–2
• Specifications . . . . . . . . . . . . . . . . . . . . . . . . . . . . . . . . . . . . . . . .B–3
• H2-SERIO(-4) Wiring: RS-232 . . . . . . . . . . . . . . . . . . . . . . . . . . . .B–4
• H2-SERIO-4 Wiring: RS-422/485
. . . . . . . . . . . . . . . . . . . . . . . . .B–4
• Using Think & Do to Set Serial Port Parameters . . . . . . . . . . . . . .B–5
Note: This Appendix only applies if you are using the Serial I/O Module with Think & Do versions 5.2 or 5.3.
Use Chapter 3 if using the Serial I/O Module with Think & Do Studio version 6.0 or later, including Think &
Do 8.0.
Only Think & Do WinPLCs (H2-WPLC1-TD and H2-WPLC2-TD) support the H2-SERIO module.
Serial I/O Module Installation and Operation
H2–SERIO(-4) Overview
The Scope of This Appendix
This chapter introduces the use of the
H2-SERIO and H2-SERIO-4 modules using
the WinPLC with Think & Do versions 5.2 or
5.3.
This chapter will not describe in detail how to
build a project or connect to a WinPLC.
Depending on which version of Think & Do you
are using, further information can be found in:
Chapter 2 of this manual, Workbench Utility
Operation
Appendix A of this manual, Using The ESP
Utility To Set Up The WinPLC
H2-SERIO
H2-SERIO-4
The Think & Do Studio Learning Guide,
Chapter 2.
The basic steps in using this module are:
1. Install the Serial I/O module in the base.
2. Connect power to the base.
3. Bring up Think & Do.
4. Select the WinPLC as the target.
5. Connect to the WinPLC.
WinPLC
H2-SERIO
Add Serial Ports to Your WinPLC or
EBC(100)
The H2-SERIO and H2-SERIO-4 modules plug into the DL205 I/O base and are 3 port serial I/O
modules for use with the H2-WPLC-x (WinPLC) and the H2-EBC/H2-EBC100. These additional
serial ports give the H2-WPLC-x and H2-EBC(100) the ability to connect with a wide range of serial
devices, such as barcode scanners, scales, printers and modems.
The H2-SERIO module has three RS-232C ports, while the H2-SERIO-4 module has two RS-232C
ports and one RS-422/485 port.
A WinPLC can support up to three H2-SERIO(-4) modules for a total of ten serial ports (including the
one on the WinPLC itself ). Port numbers are assigned from left to right across the base. For example, on
a WinPLC the onboard port is Com 1:
• The first H2-SERIO(-4) module would have ports Com 2, Com 3 and Com 4.
• The next H2-SERIO(-4) module would have Com 5, Com 6 and Com 7.
• The final H2-SERIO(-4) module would have Com 8, Com 9 and Com 0.
An H2-EBC100 can support up to eight H2-SERIO(-4) modules; the limits are the power budget and
number of slots in the base.
The H2-SERIO(-4) modules can reside in any slot of the DL205 base; they do not have to be installed
next to each other.
B–2
WinPLC and Serial I/O Module Installation and Operation, 4th Edition
Serial I/O Module Installation and Operation
Setting Communication Parameters Using Think & Do
Use I/O View to set baud rate, parity, data bits, and stop bits for each port. Choose from 1200 to 115,200
baud communication speeds. Think & Do allows each port to be designated as a MODBUS slave or a
generic serial device. Each port on the H2–SERIO(-4) module is capable of hardware handshaking.
Specifications
H2-SERIO / H2-SERIO-4 Specifications
H2-SERIO
Module Type
Approvals
Number of Serial Ports
per Module
Signals
H2-SERIO-4
Intelligent module for use with H2–WPLC-xx or H2-EBC(100)
cUL Listed, file number E185989
3 ports: all RS-232 (RJ12 jack)
3 ports: 2 RS-232 ports (RJ12 jack) and 1 RS422/485 5 position terminal strip
RS-232: CTS, RXD, TXD RTS, GND
RTS transmision delay times: 5, 50, 250 and
500 ms
RS-232: CTS, RXD, TXD RTS, GND
RTS transmision delay times: 5, 50, 250 and
500 ms
RS-422 (4 wire) : TX+, TX-, RX-, RX+, GND
RS-485 (2 wire): Data+, Data-, GND
Number of Modules
Supported per
H2-WinPLC-xx
Number of Modules
Supported per
H2-EBC(100)
3
8
RS-232 ports: Belden 9729 or equivalent
RS-422/RS-485 terminal: 16-28 AWG solid or
stranded conductor (1.5mm2)
Wire strip length: 0.24-0.27 inches (6-7 mm);
Screw torque: 1.7 in-ibs (0.2 Nm)
Recommended Cables
Belden 9729 or equivalent
Protocols Supported
Power Consumption
Baud Rates
Parity
Start and Stop Bits
Serial ASCII and Modbus RTU slave
Operating Environment
0 to 60°C (32°F to 140°F), 5% to 95% RH (non-condensing); No corrosive gases, Pollution level
2; Vibration: MIL STD 810C 514.2; Shock: MIL STD 810C 516.2
Storage Temperature
Firmware Note
The H2-EBC requires firmware version v2.1383 or later to support the H2-SERIO or H2-SERIO-4.
80 mA @ 5 VDC
1200, 2400, 4800, 9600, 19200, 38400, 57600, 115200
None, odd, even
1, 2
-20 to 70°C (-4°F to 158°F)
WinPLC and Serial I/O Module Installation and Operation, 4th Edition
B–3
Serial I/O Module Installation and Operation
H2-SERIO(-4) Wiring: RS-232
RS-232
6 pin RJ12 Phone
Type Jack – both ports
H2-SERIO(-4) RS-232 Pin
Descriptions
6
1
1
2
3
4
5
6
0V
CTS
RXD
TXD
RTS
0V
Power (-) connection (GND)
Clear to Send
Receive data (RS-232)
Transmit data (RS-232)
Request to Send
Signal Ground (GND)
NOTE: The serial port on-board the WinPLC has a different pinout from the H2–SERIO module. Refer to
page 1–7 for the WinPLC serial port pin assignments.
H2-SERIO-4 Wiring: RS-422/485
NOTE: Set DIP Switch
for desired operation
OFF
NO TERM
RS422
ON
120 OHM
RS485
Set DIP switch S2 on the H2-SERIO-4 to:
1. Activate or deactivate the internal 120Ω termination resistor.
2. Select RS-422 or RS-485 operation.
RS-422
SERIO-4
TX+
TX(D-) RX(D+) RX+
GND
Slave 1
Slave 2
Last Slave
RX+
RXTXTX+
GND
RX+
RXTXTX+
GND
RX+
RXTXTX+
GND
User Supplied
120Ω Termination
Resistor
(H2-SERIO-4 contains an optional 120Ω
termination resistor between RX+ and RX-; use
DIP switch S2 to activate or deactivate resistor.)
RS-485
SERIO-4
TX+
TX(D-) RX(D+) RX+
GND
Slave 1
Slave 2
Last Slave
DD+
GND
DD+
GND
DD+
GND
(H2-SERIO-4 contains an optional 120Ω
termination resistor between RX+ and RX-; use
DIP switch S2 to activate or deactivate resistor.)
B–4
WinPLC and Serial I/O Module Installation and Operation, 4th Edition
User Supplied
120Ω Termination
Resistor
Serial I/O Module Installation & Operation When Using T & D Ver. 5.2 or 5.3
Using Think & Do to Set Serial Port Parameters
Check Think & Do Version First
You will need Version 5.2 of Think & Do, to recognize
the H2–SERIO(-4) module. To determine whether you
have the right version, open the Project Binder. As the
Project Binder opens, you may notice a screen that tells
you which Version of Think & Do you are opening.
That screen disappears as the Project Binder opens.
After the Project Binder is open, you can click on
“Help,” and the bottom menu option, “About
Project Binder,” will tell you which Version you are
using.
New Project Using H2–SERIO(-4) Module
Start a new project by clicking on the blank document
button. A dialog box will pop up asking you to “Choose
Runtime Target.” Select “Windows CE – Think & Do
WinPLC.”
You will see a new Untitled Project open. Next, click on
the “Tools” menu and select I/O View.
WinPLC and Serial I/O Module Installation and Operation, 4th Edition
B–5
Serial I/O Module Installation & Operation When Using T & D Ver. 5.2 or 5.3
Notice in I/O View that the drivers for the
DL205 backplane and the WinPLC serial port
are already loaded. You will see them graphically
represented in the left pane of the I/O View
window.
Connecting to the WinPLC
Prior to the next step, you will need to install the H2–WPLC1–TD and the H2–SERIO module in your
DL205 base. Please refer to the guidelines elsewhere in this publication for information about installation,
power wiring, and Ethernet connections. The WinPLC must be recognized on the network to proceed.
Use “Think & Do ESP” to establish your link to the WinPLC, as described on pages 1–12 through 1–15.
The next step is to click on “Configuration” and select “Connect.”
Think & Do recognizes the DL205 base as you
have configured it. The WinPLC is displayed in
the CPU-slot, and the Serial I/O module is
displayed in the slot where you have installed it.
B–6
WinPLC and Serial I/O Module Installation and Operation, 4th Edition
Serial I/O Module Installation & Operation When Using T & D Ver. 5.2 or 5.3
Click on the Serial Driver in the left pane of the
I/O View window. You will see a port
configuration box for each serial port Think &
Do recognizes. In our example to the right,
Think & Do sees four serial ports. One is on the
WinPLC and the other three are on the Serial
I/O module.
Notice that the ports are numbered COM 1
through COM 4 in Think & Do. COM 1 is on
the WinPLC. COM 2 through COM 4 are on
the first Serial I/O module in the base. Think &
Do counts the serial ports from top to bottom
(on the Serial I/O module) and from left to
right in terms of slot position.
If you install additional Serial I/O modules at a
later time, be aware that the module’s slot
position determines its COM number. If you
install a Serial I/O module between an existing
Serial I/O module and the CPU, your port
settings will remain the same, but the COM
number will change.
NOTE: You must be disconnected from the
WinPLC and the I/O base in order to change the
serial port parameters on the H2–SERIO(-4)
module. To disconnect, you have two choices. You can click on Configuration/Disconnect as shown above, or you
can physically disconnect the WinPLC by removing power or by removing the Ethernet cable.
Now, click on “Configuration” and select Disconnect. Think & Do will ask if you want to save the
configuration. If you want to re-use this I/O Configuration later, click yes. If you click yes, you will see the
“Save I/O Configuration As” screen. Name the configuration and click save.
WinPLC and Serial I/O Module Installation and Operation, 4th Edition
B–7
Serial I/O Module Installation & Operation When Using T & D Ver. 5.2 or 5.3
Setting Serial Port Parameters
To set the serial port parameters, click on the
Serial Driver in the left pane of the I/O View
window. You will see a port configuration box
for each serial port Think & Do recognizes. In
our example to the right, Think & Do sees four
serial ports. One is on the WinPLC and the
other three are on the Serial I/O module.
Expand the Window Pane
Position your cursor on the line that separates
the upper window panes from the lower window
pane. Move this line up by dragging your mouse.
Click on the tab at the bottom of the lower
window pane marked Module Info. You will see
a screen that looks similar to the one shown
here. Pull-down menus allow you to change the
serial port parameters.
Select the port whose parameters you want to
change by clicking on that port in the upper
right pane. Make the changes in the lower pane,
and save the changes using the Ctrl + S keys.
B–8
WinPLC and Serial I/O Module Installation and Operation, 4th Edition