1
Charge Voltage
Charging method C
Charge Voltage
Orange
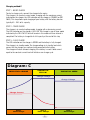
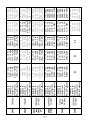
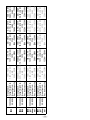
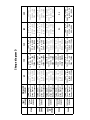
STEP 1 - BOOST CHARGE
To start a charge cycle; connect the charger to the mains.
The charger is in constant current mode, charging with the maximum current
Orange
Orange
indicated onBattery
the charger,
the LED-indication on the charger is ORANGE (or RED
Voltage
9640). This step allows rapid charging of your battery until the battery reachesCurrent pulses at safe float voltage level
for maximum topping of battery capacity.
typically 80 - 95% of its capacity.
Pulse frequency: Microprocessor controlled.
Pulse Current: max current
Charge
Current
Orange
Green
STEP 2 – TIMER CHARGE
The charger is in constant voltage mode, charging with a decreasing current.
Orange
The LED-indication on the charger is YELLOW. The charger is now in timer mode
Green
indicated by the YELLOW LED and will remain in this mode until time interval is
Yellow
completed. The battery is charged to its full capacity at the end of this step
Start Current
Cut-Off Current
Orange
Low Current Start-Up at Vbatt <10.5V
Yellow
STEP 3Error
– FLOAT
CHARGE
Mode if <10.5V after 30 minutes
Yellow
(for 12V system)on the charger is GREEN and the battery is fully charged.
The LED-indication
The0charger is in standby
mode. The charge voltage is Step
at standby
level which
Step
Step 1
Step 3
2
Start Timer
Boost Charge
Float Charge
Top Up Charge
(4 hours)
means that the charger
can continue to be connected
to the battery.
Green
(0.5 hours)
Yellow
The charger will return to boost charging if the battery is used. A load current
Safety Timer (72 hours)
equal to the constant
current level will initiate a new charge cycle.
Lead acid diagrammer
Yellow
Diagram: C
INDICATOR: ORANGE
INDICATOR:
YELLOW
INDICATOR: GREEN
Charge Voltage
Charge Voltage
Charge Current
Cut-Off Current
Step 1
Boost Charge
Yellow
Step 2
Timer Charge
9
Step 3
Float Charge