Transcript
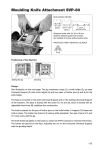
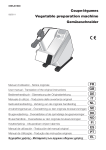
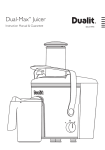
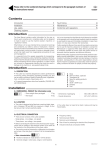
!
USER INSTRUCTIONS
THE TRIMPRO ROTOR XL IS DESIGNED TO BE USED WITH FRESHLY HARVESTED PLANTS.
USER INSTRUCTIONS
WARNING: WHEN THE MACHINE IS RUNNING:
• Never put your fingers, gloves or any other body part in contact with the grate, the blade and/or
the rotor.
• Never apply pressure on the grate.
• Do not use scissors, knives or any instrument above the grate.
• Safety glasses and gloves are required at all times.
• Gloves have to be tight enough so they can’t get inside the grate slots. A loose glove is dangerous, beware!
1. Carefully read the security instructions (see Warnings ! ) before using the machine.
2. Plug the machine into an electrical outlet.
3. Turn on bottom (blade) motor by side mounted dimmer switch and adjust to desired speed.
4. Segregate freshly harvested flowers into similar sizes.
5. Lift cover and add several handfuls of flowers to upper container. Quantities will vary according to flower type.
6. Close the cover, turn on the upper motor and adjust to desired speed.
7. Let the plants move around in the machine for 1 to 3 minutes or until desired cut is obtained.
8. Open the exit door and keep it open until the upper container is empty. Increasing the rotation speed may facilitate emptying the container.
9. Frequently remove the accumulation of plants under the machine. The accumulation should never reach the motor in order not to
obstruct the motor ventilation.
10. Turn off the machine.
11. Unplug the machine from the electrical outlet.
To be used in accordance with all applicable laws and regulations. The manufacturer does not accept any responsibility
for damages caused to or by the TRIMPRO ROTOR XL which is the result of improper use or assembly.
Note: If the top motor has to be stopped DO NOT USE YOUR HANDS as this may burn the motor. Turn off the motor using the OFF switch instead.
CAUTION:
Height adjustment screw.
B we recommend to keep a distance of at C
For security reasons,
least
1/8 key
of an
inch (3mm) between the
(Allen
3/16")
Tightening screw
grate and the blade.
(Allen key 5/32")
!
Lift cover,
add flowers
Carefully read
the security
instructions
Bottom motor
dimmer switch
Segregate
fresh flowers
NO HEIGHT:
ADJUSTMENT OF THE BLADE
To adjust the height of the blades, follow these steps:
1. Remove both “A“ screws (blocking screw), then both “B” screws (tightening screw). (See drawing)
2. Turn the “C” screw (height adjustment screw). To raise the blades, turn clockwise. To lower the
blades, turn counterclockwise.
3. Apply pressure on the blades to NO
ensure it is well located.
4. Put both “B” screws back.
5. Verify if the height of the blade is OK by closing the grate. If not, return to step 1.
6. To finish, put both “A” screws back.
!
A
Blocking
screw
ADJUSTMENT
SCREWS:
(Allen key 5/32")
B
Tightening screw
(Allen key 5/32")
A
C
Blocking screw
Blocking (Allen
screw key 5/32")
(Allen key 5/32")
Blocking screw
(Allen key 5/32")
Upper motor
dimmer switch
A
A
Height adjustment screw.
(Allen key 3/16")
screw
B Tightening
(Allen key 5/32")
screw
B Tightening
(Allen key 5/32")
LOWER AND RAISE THE BLADE:
MAINTENANCE
RotorXL0213
In order to facilitate the trimming, spray vegetable oil and clean the grate and blades frequently with
soap or isopropyl alcohol. This must be done when the machine is not running. Sharpen the blade
when necessary. To sharpen them, never remove the blades from the hub even for sharpening.
NO
FOR INFORMATION OR TO ORDER:
Visit: www.Trimpro.Ca • Contact: [email protected] • Call (Canada): +1-450-349-0811
PATENT: CAN: 2.470.370 USA: 7.168.643 AUS: 2004269786 EUR: 1,662,858 B1 CE HOMOLOGATION
SHARPENING:
1. Remove the 4 set screws located in the 2 holes on the side of the aluminum hub where the blade is fixed
(see drawing).
2. Remove the blade and the hub in one piece from the motor shaft.
3. Clean the blade with alcohol.
4. Use a grindstone.
5. Put a gentle pressure with the bottom of the blade on the grindstone with the sharpening angle desired.
6. Pass the blade on the grindstone with a movement from left to right and from right to left until the blade
is properly sharpened.
7. Put back the blade and the aluminum hub on the motor shaft.
8. Put back in position the 4 set screws in the 2 holes on the side of the aluminum hub.