1
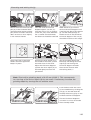
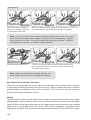
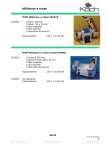
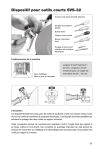
Moulding Knife Attachment SVP-80
MOULDING KNIVES
Sharpens knifes with 24, 30 or 38 mm
distance between guide hole centres.
Not suitable for knives without guide holes.
PROFILED PAINT REMOVAL BLADES
Positioning of the Machine
Setting the jig
Grinding
Design
See illustration on the next page. The jig comprises a base (1), a knife holder (2), an extra
Universal Support (3) with micro adjust (4) and two pairs of hollow pins (5 and 6) for the
knife holder.
The base is mounted on this extra Universal Support and on the existing Universal Support
of the machine. The base is locked with the screw (7). An arm (8), which is locked with an
adjustable hand lever (9), stabilizes the construction.
The knife is placed on the pair of hollow pins on the knife holder. A magnet (13) keeps the
knife in place. The holder has holes to fit various knife standards. Two pair of pins (∅ 4 and
∅ 5 mm) come with the jig.
The knife holder (2) glides on the base (1), which has PTFE surfaces to minimise the friction.
The knives are ground on the face. Adjusting the nut on the horizontal Universal Support
sets the grinding depth.
133
Existing Universal Support (A)
Mounting the jig
To minimise the packaging, the
two knobs (11) are not mounted.
Mount them by a light knock
with a hammer. Be sure to have
a flat support under the holder.
Use the pair of pins which fit the
hole diameter of the knife and
mount them in the two holes
which fit the knife. Compress
the pins with a pair of pliers and
push them fully into the holes.
Mount the arm (8) with the
hand lever (9) and the nut
(12). Adjust the lever to the
most suitable position.
Checking the Grindstone
Check that the grinding wheel is exactly round and
that the grinding surface is even. Adjust if necessary
with the Tormek Truing Tool TT-50.
134
Mounting and setting the jig
Mount the extra Universal Support (3) in the horizontal base
and the original Universal Support (which on older machines
does not have a micro adjust)
in the vertical sleeves.
Lock the vertical Universal
Support approx. 25 mm (1")
from the stone. This is valid for
a 250 mm (10") stone diameter.
For a smaller stone diameter,
the distance should be reduced.
Slide the base (1) onto the
vertical Universal Support until
it touches the leg of the support
(a). Let the lower part (b) of
the base rest on the horizontal
Universal Support. The arm (8)
should be inactive at this stage.
Place the knife on the knife
holder and the magnet will
keep it in place.
Position the knife holder (2) in
the middle of the base (1) with
the knife clear of the stone.
Adjust the Universal Support
(3) with the micro adjust (4) so
the knife lightly touches the
grindstone.
Set the grinding depth (see
below) by loosening the micro
adjust (4) and moving the
Universal Support towards
the machine. Secure with
the locking knob, c.
Note Start with a grinding depth of 0.05 mm (0.002"). This corresponds
to a turning of the micro adjust (4) by one mark. If necessary increase the
grinding depth by turning the nut another mark.
Lock the base with the screw
(7) and stabilize it by locking the
arm (8), so that the base lies
steadily without any play on the
horizontal Universal Support.
The two Universal Supports
now work in unison and make
the assembly stable.
135
Sharpening
Grind the knife by sliding the
holder up and down covering
the full width of the knife.
Move the holder sideways gradually while still moving it up and
down between the left and right hand stops in the base.
Note The up and down movement should be made without too much pressure. Move the holder rather rapidly at the end of the sharpening – approx.
one stroke per second – and you will get the most even surface. Continue
sharpening until almost no steel is being removed.
Rotate the knife holder 180°.
Continue sharpening. Move the knife holder between the
left and right hand stops in the base. Now the whole knife
should be evenly ground.
Note When the first knife has been ground, you
do the other knife without changing the setting.
Max Reduction of the Knife Thickness
The knife must not be ground so many times that it becomes too thin and loses its strength.
It should not be decreased more than 0.3 mm (0.012") from its original thickness. A normal
grinding reduces the thickness with 0.05 mm (0.002"). This means that you can sharpen a
knife 6 times before it becomes too thin.
Honing
The burr, which remains on the bevel side, should be honed off free hand on the leather
honing wheels. Always hold the knife so that the honing wheel runs away from the edge.
Hone the face and the bevel alternately on the large honing wheel and on the small, profiled
wheel so far as the profile of the knife allows, until the burr disappears. A properly honed
edge leaves a cleaner, finer surface on the wood and the sharpness of the knife lasts longer.
136