1
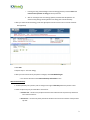
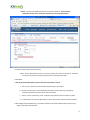
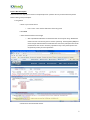
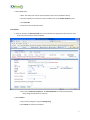
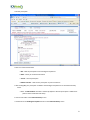
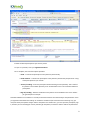
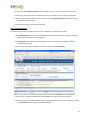
Table of Contents ACCESSING E-PRESCRIBING IN ICANOTES (RCOPIA 101) LOG IN ......................................................................................................................................................................1 ALLERGY MAINTENANCE ........................................................................................................................................2 ADD A DEFAULT PHARMACY ...................................................................................................................................3 CREATE A NEW PRESCRIPTION ...............................................................................................................................5 SEND TO MAIL ORDER PHARMACY ....................................................................................................................... 10 RENEWAL REQUESTS ............................................................................................................................................. 11 RENEW ACTIVE MEDICATIONS .............................................................................................................................. 12 DRUG INTERACTION ALERTS ................................................................................................................................. 13 ALLERGY INTERACTION ALERTS .......................................................................................................................... 13 MINI MEDICATION REPORT................................................................................................................................... 14 RCOPIA 201 CUSTOM PRESCRIPTION NOTES............................................................................................................................. 14 FORMULARY CHECKING ........................................................................................................................................ 15 HOW TO TAPER SIG DETAILS ............................................................................................................................... 16 RCOPIA 301 – FOR ADVANCED USERS............................................................................................................. 16 MANAGING PROBLEMS .......................................................................................................................................... 16 PATIENT SUMMARY SCREEN .................................................................................................................................. 17 PHARMACY INFORMATION .................................................................................................................................... 21 MEDICATION HISTORY .......................................................................................................................................... 22 ADDITIONAL OPTIONS............................................................................................................................................ 22 F.A.Q. (FREQUENTLY ASKED QUESTIONS) .................................................................................................... 23 Accessing e-Prescribing in ICANotes You can access e-Prescribing in ICANotes from several areas of the program: From the Chart Room, by pressing the “# Pending e-Rxs” or “# e-Rx Renewals” buttons at the top of the Chart Room (these serve to remind the user of pending renewal, refill, or partially completed e-Rx entries). From the Work Areas of a note, specifically the Medication List in Progress Note Part 2. From the patient’s Demographics page in ICANotes using the Go to e-Prescribe button at the top of the page. When you access e-Rx from ICANotes, it will take you directly to the patient’s chart. Otherwise, you will type in the patient’s name or ID to locate their chart. E-prescribing will launch onto either the Patient Summary screen shown below, or the Allergy Maintenance screen (see Page 2). 1 In either instance, you can enter in the patient’s pharmacy by clicking on Change below the patient’s name at the top of the screen to the right of the Pharmacy link. For directions on how to choose a pharmacy skip to the Pharmacy Information section on page 3. To proceed to the directions on how to prescribe, go to page 5. NOTE: Demographics, Medication Reconciliation, Clinical Summary, and Clinical Order Sheet are not set up for two-way integration between DrFirst and ICANotes and require double entry. Current demographics will sync from ICANotes to DrFirst when you enter the e-prescribing module, but if you update demographics in the e-prescribing system, that data will not sync with the demographics in ICANotes. The first new note you create for an existing patient who you have previously prescribed meds to from ICANotes will require a 10-20 second sync. Please be patient while the information is uploaded to DrFirst. Note: Do not “X” out of the screen during the sync process. Patient allergies are not transferred to the e-Prescribing module from ICANotes, so you will first need to enter the patient’s allergies from the Allergy Maintenance screen shown below. 1. Click on Manage Allergies 2. Enter the patient’s allergy history. There are three different ways for entering your patient’s allergy information. a. If your patient has no known allergies, click the Indicate 'No Known Drug Allergies (NKDA)' link at the top b. Select a common allergy from the drop down menu and click Add Common Allergy c. Enter search criteria for your patient’s allergy, click Find and select the appropriate allergy 2 i. Entering non-drug related allergies: Enter the allergy (peanuts) and click Find. Click Enter free text ‘peanuts’ as allergy at the top of the list. ii. Note: A red triangle next to an allergy (peanuts) indicates that Rcopia does not conduct a drug-allergy checking because this allergy was entered manually. 3. After you select the desired allergy, select the appropriate reaction such as hives or nausea and onset date (optional) 4. Click Add 5. Repeat steps 3 - 4 for each allergy 6. After you have entered all of your patient’s allergies, click Done With Allergies a. You will now be taken to the Patient Pharmacy Information screen Add a Default Pharmacy 1. To add a pharmacy for a patient, click on Change to the right of Pharmacy below the patient’s name. 2. Select the pharmacy list you would like to search from a. Favorites List – contains only the pharmacies that the individual user has previously selected to be in their favorites list b. Practice List – contains only those pharmacies located in the first three numbers of the practice’s zip code 3 c. All List – contains all available pharmacies in the Rcopia database. Since this most comprehensive list, this is usually the desired way to search for pharmacies. 3. Enter the search criteria for the pharmacy a. Note: The less information you enter, the more successful your search results may be. Start with the city and zip code and maybe the first few letters of the pharmacy name. 4. Click Find 5. Click on the desired pharmacy’s name to attach it to the patient’s record a. “24” next to a pharmacy’s name indicates the pharmacy is open 24hrs b. (E) next to a pharmacy’s name indicates the pharmacy accepts electronic prescriptions. Pharmacies without an (E) will receive a fax from Rcopia. c. “No fax” next to a pharmacy’s name means that the pharmacy does not accept any faxes d. For information on mail-order pharmacies, see the “Pharmacies” section of the user manual. 6. After adding the desired pharmacy, your patient has been successfully added to Rcopia and you may begin to prescribe for this patient. 4 Create a New Prescription There are four main ways you can create a new prescription for a patient. Be sure you have selected a patient before creating a new prescription. 1. Drug Search a. Enter in your search criteria i. Less is more – enter the first few letters of the drug name b. Click Find c. Select the desired form and strength i. Note: Capitalized medications are the brand name versions of the drug. Medications listed in all lower case are the generic versions of the drug. The designation (otc) next to the strength indicates that this medication does not need a prescription and can be purchased over the counter. Formulary information may or may not be present. See the formulary section for more information d. Continue to the Enter Details section. 5 2. Drug Category Search a. Click Category Search. This allows you to look up all medications within a specific therapeutic class b. Click the + icons to expand each category until you find the desired form of the drug c. Click the desired form of the drug d. Continue to the Enter Details section 3. Favorite Prescription a. Select the desired prescription from the Favorites drop-down menu b. Click Use to create the prescription and add it to the pending prescriptions at the bottom of the page c. Click View/Edit to make changes to the prescription before creating the prescription d. Continue to the Enter Details section 6 4. Active Medications a. Note: This method can only be used if the patient has an active medication history b. Find the medication in the patient’s active medication list on the Patient Summary screen c. Click Prescribe d. Continue to the Enter Details section Enter Details: 1. Verify the provider and pharmacy fields are correct and select the appropriate values from the dropdown menus for the SIG (instructions) details. a. If you used a Favorite Prescription or an Active Medication to create this prescription, verify/change the SIG details as necessary. 2. Click Continue a. If you need to change the drug, click Change Drug. b. Click Cancel to cancel the prescription 7 3. Review prescription 4. Click one of the action buttons a. OK – adds the prescription to the Pending Prescription list b. Back – allows you to edit the SIG details c. Cancel – cancels prescription d. Add to Favorites – adds current prescription to your Favorites list. 5. After clicking OK, your prescription is added to the Pending Prescriptions list on the Patient Summary screen. a. Note: The Add to Meds check box is selected by default so that the prescription is added to the patient’s active medication and history 6. You are then taken to the Patient Summary screen. 7. Scroll down to the Pending Prescriptions section on the Patient Summary screen 8 8. Select the desired prescriptions you want to process 9. If you are a provider, enter your Signature Password 10. To complete, click one of the options provided: a. Send – Transmits the prescription to the pharmacy electronically. b. Send and Print – Transmits the prescription to the pharmacy electronically and prints out a copy of the prescription for your records. c. Print w/o sending – Prints the prescription without sending it to the pharmacy. This is useful if the patient is unsure which pharmacy he or she would like to use or for controlled substance prescriptions. d. Sign w/o sending – Adds the medication to the patient’s active medication list. This is useful if you gave the patient a sample. Controlled substances in schedules II-V must be printed and cannot be sent electronically to the pharmacies unless you upgrade to EPCS Gold e-Prescribing. For schedule II medications (this is denoted next to the drug as II), you must print these prescriptions and give them to the patient. For schedule III-V, you must print the prescription, sign it, and then you can manually fax it to the pharmacy for the patient, or hand it to them to take to the pharmacist. 9 Send to Mail Order Pharmacy Mail order pharmacies are given for patients who show eligibility obtained from Surescripts. Note: Only when eligibility is obtained for your patient can you send to a mail order pharmacy, such as Caremark, Express Scripts, Medco, etc. You will notice when you log into Rcopia and pull up a patient if a formulary appears for the patient then the system may provide a mail order option. You will see the mail order listed in 3 places: 1. When you get to the Pharmacy Information page, you will notice above the search boxes for retail pharmacies, you will see the mail order pharmacy that the patient is eligible.. a. You do not have to choose the pharmacy from here. Our recommendation is to choose the retail pharmacy the patient uses so that you can get this on file and be able to send prescriptions to both pharmacies at the same time. 2. You will find the mail order pharmacy automatically added to the drop down list of pharmacies for the patient found under their name and phone number in the Patient Demographic Information box at the top of the Prescribe screen. 3. The patient’s mail order pharmacy will appear on the Enter details page, or Sig page, where you will be entering the details for the prescriptions you are prescribing. a. Below the provider drop down you will find the default pharmacy for the patient, and directly below that you will find the mail order pharmacy that the patient is eligible . i. There will be boxes to the left of both the retail pharmacy and the mail order pharmacy. 10 b. You then have the option to check just the mail order box to send a 90 day prescription, or both boxes and send a prescription to the retail pharmacy as well as the mail order. i. This will allow the patient to get their prescription from the retail pharmacy and start their medication while waiting to receive the prescription in the mail order pharmacy Renewal Requests Renewals requests are electronic requests generated by a pharmacy for the patient and you will have a link to view these messages in your EMR. Click on this link and you will be launched into Rcopia through the portal onto the renewal request screen with your pending renewal request. 1. Click Renewal Requests (XX) at the top of the screen in the blue toolbar 2. Select the desired action from the dropdown menu for each renewal request a. Deny – Will deny the request for a Renewal and sends a denial message to the pharmacy. b. Change – Allows you to change the prescription and/or pharmacy information. When change is selected, and the prescription is changed, the prescription becomes a pending prescription in the appropriate provider’s prescription report. This will alert the pharmacy that the requested renewal has been denied, but a new prescription will follow. c. Renew plus, X refills – Renews the prescription with a desired amount of additional refills d. Forward – Allows a staff member to forward the prescription request to another qualified prescriber in their practice. e. Remove – Should only be used if you have previously handled this request and it is a duplicate. 11 3. If necessary, select Pharmacy Notes from the dropdown menu or type them into the box to the right 4. If necessary, enter comments in the comments box. They are visible only to you and your office staff. 5. After you have selected an action for each request, enter your Signature Password at the top or bottom of the screen and click Perform. 6. All requests that have an action will be executed. Renew Active Medications For patients with an active medication list, one or more medications can be renewed at a time. 1. Click Renew Selected to renew all of the medications on this patient’s list at once. (Rcopia automatically selects all the medications in the patient’s list) 2. Click Select None to unselect all of the medications so you can manually select a desired number of medications from the list. 3. Once you have selected the medications you wish to renew, click Renew Selected. 4. You can renew a particular medication by clicking Renew to the right of the listed medication. 5. You can change the details (Sig, Duration, Quantity, Renewal, Pharmacy, etc.) of a prescription by clicking on the Prescribe link to the right of the listed medication. 12 6. You can stop a medication by clicking the [Stop] link to the right of the listed medication. a. You will be prompted to enter a reason for stopping this medication. i. Best practice: Enter a specific reason for stopping the medication and it will be displayed in the patient’s medication history. Drug Interaction Alerts When prescribing medications, Rcopia will always check against the active medication list for drug to drug interactions. The alerts will appear after you have searched for the drug and chosen the strength. These alerts will appear in RED, as shown here: DRUG INTERACTION ALERT! This patient is being given Lipitor (atorvastatin), which has a severe incidence of adverse effects when combined with the drug you have just prescribed, erythromycin. [See Reference]. Proceed with extreme caution. These alerts will have a See Reference link that allows the user to view an Interaction Report. The user will also be given the ability provide a justification for prescribing this medication notwithstanding the warning, this is optional. Allergy Interaction Alerts When prescribing medications, Rcopia will always alert you if you are prescribing something that is associated with a drug on the list of allergies and adverse reactions. The alerts will appear after you have searched for the drug and chosen the strength. These alerts will appear in RED, as shown here: ALLERGY ALERT! This patient is listed as having an allergic reaction (unspecified) to amoxicillin, which is identical to the drug you have just prescribed, amoxicillin. Proceed with extreme caution 13 The user will also be given the ability provide a justification for prescribing this medication notwithstanding the warning, this is optional. Mini Medication Report 1. To print a wallet-sized version of a patient’s current medication and allergy list, click Mini on the patient summary screen once you have selected a patient. a. This is an ideal way for patients to keep track of the medications they are currently taking. 2. The Mini Medication Report will then open in a new window. a. Note: If you have disabled pop-up blockers, the print window will automatically display so you can quickly print a copy for the patient. See example below: 3. To close that window, click the X or Close button in the upper right corner of the title bar. Custom Prescription Notes 1. Custom prescription notes can be created by clicking on Additional Options on the blue navigation toolbar at the top of the screen and going to Preferences – User. 2. At the very bottom of the screen you will find a box, which allows the user to enter customized prescription notes that will be available to select while prescribing medications. a. A custom prescription note can be any length desired. b. Do not hit the return key while typing the prescription note, let the text wrap on its own. c. Hit the return key to delineate between individual prescription notes. 14 d. You will find these notes in a drop down on the sig page above the Directions to Patient box. e. These can be very helpful and are the next best thing to creating favorite prescriptions. 3. When finished, click on the Make These Changes. Formulary Checking Formulary information in Rcopia is obtained from Surescripts 1. When you pull a patient up the system will automatically start searching for his/her eligibility using the patient’s first name, last name, zip code, and DOB. a. Surescripts provides formulary information for health plans and payers such as Blue Cross, Anthem, Mamsi, etc. b. They do not provide eligibility for government funded formularies or some small payers. 2. Once the formulary information is obtained the system can tell you what medications may be covered and not covered by the patient’s insurance. a. If you try to prescribe a medication that is not covered, or has higher co pay, you will receive a formulary alert in the system. 3. The user can override these alerts or select from the list of alternatives and prescribe a medication that has a lower co pay. 15 How to Taper SIG Details In order to taper a sig in Rcopia: 1. Use the drop downs provided on the Rcopia Prescription Form page or Sig page to start the sig or leave them blank. a. You can also go down below where the Directions to Patient box is and free text all of the directions here. b. There is no limit so you can type in as much text as needed to complete the tapered sig. (Note: If you exceed 140 characters the prescription will be faxed, and will not go electronically.) 2. When you are done click on Continue and if it is a drug that you prescribe all the time this way, make sure to add it to your favorites so that you don’t have to type out all the directions again. For Advanced Users Managing Problems The Rcopia e-prescribing system allows you to enter a patient’s diagnosis or problem. By entering this information, this will allow you to associate a diagnosis with a prescription and allow the drug diagnosis checking to be enabled. You can begin populating problems by clicking on Manage Problems, located to the right of the allergies on the Patient Summary page To find a problem, just type on the diagnoses or an ICD-9 code and choose the problem that best describes your patient’s diagnoses from the list below. 16 Patient Summary Screen This screen has several sections in order to provide you a complete view of the patient. Medications This section allows you to view the patient’s current medications. 1. Last means that was the last date the prescription was prescribed. a. The red triangle next to the drug indicates that this product has been prescribed as a free text drug. i. A free text drug is one that is used for compounded medications or medications that cannot be found in the Rcopia drug database. ii. Rcopia is unable to perform many of the clinical and formulary checks with these types of medications. Note: By clicking Check Interactions for Selected, you can check “on demand” potential interactions on a patient’s medication list even if a medication is not being prescribed. This included drug-drug, drug-diagnosis and drug allergy interactions. Allergies/Adverse Reactions This section allows you to record the patient’s allergies or adverse reactions to medications. 1. Select the medication from our list to perform drug-allergy checking. a. The red triangle indicates the product was a free text selection and no allergy checking can be performed. i. Note that by clicking Check Interactions for Selected, you can check “on demand” potential interactions on a patient’s medication list even if a medication is not being prescribed. ii. This includes drug-drug, drug-diagnosis and drug allergy interactions. Problems This section allows you to record a patient’s list of conditions, diagnoses, and symptoms by conducting a search using name or ICD9 code. Recording this information is particularly important for drug-diagnosis interaction checking. In addition, by populating this information, you will be able select a diagnosis on the enter details screen and it will be placed on the prescription. Pending prescriptions Allows you or your staff to write prescriptions and queue them until they are reviewed by the appropriate person who can review them and sign off to be sent to the pharmacy. 17 Commonly Used Medications You may select a medication from the drop-down Favorites list or you can type the name or partial name of the medication in the Name text box and click on Find. Using the Favorites list Once you engage the drop down list, you can type the first letter of the desired medication and the list will move to that area of the alphabet. The Favorites drop-down list contains lists of medications previously prescribed by this practice and saved as a Favorite. It includes the SIG and strength previously determined appropriate for an existing patient. Once you click on the desired medication you can click on the Use button to prescribe that medication. This offers the physician a quick method of prescribing similar drugs without having to enter the same information over and over again in the medications Enter Details window. Select a Medication by Category Clicking on the Category Search button takes you to a screen where you can search for drugs by therapeutic class. There are + sign links to the left of the categories that you click on to open up the category. Prescribing a Medication by Name 1. Type in the first few letters of the medication name and click on Find 2. Click on the appropriate medication and dosage link. a. WARNING: A red warning indicates a drug and/or allergy interaction b. WARNING: A blue warning indicates a formulary warning c. Capitalized medications are the brand name versions of the drug. d. Medications listed in all lowercase are the generic versions of the drug. e. The designation (otc) next to the strength indicates that this medication does not need a prescription and can be purchased over the counter. 3. Please click on “What do these Codes Mean?” link on the left side of the screen in order to understand what the formulary designations mean. a. For example: P1 is preferred level 1 drug. The higher the preferred status, the more preferred the drug is in the formulary. 4. After you have selected a medication, you will be taken to the Enter Details screen where you will be prompted to enter the Sig, Duration, Quantity, Refills, and Directions to the pharmacist, Directions to patient, and Comments. 18 a. The Duration field will automatically take the current prescription off the patient’s active meds list when the duration that is selected expires. b. Leave the Duration blank for maintenance prescriptions so they do not automatically get removed from the active medication list. 5. Click on the Change Drug button to return to the previous window, allowing you to switch to a different medication. Recent Pharmacies Rcopia will remember up to the last five pharmacies that were chosen for the patient. This pharmacy drop-down menu can be found above the sig instructions. These pharmacies can be changed by clicking change, or removed by clicking remove. The pharmacy drop-down menu can also be found under the patient’s name and phone number in the patient demographic box at the top of the screen. Dose Calculator A dose calculator is available on the Enter Details screen. 1. Click on the show dose calculator button next to the patient weight, the calculator appears on-screen to view the calculator. a. The calculator does not open in a new window. b. You must ensure that the patient weight and the mg/kg/day for the drug are populated in order for the dose calculator to work properly. 2. Enter desired prescription information and click on the Continue button. 3. Next the prescription review screen appears so that you can: a. Review the prescription for accuracy b. Add this medication to the practice’s favorites list (optional) by clicking on the Add to Favorites button. c. If you have enabled the preference to sign prescriptions from the review prescription screen, then you can send prescriptions directly from this page. i. Note: The Add to Meds check box is selected by default so that it adds this medication to the patient’s active medication and history. 4. Also see above that if the patient desires a printed copy of the prescription, Rcopia has the ability to display the associated problem or diagnosis on the printed prescription. 5. Clicking OK by a staff member creates a pending prescription. 19 Review Prescription Review the script and click on the OK button. This adds the current medication to the patients pending prescriptions list. You are then taken to the Prescribe Medication screen so another medication can be added to the patient’s pending prescription list (optional). Pending Prescriptions Regardless if you prescribe another medication to this patient or not, you will end up at the Prescribe a Medication screen. If you scroll down this window you will see the Pending Prescriptions for this Patient section at the bottom above the allergies. You can select any number of medications and perform the following options. The options depend on your user role in the application. Note: due to DEA regulations as of 7/08, controlled substances in schedules II-V must be printed and can not be sent electronically to the pharmacies. For schedule II medications (this is denoted next to the drug as II), you must print these prescriptions and give them to the patient. For schedule III-V, you must print the prescription, sign it, and then you can manually fax it to the pharmacy for the patient. Provider Options Send – transmits prescription(s) to the pharmacy. Send and Print – transmits prescription(s) to the pharmacy and prints a copy to the local office printer for your charts or for the patient to take with them upon request. Print without sending – sends the script(s) to the local office printer, and does not send to the pharmacy. Sign without sending – adds a medication(s) to the patient’s active medication list, and does not send to pharmacy (often used when giving samples). All options require a valid Signature Password Provider Agent Options Provider agent options are identical to the Prescriber options displayed above with the following two exceptions: First, a Send, signature to follow button will display instead of the Send button. This will send the script to the pharmacy (who will dispense the script to the patient), and to the Prescriber’s pending prescription queue review and validate the prescription with their signature at a later date. Second, an Archive without sending button will display instead of the Sign without sending button. Both buttons adds a medication(s) to the patient’s active medication list, and does not send to pharmacy (often used when giving samples). Staff Options Hold for Signature – Sends the prescription request to the appropriate Prescriber so they can review and act upon it as they desire. Print without sending – sends the script(s) to the local office printer, and does not send to the Prescribers queue. 20 Archive without sending – adds medication(s) to the patient’s active medication list, and does not send to a Prescriber. Pharmacy Information If the patient does not have a pharmacy attached to their account, you will be prompted to select a pharmacy prior to sending a prescription. 1. Upon selecting a patient, their information is displayed in the patient demographics section. a. From here, you can always click on Change, to the right of the default pharmacy to change and/or add pharmacy information to the current patient’s account. 2. You are able to choose from three pharmacy lists, based which radio button you select: a. Favorites List – contains only the pharmacies that the individual user has previously selected to be in their favorites list b. Practice List – contains only those pharmacies located in the first three digits of the practice’s zip code c. All List – contains all available pharmacies in database. Since this is most comprehensive list, this is usually the desired way to search for pharmacies. 3. Enter limited search criteria (i.e. city, zip code). a. Tip: entering less information is desired. 4. Click on the Find button. 5. The pharmacies that meet your criteria will appear. 6. Click on the pharmacy’s name to attach it to the patient’s account. 7. To add a pharmacy to your Favorites List or the Practice List, scroll down and enter a check in the box next to as many pharmacies as desired. a. Notes on pharmacies are as follows: i. Pharmacies open 24 hours are noted with a 24 next to their name. ii. Pharmacies that can accept electronic prescriptions are noted with an (E). Those which cannot will receive a fax through Rcopia. iii. “No fax” means that the pharmacy does not accept any faxes In addition to local pharmacies, scripts may also be sent to mail order pharmacies (Caremark, ESI, Medco etc.). These cannot be added to the patient’s account. If the patient has mail order eligibility, the pharmacy will be displayed on the Details Page beneath the local pharmacy. You will see a link for the mail order if it is available. The script may also be printed out and signed by the provider and given to the patient for mailing. 21 Medication History 1. Medication History is found on the Patient Summary Screen, located below the Medications heading. a. Medicaiton History will display up to 2 years of the patient’s prescribed medications. 2. Click on Medication History. a. Medication history is available for all patients whose insurance companies provide this information to Surescripts b. Patient medication information is displayed according to their primary insurance company’s records. If the patient has more than one insurance company, this information will be listed for selection in the Formulary drop-down list. 3. You can use the Obtain New Data drop-down list to choose the timeframe you wish the Medication History to display. a. Click on the Obtain New Data button to generate report against the parameters you just selected. 4. Adding to the Active Medication List a. Medications that are not currently on the patient’s active medication list can be added by adding a check in the box to the left of the medication’s listing and clicking on the Add Selected button. This will copy all of the medications information, to the patient’s active medication list. b. By clicking on the + sign, you can get detail records of the patient’s history. Additional Options There are many additional options available in the Rcopia application. Click on the Options link in the blue toolbar. A few of the provided Options are informational and a few have already been performed for your practice. We will mention those briefly: Configure Formularies – Rcopia is connected to Surescripts, so it automatically provides most formulary information regarding your patient’s insurance preferences. However, DrFirst does host some formularies and these need to be enabled within the application to be available for manually linking to patients. Favorite Prescription – allows users to add prescriptions to their favorites list (My List or Practice List) without being in a patient’s record or having to be in the Manage Meds section of the application. A current list of your favorite prescriptions is provided in the Favorites drop-down list. Note: You will be directed to Find a medication. Please reference the Prescribing a Medication portion of the manual for directions. 22 Pharmacy Data – This option allows the users to add or modify the practice’s pharmacy data list without having to be in a patient’s record. You will be directed to the same screen that was covered in the Pharmacy Information – Adding a Pharmacy section of this manual. Please refer to that section for use. F.A.Q. (Frequently Asked Questions) Eligibility and Formulary Q: “Why isn’t my patient’s insurance and formulary information being displayed in the dropdown menu? I entered the correct demographic information.” A: If formulary information is not displaying for your patients, (i.e. the display says “none”), there are a few possible causes: 1. The information doesn’t match what the insurance company has on file: double check that the patient’s information in your system matches the information on their insurance card. If it does match, we recommend that you ask if they have recently changed their address or insurance companies. For example, if you listed a patient as Bill and their legal name is William, then change the first name to reflect that. 2. The patient may be insured by a non-participating PBM/Insurance Company. Some payers are not yet sharing information electronically. Logging in Q: “I forgot my signature password” A: Contact ICANotes at (443) 569-8778 to get it reset. (Please have your credentials available as we will be verifying your information.) Prescriptions Q: “The drug I want to prescribe is not in the system. How can I add it?” A: DrFirst researches and incorporates new drugs into Rcopia every month at the end of the month. Please be patient, but if you do not see your drug in the system, you can send it through as a “Free Text Drug,” and/or send a add drug request to [email protected]. (Note: It is better to use a medication from the med list then to Free Text whenever possible in order to utilize the clinical alerts functionality.) Q: “The sig dropdowns don’t meet my needs. What should I do? A: DrFirst continually researches and develops new ways to make your time prescribing Simple, Powerful, and Fast. If the available dropdowns are not sufficient for the medication at hand, please use the “Directions to Patient” section and enter the sig as free text. This section functions the same as the dropdown sig does, but it gives the user more freedom to tailor the sig to match their specific directions. Please make sure you do not leave data entered in the dropdown SIG boxes and then put conflicting data in the “Directions to Patient” section. Q: “The pharmacy says that my prescription didn’t go through. What should I do?” A: There are a few reasons this may be the case: 23 1. 2. 3. First verify that the prescription has been sent. Go to the “Prescription Report,” or if it is for a single patient, go to “Select Patient,” find your patient, scroll all the way down to: “Pending Prescriptions for this Patient,” and make sure it is not still pending. Try and resend it. Many times when a script does not go through, it is because the pharmacy may have mishandled it during a “training error” (i.e. their machine was not set up correctly; they were out of ink or paper and in resetting their machine, all the incoming prescriptions were erased; some pharmacies still need to print out electronically-received prescriptions and can lose the print-out). If they still have not received the script and you have called to confirm, please contact DrFirst: a. On the Prescription Report of completed prescriptions, click “sent” next to the patient’s name and then click “Contact Us About this Prescription” on the upper right of the prescription image. If you cannot send us the message electronically, call ICANotes at 443-569-8778. Be sure to have the prescription handy. Customer Service will ask you questions about the script including the serial number, which can be found along the bottom. It will be an “AA-“ or “BB-“ number – example: AA-5555555. Q: “I got an alert/warning. What does this mean?” A: As you prescribe, the system will show you clinical and formulary alerts when applicable. Clinical Alerts: When you receive an alert in RED, this indicates a clinical alert. (Examples are: Drug/Drug Interaction, Drug/Allergy Interaction, Dose checking, and Duplicate Therapy.) *Note: It is very important to make sure the patient's medication list is accurate and up-to-date to receive complete clinical alert checking. Formulary Alerts: When you receive an alert in BLUE, this indicates a formulary alert. (Examples are: nonformulary drugs and drugs that offer a preferred alternative(s) with lower co-pay for the patient.) If you receive a formulary alert, you can switch to an alternative provided in the dropdown. Click the "Switch" button. Prescribe Anyway: You may also click the "Prescribe Anyway" button to continue to prescribe the alerted drug. o "Prescribe Anyway"- Creates the prescription despite the warning. o "Cancel"- Does not create the prescription and will return the user to the patient's homepage. This is used when the user decides not to prescribe the selected medication. Q: “There is a prescription I voided and it still shows up. How do I get rid of it?” A: Show Voided Prescriptions: To remove voided-prescription notifications, go to “Additional Options,” “Preferences—user,” go down to “Show voided prescriptions in reports,” and select “No.” To remove a voided medication that the patient HAS taken from the active medication list, click “stop” just to the right of the medication listing, and enter a reason for removing the drug from the active list. To remove a voided medication that the patient has NEVER taken from the active medication list, click “Manage Medications” on the blue menus at the top of the screen, and click “delete” to the right of the medication. Pharmacies Q: “I can’t find a pharmacy in DrFirst. How do I add/delete a pharmacy?” A: To add or delete a pharmacy: 24 Click the "Pharmacy" link in the patient demographics section to search for a new default pharmacy or click the "Change" link on the Enter Details screen of a prescription to change the pharmacy associated with that particular prescription. Choose a list from which to search. Note: DrFirst recommends using the “All Lists” option because that contains our entire nationwide list of pharmacies plus any pharmacies you have added to your Practice or Favorite List. You can set the default for which list you would like to search from under the "PreferencesUser" in the "Options" menu. When searching for pharmacies, less is more... If you fill out every field and something does not match, you will not get a result so try searching with, for example, only the State and ZIP code, or just the street name in the address but leave the “City” field blank. It is rare that the pharmacy is not in the database, but common that someone in a hurry adds it as a new pharmacy anyway – and prescriptions cannot go electronically (only by fax) to pharmacies added by the practice. Only after you are certain a pharmacy is truly not in the database, you may add a pharmacy by clicking “Add a new pharmacy to the practice list” and enter the required data. (ALERT: You will not be able to receive renewal requests electronically for pharmacies entered in manually into the system.) ***If you have any other questions or if you require additional assistance, please call ICANotes Customer Support at 443-569-8778 email us at [email protected]. 25