1
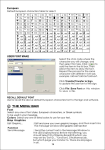
Oasis Owners Manual
ADVISORY
IMPORTANT INFORMATION
READ THE FOLLOWING INFORMATION CAREFULL Y BEFORE USING THIS PRODUCT
FOR OPTIMUM ADJUSTABLE BASE OPERATION, USE A GROUNDED, ELECTRICAL SURGE PROTECTION
DEVICE (NOT INCLUDED). FAILURE TO USE A SURGE PROTECTION DEVICE COULD COMPROMISE SAFETY
OR CAUSE PRODUCT MALFUNCTION.
ELECTRICAL RATING
Electrical components are rated for 100–240V, 50–60Hz, 1.5 amp.
ELECTRICAL GROUNDING
This product is equipped with a polarized or grounded electrical power cord. The power cord will only fit into a
grounded, electrical surge protection device (not included) or a grounded electrical outlet.
WARRANTY WARNING
Do not open any control boxes, motors or remote control devices (with the exception of the remote control and
power down box battery compartments). The product warranty will be void if these components are tampered with.
Do not attempt to alter component wiring or adjust or modify the structure of the product in any way or the
warranty will be void. Any repair or replacement of bed parts must be performed by authorized personnel.
LUBRICATION
This product is designed to be maintenance free. The lift motors are permanently lubricated and sealed—no
additional lubrication is required. Do not apply lubricant to lift motor lead screws or any nylon nuts or the base may
inadvertently creep downward from the elevated position.
PRODUCT RATINGS
The base lift motors are not designed for continuous use. Reliable operation and full life expectancy will be
realized as long as the lift motors do not operate any more than four (4) minutes over a forty (40) minute period, or
approximately 10% duty cycle. Note: Massage equipped bases are not designed for continuous, extended
massage operation. Massage systems are rated for a maximum of 2 hours of use within any 6 hour period.
Any attempt to circumvent or exceed product ratings will shorten the life expectancy of the product and may void
the warranty.
The rated weight restriction for The Oasis base is 700 lb (317 kg). The base will structurally support the
recommended weight distributed evenly across the head and foot sections. This product is not designed to
support or lift this amount in the head or foot sections alone. Note: Exceeding the recommended
weight restrictions could damage the base and void the warranty.
For best performance, consumers should enter and exit the adjustable base with the base in the flat (horizontal)
position. DO NOT SIT ON THE HEAD OR FOOT SECTIONS WHILE IN THE RAISED POSITION.
UL (Underwriters Laboratories) recognized components.
CFR 1633 approved for use with most mattresses.
Assembled in USA.
ii
Oasis Owners Manual - 4/2015
3
Table of Contents
Advisories
ii
Accessories
2
Installation:
Opening Box & Installing Legs
3
Battery Box
4
Retainer Bar
5
Joining Two Beds
6
Remote Control Syncing
7
Remote Contols
8
Headboard Brackets
9
Troubleshooting
10
Warranty
11-12
INSTALLATION
For Oasis Adjustable Base installation and setup, complete the numbered procedure
indicated below and on the following pages:
a.
1. Before discarding any packing materials,
check the shipping carton and
verify the following items are
included:
a. (4) Base Legs
b. Remote Control (batteries included with
wireless)
c. Mattress Retainer Bar (2) screws and (2)
brackets.
d. Power Cord (for Battery Power Box)
e. Battery Backup Pack (battery included)
b.
d.
c.
e.
OPTIONAL ACCESSORIES
SPLIT BED CONNECTORS (For King & California King bed)
Not included.
HEADBOARD BRACKET ASSEMBLIES (Optional)
Not included.
2
INSTALLATION
Step 1: Remove Box from Packaging and Install Legs
a. Lay shipping box flat on floor (top up) and open to remove adjustable base. Set all loose parts
to the side. Lift bed out of box by metal frame (do not pick up by upholstered sides) and set on
floor. *Always use 2 people to lift bed.
b. Install leg attachments by screwing them into the screw inserts on all four sides of the base (do
not over-tighten.)
a.
b.
3
INSTALLATION
Step 2 Battery Box
Open backup battery compartment and connect the 9 Volt battery (included) to
battery connectors and close. Connect the adaptor plug that is connected to the base
motor to the power cord and plug into battery box.
BATTERY BOX
BATTERY
COMPARTMENT
INSERT POWER CORD HERE
CONNECT
ADAPTOR
PLUG HERE
CONNECTED MOTOR CORD TO BATTERY BOX
4
INSTALLATION
Step 3: Install Mattress Retainer Bar
The mattress retainer is shipped attached to the bed upside down. To assemble, remove
screws and capture washers with tool (included) and remove the retainer bar from the base.
Re-insert screws and capture washers loosely and slide retainer bar upright over the screws
and under the washer and tighten.
MATTRESS RETAINER BAR - UPSIDE DOWN
MATTRESS RETAINER BAR - RIGHT SIDE UP
5
INSTALLATION
Step 4: How to Join Two Bases (Optional for King/California King set-up)
To join two split bases you will need to purchase the optional connector plate bracket to connect
both bases together from the manufacturer.
1. With the adjustable bases face down, loosen the four interior bed legs so that there is enough
room to slide the connector plate under them.
2. Start at the top of the bed and slide the connector plate in between the threaded leg bolts on bed
#1 and re-tighten legs to hold in place. Repeat Step 1 with bottom leg and turn both beds upright.
3. Lift up the top corner of bed #2 and slide the connector plate in between the leg bolt and turn to
tighten. Be sure to use the same slots as the #1 connector so that the bed is attached evenly. Repeat
Step 3 with bottom corner leg.
Slide one of the openings on the
connector bracket in between the
leg screw and tighten. Attach other
end of bracket to 2nd bed leg.
6
INSTALLATION
Step 3: Oasis Wireless Remote
The wireless remote is synced to the electronics controller at the factory. You
should not have to sync the remote to the controller. If, however, the remote is
not synced or becomes unsynced, follow the steps below:
● Hold both the “Head Up” and “Foot Up” buttons at the same time.
● While holding the “Head Up” and “Foot Up” buttons, press the “Reset
Coding” button on the controller (see figure below).
If two units are used together to create a single, split bed and you would like
one remote to operate both sides, both controllers must be synced to a single
remote. Follow steps above to sync the remote to both controllers.
RESET CODING
7
INSTALLATION
Step 6: Wireless Remote
Your remote is shipped pre-programmed to your bed settings. Insert the (3) AAA batteries
that are included into the wireless remote and press the head or leg up button to test the
power and functions.
Function
a.
POS 1 - TV Mode (Head side top position,
foot side flat position
b.
POS 2 - Zero Gravity (Foot side top position,
Head side flat position
a.
c.
POS 3 - Lounge - Head and foot top position
d.
HEAD - Head Up & Head Down
e.
FOOT - Foot Up & Foot Down
f.
SET - Use with P to program a favorite position
g.
Flat - One Touch Flat
h.
P - Use with Set to program a favorite position
i.
Intensity Up & Down (Massage Intensity)
J.
Speed Up & Down (Massage Speed)
k.
On/Off Head Massage
l.
On/Off Foot Massage
m.
1 (Pre-programmed massage #1 )
n.
2 (Pre-programmed massage #2 )
o.
3 (Pre-programmed massage #3 )
p.
Flashlight (Off & On)
q.
Undercarriage Lights (Off & On)
c.
POS 3
H
E
A
D
d.
b.
POS 2
POS1
f.
SET
F
O
O
T
e.
g.
FLAT
P
h.
j.
i.
ON
OFF
k.
m.
o.
l.
3
n.
2
1
p.
ON
OFF
q.
NOTE
THE REMOTE REQUIRES THREE (3)
AAA BATTERIES TO FUNCTION
8
INSTALLATION
Step 7: Headboard Brackets (Optional)
To attach a headboard to your adjustable bed you will need to order the optional
headboard brackets from the manufacturer.
1. Attach the bracket at the head of your bed to the adjustable base frame by inserting a
inserting a bolt into the long bracket slot and through the 2nd hole of the bed frame
(see Figure 1.)
2. Fasten bolt with a washer and nut and tighten with wrench.
(see Figure 2.)
What you will need:
A wrench
What’s Included:
2 Headboard
Brackets 2 Bolts
2 Washers
Figure 1
Figure 2
9
TROUBLESHOOTING
If your adjustable bed fails to operate, please review the problem you are having and look for a
solution below.
SYMPTOM
Wired remote control does not light up or is
not operating the base.
SOLUTION
1. Check to make sure that your adjustable bed is
plugged into the electrical outlet and is receiving power.
2. Your remote control may not be connected securely
to the motor. If loose, re-attach and try remote again.
Wireless remote control lights up, but is not
operating the base.
1. Check to make sure that your adjustable bed is
plugged into the wall outlet.
2. Your remote control may be un-synced from your
controller. To re-sync you must press the Head Up and
Foot Up button at the same time while pressing the
“Reset Coding” button on the controller (underneath
the bed).
3. Check motor connections at controller. If loose, reattach.
Wireless remote control does not light up.
1. Check batteries in remote to make sure that they
are installed properly.
2. Replace batteries in remote.
Massage motor noise seems excessively loud.
1. Check to make sure base is not contacting walls,
furniture, etc. that would cause noise or vibration.
2. If base is sitting on hard flooring (wood, tile, etc.),
place pieces of carpet or furniture pads under each leg.
3. If headboard bracket was installed, check to make
sure that hardware has been firmly tightened.
LED lights are not working
1. Check cable connections at LED lights and controller.
If loose re-attach.
10
LIMITED WARRANTY
ADJUSTABLE BED BASE
WARRANTY TERMS & CONDITIONS
Full 1-Year Warranty
Your adjustable bed base is warranted against defects in materials or workmanship for a
period of one year from the date of purchase by the original purchaser. This warranty is not
transferable. During this period the manufacturer will repair or replace, at no cost to the
original purchaser, any defective part or workmanship. During this one year period the
manufacturer will bear full responsibility for all authorized warranty related costs, including
labor and transportation costs incurred in connection with the repair or replacement of any
part found to be defective.
Limited 3 Year Warranty
Beginning one year from the date of original purchase through 36 months, from said date,
the manufacturer will replace any part on the adjustable bed base found to be defective.
Note: This limited warranty specifically excludes labor, shipping and transportation costs
which will be charged to the purchaser. This warranty is limited to the replacement of the
defective electrical/mechanical part(s).
20-Year Pro-Rated Limited Warranty
Beginning 37 months from the original purchase date through year 20 (month 240), the
manufacturer will replace, consistent with the terms and conditions set forth herein, the
adjustable bed base electrical/mechanical part(s) found to be defective as follows: Purchaser
shall pay 1/17 of the then current replacement cost of the defective part multiplied by the
number of years after the 3rd year, from the original purchase date. This warranty applies
only to the replacement of defective or electrical and/or mechanical parts. Purchaser will be
responsible for labor, transportation and shipping costs and any installation and service
fees or expenses.
All warranty claims are subject to verification by the manufacturer. This warranty will be null
and void if the product is subject to abuse, misuse or is otherwise operated in a manner not
consistent with this User Manual.
Limitation of Liability. Under no circumstances shall the manufactuer’s liability exceed the
purchase price paid by the original purchaser. Under no circumstances shall the
manufacturer be liable or responsible for claims seeking special, indirect or consequential
damages.
2-Year Floor Model Warranty
Your adjustable bed base floor model is warranted against defects in the electronic parts for
a period of two years from the date of purchase by the original purchaser. Subject to the
limitations set forth below, during this period the manufacturer will replace at no cost to the
original purchaser, any defective electronic part(s). Liability is limited to the replacement of
the defective electronic part(s) ONLY, with the purchaser responsible for all service,
installation and transportation costs associated with any warranty repair.
This limited warranty will be null and void if the warranty card or registration is not received
by HSM within one year of original date of purchase.
11
LIMITED WARRANTY
Note: Additional conditions apply concerning weight distribution. This warranty only applies
to original owner. This warranty will be modified where necessary to comply with state laws
that do not permit the exclusion or limitation of incidental or consequential damages. This
warranty is valid in all States within the United States, the District of Columbia, Puerto Rico,
and the 10 Provinces and 3 Territories of Canada. For customer service under this limited
warranty, please give notice to the manufacturer by mail, phone, email or online to the
addresses set out below:
For warranty claims: call or email Customer Service.Toll Free: 1-844-433-2435 or send an email
to [email protected]
PRODUCT RATINGS: The adjustable bed base lift motors are not designed for continuous
use. Reliable operation and full life expectancy will be realized as long as the lift motors do
not operate any more than five (5) minutes over a thirty (30) minute period, or approximately
10% duty cycle
Note: Massage equipped bases are not designed for continuous, extended massage
operation. Massage systems are rated for a maximum of 2 hours of use within any 6 hour
period. Any attempt to circumvent or exceed product ratings will shorten the life expectancy
of the product and may void the warranty. This warranty will be null and void if the product is
subject to abuse, misuse or is operated in a manner not consistent with the base's operating
instructions and User Manual.
12