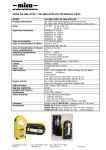
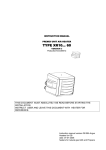
1
IMPORTANT CAUTION
Read these instructions before
switching on your lamp!!!
The life span of the accumulator amounts
between 2 days and 7 years and depends
on the user.
The batteries may not be opened !
The batteries can just be upgraded by the manufacturer !
The nonobservance of the following tips in the manual
can lead to damages to property, personal damages or
death!
The operating instructions are on the state 01.01.2014.
Technical changes are left.
The most topical changes are to be found
on the last side.
BEFORE THE FIRST USE
PLEASE REMOVE THE PROTECTIVE FOIL
ON THE GLASS OF THE LAMP HEAD
(OTHERWEISE THE LIGHT POWER IS LESS) !!!
-1-
www.TillyTec.de
Table of contents
1.
2.
3.
4.
5.
6.
7.
8.
9.
10.
11.
12.
12.
Instruction summary
Safety Advice
Operation and Handling
General Care and Usage Instructions
Using Light Heads
3.1 LED Lamp Heads
Advice on Using Battery Chargers
4.1 Battery Chargers TT-series / MPL-series
(not MPL 30010 , MPL 15010 and MPL 40010)
4.2 Charger for battery type 18650 LiCoMn
4.3 charging times
Adivces on using batteries
5.1 Using batteries
5.2 burning duration
spezial features
6.1. charging
6.2. protection cap
6.3. charging when using umbilical lamp
MPL 500 series
7.1. Introduction
7.2. Type of batteries
7.3. To change alkaline batteries
7.4. To change batteries (optional)
7.5. Types of MPL 500 torches
MPL - series and hand torches
8.1. Introduction
8.2. Type of batteries
8.3. To change batteries
8.4. To change alkaline batteries (optional)
8.5. Types of MPL – series handlamps
The new backupholder / backupbag from TillyTec
GOODMAN
10.1. Connection possibility
Mountig of the front lens for photograph or night dives
with all LED – heads
Place for own notes
technical news
3
4
5
5
6
7
7
8
9
10
11
11
11
12
13
13
13
13
14
14
15
15
15
16
19
19
20
21
23
Date: 01.01.2014
-2-
www.TillyTec.de
INSTRUCTION SUMMARY
Which torch have I bought ?
Light head
Appellation of battery system
Comparable
output in
halogen
watts
light power
in Lux
(approx.)
MPL 9010
approx. 30
approx. 9000
MPL 18005
approx. 40
approx. 18000
MPL 15010
approx. 60
approx. 15000
MPL 30010
approx. 85
approx. 30000
MPL 40010
approx. 130
approx.40000
MPL UV 1
no value
no value
MPL 1000
approx. 60
approx. 15000
MPL 1500
approx. 85
approx. 13000
MPL 4500
approx. 130
approx. 40000
LED 1500
approx. 85
approx. 30000
LED 1800
approx. 75
approx. 25000
LED 4500
approx. 175
approx. 50000
LED 3000-S3
approx. 175
approx. 50000
TT1
TT2
TT3
MPL1
If using the letter “V” it is the video version of the torch
Purchase Date ?
................................................................................................
HOTLINE (24 h 7 days ) : +49 (0) 171 742 52 21
Stand : 01.01.2014
-3-
www.TillyTec.de
Safety Advice
•
•
•
•
•
•
•
•
•
•
•
•
•
•
•
•
•
•
•
•
•
Before using the torch, ensure that you read and understand the safety advice leaflet so that
the torch is always operated correctly.
Never point the light beam at your or other persons eyes. Doing so could damage the retina.
Keep the torch away from children.
Never attempt to take the torch apart unless it is specifically directed in the operating
instructions. Doing so can result in severe injuries and electric shocks. Servicing of internal
components, servicing or repairs have to be carried out by qualified persons, authorized by
the manufacturer.
If smoke or steam appears, switch off the mains or battery supply immediately. Disconnect
the torch head from the battery and remove the charger from the socket..
Do not touch the charger’s power cable with wet hands as there is danger of an electric shock
or short circuit. To disconnect, depress the catch on the connector whilst withdrawing it from
the charging adapter plug. Do not disconnect it by pulling on the cable.
To prevent overheating, damage, fires, electric shocks or other dangers only use the charger
and attachments supplied.
Keep the torch and battery pack away from open fires or sources of heat as it could lead to
overheating, fires, electric shocks and explosions and cause severe injury.
Never attempt to change or take apart the battery pack. To do so could lead to injury by
explosion.
Do not drop the batteries or battery packs and protect them from impact. Damage could result
in leakage of the battery chemicals and result in injuries.
Clean with water all areas of the body (especially mouth and eyes) or clothing that come in
contact with battery chemicals.
Never short across the battery contacts with metal objects (e.g. key rings, screwdrivers etc) as
this could result in overheating and to burns and other injuries.
After charging disconnect the charger from the battery pack and the mains socket to avoid
fires or other damage.
The charger supplied with the torch has been developed for use exclusively with the torch and
battery pack. Do not use it with other products or batteries as this could result in fires or
damage.
Use and store the torch, battery pack and charger away from exposure from heavy solar
radiation or high temperature (e.g. the dashboard or the boot of a car etc.). Heavy solar
radiation and heat can lead to leakage, overheating or explosion of the batteries which can
result in fire other damage.
While charging the battery pack keep it in a well ventilated area.
Charge the battery pack at room temperature.
If the batteries become too warm, cease charging immediately. Normal temperature is slightly
higher than “hand-hot“ ( +/- 50 degree )
Let the batteries cool down after charging.
Use the torch, battery pack and accessories only when diving. Using the products or other
component parts for other purposes is not allowed.
For enquiries please contact the TillyTec hotline at any time on 0049 171 742 52 21 or
contact your local specialist retailer.
Date: 01.01.2014
-4-
www.TillyTec.de
1.
Operation and Handling
•
•
2.
To turn your torch on, rotate the torch head. A half revolution is sufficient to engage the
contacts. Further rotation when switching off is not a problem as the system is protected
with 3 O-rings, however it should be stopped when the first O-ring is visible.
When transporting your torch, unscrew the torch head and carry it separately. Protect the
ends of the torch head, battery pack and umbilical cable with the caps provided.
(see point 6)
General Care and Usage Instructions
•
•
•
•
•
•
•
•
The O-rings (sealing rings) should only be removed if they require replacing.
Lubricate the O-rings occasionally with a smear of silicone grease. Please do not apply to
much grease. Do not use silicone spray !
Regularly inspect the O-rings for damage or contamination, and change them if necessary.
We recommend that you carry spare O-rings.
The torches can be operated out of water for a short time, however they will become very
hot very quickly so do not leave unattended. Only operate until the torch head becomes
warm.
After use rinse the torch thoroughly with fresh water whilst still attached to the umbilical and
battery pack. Never use any other cleaning agents.
Recharge the battery as soon after use as possible to ensure a full battery lifespan. Partial
charging will not damage the batteries or reduce their lifespan. The lifespan also depends on
how fast the accumulator will charged.
The battery pack must not be opened unless the battery requires replacing.
When the torch head is removed, the battery pack and the umbilical cable are not
waterproof. If you wish to dive the battery pack or umbilical without the torch head you must
use an accessory blanking plug and screw it into the open ends.
Date: 01.01.2014
-5-
www.TillyTec.de
3.
Using Light Heads
3.1
LED Lamp Heads
•
•
•
•
•
•
•
•
Our LED torches can be operated out of water for a short time. Only operate until the
torch head becomes warm.
Longer operation out of water will overheat and destroy the LED.
Switch the torch off immediately if it is too hot to touch.
As the battery reaches full discharge the light emitted darkens. If the light fades the torch
must be switched off immediately to prevent over-discharge. It does not automatically
switch off.
Do not shine the torch into your eyes or the eyes of others as severe damage to the retina
could result.
All LED modules can be equipped together.
IMPORTANT INFORMATION WHEN USING ALL KIND OF LED LIGHT HEADS :
- The front checkered adjusting ring of all models must not be rotated when
under water.
- Turning the adjusting ring will result in immediate destruction of
the LED bulb.
IMPORTANT INFORMATION WHEN USING LIGHT HEADS WITH UV:
DO NOT SHINE THE TORCH INTO YOUR EYES OR THE EYES OF OTHERS !
OTHERWISE THE RESULT IS NET SKIN COMBUSTION AND GOING BLIND !
Date: 01.01.2014
-6-
www.TillyTec.de
4.
Advice on Using Battery Chargers
4.1
Battery Chargers TT-Series / MPL-series (not MPL 30010 und 15010 und 40010)
•
•
•
•
•
•
4.2
•
Always connect the charger to the battery first, and then plug in the charger. Never
reverse this procedure.Charger input voltage range : 90 – 240 Volt (automatically
detected).
Screw the adapter connector into the battery pack end (see point 6)l, then plug in and
switch on at the socket.
The charger has LEDs with the following functions:
o
red = fast charging
o
green = battery is fully charged 100 % (overloading no possible)
After charging is completed, switch off and unplug the charger from the mains supply first,
then disconnect the lead from the adapter. Finally unscrew the adapter from the battery
pack.
The charger can be used to top up a partially discharged battery with no adverse effects.
Fully discharging a partially used battery is not necessary.
Recharging the batteries during the surface interval between dives is recommended
especially if long duration and/or frequent dives are being undertaken. This is particularly
useful where larger battery packs are being used which require extended recharge times.
Important: Battery charging must be undertaken in a dry protected environment.
The correct voltage as specified for each charger must be adhered to.
Charger for battery type 18650 LiCoMn
Please read the user manual inside the charger.
Important: Battery charging must be undertaken in a dry protected environment.
The correct voltage as specified for each charger must be adhered to.
ONLY BATTERY TYPE 18650 AND TYPE LiCoMn charge with this charger!
By using of other cells exists danger of explosion !!!
IMPORTANTLY
TILLYTEC has developed the battery technology during the last years.
So it happened that different chargers are used for different battery types
(NiMh, LiFe, LiCoMn). Theese chargers do not differ optically! Please
NEVER!!! exchange the chargers together. Always pay attention to the
fact that the charger fits to the battery type. The chargers are marked on
the front. Should the marking not be recognize any more please contact
with TillyTec. Otherwise the use of the wrong charger leads to the
immediate destruction of the battery or an explosion!!!!!
Date: 01.01.2014
-7-
www.TillyTec.de
4.3.
charging times
batteries
Charging times in min
Single cell
18650 LiCoMn
approx. 120
MPL1
approx. 180
TT 1
approx. 100
TT2
approx. 200
TT 3
approx. 180-300
Important : The charging time raises during the first 30 – 50 charging cycles. In this time
the battery becomes formated.
We recommend during the charging cycles to leeve the charger connected to the battery
over night (about 12 hours). Without this charge cycling, full charge cannot be reached
resulting in reduced burn duration.
Date: 01.01.2014
-8-
www.TillyTec.de
5.
Adivces on using batteries
5.1. Using batteries
•
•
•
•
•
•
•
•
•
The batteries we use lose their charge only for a minimum when stored. Fully
charged batteries will require recharging before use after 12 months.
If recharging after storage do not pre-discharge the batteries. The charger will
detect the remaining capacity in the batteries and will compensate during the
charging cycle.
After each use the batteries should always be fully recharged.
Discharges until end of capacity of battery (100 % ) reduce the lifespan of battery.
The lifespan of the batteries depends very much on how often they are used.
The lifespan of the batteries depends very much on, how long the batteries are
using with one charging period (example : The battery is charged and will
discharged until 30 % of capacity, then the lifespan is much more higher than
discharging until 70 % !).
If an umbilical lamp is used, the charging about the umbilical is generally possible.
However, we recommend exclusively the charging directly about the accumulator
tank (charging plug screw in the accumulator tank, remove the umbilical).
If you charge with umbilical, the room / outside temperature should not be lower
than 20 ° degrees.
We recommend only the use of original batteries from TillyTec. By application of
other battery cells the guarantee is not given. We also point out to the fact that
with using of other battery cells the given light achievements as light power,
burning duration and loading times are not valid!
The battery may be never damaged ! If damages are recognised never use it any
more !!!
Date: 01.01.2014
-9-
www.TillyTec.de
5.3
Burning duration
light head
Burning duration in min
MPL 9010
MPL 18005
UV1
MPL 9010
MPL 18005
UV 1
MPL 30010
MPL 15010
MPL 1
TT1
TT2
TT3
approx.
540-600*
x
x
x
approx.
180-600*
x
MPL 15010 (V)
MPL 30010 (V)
x
approx.
60-90
x
x
x
x
MPL 40010 (V)
x
approx.
45-60
x
x
x
x
MPL1000 (V)
MPL 1500 (V)
x
x
approx.
120-240
x
x
x
approx.
80-150
x
x
x
MPL 4500 (V)
LED 1500 (V)
x
x
x
approx.
120-240
approx.
180-300
approx.
420-600
LED 1800 (V)
x
x
x
approx.
60-120
approx.
90-150
approx.
210-300
LED 4500 (V)
x
x
x
approx.
60-90
approx.
90-120
approx.
180-220
LED 3000-S3
x
x
x
approx.
60-90
approx.
90-120
approx.
180-220
Using with alkaline
batteries
standard delivery
with TT1 - series all possibilities
* green value = recommend burning time for optimal lifestime of battery
red value = maximum burning duration with using of the emergency light
(V) = videoversion
Stand : 01.01.2014
-10-
www.TillyTec.de
6.
spezial features
6.1.
charging
Screw the adpater
connector, attach the cable,
then plug in and switch on
the socket
6.2.
protection cap
The protective cap fits onto the thread on the torch head and the battery
pack. Only one cap is needed.
6.3.
charging when using umbilical lamp
If an umbilical lamp is used, the charging about the umbilical is generally possible.
However, we recommend exclusively the charging directly about the accumulator
tank (charging plug screw in the accumulator tank, remove the umbilical).
If you charge with umbilical, the room / outside temperature should not be lower than
20 ° degrees.
Date: 01.01.2014
- 11 -
www.TillyTec.de
7.
7.1.
MPL 500 series
Introduction
To turn your torch on, rotate the torch head. A half revolution is sufficient to engage the
contacts. Further rotation when switching off is not a problem as the system is protected
with 3 O-rings, however it should be stopped when the first O-ring is visible.
Please, unscrew the lamp head during the diving and transport a little further. (when the
first of all three O-ring is visible). With it it is avoided that the lamp intervenes in water or
in the luggage.
In addition the lamp further protect with a carabine on the jacket. For this the hole (DIR style)
can be used at the end of the handle.
With the light LED light do not shine in own eyes or in the eyes of other people, there is
danger of the net skin combustion. (Damage of the eyes)
Lubricate the O-rings and the thread of both ends occasionally with a smear of silicone
grease in regular time (all 6 - 8 weeks). Please do not apply to much grease.
Do not use silicone spray be suited for rubber rings and for thread ! If use other kind of
smear destroys the rubber rings.
The lamp can use out of water.
7.2.
Type of batteries
long version :
standard
3 x AA Alkaline Batterie
optional
3 x battery typ AA NiMh
3 x AA 1.5 volt Lithium battery
short version :
optional
1 x battery 3.2 volt LiFe 18650 or 3.7 volt LiCoMn 18650
1 x 3.7 volt LiMn 18650
1 x 3.2 volt CR 123 possible, please ask
In the short version is only possible the use of a battery LiFe 18650 or LiCoMn 18650.
Please use only 18650 LiFe or 18650 LiCoMn battery - use never Li-Ion 18650
batteries.
There is a danger of expolsion if using of Li - Ion batteries !!!!
Please notice that the light power is easily reduced if using battery LiFe 18650. This is
absolutely normal. The best light powr is reached with 3 x AA batteries NiMh and 18650
LiCoMn battery.
Attention: The use of 2 pieces of battery LiFe 18650 or LiCoMn 18650 in the
long pipe (long version) leads to the immediate destruction of the LED !!!!!!
We recommend the use in the long version with 3 x 1.5 volts alkaline batteries or in the short
version with 1 x battery LiFe 18650 or LiCoMn 18650.
The optional sets 3 x AA NiMh batteries and charger and 1 x battery LiFe 18650 or LiCoMn
18650 and charger are available with TillyTec. Please ask !
Date: 01.01.2014
- 12 -
www.TillyTec.de
7.3.
To change alkaline batteries
The pluspol of alkaline battery is in the direction of lamphead, not bottom. The minuspol
is in the direction of the bottom of handle.
The pluspol of alkaline battery above is compared with the pluspol in the middle of LED
light head. ( pluspol in the middle = plus, external ring = minus ).
7.4.
To change batteries (optional)
The pluspol of battery is in the direction of lamphead, not bottom. The minuspol is
in the direction of the bottom of handle. The battery should never be damaged. If
damages are recognised this battery never use any more.
7.5.
Types of MPL 500 torches
In the series MPL 500 there are :
MPL 500 - 9000 - 10
approx. 500
Lumen (theoretically possible according to data sheet)
approx. 9000
Lux (light power in Lux measured in 1 meter distance)
ca.10
degrees beam angle 10°
MPL 500 - 18000 - 5
approx. 500
Lumen (theoretically possible according to data sheet))
approx. 18000
Lux (power in Lux measured in 1 meter distance)
approx.10
degrees beam angle 10°
MPL – UV (UV-Lampe)
IMPORTANT !!!
For all light heads of MPL-series is possible to use the MPL1 – battery.
In combination with the battery MPL1 the lamp is only used as a tank lamp.
The use of the lamp heads of the MPL-series with the battery MPL1 extends
the burning duration considerably !
Date: 01.01.2014
-13-
www.TillyTec.de
8.
8.1.
MPL series and hand torches
Introduction
To turn your torch on, rotate the torch head. A half revolution is sufficient to engage the
contacts. Further rotation when switching off is not a problem as the system is protected
with 3 O-rings, however it should be stopped when the first O-ring is visible.
Please, unscrew the lamp head during the diving and transport a little further. (when the
first of all three O-ring is visible). With it it is avoided that the lamp intervenes in water or
in the luggage.
In addition the lamp further protect with a carabine on the jacket. For this the hole (DIR style)
can be used at the end of the handle.
With the light LED light do not shine in own eyes or in the eyes of other people, there is
danger of the net skin combustion. (Damage of the eyes)
Lubricate the O-rings and the thread of both ends occasionally with a smear of silicone
grease in regular time (all 6 - 8 weeks). Please do not apply to much grease.
Do not use silicone spray be suited for rubber rings and for thread ! If use other kind of
smear destroys the rubber rings.
The lamp can use out of water.
8.2.
Type of batteries
Long version :
optional version
3 x AA NiMh batteries 1,2 Volt
3 x alkaline battery 1,5 Volt
3 x AA 1,5 Volt lithium battery
Short version :
standard version
1 x battery 3,7 Volt LiCoMn type 18650
optional version
1 x battery 18650 LiFe 3,2 Volt
1 x 3,7 Volt LiMn battery type 18650
1 x 3,2 Volt CR 123 , possible please ask
In the short version is only possible the use of a battery LiFe 18650 or LiCoMn 18650.
Please use only 18650 LiFe or LiCoMn 18650 battery - use never Li-Ion 18650
batteries.
There is a danger of expolsion if using of Li - Ion batteries !!!!
Please notice that the light power is easily reduced if using battery LiFe 18650. This is
absolutely normal. The best light powr is reached with 3 x AA batteries NiMh or 18650
LiCoMn battery.
Attention: The use of 2 pieces of battery LiFe 18650 or LiCoMn 18650 in the
long pipe (long version) leads to the immediate destruction of the LED !!!!!!
We recommend the use in the long version with 3 x 1.5 volts alkaline batteries or in the short
version with 1 x battery LiFe 18650 or LiCoMn 18650.
The optional sets 3 x AA NiMh batteries and charger and 1 x battery LiFe 18650 or LiCoMn
18650 and charger are available with TillyTec. Please ask !
Date: 01.01. 2014
- 14 -
www.TillyTec.de
8.3.
To change batteries
The pluspol of battery is in the direction of lamphead, not bottom. The minuspol is in the
direction of the bottom of handle. The battery should never be damaged. If damages are
recognised this battery never use any more.
8.4.
To change alkaline batteries (optional)
The pluspol of alkaline battery is in the direction of lamphead, not bottom. The minuspol is
in the direction of the bottom of handle.
The pluspol of alkaline battery above is compared with the pluspol in the middle of LED
light head. ( pluspol in the middle = plus, external ring = minus ).
5.5.
Types of MPL – series handlamps
In the MPL - series handlamps there are :
MPL 1000 – 15000 - 10
approx. 1000
Lumen (theoretically possible according to data sheet)
approx. 15000
Lux (light power in Lux measured in 1 meter distance)
ca.10
degrees beam angle 10°
MPL 1500 - 30000 - 10
approx. 1500
Lumen (theoretically possible according to data sheet))
approx. 30000
Lux (power in Lux measured in 1 meter distance)
approx.10
degrees beam angle 10°
MPL 4500 - 40000 - 10
approx. 4500
Lumen (theoretically possible according to data sheet))
approx. 40000
Lux (power in Lux measured in 1 meter distance)
approx.10
degrees beam angle 10°
IMPORTANT !!!
For all light heads of MPL-series is possible to use the MPL1 – battery.
In combination with the battery MPL1 the lamp is only used as a tank lamp.
The use of the lamp heads of the MPL-series with the battery MPL1 extends
the burning duration considerably !
Date: 01.01.2014
-15-
www.TillyTec.de
9. THE NEW BACKUPHOLDER / BACKUPBAG FROM TILLYTEC
We identify that the backup bag we used before looked very nice and made a nice impression but nobody used it.
So we decided to create a new one. Now you can use it to mount the MPL-series (series MPL 500 and series
MPL 1500) directly on the BCDs.
Here a short information :
So the new backup holder looks.
Here you can see the holder with the lamp.
picture 1
Once again the holder without lamp.
picture 2
step 1 :
Please open the booth ends of holder.
picture 3
Stepp 2 :
You mount the holder on the BCD. It is possible to do it on
different places. Here you can see the mounting on the strap of
the BCD.
picture 4
Date: 01.01.2014
-16-
www.TillyTec.de
ready mounted without lamp
picture 5
ready mounted with lamp
picture 6
Date: 01.01.2014
-17-
www.TillyTec.de
step 3 :
Push the lamp in the holder.
The holder is made of elastic band and so it is flexible.
To push the lamp better in holder pull on the blue band.
picture 7
IMPORTANT :
Mount the lamp in addition with a karabiner on the
D-ring of BCD !!!
picture 8
You can mount the holder in different directions
on the BCD.
Here : The lamp pushes into the holder from
below - the light
head shows downwards.
OR
The lamp pushes into the holder from the top the light
head shows upwards. See picture 6.
picture 9
Date: 01.01.2014
-18-
www.TillyTec.de
10.
GOODMAN
The goodman has a band made from stainless steel to mount the light head.
The goodman is universal and suits to all light heads of TillyTec.
10.1. Connection possibility
The provided tube pull on the light head. The tube is a slide protection between light head and the
small clamb. Please fix the light head in the band made from stainless steel than pull it strongly.
After solve the band made from stainless steel the lamp head can be removed again from the clip.
Band made from stainless steel
Clip for light head
The changing of the goodman to a soft goodman is not planned normally.
If you need it please contact with TillyTec directly!
Date: 01.01.2014
www.TillyTec.de
- 19 -
www.TillyTec.de
11. Mountig of the front lens for photograph or night dives
O-ring
Delivered front ring with inside
lying one rubber ring.
Here the ancillary lens is
completely mounted on the
LED lamp head.
From the front thus it looks with the frosted
glass.
TIP: The frosted glass can clatter a little. This
must be in such a way, so that the water is
able behind the glass out and purely.
The ancillary lens has a drilling to
fasten e.g. a carabiner there as a
protection from loss of the ancillary
lens.
Important : You see on the picture a
red rubber ring. This red rubber ring
is no more mounted and not
necessarily.
ATTENTION (only with small front ring - not LED 4500 / LED 3000-S3):
In the scope of supply 3 rubber rings are included.
It is necessary, to change the rubber ring, if the intention with the mounted
one rubber ring on the lamp head does not fit.
The insert rubber rings have different strength.
Date: 01.01.2014
- 20 -
www.TillyTec.de
12. Place for own notes
-21www.TillyTec.de
-22-
www.TillyTec.de
13. technical news
-23-
www.TillyTec.de
-24-
www.TillyTec.de