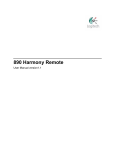
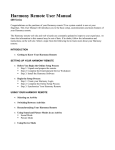
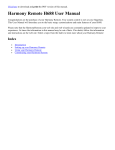
1
Harmony Remote User Manual
March 25, 2003
Harmony Remote H768 User Manual
This User Manual introduces you to the main features of your Harmony Remote H768. Please note
that the HarmonyRemote.com web site and web wizards are constantly updated to improve your
experience. At times the information in this manual may be out of date. If in doubt, follow the
information and instructions on the web site. Select a topic from the Index to learn more about your
Harmony Remote H768:
If you did not find what you were looking for, contact us.
Index
l
l
l
l
l
Introduction
Setting up your Harmony Remote
Using your Harmony Remote
Customizing your Harmony Remote
Interacting with your entertainment
Harmony Remote User Manual
March 25, 2003
Introduction
The Harmony Remote is an internet powered universal remote. For the first time you will be able to
control your home entertainment devices as a system, not as a collection of components.
To configure your Harmony Remote, answer web wizard questions to create your own personal
Harmony configuration. The web wizards allow you say how you have set up your home
entertainment components, and what your preferences are.
Your Harmony Remote can control most devices that understand infrared (IR) signals. If one of your
devices is not in the HarmonyRemote.com database, the web wizard will learn about your device and
will automatically add it to the database.
At the end of the setup process, you will have your own configuration loaded onto your Harmony
Remote and your own personal Harmony Member home page. Come back to your Member home
page as often as you like to customize all of your Harmony Remote’s features, to update your
interactive television listings, to explore your Zap links, or to add new entertainment devices.
How is the Harmony Remote H768 different?
The Harmony Remote H768 has fewer buttons than many other remotes. This is because the
Harmony Remote takes care of many tasks automatically. For example, you do not need a separate
button to choose between controlling your TV or your VCR. With the Harmony Remote, you say what
you want to do (e.g. Watch a Videotape) and the Harmony automatically controls your TV and your
VCR at the same time! You do not have to program any macros to achieve this level of automated and
simple control.
The ways that you interact with your entertainment system are grouped into Activities. Each Activity
controls just those devices that are needed. For example, in the "Watch a Videotape" Activity example
above, the Harmony Remote controls the television and VCR together.
Harmony Remote User Manual
March 25, 2003
There are two buttons and a scroll wheel on the right hand side of your Harmony Remote. The scroll
wheel can be rotated with your thumb or finger to view options on the LCD screen. The scroll wheel is
also a Select button. Press it on your Harmony Remote to feel it click. This is used to select options
that you see on the LCD screen. The oval button below the scroll wheel generally changes to a new
Mode, Cancels a selection, or Exits a sub-menu.Take a moment to find these buttons in the picture,
and on your Harmony Remote.
Harmony Remote showing side LCD control buttons.
-
-
-
-
-
-
-
-
-
Scroll & Select
Change Mode / Cancel
-
-
-
Smart State Technology
Smart State Technology TM is what allows the Harmony to command your entire entertainment system
with just one touch. For example, when you select an Activity (e.g. "Watch a DVD"), the Smart State
TechnologyTM instantaneously evaluates the current state of all your individual components and then sends the
appropriate commands for perfect configuration. In other words, the Harmony will turn on your TV,
DVD and receiver, set the inputs, and even start the DVD playing. With Smart State TechnolgoyTM, you will
never need to program macros to control your system simply and perfectly.
If your Harmony Remote gets out of sync with your entertainment devices, press the Help
button. For more information, read the "Using your Harmony Remote" chapter in this
manual.
Harmony Remote User Manual
March 25, 2003
Activities
When your entertainment system is off, your Harmony Remote shows the main menu on its LCD
screen. The main menu shows which Activities you can enjoy. Different homes have different
entertainment devices, so your Harmony will only show you the Activities that are relevant to you!
Modes
Once you have selected an Activity to enjoy, your Harmony's LCD screen will show options that are
available for that Activity. The functionality of the buttons on your Harmony is also tailored to the
Activity.
Some Activities have more than one Mode. Press the side button (below the scroll wheel) to change
Modes. In each Mode the buttons on the Harmony Remote may have slightly different functions, and
the LCD screen may show different commands. For example, when you watch a DVD, you can change
between Play Mode and Navigate Mode. In Play Mode the number buttons send the corresponding
numbers to your DVD player. In Navigate Mode, the numbers 5 (Up), 0 (Down), 7 (left), 9 (Right)
control the cursor on your DVD's onscreen menu, and the 8 (select) button selects an onscreen option.
Harmony Remote User Manual
March 25, 2003
Setting up your Harmony Remote
Step 1: Create a new User account
Enter information about yourself, such as your address and zip code. This information is used to
determine which antenna, cable or satellite channels are available in your area.
Step 2: Answer web wizard questions about what devices you want to control as a
system
This step is best performed by someone in your household who is familiar with your entertainment
system. The web wizard will ask you questions about the make and model of your entertainment
devices.
If your device model number is not in the HarmonyRemote.com database, you have the option of
choosing a compatible device, or setting up the device you own. We recommend that beginners select
a compatible device to start. This will get you up and running faster. Later you can come back to your
Member Home Page, and tweak the functionality of the device you chose.
At times the wizards will ask you to press buttons on your current remote controls to identify infrared
languages or teach infrared commands. This will allow your Harmony Remote to determine which
infrared languages and commands control your entertainment devices. Gather all of your current
remote controls and bring them to your computer. For more details on the best way to teach infrared,
please read the "Customizing your Harmony Remote" chapter in this manual.
Step 3: Answer web wizard questions about how you have set up your entertainment
devices
As described in the previous chapter, your Harmony Remote organizes functionality into Activities.
The web wizard will ask you questions about how your entertainment devices are connected so that
appropriate Activities can be created and automatically configured.
The web wizard not only creates a configuration that is perfect for your entertainment system, but also
for your preferences. Therefore there will also be questions related to your favorite channels, channels
you would like to hide, etc.
Update your Harmony Remote with your configuration
Once you have finished answering the questions, the wizard compiles a configuration that is then
downloaded from the Internet to your computer. From there it is transferred to your Harmony Remote's
memory via the USB cable. Your Harmony contains Flash memory to store your configuration, so it is
never lost, even if you take out the batteries.
Whenever you wish to make changes (such as when you buy a new entertainment device),
simply logon to your Member Home Page at HarmonyRemote.com and update your Harmony
Remote with the new configuration.
Keep in mind that because everyone's entertainment devices are different, the wizards may not get
Harmony Remote User Manual
March 25, 2003
things exactly right the first time. That's ok. Just go back to your Member Home Page and tweak the
settings, or run one of the setup wizards again. Update your Harmony Remote with the new
configuration and try again.
Something to remember is that whenever your configuration file is transferred to your Harmony
Remote's memory, all of your TV listings are transferred as well. This transfer can take a few minutes
depending on how many channels are transferred.
Harmony Remote User Manual
March 25, 2003
Using your Harmony Remote H768
Important: Please read before using your Harmony Remote for the first time.
After your Harmony Remote has been programmed for the first time you must synchronize it with
your entertainment devices. This will tell the Harmony Remote which devices are on and off, and what
their inputs are set to. You will only have to do this the first time that you try an Activity. From then
on your Harmony Remote will rememeber these settings and will control all of your entertainment
devices for you.
Synchonization Steps:
1. Start by turning off all of your entertainment devices by hand or with their original remote
controls (you can put them away after this because you shouldn't need them again).
2. Use the scroll wheel on the side of your Harmony Remote to choose an Activity you would like
to try (see below for more details on how to select Activities).
3. If your Harmony Remote did not seem to turn on the correct devices for that Activity, or if an
input or setting is not correct (for example, you do not see a picture on your TV or hear sound)
press the Help button on your Harmony Remote. Answer the questions on your Harmony
Remote's LCD screen by selecting Yes or No with the scroll wheel. This will synchronize the
Harmony Remote with your entertainment devices.
4. Press the Harmony Remote's power button to turn off your entertainment system.
5. Repeat steps 2 to 4 to try other Activities.
6. After you have tried each Activity (and used Help if necessary), if your Harmony Remote is not
controlling your entertainment system as you expect it to, then return to your Harmony Member
home page. Click on the "Troubleshoot" button and the Troubleshooting web wizard will help
you find the problem and make the necessary changes to get all of your Activites working
perfectly.
Harmony Remote User Manual
March 25, 2003
Selecting an Activity
When your entertainment system is turned off, your Harmony Remote LCD display shows Activities
that you can enjoy. The Harmony Remote only displays Activities that you have set up for your
entertainment system. The picture below shows some of the Activities that you may have set up.
Scroll and select an Activity
-
-
-
-
-
-
-
-
Select Fav. Activity
-
Resynchronize
Scroll & Select Activity
Cancel
-
-
-
To select an Activity that you wish to enjoy, simply rotate the scroll wheel with your thumb until you
see the Activity on the LCD screen. Then press the scroll wheel in to select the Activity (you will feel
it click). The Harmony Remote will send all the appropriate commands to your entertainment system
so that it is configured for that Activity. For example, if you have a television and a satellite receiver,
the Harmony Remote will turn on your television, turn on your satellite receiver, and set your
television to the correct input.
When your entertainment system is off, press the Power button to quickly select your favorite
Activity. By default this is the “Watch Television” Activity. You can use this tip to explain
quickly to friends, relatives, or the baby sitter how to turn on your entertainment system and
start channel surfing.
Harmony Remote User Manual
March 25, 2003
Changing Activities
To change to a different Activity, simply press the POWER button once. The LCD screen will prompt
you to "Press the POWER button again to switch off your entertainment system, or scroll for more
options". Rotate the scroll wheel with your thumb until you see the desired Activity on the LCD
screen. Then press the scroll wheel in to select the Activity. The Harmony Remote will send all the
appropriate commands to your entertainment system so that it is configured for that Activity.
An alternative method of changing to a different Activity is to use the Mode/Cancel button to switch
into Control Mode. Once in Montrol Mode you can use the scroll wheel to select the "Change
Activity" menu item and the use the scroll wheel again to select the desired Activity. The Harmony
Remote will send all the appropriate commands to your entertainment system so that it is configured
for that Activity.
Status Light
The green status light located at the top of your Harmony Remote blinks or shines at various times to
remind you that your Harmony Remote is sending infrared commands to your entertainment devices.
So if you use your television, stereo receiver and DVD player to watch DVDs, when you select "Watch
a DVD" the status light may stay on for 3 to 5 seconds.
Make sure that you keep your Harmony Remote pointing at your entertainment devices while
the green status light is on.
Resynchronizing
From time to time when you select an Activity, your system will not be configured perfectly. This can
happen when the Harmony Remote is sending many infrared commands to set up all your devices for
an Activity, and some of the commands are not received by one or more devices. The Harmony
Remote is then "out of sync" with your devices because it thinks one of your devices is on, for
example, but it is still turned off. These are some of the reasons why the Harmony Remote can get out
of sync with your system when selecting an Activity:
l
l
l
l
Someone walks between the Harmony Remote and your entertainment system while the red
status light is on
You point your Harmony Remote away from your system while the red status light is on
There is an object blocking the line-of-sight between your Harmony Remote and the system
You are very far away from your entertainment system
Before resynchronizing, make sure the cause of the problem has been addressed. For example,
remove all obstructions so that the infrared commands that the Harmony Remote sends can be
received by the entertainment devices.
To resynchronize, press the Help button. The Harmony Remote will ask you a series of questions such
as "Is the Television On?" and "Is the Stereo Receicer set to the DVD input?". Answer the questions
on your Harmony Remote's LCD screen by selecting Yes or No with the scroll wheel. When you're
done, the Harmony Remote will be back in sync with your devices.
Harmony Remote User Manual
March 25, 2003
If after answering a few questions you believe the Harmony Remote is in sync again, press the
side button (below the scroll wheel) to skip the rest of the resynchronization questions.
Menu and Button Functions (Modes within Activities)
When you select an Activity, the Harmony Remote will not only turn on all the correct entertainment
devices and set their inputs correctly, it will also set up its LCD menu and buttons to match that
Activity. For example, if you select the "Watch Television" Activity, the LCD will show a list of
channels that you can select, and the Recall button will send "Previous Channel".
Some Activities have more than one Mode. Press the side button (below the scroll wheel) to change
Modes. In each Mode the buttons on the Harmony Remote may have slightly different functions, and
the LCD screen may show different commands. For example, when you watch a DVD, you can change
between Play Mode and Navigate Mode. In Play Mode the number buttons send the corresponding
numbers to your DVD player. In Navigate Mode, the numbers 5 (Up), 0 (Down), 7 (left), 9 (Right)
control the cursor on your DVD's onscreen menu, and the 8 (select) button selects an onscreen option.
The diagrams below show the various Modes within each type of Activity. They show example LCD
menus, and the default function of each button.
Harmony Remote User Manual
March 25, 2003
"Watch Television" Activity
Favorite Channels Mode: In this mode, the LCD shows a list of all of your favorite
channels. To change your favorite channels, from your Member Home Page, click on
the "Edit this Activity" link next to the Watch Television icon, and then click on the
"Change Settings" link.
All Channels Mode: In this mode, the LCD shows a list of all channels for you to
select from. The list will not contain channels that you have deselected (i.e. channels
you do not like). To hide channels that you never watch, from your Member Home
Page, click on the "Edit this Activity" link next to the Watch Television icon, and
then click on the "Change Settings" link.
The button functions are quite similar in each of the modes in the "Watch Television" Activity. The
Zap button bookmarks what you see on television. The Volume buttons control the volume on your
television or stereo receiver (whichever you have specified to the web wizard). The Channel and
number buttons change channel on your television, VCR, cable box, or satellite receiver, etc.
(whichever you have specified to the web wizard).
"Watch Television" Activity,
"All Channels" or "Favorite Channels" Modes
-
-
-
-
-
-
Change Activity / System
Power Off
-
Mute
Bookmark
Volume Up
Volume Down
Previous Channel
Resynchronize
Scroll & Select
Change Mode / Cancel
Show Listings
Channel Up
Channel Down
Numbers
+10, +100, - or .
Enter / Select
Favorite Shows Mode: In this mode, the LCD shows a list of the TV shows that are
on your favorite channels at a particular time. To change your favorite channels,
Harmony Remote User Manual
March 25, 2003
from your Member Home Page, click on the "Edit this Activity" link next to the Watch Television
icon, and then click on the "Change Settings" link.
All Shows Mode: In this mode, the LCD shows a list of all TV shows that are on
your channels at a particular time. The list will not contain TV shows on channels
you have deselected (i.e. channels you do not like). To hide channels that you never
watch, from your Member Home Page, click on the "Edit this Activity" link next to
the Watch Television icon, and then click on the "Change Settings" link.
In the "All Shows" or "Favorite Shows" modes, the ">>" button allows you to see what's on in later
time slots. This can be especially useful close to the hour (or half hour) when programs are about to
change. Press this button to see what's on next. The "<<" button shows what was on in previous time
slots.
"Watch Television" Activity,
"All Shows" or "Favorite Shows" Modes
-
-
-
-
Previous Time Slot
Change Activity / System
Power Off
Mute
Bookmark
Volume Up
Volume Down
Next Time Slot
Previous Channel
Resynchronize
Scroll & Select
All Shows / Fav. Shows
Channel Listings
Channel Up
Channel Down
Numbers
+10, +100, - or .
Enter / Select
In "All Channels" or "All Shows" modes, the list on the LCD can be quite long (depending
on how many channels you receive). To rapidly scroll to a channel or show, the list is
scrolled by pages when the cursor is at the top or bottom of the LCD screen. The arrow bars
on the left side of the LCD screen remind you of this. To disable this rapid page scrolling mode,
from your Member Home Page, click on the "Edit this Activity" link next to the Watch Television
icon, and then click on the "Change Options" link.
Harmony Remote User Manual
March 25, 2003
Control Mode: In this mode, you can change to a new Activity, or select one of your
entertainment devices to control in more detail. The LCD shows a list of devices that
are used in the Activity. For example, if you use your television, satellite receiver and
stereo receiver to watch television, these three devices will be listed. Select one of the
devices you would like to control. A list of submenus will be displayed. The commands are grouped
by related function.
In the Control Mode, the deafult button mappings are the same as in the All and Fav. Channels
Modes. This is a good mode to create your own button functions. For example, you could have the
"<<*" button turn Picture-in-Picture (PIP) on and off, and the ">>" button perform the PIP swap
function. To create your own button function, from your Member Home Page, click on the "Edit this
Activity" link next to the Listen to CDs icon, and then click on the "Change a Buttons's function or
behaviour for this Activity" link.
"Watch Television" Activity, Control Mode
-
-
-
-
-
-
Change Activity / System
Power Off
-
Mute
Bookmark
Volume Up
Volume Down
Previous Channel
Resynchronize
Scroll & Select
Change Mode / Cancel
Show Listings
Channel Up
Channel Down
Numbers
+10, +100, - or .
Enter / Select
Harmony Remote User Manual
March 25, 2003
"Watch Tivo TV" Activity
Favorite Channels Mode: In this mode, the LCD shows a list of all of your favorite
channels. To change your favorite channels, from your Member Home Page, click on
the "Edit this Activity" link next to the Tivo Television icon, and then click on the
"Change Settings" link.
All Channels Mode: In this mode, the LCD shows a list of all channels for you to
select from. The list will not contain channels that you have deselected (i.e. channels
you do not like). To hide channels that you never watch, from your Member Home
Page, click on the "Edit this Activity" link next to the Tivo Television icon, and then
click on the "Change Settings" link.
The button functions are the same in each of the Channels modes in the "Tivo Television" Activity.
The Zap button bookmarks what you see on television. The Volume buttons control the volume on
your television or stereo receiver (whichever you have specified to the web wizard). The Channel
and number buttons change channel on your PVR. The transport keys control the Pause, Advance,
Replay commands for your PVR.
"Watch Tivo TV" Activity,
"All Channels" or "Favorite Channels" Modes
Pause
Play
Record
Tivo Central
Rewind
Fast Forward
Replay
Change Activity / System
Power Off
Mute
Bookmark
Volume Up
Volume Down
Slow
Advance
Previous Channel
Resynchronize
Scroll & Select
Change Mode / Cancel
Guide / LiveTV
Channel Up
Channel Down
Numbers
+10, +100, - or .
Enter / Select
Harmony Remote User Manual
March 25, 2003
Navigate Mode: In this mode, you can control the menu system of your Tivo device.
Your Tivo's main functions are easily accessed via the buttons on the Harmony
Remote (see below for button functions). Other commands can be selected from the
list displayed on the LCD.
"Watch Tivo TV" Activity, Navigate Mode
Pause
Play
Record
Stop
Rewind
Fast Forward
Replay
Change Activity / System
Power Off
Mute
Bookmark
Volume Up
Volume Down
Slow
Advance
Previous Channel
Resynchronize
Scroll & Select
Change Mode / Cancel
Guide / LiveTV
Channel Up
Channel Down
-
+10, +100, - or .
5=Up 0=Down
7=Left 9=Right
8=Select
Enter / Select
Harmony Remote User Manual
March 25, 2003
Control Mode: In this mode, you can change to a new Activity, or select one of your
entertainment devices to control in more detail. The LCD shows a list of devices that
are used in the Activity. For example, if you use your television, PVR and stereo
receiver for Tivo television, these three devices will be listed. Select one of the
devices you would like to control. A list of submenus will be displayed. The commands are grouped
by related function.
In the Control Mode, the deafult button mappings are the same as in the All and Fav. Channels
Modes. This is a good mode to create your own button functions. For example, you could have the
"+*" button turn Picture-in-Picture (PIP) on and off, and the "E" button perform the PIP swap
function. To create your own button function, from your Member Home Page, click on the "Edit this
Activity" link next to the Listen to CDs icon, and then click on the "Change a Buttons's function or
behaviour for this Activity" link.
"Watch Tivo TV" Activity, Control Mode
Pause
Play
Record
Tivo Central
Rewind
Fast Forward
Replay
Change Activity / System
Power Off
Mute
Bookmark
Volume Up
Volume Down
Slow
Advance
Previous Channel
Resynchronize
Scroll & Select
Change Mode / Cancel
Guide / LiveTV
Channel Up
Channel Down
Numbers
+10, +100, - or .
Enter / Select
Harmony Remote User Manual
March 25, 2003
"Watch Replay TV" Activity
Favorite Channels Mode: In this mode, the LCD shows a list of all of your favorite
channels. To change your favorite channels, from your Member Home Page, click on
the "Edit this Activity" link next to the Watch ReplayTV icon, and then click on the
"Change Settings" link.
All Channels Mode: In this mode, the LCD shows a list of all channels for you to
select from. The list will not contain channels that you have deselected (i.e. channels
you do not like). To hide channels that you never watch, from your Member Home
Page, click on the "Edit this Activity" link next to the Watch ReplayTV icon, and
then click on the "Change Settings" link.
The button functions are the same in each of the Channels modes in the "Watch ReplayTV" Activity.
The Zap button bookmarks what you see on television. The Volume buttons control the volume on
your television or stereo receiver (whichever you have specified to the web wizard). The Channel
and number buttons change channel on your PVR. The transport keys control the Pause, Advance,
Replay commands for your PVR.
"Watch Replay TV" Activity,
"All Channels" or "Favorite Channels" Modes
Pause
Play
Record
Replay Guide
Rewind
Fast Forward
Replay
Change Activity / System
Power Off
Mute
Bookmark
Volume Up
Volume Down
Live TV
Advance
Previous Channel
Resynchronize
Scroll & Select
Change Mode / Cancel
Guide / LiveTV
Channel Up
Channel Down
Numbers
+10, +100, - or .
Enter / Select
Harmony Remote User Manual
March 25, 2003
Navigate Mode: In this mode, you can control the menu system of your ReplayTV
device. Your ReplayTV's main functions are easily accessed via the buttons on the
Harmony Remote (see below for button functions). Other commands can be selected
from the list displayed on the LCD.
"Watch Replay TV" Activity, Navigate Mode
Pause
Play
Record
Stop
Rewind
Fast Forward
Replay
Change Activity / System
Power Off
Mute
Bookmark
Volume Up
Volume Down
Slow
Advance
Previous Channel
Resynchronize
Scroll & Select
Change Mode / Cancel
Guide / LiveTV
Channel Up
Channel Down
-
+10, +100, - or .
5=Up 0=Down
7=Left 9=Right
8=Select
Enter / Select
Harmony Remote User Manual
March 25, 2003
Control Mode: In this mode, you can change to a new Activity, or select one of your
entertainment devices to control in more detail. The LCD shows a list of devices that
are used in the Activity. For example, if you use your television, PVR and stereo
receiver for Watch ReplayTV, these three devices will be listed. Select one of the
devices you would like to control. A list of submenus will be displayed. The commands are grouped
by related function.
In the Control Mode, the deafult button mappings are the same as in the All and Fav. Channels
Modes. This is a good mode to create your own button functions. For example, you could have the
"+*" button turn Picture-in-Picture (PIP) on and off, and the "E" button perform the PIP swap
function. To create your own button function, from your Member Home Page, click on the "Edit this
Activity" link next to the Listen to CDs icon, and then click on the "Change a Buttons's function or
behaviour for this Activity" link.
"Watch Replay TV" Activity, Control Mode
Pause
Play
Record
Replay Guide
Rewind
Fast Forward
Replay
Change Activity / System
Power Off
Mute
Bookmark
Volume Up
Volume Down
Slow
Advance
Previous Channel
Resynchronize
Scroll & Select
Change Mode / Cancel
Guide / LiveTV
Channel Up
Channel Down
Numbers
+10, +100, - or .
Enter / Select
Harmony Remote User Manual
March 25, 2003
"Watch PVR TV" Activity
Favorite Channels Mode: In this mode, the LCD shows a list of all of your favorite
channels. To change your favorite channels, from your Member Home Page, click on
the "Edit this Activity" link next to the Watch PVR icon, and then click on the
"Change Settings" link.
All Channels Mode: In this mode, the LCD shows a list of all channels for you to
select from. The list will not contain channels that you have deselected (i.e. channels
you do not like). To hide channels that you never watch, from your Member Home
Page, click on the "Edit this Activity" link next to the Watch PVR icon, and then
click on the "Change Settings" link.
The button functions are the same in each of the Channels modes in the "Watch PVR" Activity. The
Zap button bookmarks what you see on television. The Volume buttons control the volume on your
television or stereo receiver (whichever you have specified to the web wizard). The Channel and
number buttons change channel on your PVR. The transport keys control the Pause, Advance,
Replay commands for your PVR.
"Watch PVR TV" Activity,
"All Channels" or "Favorite Channels" Modes
Pause
Play
Record
PVR Menu
Rewind
Fast Forward
Replay
Change Activity / System
Power Off
Mute
Bookmark
Volume Up
Volume Down
Live TV
Advance
Previous Channel
Resynchronize
Scroll & Select
Change Mode / Cancel
Guide / LiveTV
Channel Up
Channel Down
Numbers
+10, +100, - or .
Enter / Select
Harmony Remote User Manual
March 25, 2003
Navigate Mode: In this mode, you can control the menu system of your PVR device.
Your PVR's main functions are easily accessed via the buttons on the Harmony
Remote (see below for button functions). Other commands can be selected from the
list displayed on the LCD.
"Watch PVR TV" Activity, Navigate Mode
Pause
Play
Record
Stop
Rewind
Fast Forward
Replay
Change Activity / System
Power Off
Mute
Bookmark
Volume Up
Volume Down
Slow
Advance
Previous Channel
Resynchronize
Scroll & Select
Change Mode / Cancel
Guide / LiveTV
Channel Up
Channel Down
-
+10, +100, - or .
5=Up 0=Down
7=Left 9=Right
8=Select
Enter / Select
Harmony Remote User Manual
March 25, 2003
Control Mode: In this mode, you can change to a new Activity, or select one of your
entertainment devices to control in more detail. The LCD shows a list of devices that
are used in the Activity. For example, if you use your television, PVR and stereo
receiver for Watch PVR, these three devices will be listed. Select one of the devices
you would like to control. A list of submenus will be displayed. The commands are grouped by
related function.
In the Control Mode, the deafult button mappings are the same as in the All and Fav. Channels
Modes. This is a good mode to create your own button functions. For example, you could have the
"+*" button turn Picture-in-Picture (PIP) on and off, and the "E" button perform the PIP swap
function. To create your own button function, from your Member Home Page, click on the "Edit this
Activity" link next to the Listen to CDs icon, and then click on the "Change a Buttons's function or
behaviour for this Activity" link.
"Watch PVR TV" Activity, Control Mode
Pause
Play
Record
PVR Menu
Rewind
Fast Forward
Replay
Change Activity / System
Power Off
Mute
Bookmark
Volume Up
Volume Down
Slow
Advance
Previous Channel
Resynchronize
Scroll & Select
Change Mode / Cancel
Guide / LiveTV
Channel Up
Channel Down
Numbers
+10, +100, - or .
Enter / Select
Harmony Remote User Manual
March 25, 2003
"Play a Videotape" Activity
Play Mode: In this mode, you can play, stop, pause, fast forward, etc. the Videotape.
Your VCR's main functions are easily accessed via the buttons on the Harmony
Remote (see below for button functions). Other commands can be selected from the
list displayed on the LCD.
The Volume buttons control the volume on your television, stereo receiver or amplifier (whichever
you have specified to the web wizard).
"Play a Videotape" Activity, Play Mode
Pause
Play
-
Stop
Rewind
Change Activity / System
Power Off
Mute / Pause
Volume Up
Volume Down
Fast Forward
Resynchronize
Scroll & Select
Change Mode / Cancel
Next Disc
Numbers
-
Enter / Select
Harmony Remote User Manual
March 25, 2003
Control Mode: In this mode, you can change to a new Activity, or select one of your
entertainment devices to control in more detail. The LCD shows a list of devices that
are used in the Activity. For example, if you use your television, VCR and stereo
receiver to watch videos, these three devices will be listed. Select one of the devices
you would like to control. A list of submenus will be displayed. The commands are grouped by
related function.
In the Control Mode, the deafult button mappings are the same as in the Play Mode. This is a good
mode to create your own button functions. For example, you could have the 9 (Right) and 7 (Left)
direction buttons perform balance control on your stereo receiver. To create your own button
function, from your Member Home Page, click on the "Edit this Activity" link next to the Watch a
DVD icon, and then click on the "Change a Button's function or behaviour for this Activity" link.
"Play a Videotape" Activity, Control Mode
Pause
Play
-
Stop
Rewind
Change Activity / System
Power Off
Mute / Pause
Volume Up
Volume Down
Fast Forward
Resynchronize
Scroll & Select
Change Mode / Cancel
Next Disc
Numbers
-
Enter / Select
If your VCR automatically turns on when you insert a video tape, simply turn it off again
before you select "Play a Videotape". This will prevent the Harmony Remote from getting
out of sync with your VCR.
When you are watching a video and the phone rings, simply press Mute. The Harmony will
not only mute the sound, but will also pause the video.
Harmony Remote User Manual
March 25, 2003
"Watch a DVD" Activity
Navigate Mode: In this mode, you can play, stop, pause, fast forward, etc & control
the menu system of your DVD player. Your DVD's main functions are easily
accessed via the buttons on the Harmony Remote (see below for button functions).
Other commands can be selected from the list displayed on the LCD.
"Watch a DVD" Activity, Navigate Mode
Pause
Play
-
Stop
Rewind
Previous Chapter
Change Activity / System
Power Off
Mute / Pause
Volume Up
Volume Down
Fast Forward
Next Chapter
Resynchronize
Scroll & Select
Change Mode / Cancel
Next Disc
Previous Disc
-
Exit / Cancel
5=Up 0=Down
7=Left 9=Right
8=Select
Enter / Select
Harmony Remote User Manual
March 25, 2003
Numbers Mode: In this mode, you can play, stop, pause, fast forward, etc and send
numbers to the DVD. Your DVD's main functions are easily accessed via the buttons
on the Harmony Remote (see below for button functions). Other commands can be
selected from the list displayed on the LCD.
The Volume buttons control the volume on your television, stereo receiver or amplifier (whichever
you have specified to the web wizard).
"Watch a DVD" Activity, Play Mode
Pause
Play
-
Stop
Rewind
Previous Chapter
Change Activity / System
Power Off
Mute / Pause
Volume Up
Volume Down
Fast Forward
Next Chapter
Resynchronize
Scroll & Select
Change Mode / Cancel
Next Disc
Previous Disc
Numbers
-
Enter / Select
Harmony Remote User Manual
March 25, 2003
Control Mode: In this mode, you can change to a new Activity, or select one of your
entertainment devices to control in more detail. The LCD shows a list of devices that
are used in the Activity. For example, if you use your television, DVD player and
stereo receiver to watch DVDs, these three devices will be listed. Select one of the
devices you would like to control. A list of submenus will be displayed. The commands are grouped
by related function.
In the Control Mode, the deafult button mappings are the same as in the Navigate Mode. This is a
good mode to create your own button functions. For example, you could have the 9 (Right) and 7
(Left) direction buttons perform balance control on your stereo receiver. To create your own button
function, from your Member Home Page, click on the "Edit this Activity" link next to the Watch a
DVD icon, and then click on the "Change a Button's function or behaviour for this Activity" link.
"Watch a DVD" Activity, Control Mode
Pause
Play
-
Stop
Rewind
Previous Chapter
Change Activity / System
Power Off
Mute / Pause
Volume Up
Volume Down
Fast Forward
Next Chapter
Resynchronize
Scroll & Select
Change Mode / Cancel
Next Disc
Previous Disc
-
Exit / Cancel
5=Up 0=Down
7=Left 9=Right
8=Select
Enter / Select
If your DVD player automatically turns on when you insert a DVD disc, simply turn it off
again before you select "Watch a DVD". This will prevent the Harmony Remote from
getting out of sync with your DVD player.
When you are watching a DVD and the phone rings, simply press Mute. The Harmony will
not only mute the sound, but will also pause the DVD.
Some DVD players don't respond to certain infrared commands when the "intro" portion is
playing. For example, Pause and Zoom may not work while the DVD intro is playing.
Harmony Remote User Manual
March 25, 2003
"Listen to CDs" Activity
Numbers Mode: In this mode, you can play, stop, pause, fast forward, etc and send
numbers to the CD. The commands can be selected from the LCD list, or many
functions are easily accessed via the buttons on the Harmony Remote (see below for
button functions).
The Volume buttons control the volume on your stereo receiver or amplifier (whichever you have
specified to the web wizard).
"Listen to CDs" Activity, Play Mode
Pause
Play
-
Stop
Rewind
PreviousTrack
Change Activity / System
Power Off
Mute / Pause
Volume Up
Volume Down
Fast Forward
Next Track
Resynchronize
Scroll & Select
Change Mode / Cancel
Next Disc
Previous Disc
Numbers
-
Enter / Select
Harmony Remote User Manual
March 25, 2003
Navigate Mode: In this mode, you can you can play, stop, pause, fast forward, etc &
control the menu system of your CD player. Your CD's main functions are easily
accessed via the buttons on the Harmony Remote (see below for button functions).
Other commands can be selected from the list displayed on the LCD.
"Listen to CDs" Activity, Navigate Mode
Pause
Play
-
Stop
Rewind
Previous Track
Change Activity / System
Power Off
Mute / Pause
Volume Up
Volume Down
Fast Forward
Next Track
Resynchronize
Scroll & Select
Change Mode / Cancel
Next Disc
Previous Disc
-
Exit / Cancel
5=Up 0=Down
7=Left 9=Right
8=Select
Enter / Select
Harmony Remote User Manual
March 25, 2003
Control Mode: In this mode, you can change to a new Activity, or select one of your
entertainment devices to control in more detail. The LCD shows a list of devices that
are used in the Activity. For example, if you use your CD player and stereo receiver
to listen to CDs, these two devices will be listed. Select one of the devices you would
like to control. A list of submenus will be displayed. The commands are grouped by related function.
In the Control Mode, the deafult button mappings are the same as in the Numbers Mode. This is a
good mode to create your own button functions. For example, you could have the 9 (Right) and 7
(Left) direction buttons perform balance control on your stereo receiver. To create your own button
function, from your Member Home Page, click on the "Edit this Activity" link next to the Listen to
CDs icon, and then click on the "Change a Buttons's function or behaviour for this Activity" link.
"Listen to CDs" Activity, Control Mode
Pause
Play
-
Stop
Rewind
PreviousTrack
Change Activity / System
Power Off
Mute / Pause
Volume Up
Volume Down
Fast Forward
Next Track
Resynchronize
Scroll & Select
Change Mode / Cancel
Next Disc
Previous Disc
Numbers
-
Enter / Select
If your CD player automatically turns on when you insert a CD, simply turn it off again
before you select "Listen to CDs". This will prevent the Harmony Remote getting out of
sync with your CD player.
When you are listening to a CD and the phone rings, simply press Mute. The Harmony will
not only mute the sound, but will also pause the CD.
Harmony Remote User Manual
March 25, 2003
"CD Jukebox" Activity
Numbers Mode: In this mode, you can play, stop, pause fast forward, etc and and
send numbers to the CD Jukebox. The commands can be selected from the LCD list,
or many functions are easily accessed via the buttons on the Harmony Remote (see
below for button functions).
The Volume buttons control the volume on your stereo receiver or amplifier (whichever you have
specified to the web wizard).
"CD Jukebox" Activity, Play Mode
Pause
Play
-
Stop
Rewind
PreviousTrack
Change Activity / System
Power Off
Mute / Pause
Volume Up
Volume Down
Fast Forward
Next Track
Resynchronize
Scroll & Select
Change Mode / Cancel
Next Disc
Previous Disc
Numbers
-
Enter / Select
Harmony Remote User Manual
March 25, 2003
Navigate Mode: In this mode, you can play, stop, pause fast forward, etc and control
the menu system of your CD Jukebox. Your CD Jukebox's main functions are easily
accessed via the buttons on the Harmony Remote (see below for button functions).
Other commands can be selected from the list displayed on the LCD.
"CD Jukebox" Activity, Navigate Mode
Pause
Play
-
Stop
Rewind
Previous Track
Change Activity / System
Power Off
Mute / Pause
Volume Up
Volume Down
Fast Forward
Next Track
Resynchronize
Scroll & Select
Change Mode / Cancel
Next Disc
Previous Disc
-
Exit / Cancel
5=Up 0=Down
7=Left 9=Right
8=Select
Enter / Select
Harmony Remote User Manual
March 25, 2003
Control Mode: In this mode, you can change to a new Activity, or select one of your
entertainment devices to control in more detail. The LCD shows a list of devices that
are used in the Activity. For example, if you use your CD Jukebox and stereo receiver
in your CD Jukebox Activity , these two devices will be listed. Select one of the
devices you would like to control. A list of submenus will be displayed. The commands are grouped
by related function.
In the Control Mode, the deafult button mappings are the same as in the Numbers Mode. This is a
good mode to create your own button functions. For example, you could have the 9 (Right) and 7
(Left) direction buttons perform balance control on your stereo receiver. To create your own button
function, from your Member Home Page, click on the "Edit this Activity" link next to the CD
Jukebox icon, and then click on the "Change a Buttons's function or behaviour for this Activity"
link.
"CD Jukebox" Activity, Control Mode
Pause
Play
-
Stop
Rewind
PreviousTrack
Change Activity / System
Power Off
Mute / Pause
Volume Up
Volume Down
Fast Forward
Next Track
Resynchronize
Scroll & Select
Change Mode / Cancel
Next Disc
Previous Disc
Numbers
-
Enter / Select
If your CD jukebox supports random and continuous modes, the Harmony Remote can
switch between them.
When you are listening to a CD and the phone rings, simply press Mute. The Harmony will
not only mute the sound, but will also pause the CD.
Harmony Remote User Manual
March 25, 2003
General Tips
You can change the names of Activities. From your Member Home Page, click on the "Edit
this Activity" link next to the Activity icon, and then click on the "Rename..." link.
You can have more than one Activity of a given type. For example, if you have both a cable
converter and a satellite receiver, you can add a second "Watch Television" Activity. From
your Member Home Page, click on "Add an Activity". When you're done, rename the
Activities to help you distinguish between them. In the example above, you could rename one "Watch
Television" to "Watch Cable" and the other to "Watch Satellite".
Each "Watch Television" type Activity has its own channel listings, favorite channels, etc. To
reduce Update time, try not to have more than two "Watch Television" type Activities.
Harmony Remote User Manual
March 25, 2003
Customizing your Harmony Remote
All customization of your Harmony Remote is done from your Member Home Page.
l
l
l
l
To add or remove an Activity, click on "Add an Activity" or "Remove an Activity".
To change an Activity you have already set up, click on "Edit this Activity" next to the Activity
icon, and then clcik on the appropriate option.
To add or remove entertainment devices, click on "Add a Device" or "Remove a Device".
To change a device you have already set up, click on "Edit this device" next to the Device icon,
and then click on the appropriate option.
You can see the Activity Id, or a Device Id, by "hovering" your mouse cursor over the
Activity icon or device icon.
You can change the function of buttons within a particular Activity and mode. From your
Member Home Page, click on "Edit this Activity" next to the Activtiy icon, and then click on
"Change a Button's function or behaviour for this Activity".
Teaching Infrared Commands
The Harmony Remote will learn infrared commands from other remote controls. This is important in
situations where the HarmonRemote.com infrared database does not already contain an infrared
command you would like to use.
Determine which device you would like to send the infrared command to. click on "Edit this
device" next to the Device icon, and then click on "Learn infrared commands".
Setup
The Harmony Remote has an infrared sensor in a small slot as shown in the picture on the left. It is
important that the remote that you wish to learn the infrared command from is placed pointing at the
infrared sensor on the Harmony Remote. The other end of the Harmony Remote should be plugged
into the USB cable. The remote controls should be about 2 to 4 inches apart as shown in the picture
below.
If the web site says that there were problems reading the infrared signal, try moving the
original remote control further from your Harmony Remote and try again. If that does not
work, try again with your original remote control closer to the Harmony Remote.
Harmony Remote User Manual
March 25, 2003
Uploading infrared commands
When you press a button on your original remote control, the infrared sensor on the Harmony Remote
learns the infrared signal, and the Harmony Remote uploads it via the USB cable (and your computer's
internet connection) to the HarmonyRemote.com web site. The web site trys to find a matching
pattern for the infrared signal. If no pattern is found, the signal will be stored as-is in its original
format. If a pattern is found, the HarmonyRemote.com web site converts the signal into a format for
convenient storage. Either way, the signal is then available for you to assign to a button on your
Harmony Remote.
Naming Infrared Command
When you teach an infrared command to the Harmony Remote, you need to give the command a name.
You can then refer to this command by name in various locations on the web site. It is best to use the
default names listed on the Language page. This is so that the web wizards can perform automatic
button function assignments for you. For example, if you teach the volume button infrared commands
from your original remote control, name them VolumeUp and VolumeDown (i.e. with no space, and
capitalization as shown). The web wizards look for commands with these names to automatically
assign them to the volume up and down buttons on the Harmony Remote.
To name a command for which there is no default name on the Language page, try to follow these
simple naming conventions. If you do so, it will make button assignment easier. It will also allow you
to easily share infrared commands with others.
l
l
l
l
Do not use spaces or other special characters such as /, & or * in the name.
Capitalize the start of words.
Examples: NextDisc, ModeDigital
Start the command name with its main function. This helps group related commands in lists.
Example: VolumeRearUp, VolumeRearDown, VolumeFrontUp, VolumeFrontDown
For infrared commands that select inputs (for example on a stereo receiver), start with the prefix
Input. Do not name the input based on what you have connected to your device, but name it
based on what it is called on the front of the device, or on the remote control.
Examples: InputAux, InputVideo1, InputTape, InputDVD, InputVCR.
Harmony Remote User Manual
March 25, 2003
Interacting with your Entertainment
Bookmark with Zap
Your Harmony Remote always keeps track of what you are doing, whether that be watching TV
though your satellite receiver or cable box. When you see something you like, you simply press the
Zap button. At that instant, your Harmony Remote stores the date and time in its memory, as well as a
note of the channel. Therefore it is as if the Harmony Remote bookmarks what you are watching.
The next time you Update your Harmony Remote (for example to receive the latest TV listings), this
bookmark information is uploaded from the Harmony Remote's memory directly to
HarmonyRemote.com. The web site looks for information related to this bookmark in its database and
tries to find appropriate links to other web sites. Click on the "My Zaps" button on your Member
Home Page to see the links.
Lets look at an example: Lets say that you are watching Oprah and an interesting book is reviewed.
Press the Zap button. Later, Update your Harmony Remote. Click on "My Zaps" and you will see
various links such as one to www.Oprah.com. You will also see search links that can help you find out
more about what you were watching.
Make sure the date and time on your computer are correct when you Update your Harmony
Remote. This information is used to determine what show you were watching when you
Zapped.
If you change the batteries in your Harmony Remote, the date and time are reset. Your Zap
links may not be correct when you next Update. However, from that point forward they will
be correct.