1
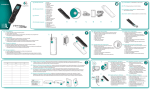
Click here to download and print the PDF version of this manual.
Harmony Remote H688 User Manual
Congratulations on the purchase of your Harmony Remote. True system control is now at your fingertips.
This User Manual will introduce you to the basic setup, customizations and main features of your H688.
Please note that the HarmonyRemote.com web site and web wizards are constantly updated to improve your
experience. At times the information in this manual may be out of date. If in doubt, follow the information
and instructions on the web site. Select a topic from the Index to learn more about your Harmony Remote:
Index
•
•
•
•
Introduction
Setting up your Harmony Remote
Using your Harmony Remote
Customizing your Harmony Remote
Introduction
The Harmony Remote is an Internet powered universal remote control. For the first time you will be able to
control your home entertainment devices as a system, not as a collection of components.
Your Harmony Remote can control most devices that understand infrared (IR) signals.
The configuration of your Harmony Remote is simple. Answer web wizard questions to create your own
personal Harmony Remote configuration. The web wizards allow you say what entertainment devices you
have, how you have set them up, and what your preferences are. If one of your devices is not in the
HarmonyRemote.com database, the web wizard will learn about your device and add it to your configuration.
At the end of the setup process, you will have your own configuration loaded onto your Harmony Remote
and your own personal Harmony Member home page. Come back to your Member home page as often as
you like to customize any of your Harmony Remote's features, to add new entertainment devices, or to add
new features such as interactive television listings or CD Jukebox Media Listings.
How is the H688 different?
The H688 takes care of many tasks automatically by interacting with your entertainment system through
Activities. Each Activity controls just those devices that are needed. For example, in the "Play Video"
Activity, the Harmony Remote switches on and controls the television and VCR together. You do not have to
program any macros to achieve this level of automated and simple control.
You will instantly recognize most of the buttons on your Harmony Remote. This is because these buttons are
standard across many remote controls and we know that they work for you. However, there are buttons and
other hardware that may not be so familiar to you. It is these extra buttons and hardware which give you the
Special Features that only the Harmony Remote can offer.
Activity Buttons: Controlling your system is made easy with Activity
buttons such as "Watch TV" and "Play Music". With one press of a button all
of the appropriate devices will switch on and the Harmony Remote will give
you control of the key functions of each device.
Custom Buttons: Use the 6 buttons at the side of the display to select the
corresponding command. Use the 'NEXT' button to display the next page of
commands.
OFF: When you are finished with your entertainment system, turn all devices
off with one button press.
HELP: To resolve any issues with enjoying an Activity, press the 'HELP'
button. Answer the questions on your Harmony Remote Display and when
you're done, the Harmony Remote will have reset your devices so that you are
enjoying the Activity again. Alternatively, hold the 'HELP' button down for 2
seconds and the Harmony Remote will display the command for every button.
DEVICE: Lists all your devices in the Display and allows you to select and
fully control any device directly.
SOUND: Control the advanced features of your sound processing device.
PICTURE: Control the advanced features of your video output device.
MEDIA: Gives access to media listings such as the Harmony Electronic
Program Guide (EPG) or CD Jukebox Media Listings. Note: There is an
additional charge for these features. Call the Harmony Support Team toll free
at 1-866-291-1505 to find out how to get these additional features.
Smart State Technology
Smart State Technology™ is what allows the Harmony Remote to control your entire entertainment system
with just one touch. For example, when you select an Activity (e.g. "Play Video"), the Smart State
Technology™ instantaneously evaluates the current state of all your individual entertainment devices and
then sends the appropriate commands for perfect configuration. In other words, the Harmony will turn on
your TV, VCR and Receiver, set the inputs, and even start the VCR playing. With Smart State
Technology™, you will never need to program macros to control your system simply and perfectly.
If your Harmony Remote gets out of sync with your entertainment devices, press the Help button.
For more information, read the "Using your Harmony Remote" chapter in this manual.
Activities
The H688 gives you 5 dedicated buttons for selecting Activities. Press any one of the first 4 buttons to jump
directly to your favorite Activities, or press the "More Activities" button to choose other Activities from the
Display. Different homes have different entertainment devices and your Activities will be unique, so your
Harmony will let you choose from the Activities that are relevant to you!
To find out how to set-up your Activity buttons read the "Customizing your Harmony Remote"
chapter of this manual.
Modes
Once you have selected an Activity to enjoy, the functionality of each button on your Harmony Remote is
automatically configured to that Activity. In addition the Custom Buttons and Display will give you access to
other commands for that Activity which cannot be set to the standard buttons. This is known as the Activity
mode.
To understand more about how the Harmony Remote works in each different Mode, read the "Using
your Harmony Remote" chapter in this manual.
Within each Activity you can change how the Harmony Remote behaves by switching into one of 3
alternative modes; Sound mode puts the emphasis on controlling the sound fields of the device that you have
chosen to control your sound (e.g. Stereo Receiver); Picture mode puts the emphasis on controlling the
picture of the device that you have chosen to view your pictures (e.g. TV or Projector); and Device mode
which gives you access to all of the possible commands for every one of the devices that are included in your
Harmony Remote configuration.
To find out how to change the function of buttons in each of your Harmony Remote Modes read the
"Customizing your Harmony Remote" chapter of this manual.
Setting up your Harmony Remote
Step 1: Unpack and set-up
1. Ensure that you have received the following items:
• 1 H688
• 1 USB Cable
• 4 AAA batteries
• 1 Software Installation CD
2. Open the battery compartment on the underside of your Harmony Remote. Insert the four AAA
batteries as indicated on the bottom of the battery compartment. Close the battery compartment.
Step 2: Entertainment Device Worksheet
Fill out the Device Worksheet with the details of your entertainment devices that you would like to have the
Harmony Remote control as a system. Once you have entered all the information, take your current remote
controls along with this worksheet to your computer.
Step 3a: Install the Harmony Software (Windows)
The minimum recommended Windows™ system configuration is:
•
•
•
•
IBM compatible PC with USB plug-and-play support
Microsoft Windows 98SE/Me/2000/XP operating system
10MB free hard drive space
Internet connection (dial-up, cable, LAN, etc.)
1. Connect one end of the cable provided to the USB port on your computer and the other end to your
Harmony Remote.
2. The Harmony Remote will be detected automatically and USB Human Interface Device drivers
installed. For some versions of Windows you may be prompted to insert the Windows software CD.
Insert the Windows software CD into the computer's CD-ROM drive when asked to do so, then
follow the on-screen instructions.
3. Log onto the Internet using the account and password provided by your Internet Service Provider.
4. Insert the Harmony Client Software CD into the CD-ROM drive of your computer. After 10
seconds the installation program will start automatically. If the installation does not start
automatically, select Run from the Start Menu on the Taskbar. Next, type D:\Windows\setup.exe
(where D: is the designation of the CD-ROM drive).
5. Follow the on-screen instructions to complete the software installation.
6. If your computer reboots at the end of the software installation process then go to Step 4.
7. After the software is installed a web browser window will open automatically and take you to the
Harmony Remote Software page. Go to Step 4.
Step 3b: Install the Harmony Software (Mac)
The minimum recommended Macintosh system configuration is:
•
•
•
•
Mac with USB plug-and-play support
Mac OS X 10.2 operating system
10 MB free hard drive space
Internet connection (e.g. dial-up, cable, LAN)
1.
2.
3.
4.
5.
6.
Insert the Harmony Client Software CD into the CD-ROM drive of your computer.
After a few seconds, a CD-ROM icon will appear on your desktop.
Double click the CD-ROM icon to display the contents of the CD-ROM.
Double click the Mac folder and then the Harmony Remote Software.mpkg icon.
Follow the on-screen instructions to complete the software installation.
After the software installation completes, the Harmony Remote application will start automatically
and the Harmony icon will be displayed in the Dock. If the application does not start automatically
then use Finder to open the Applications folder and then double click the Harmony Remote
application.
7. Click on Harmony Remote from the menu bar and then select Preferences. In the Harmony Remote
Preferences dialog, set the Download Folder to match the downloads folder for your Safari web
browser. To check the Downloads folder for Safari, open the web browser and select
Safari/Preferences/General/Save downloaded files to.
8. In the Harmony Remote Preferences dialog, ensure that there is a check mark next to Watch
download folder and Cleanup downloaded files. Note: If you have not set your download directory
previously then you will not be able to check the Watch download folder option.
9. Connect one end of the cable provided to the USB port on your computer and the other end to your
Harmony Remote.
10. Log onto the Internet using the account and password provided by your Internet Service Provider. Go
to Step 4.
Step 4: Create your Harmony Account
Enter information about yourself, such as your address and zip code to create your account with a unique
Login ID.
Step 5: Answer web wizard questions about the devices you want to control as a system
This step is best performed by someone in your household who is familiar with your entertainment system.
Use the Entertainment Device Worksheet that you completed in Step 2 to answer the web wizard questions
about the make and model of your entertainment devices.
If your device model number is not in the HarmonyRemote.com database, you have the option of choosing a
compatible device, or setting up the device yourself. We recommend that beginners select a compatible
device to start. This will get you controlling your system faster. Later you can come back to your Member
Home Page, and adjust the functionality of the device you chose.
At times the wizards will ask you to press buttons on your current remote controls to identify infrared
languages or teach infrared commands. This will allow your Harmony Remote to determine which infrared
languages and commands control your entertainment devices. Gather all of your current remote controls and
bring them to your computer. For more details on the best way to teach infrared, please read the
"Customizing your Harmony Remote" chapter in this manual.
Step 6: Answer web wizard questions about how you have set up your entertainment
system
As described in the previous chapter, your Harmony Remote organizes functionality into Activities. The web
wizard will ask you questions about how your entertainment devices are connected so that appropriate
Activities can be created and automatically configured.
Step 7: Update your Harmony Remote with your configuration
Once you have finished answering the questions, the wizard creates a configuration that is then downloaded
from the Internet to your computer. From there it is transferred to your Harmony Remote memory via the
USB cable. Your Harmony contains Flash memory to store your configuration, so it is never lost, even if you
take out the batteries.
Whenever you wish to make changes (such as when you buy a new entertainment device), simply
logon to your Member Home Page at HarmonyRemote.com and update your Harmony Remote with
the new configuration.
Keep in mind that because everyone's entertainment devices are different, the wizards may not get things
exactly right the first time. That's ok. Just go back to your Member Home Page and adjust the settings, or run
one of the setup wizards again. Update your Harmony Remote with the new configuration and try again.
Using your H688
Important: Please read before using your Harmony Remote for the first time.
After your Harmony Remote has been programmed for the first time you must synchronize it with your
entertainment devices. This will tell the Harmony Remote which devices are on and off, and what their inputs
are set to. You will only have to do this the first time that you try an Activity. From then on your Harmony
Remote will remember these settings and will control all of your entertainment devices for you.
Synchronization Steps:
1. Start by turning off all of your entertainment devices by hand or with their original remote controls
(you can put them away after this because you shouldn't need them again).
2. Use the Activity buttons on your Harmony Remote to choose an Activity you would like to try.
3. If your Harmony Remote did not seem to turn on the correct devices for that Activity, or if an input or
setting is not correct (for example, you do not see a picture on your TV or do not hear sound) press
the 'HELP' button on your Harmony Remote. Answer the questions on your Harmony Remote
Display by selecting Yes or No. This will synchronize the Harmony Remote with your entertainment
devices.
4. Press the Harmony Remote's power button to turn off your entertainment system.
5. Repeat steps 2 to 4 to try other Activities.
6. After you have tried each Activity (and used HELP if necessary), if your Harmony Remote is not
controlling your entertainment system as you expect it to, then return to your Harmony Member home
page. Click on the "Troubleshoot" button and the Troubleshooting web wizard will help you find the
problem and make the necessary changes to get all of your Activities working perfectly.
Selecting an Activity
The H688 gives you 5 dedicated buttons for selecting Activities. Press any one of the first 4 buttons to jump
directly to your favorite Activities, or press the "More Activities" button to see other Activities in the
Display. Select the Activity that you want to enjoy by pressing the adjacent button.
Different homes have different entertainment devices and your Activities will be unique, so your
Harmony will let you choose from the Activities that are relevant to you!
As soon as you select an Activity, the Harmony Remote will send all the appropriate commands to your
entertainment system so that it is configured for that Activity. For example, if you have a television and a
satellite receiver, the Harmony Remote will turn on your television, turn on your satellite receiver, and set
your television to the correct input.
Changing Activity
To change to a different Activity, simply press any one of the first 4 buttons to jump directly to one of your
favorite Activities, or press the "More Activities" button to see other Activities in the Display. Select the
Activity that you want to switch to by pressing the adjacent button.
Status Light
The status light located at the top of your Harmony Remote blinks or shines at various times to remind you
that your Harmony Remote is sending infrared commands to your entertainment devices. So if you use your
television, Receiver and DVD player to watch DVDs, when you select "Play DVD" the status light may stay
on for 3 to 5 seconds.
Make sure that you keep your Harmony Remote pointing at your entertainment devices while the
status light is on.
Resynchronizing
From time to time when you select an Activity, your system will not be configured perfectly. This can
happen when the Harmony Remote is sending many infrared commands to set up all your devices for an
Activity, and one or more devices do not receive some of the commands. The Harmony Remote is then "out
of sync" with your devices because it thinks one of your devices is on, for example, but it is still turned off.
These are some of the reasons why the Harmony Remote can get out of sync with your system when
selecting an Activity:
•
•
Someone walks between the Harmony Remote and your entertainment system while the red status
light is on
You point your Harmony Remote away from your system while the red status light is on
•
•
There is an object blocking the line-of-sight between your Harmony Remote and the system
You are very far away from your entertainment system
Before re-synchronizing, make sure the cause of the problem has been addressed. For example,
remove all obstructions so that the entertainment devices can receive the infrared commands that the
Harmony Remote sends.
To resynchronize, press the Help button. The Harmony Remote will re-send the appropriate commands to
your entertainment devices and then ask you a series of questions such as "Is the Television On?" and "Is the
Stereo Receiver set to the DVD input?". Answer the questions on your Harmony Remote Display by
selecting Yes or No. If you answer "No" to any question then the Harmony Remote will re-send the
necessary command and then ask you the same question again. When you're done, the Harmony Remote will
be back in sync with your devices.
Button Functions within an Activity
When you select an Activity, the Harmony Remote will not only turn on all the correct entertainment devices
and set their inputs correctly, it will also set up its buttons to match that Activity. This includes the 6 Custom
Buttons that will be automatically set-up to give you access to other useful commands for that Activity. For
example, the 'Watch a DVD' Activity may have the Custom Buttons labeled "Angle", "Zoom" and "Eject"
which will all control the DVD player.
The tables below show the default function of each labeled button within each type of Activity.
Watch Television, Watch PVR, Tivo Television & Watch ReplayTv Activities
Button
UP
DOWN
LEFT
RIGHT
SELECT/OK
EXIT
INFO
MENU
GUIDE
VOL +
VOL MUTE
CH +
CH PG +
PG PREV
1
2
3
4
5
6
7
8
9
0
+*
ENTER
FF
PLAY
REW
REC
PAUSE
STOP
Channel Tuner
Up
Down
Left
Right
Select, OK, Enter
Exit, Cancel
Info
Menu, Menu On
Guide, Guide On,
TV Guide
Device
Volume Control
Volume Up
Volume Down
Mute
Channel Up
Channel Down
Page Up
Page Down
Previous Ch, Recall
1
2
3
4
5
6
7
8
9
0
>100, -, .
Enter
Play a Videotape Activity
Button
UP
DOWN
LEFT
RIGHT
SELECT/OK
EXIT
INFO
MENU
GUIDE
VOL +
VOL MUTE
CH +
CH PG +
PG PREV
Video Source
Up
Down
Left
Right
Select, OK, Enter
Exit, Cancel
Device
Volume Control
Menu, Menu On
Volume Up
Volume Down
Mute
Channel Up
Channel Down
Previous Channel,
Recall
1
2
3
4
5
6
7
8
9
0
>100, -, .
Enter
Fast Forward
Play
Rewind
1
2
3
4
5
6
7
8
9
0
+*
ENTER
FF
PLAY
REW
REC
PAUSE
Pause
STOP
Stop
If your VCR automatically turns on when you insert a videotape, simply turn it off again
before you select "Play a Videotape". This will prevent the Harmony Remote from getting out
of sync with your VCR.
When you are watching a video and the phone rings, simply press Mute. The Harmony will
not only mute the sound, but will also pause the video.
Watch a DVD Activity
Device
Button
Video Source
Volume Control
UP
Up
DOWN
Down
LEFT
Left
RIGHT
Right
SELECT/OK
Select, OK, Enter
EXIT
Exit, Cancel
INFO
MENU
Menu, Menu On
GUIDE
VOL +
Volume Up
VOL Volume Down
MUTE
Mute
CH +
Next Chapter
CH Previous Chapter
PG +
PG PREV
1
1
2
2
3
3
4
4
5
5
6
6
7
7
8
8
9
9
0
0
+*
>10
ENTER
Enter
FF
Fast Forward
PLAY
Play
REW
Rewind
REC
PAUSE
Pause
STOP
Stop
If your DVD player automatically turns on when you insert a DVD disc, simply turn it off
again before you select "Watch a DVD". This will prevent the Harmony Remote from getting
out of sync with your DVD player.
When you are watching a DVD and the phone rings, simply press Mute. The Harmony will not
only mute the sound, but will also pause the DVD.
Some DVD players don't respond to certain infrared commands when the "intro" portion is
playing. For example, Pause and Zoom may not work while the DVD intro is playing.
Listen to CDs Activity
Device
Volume Control
Button
Audio Source
UP
DOWN
LEFT
RIGHT
SELECT/OK
EXIT
INFO
MENU
GUIDE
VOL +
Volume Up
VOL Volume Down
MUTE
Mute
CH +
Next Track
CH Previous Track
PG +
PG PREV
1
1
2
2
3
3
4
4
5
5
6
6
7
7
8
8
9
9
0
0
+*
>10
ENTER
Enter
FF
Fast Forward
PLAY
Play
REW
Rewind
REC
PAUSE
Pause
STOP
Stop
If your CD player automatically turns on when you insert a CD, simply turn it off again before
you select "Listen to CDs". This will prevent the Harmony Remote getting out of sync with
your CD player.
When you are listening to a CD and the phone rings, simply press Mute. The Harmony will
not only mute the sound, but will also pause the CD.
CD Jukebox Activity
Device
Volume Control
Button
Audio Source
UP
Up
DOWN
Down
LEFT
Left
RIGHT
Right
SELECT/OK
Select, OK, Enter
EXIT
Exit, Cancel
INFO
MENU
Menu, Menu On
GUIDE
VOL +
Volume Up
VOL Volume Down
MUTE
Mute
CH +
Next Track
CH Previous Track
PG +
PG PREV
1
1
2
2
3
3
4
4
5
5
6
6
7
7
8
8
9
9
0
0
+*
>10, >100
ENTER
Enter
FF
Fast Forward
PLAY
Play
REW
Rewind
REC
PAUSE
Pause
STOP
Stop
If your CD jukebox supports random and continuous modes, the Harmony Remote can switch
between them.
When you are listening to a CD and the phone rings, simply press Mute. The Harmony will
not only mute the sound, but will also pause the CD
Using Modes within an Activity
Once you have selected an Activity to enjoy, the functionality of each button on your Harmony Remote is
automatically configured to that Activity. In addition the Custom Buttons and Display will give you access to
other commands for that Activity which cannot be set to the standard buttons. This is known as the Activity
or default mode.
Within each Activity you can change how the Harmony Remote behaves by switching into one of 3
alternative modes; Sound mode puts the emphasis on controlling the sound fields of the device that you have
chosen to control your sound (e.g. Stereo Receiver); Picture mode puts the emphasis on controlling the
picture of the device that you have chosen to view your pictures (e.g. TV or Projector); and Device mode
which gives you access to all of the possible commands for every one of the devices that are included in your
Harmony Remote configuration.
Sound Mode
When in any Activity, press the "SOUND" button to switch into this mode. Once in the Sound mode, the
Harmony Remote will place the emphasis on controlling the device that you have chosen to control your
sound. For example, if you have chosen your Stereo Receiver to control the sound in your 'Watch a DVD'
Activity, then the Sound mode will change the Harmony Remote buttons to control the Stereo Receiver as
completely as possible. In the Display you will see commands such as "Surround Field" or "Bass+".
Press the "SOUND" or appropriate Activity button to return to the default Activity Mode.
Picture Mode
When in any Activity, press the "PICTURE" button to switch into this mode. Once in the Picture mode, the
Harmony Remote will place the emphasis on controlling the device that you have chosen to display your
video. For example, if you have chosen your Projector to display the video in your 'Watch a DVD' Activity,
then the Picture mode will change the Harmony Remote buttons to control the Projector as completely as
possible. In the Display you will see commands such as "Aspect" or "Picture Adjust".
Press the "PICTURE" or appropriate Activity button to return to the default Activity Mode.
Device Mode
When in any Activity or even when everything is in off mode, press the "DEVICE" button to switch into this
mode. Once in the Device mode, the Harmony Remote will display a list of all the devices that you have in
your Harmony configuration. Select a Device from the display and the Harmony Remote will place the
emphasis on controlling the device that you have chosen. For example, if you choose the Television Device,
the numbers, volume, channel buttons will all control your television.
Press the appropriate Activity button to return to the default Activity Mode.
To find out how to change the function of buttons in each of your Harmony Remote Modes read the
"Customizing your Harmony Remote" chapter of this manual.
Customizing your Harmony Remote
All customization of your Harmony Remote is done from your Member Home Page.
•
•
•
•
•
To add or remove an Activity, click on "Add an Activity" or "Remove an Activity".
To change an Activity you have already set up, click on "Customize" next to the Activity icon, and
then click on the appropriate option.
To add or remove entertainment devices, click on "Add a Device" or "Remove a Device".
To change a device you have already set up, click on "More Options" next to the Device icon, and
then click on the appropriate option.
To customize and Activity, click on "Customize" next to the Activity icon, and then click on the
appropriate option.
You can change the names of Activities. From your Member Home Page, click on the "Customize"
link next to the Activity icon, and then click on the "Rename..." link.
You can have more than one Activity of a given type. For example, if you have both a cable
converter and a satellite receiver, you can add a second "Watch Television" Activity. From your
Member Home Page, click on "Add an Activity". When you're done, rename the Activities to help
you distinguish between them. In the example above, you could rename one "Watch Television" to "Watch
Cable" and the other to "Watch Satellite".
Setting the Activity Buttons
The H688 gives you 5 dedicated buttons for selecting Activities. The Harmony Remote will automatically set
these buttons to let you start each of your Activities. However, if you would like then you can choose which
Activity you want to start when you press any one of the first 4 Activity buttons.
To customize your Activity buttons, go to your Harmony home page and click on the "Customize Activity
Buttons" link in the Activities area. Click on the label for the button that you want to change and then select
the Activity that you want to start when pressing that button.
Any Activities that are not set to a specific button will automatically be located under the "More
Activities" button.
Changing the Behaviour of Buttons within an Activity
When you select an Activity, the Harmony Remote will not only turn on all the correct entertainment devices
and set their inputs correctly, it will also set up its buttons to control that Activity. Based on our knowledge
of how each of your devices is controlled, the Harmony Remote will make its best effort to match all of the
buttons that you need to control an Activity. However, there may be some commands that you want to add to
buttons. Customizing any Activity to change the Behavior of Buttons can do this quickly and easily.
To access the tools that allow you to change the behavior of buttons, go to your Harmony home page and
click on "Customize" next to the appropriate Activity and then select the "Change the Behavior of Buttons"
link.
The first page that you see can be used to change the behavior of buttons in your default or Activity mode.
All of the available buttons on the Harmony Remote will be listed down the left side of the page and each
device that you have chosen to be included in your Activity will be displayed in a column. You can see at a
glance, which buttons have a command associated with them, the device that is being controlled and the
command that is being sent to that device.
If you would like to change the behavior of a button for this Activity, then select a command from the dropdown list in the appropriate device column next to the name of the button that you want to set.
Click on the "Picture" or "Sound" link to see and change the behavior of buttons within the Sound or Picture
mode of this Activity.
Scroll to the bottom of the page and click on the "Save" button for your changes to be saved.
You can set a button to send a command to more than one device at a time. To do this select a
command from the drop-down list in each of the required device columns next to the name of the
button that you want to set.
Adding Custom Button Labels within an Activity
In addition to changing the behavior of the standard buttons, you can also add any number of custom labeled
buttons to an Activity.
To access the tools that allow you to add custom labeled buttons, go to your Harmony home page and click
on "Customize" next to the appropriate Activity and then select the "Change the Behavior of Buttons" link.
If you would like to add a custom labeled button for this Activity, then enter the label that you would like to
appear in the Harmony Remote Display and then select a command from the drop-down list in the
appropriate device column next to the name of the button that you want to set.
Click on the "Picture" or "Sound" link to see and add custom buttons within the Sound or Picture mode of
this Activity.
Scroll to the bottom of the page and click on the "Save" button for your changes to be saved.
When you add custom labeled buttons they will appear in the display from left to right, top to bottom.
For example, the first label in your list will appear in the display next to the top left button and the
second label will appear next to the top right button.
You can add a custom labeled button to send a command to more than one device at a time. To do
this, select a command from the drop-down list in each of the required device columns next to the
name of the button that you want to set.
Add as many custom labeled buttons as you like. Click on "More Custom Labels" to add them one at
a time. When you update your Harmony Remote, use the "NEXT" button to see all of your custom
labeled buttons a page at a time.
Teaching Infrared Commands
The Harmony Remote will learn infrared commands from other remote controls. This is important in
situations where the HarmonyRemote.com infrared database does not already contain an infrared command
you would like to use.
Determine which device you would like to send the infrared command to. click on "More Options"
next to the Device icon, and then click on "Learn infrared commands".
Setup
The Harmony Remote has an infrared sensor at the opposite end to the USB connector. It is important that
the remote that you wish to learn the infrared command from is placed pointing at the infrared sensor on the
Harmony Remote. The other end of the Harmony Remote should be plugged into the USB cable. The remote
controls should be about 2 to 4 inches apart as shown in the picture below.
If the web site says that there were problems reading the infrared signal, try moving the original
remote control further from your Harmony Remote and try again. If that does not work, try again
with your original remote control closer to the Harmony Remote.
Uploading infrared commands
When you press a button on your original remote control, the infrared sensor on the Harmony Remote learns
the infrared signal, and the Harmony Remote uploads it via the USB cable (and your computer's Internet
connection) to the HarmonyRemote.com web site. The web site will try to find a matching pattern for the
infrared signal. If no pattern is found, the signal will be stored as-is in its original format. If a pattern is
found, the HarmonyRemote.com web site converts the signal into a format for convenient storage. Either
way, the signal is then available for you to assign to a button on your Harmony Remote.
Naming an Infrared Command
When you teach an infrared command to the Harmony Remote, you need to give the command a name. You
can then refer to this command by name in various locations on the web site. It is best to use the default
names listed on the Language page. This is so that the web wizards can perform automatic button function
assignments for you. For example, if you teach the volume button infrared commands from your original
remote control, name them VolumeUp and VolumeDown (i.e. with no space, and capitalization as shown).
The web wizards look for commands with these names to automatically assign them to the volume up and
down buttons on the Harmony Remote.
To name a command for which there is no default name on the Language page, try to follow these simple
naming conventions. If you do so, it will make button assignment easier. It will also allow you to easily share
infrared commands with others.
•
•
•
•
Do not use spaces or other special characters such as /, & or * in the name.
Capitalize the start of words.
Examples: NextDisc, ModeDigital
Start the command name with its main function. This helps group related commands in lists.
Example: VolumeRearUp, VolumeRearDown, VolumeFrontUp, VolumeFrontDown
For infrared commands that select inputs (for example on a stereo receiver), start with the prefix
Input. Do not name the input based on what you have connected to your device, but name it based
on what it is called on the front of the device, or on the remote control.
Examples: InputAux, InputVideo1, InputTape, InputDVD, InputVCR.