1
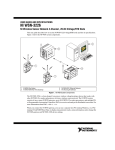
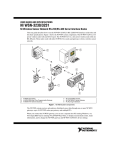
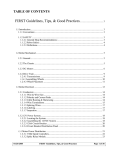
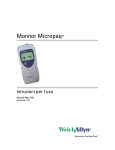
®
®
Welch Allyn Spot
Vision Screener Model VS100
Directions for use
ii
Welch Allyn Spot Vision Screener VS100
© 2015 Welch Allyn. All rights are reserved. To support the intended use of the product described in this
publication, the purchaser of the product is permitted to copy this publication, for internal distribution only,
from the media provided by Welch Allyn. No other use, reproduction, or distribution of the publication, or
any part of it, is permitted without written permission from Welch Allyn.
Welch Allyn assumes no responsibility for any injury to anyone, or for any illegal or improper use of the
product, that may result from failure to use this product in accordance with the instructions, cautions,
warnings, or statement of intended use published in this manual.
Welch Allyn® and Spot® are registered trademarks of Welch Allyn.
Software in this product is Copyright 2015 Welch Allyn or its vendors. All rights are reserved. The software
is protected by United States of America copyright laws and international treaty provisions applicable
worldwide. Under such laws, the licensee is entitled to use the copy of the software incorporated with
this instrument as intended in the operation of the product in which it is embedded. The software may not
be copied, decompiled, reverse-engineered, disassembled, or otherwise reduced to human-perceivable
form. This is not a sale of the software or any copy of the software; all right, title, and ownership of the
software remain with Welch Allyn or its vendors.
This product may contain "free" or "open source" software (FOSS). To learn more about Welch Allyn's use
and support of FOSS, please visit http://www.welchallyn.com/opensource.
For patent information, please visit www.welchallyn.com/patents.
For information about any Welch Allyn product, contact Welch Allyn Technical Support:
www.welchallyn.com/about/company/locations.htm.
DIR 80020275 Ver. A
Revision date: 2015-04
This manual applies to
Welch Allyn, Inc.
4341 State Street Road
Skaneateles Falls, NY 13153 USA
Regulatory Affairs Representative
Welch Allyn Limited
Navan Business Park
Dublin Road
Navan, County Meath,
Republic of Ireland
901029 Vision Screener.
1
1
Introduction
This Directions for use manual is a comprehensive guide designed to help you understand
the capabilities and operation of your Spot Vision Screener VS100. The information in this
manual includes all options available with the Spot Vision Screener. The applicability of
some sections of this manual depends on the configuration of your particular device.
Read this manual thoroughly before attempting to use the device.
The vision screener is a hand-held instrument with a video display on the rear of the unit
that provides subject visualization and alignment. Video display also provides user
interface functionality for data input and display. The vision screener provides visual and
audible cues to attract subject’s attention and gaze. The device provides a fast data collect
for easy evaluation of the most difficult pediatric subjects of limited compliance. Each
evaluation provides simultaneous binocular assessment of the subject’s refraction, pupil
size and gaze.
Intended use
The Spot Vision screener is intended to measure the refractive power of the eye by
measuring light reflexes from the retina. It also estimates pupil size, pupil distance and
eye gaze deviation. It is intended for use on subjects six months of age through adults.
Indications for use
The Spot Vision screener is indicated for use by healthcare professionals or under the
direction of a healthcare professional to screen or evaluate individuals for potential
refractive errors associated with poor vision.
Contraindications
The Spot Vision Screener has no known contraindications.
2
Introduction
Welch Allyn Spot Vision Screener VS100
Symbols
Documentation symbols
Consult operating instructions/directions for use (DFU). A copy of the DFU is available on this website. A printed copy of the
DFU can be ordered from Welch Allyn for delivery within 7 calendar days.
WARNING The warning statements in this manual identify conditions or practices that could lead to loss of data, illness,
injury, or death.
CAUTION The caution statements in this manual identify conditions or practices that could result in damage to the
equipment or other property.
Power symbols
Rated power input, DC
Battery inside (Not user replaceable)
Power On/Off
USB port
DC power input port, Center pin positive
Miscellaneous symbols
Equipment is not protected against the ingress of liquid
IPXØ
Non-ionizing electromagnetic radiation
This symbol is applicable for EC member countries only. To avoid potential negative consequences for the environment and
possibly human health, this instrument should be disposed of (i) for EU member countries - in accordance with WEEE
(Directive on Waste Electrical and Electronic Equipment) or (ii) for all other countries, in accordance with local disposal and
recycling laws.
Directions for use
Introduction
3
The CE mark on this product indicates that it has been tested to and conforms with the provisions noted within the 93/42/
EEC Medical Device Directive.
User Interface Symbols
Battery status/level indicator
Battery charging (Flashing) or charged (Continuous)
Wireless On/Off button
Connected to the wireless network
No wireless network in range
No IP address assigned by the router
IP
Unknown network
?
4
Introduction
Welch Allyn Spot Vision Screener VS100
Cannot connect to configured network
!
Sound off
Sound on
Continue
Back
Exit
Print job in progress
Directions for use
Introduction
5
Warnings, cautions and notes
WARNING The warning statements in this manual identify conditions or
practices that could lead to loss of data, illness, injury, or death.
CAUTION The caution statements in this manual identify conditions or practices
that could result in damage to the equipment or other property.
WARNING Risk of electric shock. All signal input and output (SIP/SOP)
connectors are intended for connection of only other medical devices, medical
systems or non-medical devices complying with IEC 60601-1, or other IEC
standards appropriate to the device. For example, a printer connected via USB
must comply with IEC 60950. Connecting additional unapproved devices to the
device might increase chassis or patient leakage currents.
WARNING Risk of electric shock. No modification of this equipment is allowed.
WARNING Risk of electric shock. Do not open the device or attempt repairs.
The device has no user-serviceable internal parts. Only perform routine cleaning
and maintenance procedures specifically described in this manual. Inspection
and servicing of internal parts shall only be performed by qualified service
personnel. Attempt to modify this device may result in bodily harm and will void
product warranty.
WARNING Risk of electric shock. Do not allow the patient to make contact with
accessible conductive parts (DC adaptor output connector, power input
connector and USB port). Additionally, you should not make contact with the
patient and any accessible conductive parts at the same time.
WARNING To avoid a possible explosion, do not use the device in the presence
of flammable anesthetics: mixtures containing air, oxygen, or nitrous oxide.
WARNING Risk of data loss. If a reboot is required during a system freeze, data
loss, such as printer configuration and subject data, can occur.
WARNING Lithium ion battery. Risk of fire, explosion, and burns. Do not handle
or disassemble the battery pack.
WARNING Use only accessories approved by Welch Allyn. Visit
www.welchallyn.com. The use of any other accessories can result in inaccurate
patient data, can damage the equipment, and can void your product warranty.
WARNING Injury risk and equipment damage risk. When charging the device,
properly secure all DC transformer cords to minimize trip hazards.
WARNING Patient injury risk. Verify patient identity on the device after manual
or barcode entry and before printing or transferring patient records.
WARNING False positive and false negative results may occur in a healthcare
screening. Vision screening does not replace a complete eye examination by an
ophthalmologist or optometrist.
6
Introduction
Welch Allyn Spot Vision Screener VS100
Caution The device is a precision instrument. Do not subject it to physical
shock.
Caution Do not use the wrist strap as a means to carry the device; it is not
designed to carry the weight of the device.
Caution The device is not waterproof. If you accidentally drop it into liquid or
liquid is spilled on the device, contact Welch Allyn Technical Support
immediately. If minor water droplets are found on the device, wipe off with a
soft dry cloth.
Caution Do not store the device in the foam or case while the DC power
adapter is plugged in; this may cause damage to the power cord and to the
device.
Caution Do not leave the device in excessive heat or in direct sunlight. High
temperatures can cause the device to malfunction.
Caution When plugging the DC power connector into the device, do not force
the power connector into the device; this may cause damage to the device,
which will not be covered under warranty.
Caution Do not push or scratch the touchscreen display with stiff or rigid
objects. This may cause damage to the device. A stylus is acceptable for use
with the device.
Note A minimum pupil size of 4mm is required for screening to occur and may
be difficult to achieve in a room with any light source. If the pupils are too small,
the vision screener will notify you on screen to adjust the lighting in the room.
For best results, subject’s pupils should be 5mm or greater.
Directions for use
Introduction
7
Contents Checklist
The main shipping box contains the vision screener, Directions for use, and the Accessory
box. The Accessory box contains:
AC Power Cord.
Power Supply/Charger.
Cleaning Cloth.
Velcro Cable Straps.
Note
Please do not discard the box and foam. Damages incurred by shipping the device
in non-approved packing material will void the limited warranty (see warranty for
details).
If you purchased a carrying case, place the foam from the shipping box inside the carrying
case for safer transport. Do not store your vision screener in the foam or case while the
Power cord is plugged in.
8
Introduction
Welch Allyn Spot Vision Screener VS100
9
2
Controls, Display Window, and
Connections
Drawings and text are representative of the Spot Vision Screener with all available
options.
Features
Rear View of Vision Screener
1
LCD Screen
2
Neck Strap Mount
3
AC Power Connector
4
Power Button
5
Wrist Strap Mount
6
Serial Number Label
7
Tripod Mount
8
Battery Charge Green LED Indicator
9
USB Port
10
Ambient Light Sensor
10
Controls, Display Window, and Connections
Welch Allyn Spot Vision Screener
Front View of Vision Screener
1
Range Finder
2
Front Glass
3
Speaker
Directions for use
Controls, Display Window, and Connections
11
Display Window
When the vision screener is powered on, the main menu or Home Screen will appear. If
the vision screener is connected to a network, the network name and IP address will be
visible in the upper left corner in the black bar.
1. Age Range
To begin instant screening, with no personal subject data, select an age range of the
subject from the Home screen. You will be able to enter subject data after the screening
if desired.
2. Start Button
The Start button will allow you to:
•
Enter subject information such as ID, First and Last Name, Gender and Date of
Birth (DOB)/Age (Required)
•
Find queued subjects (exact match on the ID screen)
•
Begin the screening process (Binocular and Monocular available)
•
Review and print screening results
3. Icons on Bottom of Screen
•
Queue – View, select or search for queued subjects from a list to begin the
screening process.
•
History – View already screened subjects (completed records).
•
Tools – A variety of options to customize the vision screener.
12
Controls, Display Window, and Connections
Welch Allyn Spot Vision Screener
Subject Information Screen
On the subject information screen, confirm all data is correct. You can modify information
by touching the field you wish to change. After the change is completed select OK and
you will come back to the subject information screen. Date of Birth/Age is required and
will highlight in red if there is no age or if it is not a valid birthdate or age (under 6 months).
Select GO to begin the screening process.
Directions for use
Controls, Display Window, and Connections
Understanding the Results
1
Pupillary Distance
2
Pupil Size Indicator
3
Right Eye (OD), Left Eye (OS)
4
Complete refraction
SE - Spherical equivalent
DS - Sphere
DC – Cylinder
Axis – Axis
5
Screening Result
6
Home
7
Cylinder Convention
8
Alignment Indicator
9
Degree, Horizontal, Vertical
13
14
Controls, Display Window, and Connections
Welch Allyn Spot Vision Screener
Tools
The Tools menu will allow you to customize and configure the vision screener with the
following options:
Displays firmware version, software application version and serial number. Also displayed
is a quick reference of important the vision screener features, including memory storage
levels of the device
View the age-based criteria settings used for exam recommendations that are currently
active on the vision screener.
Allows you to set the current date and time for your vision screener.
Enables you to import and export using an inserted USB storage device.
Location allows you to set a location for a screening and all subjects will be tied to that
location.
Allows you to connect the vision screener to a wireless network. You can manually enter
your network name (SSID), select the security type, and enter the passphrase for your
network. From this page you can view and change your TCP/IP settings.
Allows you to configure a network printer and print a test page. It also lets you view printer
status.
Allows you to configure how data is displayed on the Results screen when a screening is
complete. This includes data format, cylinder convention, displaying or hiding
measurements and recommendations, setting default screening display and screening
Helps you set a security PIN for your device for added security. If enabled a PIN will be
required whenever you start the device or upon waking it.
Activates the license on the device.
Allows you to select the language that will display on the vision screener.
15
3
Setting up the Vision Screener
Charging
1.
Connect the provided DC cord set and power supply/charger together.
2. Gently lift the back of the vision screener to view the available connections.
3. Locate the DC power connector on the vision screener and connect the power
supply/charger. The DC power connector on the power supply/charger will easily
insert into the DC power connector on the vision screener. Using force to connect the
power charger can damage the device and will void the warranty.
4. Plug the DC power cord into an available wall outlet to charge the device.
Powering the vision screener on and off
1.
To turn the vision screener on, press and release the power button (start-up process
takes approximately 30 seconds). Once powered on, you will see the Main Menu
2. To turn the device off, press and hold power button for two seconds. A confirmation
screen will appear to confirm shut down.
3. A flashing green light means the unit is charging, a steady green light means the unit
is fully charged.
Tripod Mount
The vision screener can be mounted to a standard photographic tripod. A ¼-20 threaded
mount located on the bottom of the device is available for attaching a tripod.
Helpful Hints
•
No activity on the vision screener—After 60 seconds the screen will dim; after 5
minutes the screen will automatically turn black to conserve battery power. Tap the
screen to ‘wake up’ the vision screener or press the power button. If the screen does
not light up, plug in the power cord and try again.
•
Exporting/Clear All—Verify you have successfully exported desired data to a USB
drive before you select Clear All.
•
Routinely delete ALL records from the vision screener—Go to the History screen
and select Clear All icon. Select Delete All Records. You may also delete all queued
records.
•
Avoid powering off during a screening—Once the screening takes place, exit by
selecting the Exit button, then power down the device normally.
16
Setting up the Vision Screener
Welch Allyn Spot Vision Screener
•
Input Screen—Holding down the Back button on any input (keyboard) screen will
delete all data from the field.
•
Low Battery—When the battery level reaches a very low level, a notice will appear to
the User indicating they should insert the power cable or the device will shut down. If
no power cable is inserted, the device will automatically shut down due to low voltage
Wireless Network Configuration
From the Tools menu, select the Network icon. Current network settings are displayed
on the screen. To add or edit any of the fields, see instructions below. If they are correct,
select OK to be returned to the Tools menu.
To add/change the network name (SSID):
1.
Touch the SSID Name field; a keyboard will appear.
2. Enter the SSID (case sensitive); select OK to save your changes and return to the
previous screen. The OK button will turn dark when changes have been made and are
available to be saved.
To add/select the security type:
Select the appropriate security type: None, WEP, or WPA.
Note
WPA option supports WPA Personal/WPA2 Personal.
To add/change the passphrase (password):
1.
Touch the Passphrase button; a keyboard will appear (this is only available when the
security field is set to WEP or WPA).
2. Enter the passphrase (case sensitive) and select OK.
3. On the Network screen, select OK to save changes, otherwise changes will not be
applied.
To enable or disable the wireless capabilities on the vision screener:
Select the On/Off button on the network menu.
Note
Wireless must be on for printing to be enabled.
To view advanced network settings:
1.
Select TCP/IP. From here, you can also view your current TCP/IP address as assigned
by your network.
2. For additional network configurations, select Static to manually configure your
network address and settings. (Also available is the MAC address of your vision
screener).
Directions for use
Setting up the Vision Screener
17
Printer Configuration
The vision screener is capable of connecting and printing to most network capable
Hewlett-Packard (HP) printers. The vision screener also contains some generic PCL
drivers that can be used with non-HP printers, as well as a custom driver that supports the
Brother QL-720NW label printer.
Note
1.
In order to install the QL-720NW on the vision screener, it must have QL-720 in its
name on the network and you must select the driver labeled QL-720NW from the
driver list. Use Brother DK2205 Continuous Length Paper Tape or equivalent.
From the Tools menu, select the printer icon.
2. The next screen will list the available printers on the vision screener. This is a list of all
printers already added to the vision screener.
To select or change a default printer:
From the printer list, find and select the desired printer (it will auto-highlight in blue.) If
more than one printer is listed, touch Set as Default button for the highlighted printer.
To configure a printer
Select a printer then press the Edit button to view printer status or print a test page.
To delete a printer
1.
Select the printer from the available printer list; touch the minus button to delete.
2. A pop-up will appear asking you to confirm deletion of the printer.
To reset the printer system
This will delete all printers:
1.
Touch the Trashcan icon.
2. A pop-up will appear; select Delete. This will remove all current printer configurations.
Adding a network printer
1.
From the Printers Available screen, select the plus sign to add a printer.
2. If any printers are found on the network, they will appear in the list. If your printer is
not shown, select + Add New Printer at the top of the screen or you can select the
printer you wish to add then press the continue icon.
Note
Make sure you are connected to a wireless network with available printers for the
vision screener to show printers available.
3. Review the printer details (Name, Driver and Location). To change or add settings
touch the field you wish to change. If you need to add a driver, you can use the search
feature by typing part of the driver name in the Search field.
18
Setting up the Vision Screener
Note
Welch Allyn Spot Vision Screener
PCL drivers are available for non-HP printers. It is not guaranteed that every
printer will work with the vision screener.
4. Once changes have been made, select Save.
5. Once saved, the Print Test Page will appear dark.
6. A printer icon will appear in the menu bar indicating the job is processing. The number
of jobs in the print queue will show up in the Jobs box at the top of the Printer
Details screen, along with the current printer status.
Note
7.
If you are having a problem with your printer or a print job is stuck in the queue,
select the reset button to clear the print job and reset the printer.
Return to the Printers Available screen and be sure to highlight the desired installed
printer and set is as the default by selecting the Set as Default button.
Adding a Direct Connect (USB) Printer
1.
Connect the Vision Screener to a wireless network.
2. Connect the USB cable from the printer to the VS100’s USB port.
3. Note the IP address of the VS100 from the main menu.
4. Visit the following URL on a computer on the same network:
http://<ip_address_of_VS100>:631/
5. Click on the Administration tab; under Printers, click on the Find New Printer button.
6. Click Add This Printer on the one listed with USB in the title, for example: HP ENVY
5530 series (HP ENVY 5530 series USB CN3C91S1N205XT HPLIP).
Note
7.
Give the printer a simpler name for ease of typing on the VS100, for example: use
ENVY5530 instead of HP_ENVY_5530_series_USB_CN3C91S1N205XT_HPLIP.
Click Continue.
8. Choose Make and click Continue, for example: HP.
9. Choose Model and click Add Printer, for example: HP Envy 5530 Series hpijs, 3.13.9
(en, en).
10. Click Set Default Options.
11. On the VS100, press Tools, then choose Printer.
12. Press the + arrow to add a new printer, then press the right arrow to choose Add
New Printer.
13. Give the printer a name, for example: HP Envy 5530.
14. Press Edit under Driver, choose the proper driver for the printer.
15. Press Edit under Location, type in ipp://127.0.0.1/printers/<printer_name>, for
example: ipp://127.0.0.1/printers/ENVY5530.
16. Press the Save button.
17. You may now press the Print Test Page button to confirm everything works.
Directions for use
Setting up the Vision Screener
19
Importing/Exporting Files
1.
From the Tools menu, select Import/Export and you will be directed to the Import/
Export screen.
2. Insert a USB storage device into the USB port on the vision screener (Recommended
USB size is 8GB or larger).
3. Once the USB device is detected, the Import and Export buttons will be available for
selection and you will see the USB symbol in the upper right black bar next to the
date.
4. The Import button will only become available if the vision screener recognizes a valid
import file. Number of import files found will be shown on the screen.
Note
If the buttons do not highlight within five seconds of inserting the USB drive,
remove the USB, insert it into your PC and remove all files from the drive before
attempting to retry.
Export
1.
Select the Export button. If you wish to export one file containing no subject specific
data select Exclude Personal Data, If you do not choose this option, then all data will
be exported. Select Export button again to begin the export process.
2. Wait until the message “Export Finished successfully” displays, select OK then you
may safely remove the USB drive from the vision screener.
3. The exported folder name on the USB will be
“Spot_SerialNumber_YYYYMMDD_HHMMSS” (the folder labeled
“Spot_SerialNumber” will only contain screening data if inserted while screening
subjects). It will contain:
Note
•
Spot Criteria file (located in the “import” folder).
•
Spot Subjects Template file (located in the “db” folder).
•
Spot Results file (located in the “db” folder).
•
Spot Banner file (located in the “import” folder, will only be visible if custom
banner was added).
•
Subject PDF files (located in the “pdf” folder).
If the USB drive is removed prior to export completion, data transfer may be
incomplete or become corrupted as a result.
20
Setting up the Vision Screener
Welch Allyn Spot Vision Screener
Import
With the import function, you can import:
•
Updated criteria files (SpotCriteria.csv)
•
Future, queued, screening files (SpotSubjects.csv or Location.csv By using a
Location in the name of the file, this will default all subjects in the file to a
location via the name of the file, ex LakeMary.csv would default to
“LakeMary” as the location for all subjects in this file)
•
Custom banner for the screening reports (banner.png) The file must follow
the correct naming convention for a successful import (i.e., banner.png,
SpotCriteria.csv, SpotSubjects.csv. Remember SpotSubjects can have a
location as the name of the file).
•
Updated criteria files (SpotCriteria.csv)
Custom Banner
Welch Allyn offers the ability to add a custom banner to the bottom of the printable
reports. Please note that Welch Allyn does not supply custom banners. You will need to
create your banner using the specifics below:
•
Banner files must be named “banner.png”
•
No larger than 1MB
•
Image must be 1376 x 240 pixels
To add a custom banner
1.
Place the banner.png file on the root/top-level directory of the USB.
2. Insert the USB in the vision screener. Go to Tools, then select Import/Export.
3. The import file option will highlight; select Import.
4. To verify that the file was imported successfully, screen a new subject or select a
completed record and print the report. Your new banner will be printed on the bottom
of the report.
Directions for use
Setting up the Vision Screener
21
Web Access
When connected to a wireless network, the vision screener gives you the ability to view
files from a web browser (Internet Explorer, Firefox, Safari, etc.) on a PC on the same
network.
To access the webserver on the vision screener:
1.
From your computer, open a web browser; enter the devices IP address in the
address bar (this is located on the top black bar on the Home Screen).
2. You will be prompted to enter the username and password.
Username: spot
Password: 0000
Note
If you have enabled security on your device, the password will be your four-digit
pin code.
3. Default will go to the Report folder. This contains the pdf folder where you can find
subject PDF files.
4. To view the SpotResults.csv file change to the “db” directory.
Licensing
In order to use the screening functionality of the vision screener, the device needs to be
licensed. If your device came new from the factory with this instruction document, your
license is already installed and active. If you have updated the software on your device,
the licensing will need to be updated as follows:
1.
Connect an empty USB device to the vision screener USB port.
2. Go to Tools, then press the License button.
3. After a moment, a dialog box will appear indicating that the registration file has been
exported to the USB drive.
4. Send the file titled spot-[serial number].reg to Welch Allyn Support at
[email protected].
Welch Allyn Support will review your registration file and email you a valid license key.
Once you receive the key, perform the following:
1.
Save the file to the top level (root directory) of a USB Drive.
2. Insert the USB drive into the USB port on the vision screener.
3. From the Tools menu, select License. After a moment, a dialog box will appear
indicating that the license file has been imported onto the device.
22
Setting up the Vision Screener
Welch Allyn Spot Vision Screener
23
4
Vision Screener Operation
Screening Environment
For optimal screening results, screen in an environment with lower level subdued lighting.
Be sure to eliminate or block any sources of sunlight and/or incandescent light from
reflecting on the subject’s eyes. Florescent light is acceptable but note that the subject’s
pupil size can be affected and can decrease your chances of a successful screening.
Note
A minimum pupil size of 4mm is required for screening to occur and may be
difficult to achieve in a room with any light source. If the pupils are too small, the
vision screener will notify you on screen to adjust the lighting in the room. For
best results, subject’s pupils should be 5mm or greater.
Screening a Subject
1.
Position yourself approximately 1 meter from the subject. If using a tripod, place the
tripod approximately 1 meter from subject.
2. Start screening and slowly rotate the device upward to meet both of the subject’s
eyes. Adjust your distance from the subject until both eyes are clear on the screen.
With a tripod, adjust the tripods position up or down and side to side until the
subjects eyes are in focus on the screen.
A blue screen indicates you are too close or too far from the subject.
Note
Keeping the vision screener even (on axis) with the subject’s eyes will promote
quicker results and help ensure you are not capturing other objects.
Position yourself with one foot in front of the other, slowly rock forward and back until
the screen turns grey, indicating you are in the capture range. When using a tripod,
move the tripod as needed to ensure focus on the subject’s pupils until the screen
turns grey.
3. Keep the vision screener device steady until the screening wheel appears, indicating
the capture process is underway.
4. If you were unable to capture the subject’s pupils with a successful screening, the
measurement will be stopped, at this point you can retry, flag the record, try
monocular mode or return to the Home screen.
5. If the pupils are too small, the device will notify you on screen to adjust the lighting in
the room to promote larger pupil size.
24
Vision Screener Operation
Welch Allyn Spot Vision Screener
How to Focus the vision screener
A
Position vision screener approximately 36 inches away from subject.
B
Hold vision screener close to body and lean forward and backward until
the screen becomes gray.
C
Make small movements until the spinner appears on the gray screen.
Note
Eyes should be wide open and kept on the center of the frame for best
results.
Directions for Use
Vision Screener Operation
25
Monocular Mode
In monocular mode, you will be given the option to choose which eye to screen. This
should be attempted when binocular screening does not capture the subjects’ pupils.
1.
Touch the side of the screen that corresponds with the eye you would like to screen.
(OD = subjects right eye; OS = subjects left eye).
2. When complete, you can repeat the process with the other eye by choosing Mono
from the Results Options Menu.
Viewing the Results
The results screen will appear at the end of the screening process.
All results viewing options are in the Tools menu under Results including; defaulting to a
summary screen or the detailed results screen, hiding recommendations or
measurements, cylinder convention options and raw or rounded data.
26
Vision Screener Operation
Welch Allyn Spot Vision Screener
Understanding the Results
The figure below outlines the results screen and what it shows you:
1
Pupillary Distance
2
Pupil Size Indicator
3
Right Eye (OD), Left Eye (OS)
4
Complete refraction
SE - Spherical equivalent
DS - Sphere
DC – Cylinder
Axis – Axis
5
Screening Result
6
Home
7
Cylinder Convention
8
Alignment Indicator
9
Degree, Horizontal, Vertical
Results that are out-of-range are indicated in red.
Note Screening results provide an output that is either in- or out-of-range, accompanied
by the appropriate statement in the device output display (“Screening Complete” or
“Complete Eye Exam Recommended”). The displayed message is intended to prompt
the caregiver to assess whether the subject should be referred to an eye care specialist
for further evaluation or simply be monitored at future screenings.
Directions for Use
Vision Screener Operation
27
Vision Screener Criteria
To modify current screening criteria:
1.
Perform an export and insert the USB drive into your PC.
2. Go to the USB drive folder and open the Spot folder that you just exported; select the
import folder.
3. Copy the file “SpotCriteria.csv” to the top folder on the USB drive (the file cannot be
within a folder). Once copied, open the file.
4. Make any desired changes using Microsoft Excel or compatible program.
5. Save file as a Comma Separated Value (.csv) file. You must make sure the file is called
“SpotCriteria.csv”. Eject the USB drive from your PC and insert into the vision
screener.
6. Go to the Tools menu and select Import/Export. Select the Import button to import
the updated criteria file.
7.
To verify the file was imported successfully, go to the Tools menu and select Criteria;
review new settings.
Note
When custom criteria has been imported and is in use, there will also be a
Restore button at the bottom of the screen. This button will prompt the user to
confirm they want to revert to the default criteria that was shipped with the
device. By confirming, the custom criteria will be deleted from the vision
screener and replaced with the default criteria.
Subjects
The vision screener gives you the ability to populate a subject list for queued subjects.
1.
Perform an export, once complete, remove the USB drive from the vision screener
and insert it into your PC.
2. Select the Spot folder that was just created.
3. Select the “db” folder, then select the “SpotSubjects.csv” file.
4. The SpotSubjects.csv file contains six columns; do not change any of the column
headings. Simply add information to the columns as shown below:
Note
You may add a column before the Patient ID column and call it Location if you
need to create specific locations for each subject.
•
Patient ID—You can use any combination of alpha, numeric characters and
symbols. This field is used for quick subject look-ups.
•
First Name—Enter the first name. Use any combination of alpha characters.
•
Last Name—Enter the last name. Use any combination of alpha characters.
•
Date of Birth—Enter the date of birth in the format MM/DD/YYYY. You can
enter the age of subject in years, months or a combination of both. This field
is required for the import to work.
28
Vision Screener Operation
Welch Allyn Spot Vision Screener
For example: If a subject were 2 years and 10 months old, you would enter
2Y10M. Use numeric and alpha characters.
•
Gender—Select Male or enter M; select Female or enter F. Alpha characters
only; leaving the field blank will default to no gender identified.
•
Eyewear prescription—Select None, Glasses, or Contacts. By leaving the
field blank, ‘None’ will be set as the default.
After updating the import file:
1.
Confirm the file is saved as a Comma Separated Values (.csv) file.
2. Verify file name is ‘SpotSubjects.csv’ or ‘DesiredLocation.csv’.
Note
If labeling your subject file(s) with a location, the vision screener will import all
files found on the USB drive at the same time
3. Follow the import procedures to load the file onto the vision screener. To verify the file
was imported successfully: Return to the Home screen and go to the Queue icon to
view the new records.
29
5
Troubleshooting
System Restart
1.
To power cycle the vision screener - press and hold the On/Off button until a
confirmation screen appears. Select Confirm to power off.
2. When the screen turns black, wait 30 seconds and then press the power button to
turn the vision screener back on. Ensure the device has power by plugging in the
power cord.
System Freeze
In the event the vision screener locks up and is unresponsive to touch, you will need to
perform a hard system reset.
1.
Press the On/Off button.
2. If the Power Off window appears, select Confirm to shutdown the device.
3. If not, press and hold the On/Off button until the screen goes black, then release the
On/Off button.
4. Wait about one minute then perform the normal start-up process.
Note
This may cause some data loss (ex. printer configuration and subject data).
Printer Issues
Check that your printer is turned on and has sufficient ink or toner:
1.
Print a test print page directly from the printer.
2. After you confirm your printer is in proper working order, verify the printer is on a local
network by printing to the printer from a PC on the same local network.
3. If all of the above are in working order perform a System Restart (see above).
Wireless Issues
If you encounter problems connecting to a wireless network:
1.
Check for the Wireless icon in the upper right corner. If the icon is red, try power
cycling the vision screener first.
2. Verify all network settings are entered correctly.
3. If the settings are correct, try turning the vision screener off, then back on.
30
Troubleshooting
Welch Allyn Spot Vision Screener
4. Check on the Home screen to see if your network name and IP address is identified
in the upper left corner in the black bar.
Note
Restarting helps to reinstate the connection to the network.
5. If the connection does not automatically reconnect, go to Tools, Network, select
Security Type, reselect the correct type (None, WEP, WPA) then select the
highlighted OK. This should re-instate the network connection.
System Messages
Specific system messages may appear while operating the vision screener. If so, the
information below will assist you in identifying what the messages indicate:
Message Text
Message
Actions
Sorry for the inconvenience. We OK or
need to reboot the device.
Cancel
Meaning
Action
Screening mode has encountered a problem
and the device needs to be restarted.
Problem encountered. The
device needs to reboot.
Reboot
The system was not able to start and has
attempted to correct the issue.
Select Continue to reboot the device or
Cancel to continue using the device in
Read Only mode. If the problem persists,
contact Welch Allyn Support.
Select Reboot and try again. If problem
persists, contact Welch Allyn Support.
The screening system is not
available.
None
The Exam system did not initialize, or is
unresponsive.
Power cycle the device and try again. If
problem persists, contact Welch Allyn
Support.
The screening system is not
initialized.
None
The Exam system did not initialize, or is
unresponsive.
Power cycle the device and try again. If
problem persists, contact Welch Allyn
Support.
Device has not finished saving
the previous screening.
None
The system has detected that it is still saving Power cycle the device and try again. If
files to disk from a previous exam.
problem persists, contact Welch Allyn
Support.
Un-calibrated device
None
The system has not been able to read the
device configuration file.
Power cycle the device. If problem
persists, contact Welch Allyn Support.
For more information on troubleshooting or error messages, contact Welch Allyn’s
support team (refer to the last page of this manual for additional contact information).
31
6
Cleaning the Vision Screener
Clean the Vision Screener
WARNING Electric shock hazard. Before cleaning the monitor, disconnect the DC power
cord from the power outlet and the vision screener.
WARNING Liquids can damage electronics inside the vision screener. Prevent liquids from
spilling on the vision screener.
If liquids are spilled on the vision screener:
1.
Power down the vision screener.
2. Disconnect the power plug.
3. Dry off excess liquid from the vision screener.
If liquids possibly entered the vision screener, remove the vision screener from use until it
has been properly dried, inspected, and tested by qualified service personnel.
Clean on a routine basis according to your facility's protocols and standards or local
regulations. If the vision screener is on, lock the display and disconnect the DC power
cord.
The following agents are compatible with the vision screener:
•
70 percent isopropyl alcohol
•
10 percent chlorine bleach solution
Disinfect according to your facility's protocols and standards or local regulations.
70 percent isopropyl alcohol
Wipe the vision screener with a clean cloth slightly dampened with 70 percent isopropyl
alcohol.
10 percent chlorine bleach solution
1.
Wipe the vision screener with a clean cloth slightly dampened with a 10 percent
bleach and water solution. Follow the cleaning agent manufacturer's guidelines.
2. Rinse with a clean cloth slightly dampened with water that meets EP and USP quality
standards.
3. Allow the vision screener surface to dry for a minimum of 10 minutes before using
the monitor.
32
Cleaning the Vision Screener
Welch Allyn Spot Vision Screener
33
7
Specifications
The power supply/charger’s supplied with the vision screener have the following
characteristics:
•
This vision screener DFU document is valid for software versions 3.0.xx.yy.
•
The Vision Screener has been calibrated as part of the manufacturing process and
does not require calibration henceforth.
•
The external power supply/charger supplied is a Class II equipment and the vision
screener is also a Class II equipment when connected to the external power supply/
charger.
•
The vision screener is internally powered by equipment (battery) when not connected
to the external power supply/charger.
•
Protection against electric shock, no applied part.
•
The vision screener is rated IPX0 and thus not protected from the ingress of water.
•
The vision screener is not suitable for use in the presence of a flammable anesthetic
mixture with air or with oxygen or nitrous oxide.
•
The vision screener is suitable for continuous operation.
•
The vision screener quickly and easily detects vision issues across all age groups
starting at 6 months.
•
Welch Allyn suggests a battery replacement, at an appointed Welch Allyn repair
facility, every 2.5 years at the owner’s expense. The vision screener regular
maintenance consists of wiping dust or dirt off the front glass surface and the LCD
display as needed.
•
The USB port shall only be used for software download/upload via a USB flash drive
and shall not be cable connected to any other device.
Specifications
Mfg: SL Power Electronics
Model: MENB1040A1503N01 or MEMB1040A1541N01
Input Voltage: 90 – 264VAC (100 – 240VAC Nominal)
Input Frequency: 47 – 63 Hz
Input Current: 100VAC: 1.1A
Avg. Efficiency: 81-87% @ 0-50 W, ≥ 87% @ >51 to 250
Dimensions (cm/in): 21.6 cm x 17.1 cm x 12.1 cm (8 ½ in. x 6 ¾ in. x 4 ¾ in.)
34
Specifications
Welch Allyn Spot Vision Screener
Weight (lbs.): ~2.55
Wireless Network: 802.11 b/g/n
Operating Temperatures (°C): +10 to +40
Operating Humidity: 30% to 95% Relative Humidity (non-condensing)
Storage/Shipping Temperatures (°C): 0 to +50
Storage/Shipping Humidity: 0% to 95% Relative Humidity (non-condensing)
Storage/Shipping Atmospheric Pressure: 800 hPA to 1060 hPA
Expected Battery Life: 2.5 Years (Under Normal Usage)
Measurements
Note Screening results provide an output that is either in- or out-of-range, accompanied
by the appropriate statement in the device output display (“Screening Complete or
“Complete Eye Exam Recommended). The displayed message is intended to prompt the
caregiver to assess whether the subject should be referred to an eye care specialist for
further evaluation or simply be monitored at future screenings.
Refraction
Spherical Equivalent:
•
Range: -7.50D to +7.50D in 0.25D increments
•
Accuracy: -3.50D to 3.50D, ± 0.50D
-7.50D to < -3.50D, ± 1.00D
> 3.50D to 6.00D, ± 1.00D
Cylindrical:
•
Range: 0.00D to +3.00D in 0.25D increments
•
Accuracy: 0.00D to 1.50D, ± 0.50D
> 1.50D to 3.00D, ± 1.00D
Cylindrical Axis:
•
Range: 1 to 180 degrees in 1-degree increments
•
Accuracy: ± 5 degrees (for cylinder values > 0.5D)
Pupil size:
•
Range: 4.0 mm to 9.0 mm in 0.1 mm increments
•
Accuracy: ± 0.1mm
Pupil distance:
•
Range: 35mm to 80 mm in 1 mm increments
•
Accuracy: ± 1 mm
Time per measurement:1 s
•
Measuring distance: 1 m ± 5 cm
•
Fixation target:Random visual pattern and audible sound
Measurement principle: Optical reflex
Directions for Use
Specifications
35
Environmental Protection
This device contains Lithium ion cells and other electronic materials. Please contact your
local government authorities for proper electronic waste recycling or disposal methods at
end of life.
EMC Information
This equipment has been tested and found to comply with the limits for a Class B digital
devices, pursuant to Part 15 of the FCC Rules. This medical device equipment is suitable
for use in all commercial and domestic establishments. This equipment generates, uses,
and can radiate radio frequency energy and, if not installed and used in accordance with
the instruction manual, may cause harmful interference to radio communications.
However, there is no guarantee that interference will not occur in a particular installation.
If this equipment does cause harmful interference to radio or television reception, which
can be determined by turning the equipment off and on, the user is encouraged to try to
correct the interference by one or more of the following measures:
•
Reorient or relocate the receiving antenna.
•
Increase the separation between the equipment and receiver.
•
Connect the equipment into an outlet on a circuit different from that to which the
receiver is connected.
•
Consult the dealer or an experienced radio/TV technician for help.
The maximum wireless signal rate for the system is derived from IEEE Standard 802.11b/
g/n specifications. Actual data throughput will vary. Network conditions and
environmental factors, including the volume of network traffic, building materials and
construction, and network overhead, may lower actual data throughput rate.
Environmental conditions will adversely affect wireless signal range.
Electromagnetic Compatibility
This product conforms to the EMC standard (IEC 60601-1).
•
MEDICAL ELECTRICAL EQUIPMENT needs special precautions regarding EMC and
needs to be installed and put into service according to the EMC information provided
in the accompanying documents.
•
Connectors should not be touched and connections should not be made to these
connectors unless ESD precautionary procedures are used.
•
Portable and mobile RF communications equipment can effect medical electrical
equipment.
•
The use of accessories and cables other than those supplied with the instrument
exception for cables sold by the manufacturer of the equipment as replacement parts,
may result in increase emission or decrease immunity of the equipment or system.
•
The equipment or system should not be used adjacent to or stacked with other
equipment. If adjacent or stacked use is necessary, the equipment or system should
be observed to verify normal operation in the configuration in which it will be used.
36
Specifications
Welch Allyn Spot Vision Screener
EMC Table
Table 1. Emission Guidance
The Welch Allyn vision screener is intended for use in the electromagnetic environment specified below. The operator or the user of the
device should assure that it is used in such an environment.
Emission Test
Compliance
Electromagnetic environment guide
RF EmissionCispr 11
Group 1
The vision screener must emit
electromagnetic energy in order to perform
its intended function. Nearby electronic
equipment may be affected.
RF EmissionCispr 11
Class B
Harmonic EmissionIEC 61000-3-2
Class B
Compliant
Compliant
Voltage Fluctuation/flicker Emission IEC
61000-3-3
The vision screener is suitable for use in all
establishments.
Table 2. Immunity Guidance
The vision screener is manufactured to work in the electromagnetic environment specified below. The operator or user should make sure it
is used within those environmental conditions.
Immunity Test
Test level EN 60601-1-2
Conformity Level
Electromagnetic environment guide
Electrostatic
± 8kV air
± 8kV air
The floor should be in wood, concrete or ceramic
Discharge (ESD) EN ± 6kV contact
± 6kV contact
tile. If the floor is covered with synthetic material,
61000-4-2
relative humidity should be at least 30%.
Electrical Fast
Transient/Burst EN
601000-4-4
Surge EN 61000-4-5
±2 kV high voltage
power line
Differential mode: ±1 kV
Common mode: ±2kV
Voltage dips, short
<5% UT (>95% dip of UT)
interruptions and
for 0,5 cycle
voltage variations on 40% UT (>60% dip of UT)
power supply input
for 5 cycle
lines EN 61000-4-11 70% UT (>30% dip of UT)
for 25 cycle
<5% UT (>95% dip of UT)
for 5 seconds
Magnetic field at
3 A /m
power
frequency EN 610004-8
±2 kV high voltage
power line
The quality of the power supply should be that one
of a typical commercial or clinical environment.
Differential mode: ±1 kV
Common mode: ±2kV
<5% UT (>95% dip of UT) for
0,5 cycle
40% UT (>60% dip of UT) for 5
cycle
70% UT (>30% dip of UT) for 25
cycle
<5% UT (>95% dip of UT) for 5
seconds
3 A /m
The quality of the power supply should be that one
of a typical commercial or clinical environment.
The quality of the power supply should be that one
of a typical commercial or clinical environment. If
the user requests a continuous functioning during
power supply interruptions, it is recommended a
backup power supply unit (UPS) or battery.
Power frequency magnetic fields should have
characteristic levels of a typical commercial or
clinical environment.
Directions for Use
Specifications
Table 3. Immunity Radio Frequency Guidance
The vision screener is manufactured to work in the electromagnetic environment specified below. The operator or user should make sure it
is used within those environmental conditions.
Immunity Test
Test level EN 60601-1-2
Conformity Level
Electromagnetic environment guide
Conducted RF
3 Veff from 150kHz to
3 Veff from 150kHz to 80MHz The portable and mobile devices with RF
EN 61000-4-6
80MHz
communication shouldn’t be used near any part
Radiated RF
3 V/m from 80MHz to
3 V/m from 80MHz to 2.5GHz of the device, including cables, except when
they follow the recommended safety distance
EN 61000-4-3
2.5GHz
for separation, calculated with the equation
Surge EN 61000-4-5
Differential mode: ±1 kV
Differential mode: ±1 kV
applicable to the frequency of the transmitter.
Common mode: ±2kV
Common mode: ±2kV
Recommended safety distance for separation:
D= 1.2 x P from 150kHz to 80MHz
D= 1.2 x P from 80MHz to 800MHz
D= 2.3 x P from 800MHz to 2,5GHz
Where P is the nominal maximum power of the
transmitter output expressed in Watts (W) as
specified by the transmitter manufacturer and d
is the recommended separation distance
expressed in meters (m).
The field intensity of the fixed RF transmitters, as checked in an electromagnetic investigation of the locus, should be less than the
conformity level for each range of frequency.
It is possible to have interference near devices marked with the symbol:
Recommended separation distance between portable or mobile devices for radio communication and the device
The vision screener is manufactured to work in an electromagnetic environment in which the radiated RF disturbances are controlled. The
operator or user of the device could prevent electromagnetic interferences by assuring a minimal distance between the portable or mobile
RF communication devices (transmitter) and the device as recommended in the chart below, in respect of the output maximum power of the
radio-communication devices.
Nominal power of the
transmitter (W)
Separation distance at the transmitter Output maximum frequency (m)
from 150kHz to 80MHz
from 80MHz to 800MHz
from 800MHz to 2,5GHz
D= 1.2 x P
D= 1.2 x P
D= 2.3 x P
0.01
0.12
0.12
0.23
0.1
0.38
0.38
0.73
1
1.2
1.2
2.3
10
3.8
3.8
7.3
100
12
12
23
For the transmitter with output maximum nominal power not reported above, the separation distance d in meters can be calculated using
the applicable equation at the frequency of the transmitter, where P is the output maximum nominal power of the transmitter in Watts
specified by the transmitter manufacturer.
Notes: (1) At 80 MHz and 800 MHz it is applicable the higher frequency range.
(2) This line guide could not be applicable in every circumstance. The electromagnetic propagation is affected by the absorption and the
reflection of structures, people or objects.
37
38
Specifications
Welch Allyn Spot Vision Screener
FCC Compliance Statement
This device complies with Part 15 of the FCC Rules. Operation is subject to the following
two conditions: (1) this device may not cause harmful interference and (2) this device
must accept any interference received, including interference that may cause undesired
operation.
Note
This equipment has been tested and found to comply with the limits for a Class B
digital device, pursuant to Part 15 of the FCC Rules. These limits are designed to
provide reasonable protection against harmful interference when the equipment
is operated in any environment. This equipment generates, uses, and can radiate
radio frequency energy and, if not installed and used in accordance with the
instruction manual, may cause harmful interference to radio communications.
Operation of this equipment in a residential area is likely to cause harmful
interference in which case the user will be required to correct the interference at
his own expense.
WARNING Changes or modifications not expressly approved by Welch Allyn
could void the user’s authority to operate the equipment.
Vision Screener radio
The vision screener radio operates on 802.11 networks.
Wireless network
interface
IEEE 802.11b/g/n
Frequency
802.11b/g: 2.402 GHz to 2.480 GHz, 802.11n
Wireless data rates
WLAN11n (OFDM) 7.2/14.4/15/21.7/28.9/30/43.3/45/57.8/60/
65/72.2/90/120/135/150 Mbps
WLAN11g (OFDM) 54/48/36/24//18/12/9/6 Mbps,
WLAN11b (CCK) 11/5.5/2/1 Mbps
Output power
43.5 mW typical, country dependent
Modulation
OFDM, CKK
Channels
1 to 13
Security/encryption/
authentication
WEP (64/128), AES, TKIP, WPA, WPA2 and WAPI
Antenna
Pulse W1049B050 with I-PEX cable, Max Gain: 2.0dBi
Agency approvals
US: FCC 15.247:2014, KDB 558074 V3
Europe: Annex 3.2 R&TTED in 2.4 GHz bands, EN 300 328
V1.8.1:2012, EN 301 489-17 V2.2.1:2012, EN 301 489-01
V1.9.2:2011, EN62479
Canada: (IC) RSS-210:2010 specification RSS-Gen:2010,
RSS-102, IC:4168A-VS100 based on FCC testing
Directions for Use
Specifications
39
This product can be used with the following restriction(s):
France — Outdoor use is limited to 10 mW EIRP within the band 2454 to 2483.5 MHz.
Norway — Does not apply for the geographical area within a radius of 20 km from the
center of Ny-Ålesund.
Note
Effective Isotropic Radiated Power (EIRP).
General radio compliance
The wireless features of this device must be used in strict accordance with the
manufacturer’s instructions as described in the user documentation that comes with the
product. This device complies with Part 15 of the FCC rules, rules of the Canadian ICES003 and the essential requirements of the R&TTE Directive 1999/5/EC as described
below.
This device complies with EN62479, RSS-102 and 47 CFR 2.1093 for RF exposure
Industry Canada (IC) emissions
This device complies with RSS 210 of Industry Canada.
Operation is subject to the following two conditions: (1) this device may not cause
interference, and (2) this device must accept any interference, including interference that
may cause undesired operation of this device.
L’utilisation de ce dispositif est autorisée seulement aux conditions suivantes: (1) il ne doit
pas produire de brouillage et (2) l’ utilisateur du dispositif doit étre prêt à accepter tout
brouillage radioélectrique reçu, même si ce brouillage est susceptible de compromettre le
fonctionnement du dispositif.
To reduce potential radio interference to other users, the antenna type and its gain should
be so chosen that the equivalent isotropically radiated power (EIRP) is not more than that
required for successful communication.
This device has been designed to operate with an antenna having a maximum gain of 2.0
dBi. Antenna having a higher gain is strictly prohibited per regulations of Industry Canada.
The required antenna impedance is 50 ohms.
Pour réduire le risque d'interférence avec d'autres utilisateurs, le type d'antenne et son
gain doivent être choisis afin que la puissance isotrope rayonnée équivalente (PIRE) ne
dépasse pas ce qui est nécessaire pour une communication réussie"
Ce dispositif a été conçu pour fonctionner avec une antenne ayant un gain maximal de 2.0
dBi. Antenne ayant un gain supérieur sont strictement interdites par la réglementation
d'Industrie Canada. L'impédance d'antenne requise est de 50 ohms.
This Class B digital apparatus complies with Canadian ICES-003.
Cet appareil numérique de la classe B est conform à la norme NMB-003 du Canada.
40
Specifications
Welch Allyn Spot Vision Screener
European Union
This device complies with the essential requirements of the R&TTE Directive 1999/5/EC.
The following test methods have been applied in order to prove presumption of
conformity with the essential requirements of the R&TTE Directive 1999/5/EC:
This device is a 2.4 GHz wideband transmission system (transceiver), intended for use in
all EU member states and EFTA countries, except in France and Italy where restrictive use
applies.
In Italy the end-user should apply for a license at the national spectrum authorities in order
to obtain authorization to use the device for setting up outdoor radio links and/or for
supplying public access to telecommunications and/or network services.
This device may not be used for setting up outdoor radio links in France and in some areas
the RF output power may be limited to 10 mW EIRP in the frequency range of 2454 –
2483.5 MHz. For detailed information the end-user should contact the national spectrum
authority in France.
Czech
Welch Allyn tímto prohlašuje, ze tento RLAN device je ve shodě se základními po_adavky a
dalšími příslušnými ustanoveními směrnice 1999/5/ES.
Danish
Undertegnede Welch Allyn erklærer herved, at følgende udstyr RLAN device overholder de
væsentlige krav og øvrige relevante krav i direktiv 1999/5/EF.
Bij deze verklaart Welch Allyn dat deze RLAN device voldoet aan de essentiële eisen en aan
de overige relevante bepalingen van Richtlijn 1999/5/EC.
Hereby, Welch Allyn, declares that this RLAN device is in compliance with the essential
requirements and other relevant provisions of Directive 1999/5/EC.
Käesolevaga kinnitab Welch Allyn seadme RLAN device vastavust direktiivi 1999/5/EÜ
põhinõuetele ja nimetatud direktiivist tulenevatele teistele asjakohastele sätetele.
Welch Allyn vakuuttaa täten että RLAN device tyyppinen laite on direktiivin 1999/5/EY
oleellisten vaatimusten ja sitä koskevien direktiivin muiden ehtojen mukainen.
Par la présente, Welch Allyn déclare que ce RLAN device est conforme aux exigences
essentielles et aux autres dispositions de la directive 1999/5/CE qui lui sont applicables.
Hiermit erklärt Welch Allyn die Übereinstimmung des Gerätes RLAN device mit den
grundlegenden Anforderungen und den anderen relevanten Festlegungen der Richtlinie 1999/
5/EG. (Wien)
Dutch
English
Estonian
Finnish
French
German
Greek
ΜΕ ΤΗΝ ΠΑΡΟΥΣΑ Welch Allyn ΔΗΛΩΝΕΙ ΟΤΙ RLAN device ΣΥΜΜΟΡΦΩΝΕΤΑΙ ΠΡΟΣ ΤΙΣ
ΟΥΣΙΩΔΕΙΣ ΑΠΑΙΤΗΣΕΙΣ ΚΑΙ ΤΙΣ ΛΟΙΠΕΣ ΣΧΕΤΙΚΕΣ ΔΙΑΤΑΞΕΙΣ ΤΗΣ ΟΔΗΓΙΑΣ 1999/5/ΕΚ.
Hungarian
Alulírott, Welch Allyn nyilatkozom, hogy a RLAN device megfelel a vonatkozó alapvetõ
követelményeknek és az 1999/5/EC irányelv egyéb elõírásainak.
Con la presente Welch Allyn dichiara che questo RLAN device è conforme ai requisiti
essenziali ed alle altre disposizioni pertinenti stabilite dalla direttiva 1999/5/CE.
Italian
Latvian
Ar šo Welch Allyn deklarē, ka RLAN device atbilst Direktīvas 1999/5/EK būtiskajām prasībām un
citiem ar to saistītajiem noteikumiem.
Lithuanian
Šiuo Welch Allyn deklaruoja, kad šis RLAN device atitinka esminius reikalavimus ir kitas
1999/5/EB Direktyvos nuostatas.
Hawnhekk, Welch Allyn, jiddikjara li dan RLAN device jikkonforma mal-htigijiet essenzjali u
ma provvedimenti ohrajn relevanti li hemm fid-Dirrettiva 1999/5/EC.
Welch Allyn declara que este RLAN device está conforme com os requisitos essenciais e
outras disposições da Directiva 1999/5/CE.
Malti
Portuguese
Slovak
Welch Allyn týmto vyhlasuje, ze RLAN device spĺňa základné po_iadavky a všetky príslušné
ustanovenia Smernice 1999/5/ES.
Slovene
Šiuo Welch Allyn deklaruoja, kad šis RLAN device atitinka esminius reikalavimus ir kitas
1999/5/EB Direktyvos nuostatas.
Por medio de la presente Welch Allyn declara que el RLAN device cumple con los requisitos
esenciales y cualesquiera otras disposiciones aplicables o exigibles de la Directiva 1999/5/
CE.
Härmed intygar Welch Allyn att denna RLAN device står I överensstämmelse med de
väsentliga egenskapskrav och övriga relevanta bestämmelser som framgår av direktiv 1999/
5/EG.
Spanish
Swedish
41
Warranty
Vision Screener
Your Welch Allyn product, when new, is warranted to be free from original defects in
material and workmanship and to perform in accordance with manufacturer’s
specifications under normal use and service. The warranty period* begins from the date
of purchase from Welch Allyn, Inc. or its authorized distributors. Welch Allyn’s obligation is
limited to the repair or replacement of components determined by Welch Allyn to be
defective within the warranty period. These warranties extend to the original purchaser
and cannot be assigned or transferred to any third party. This warranty shall not apply to
any damage or product failure determined by Welch Allyn to have been caused by misuse,
accident (including shipping damage), neglect, improper maintenance, modification, or
repair by someone other than Welch Allyn or one of its authorized service representatives.
* 1 (one) Year Limited Warranty
These express warranties are in lieu of any and all other warranties, express or implied,
including the warranties of merchantability and fitness for a particular purpose, and no
other person has been authorized to assume for Welch Allyn any other liability in
connection with the sale of the Welch Allyn product. Welch Allyn shall not be liable for
any loss or damages, whether direct, incidental or consequential, resulting from the
breach of any express warranty, except as set forth herein.
42
Warranty
Welch Allyn Spot Vision Screener
Material Number 723620