1
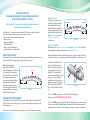
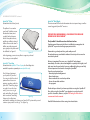
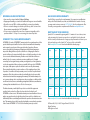
SpineDok™
Starter System
Deluxe System
Travel System
User Manual
Congratulations!
You Are On Your Way To A Better Back For Life
With Your Spinedok™ System!
SpineDok™ Base
The large, clear plastic piece
is the base of the SpineDok™.
Note that the HIGH end is
marked with the SpineDok™
website (www.SpineDok.com)
and the LOW end is marked
with Patent Pending and our
1-800 phone number.
See Figure 2a.
The SpineDok™ Is Covered By A 30 Day Money Back Guarantee
And A 5 Year Limited Warranty.*
In as little as 5-10 minutes a day, the SpineDok™ will correct and condition
your spine. Benefits of daily usage of SpineDok™ include:
• Decreased neck, back and shoulder pain
• Better posture
• Increased flexibility
• Better endurance
• Better overall spinal fitness
• Improvements in overall health
The SpineDok™ is a patented network of asymmetrical and symmetrical curves
that employ the force of gravity to gently stretch your spine.
APEX
8 77
999 8909
www.spinedok.co
8”
HIGH end
877 9
99 8909
.co
www.spinedok
8”
m
6”
Figure 2a
SpineDok™ Gel Pack
(Included with the SpineDok™ Starter, Deluxe and Travel Systems. The Gel Pack is
also available for purchase separately at www.SpineDok.com).
How Does it Work?
When the apex (highest
point) of the SpineDok’s™
asymmetrical curve is positioned
on (or near) the T4 vertebrate,
the SpineDok™ opens, stretches,
and relaxes the upper back,
shoulder, and neck area. When
the apex is placed under the
user’s spine near the bottom
of the rib cage, the SpineDok™
relaxes, stretches, and opens up
the lower back. See Figure 1.
LOW end
m
6”
Figure 1
ASSEMBLING THE SPINEDOK™
This manual covers the SpineDok™, SpineDok™ Starter System, and SpineDok™
Deluxe System. Depending on your system, this package may include the
following pieces:
Using the Gel Pack with the SpineDok™ provides a soft, cloud like experience.
You can also achieve an even deeper stretch through the use of heat or cold.
To attach the Gel Pack to the
, lay the Gel Pack down on
the floor, with the SpineDok™
logo facing down. Turn your
SpineDok™ over and lay it
upside-down with the smooth
side on top of the Gel Pack
and fasten the Velcro straps as
tightly as possible. See Figure
2b. Now turn the SpineDok™
over, so the Gel Pack is facing
up.
Figure 2b
To use as a COOL pack, place your Gel Pack in the refrigerator
for one hour. DO NOT FREEZE THE GEL PACK.
To use as a HEAT pack, gently roll the Gel Pack and place in your microwave for
1 minute on the High setting. Remove the pack and test the temperature by
placing it on your forearm – if it is not warm enough, continue to heat in the
* Please refer to the end of the manual for more information on the SpineDok™ Guarantee and Warranty.
2
3
ASSEMBLING THE SPINEDOK™ continued
microwave at :30 second intervals, removing after each :30 seconds, until it is
warm enough for you. You should be able to hold the pack in your forearm for
at least 10 seconds without feeling too hot. If it feels too hot, let it cool before
using, and decrease your warming time next time around.
There is no need to remove the Gel Pack from its fabric case for either heating
or cooling. You may remove the cover to wash.
Your Gel Pack is covered by a 6-month warranty. If you experience a malfunction
with your Gel Pack (it breaks, tears, leaks, etc) within the first 6 months of receipt,
you may contact customer service at 1-877-999-8909 for a free replacement. After
6 months, you may purchase a replacement Gel Pack at www.SpineDok.com.
SpineDok™ 3 Piece Height Riser Set
(Included with the SpineDok™ Deluxe System. The Height Riser Set is also available
for purchase separately at www.SpineDok.com).
The Height Riser System is intended for LONG TERM users, to increase their stretch.
The Risers are NOT to be used by beginners under any circumstances.
Once beginning users become comfortable on the SpineDok™ (after spending
5-10 minutes per day for at least 3 weeks) they may choose to add the Riser Set.
The Riser Set may also be beneficial to users over 6 feet tall. The set includes:
(2) Blue SpineDok™ Riser End Pieces – to attach, turn your SpineDok™ over
and lay it upside-down on the floor with the curved side down.
Starting with the smaller Riser piece, place it smooth side down on the HIGH
end of the SpineDok™, and insert the small circular pegs on the Riser into the
small circular holes in the base of the SpineDok™. Repeat these steps with the
second, larger Riser piece, inserting the pegs on that piece into the holes on
the LOW side of the SpineDok™. See Figure 2c.
Figure 2c
(1) Oval Riser Center Piece – This piece is intended for use ONLY with the Risers.
If you are using the Risers you MUST insert this piece into the center pillar of
the bottom of your SpineDok™
to avoid damaging the unit.
To insert, simply snap the
oval piece into the matching
oval hole in the bottom of the
SpineDok™. See Figure 2d.
If you are not using the
Risers, do not insert the
Center Piece.
Figure 2d
Users accustomed to the traditional SpineDok™ and one set of Risers may
consider adding additional Risers. These are available for purchase separately
at www.SpineDok.com.
Attach additional Risers as
directed. See Figure 2e.
SpineDok™ does not
recommend using more than
one additional set – total of
(2) Risers on each end of the
SpineDok™.
Figure 2e
4
5
ASSEMBLING THE SPINEDOK™ continued
SpineDok™ Pillow
(Included with the Deluxe System)
The pillow is for use under
your head. To inflate, remove
the attached straw, insert
roughly 6 inches between
the two clear plastic sheets,
and blow to inflate to desired
fullness. Remove the straw. To
deflate, insert the straw and
press gently on the pillow until
it is deflated. See Figure 2f.
SpineDok™ Multi Media
This instructional DVD includes information about set up and usage as well as
several suggested SpineDok™ exercises.
PRECAUTIONS AND WARNINGS – PLEASE READ THIS MESSAGE
BEFORE USING THE SPINEDOK™
The SpineDok™ should be used on a flat hard surface.
If getting up and down onto the floor is too difficult, you may place the
SpineDok™ on your bed and begin your practice there.
Figure 2f
In the beginning, you must use a pillow to support your head.
If necessary, use extra pillows!
SpineDok™ Travel Bag
(Included with the SpineDok™ Travel System, the Travel Bag is also
available for purchase separately at www.SpineDok.com).
Don’t let travel interrupt
your SpineDok™ practice!
You can get relief from back
pain and muscle tension
anytime, anywhere with the
SpineDok™ Travel Bag. Large
enough to house the base
unit, 3-piece riser set, gel
pack, and pillow, the sturdy
and convenient Travel Bag
Figure 2g
features a shoulder strap
and handle, enabling you tobring your SpineDok™ System with you and
continue your practice on the go. See Figure 2g.
6
Remember to go slowly and to be gentle with yourself.
Do only what you are comfortable with and do not try to do too much or
overstretch yourself.
Patience is important! For some users, SpineDok™ works almost
immediately. For others, whose back might be especially stiff or tight, it will
take some time for your back to loosen up sufficiently before you can fully
feel and experience the benefits of using the SpineDok™.
Consult your physician if you:
• Have major spinal misalignment
• Have a back injury
• Have a moderate to severe back problem
• Unsure of a medical condition
• Are pregnant
Check with your doctor if you have any doubts on using the SpineDok™.
Also, while using the SpineDok™, pay attention to your body and if
you feel discomfort, dizziness, or pain STOP and get off the unit as
recommended in the manual.
Read Gel Pak instructions before using it in a heated state.
7
USING THE SPINEDOK™
The SpineDok™ is intended to bring relief to back, shoulder, and neck pain. If
at any point you feel pain or discomfort, you should stop using SpineDok™.
To begin, place your SpineDok™ on the floor. Lay a thick beach towel down
first and then place SpineDok™ on the towel. See Figure 3a.
Then gently roll your entire body onto the unit, keeping your knees slightly
bent and your bottom on the floor*. Cross your arms over your chest (you can
place pillows under your elbows, or hips, to be more comfortable. You must
support your head with pillows). See Figure 3c.
If getting up and down onto the floor is too difficult, you may place the
SpineDok™ on your bed and begin your practice there.
Figure 3c
Slowly and deliberately move side to side to adjust your back on the unit until you
are comfortable. *Note – shorter users may need to slide their bottoms up onto the
unit slightly to ensure a proper stretch.
Figure 3a
Lay down along-side the SpineDok™ so that your back touches the unit.
See Figure 3b.
LOW end
Figure 3b
8
HIGH end
To stretch your UPPER BACK, lay along-side the unit with your shoulders next to the HIGH
side of the SpineDok™ (marked with the website www.SpineDok.com). See Figure 3d.
LOW end
HIGH end
Figure 3d
9
USING THE SPINEDOK™ continued
Gently roll onto the unit, adjusting your back until the highest point of the
SpineDok™ is between your shoulder blades. See Figure 3e.
Gently roll onto the unit, adjusting your back until the highest point of the
SpineDok™ is underneath the lower part of your rib cage. See Figure 3g.
Figure 3g
Figure 3e
To stretch your LOWER BACK, lay along-side the unit with your shoulders
next to the LOW side of the SpineDok™ (marked with the SpineDok™ 1-800
number). See Figure 3f.
HIGH end
Once you are comfortable on the SpineDok™, relax and breathe as deeply as
possible. Listen to your body and remain on the SpineDok™ only as long as it
feels comfortable – no more than 5-10 minutes at a time, twice a day during
the first two weeks. As you get more comfortable, increase your time by 5
minutes per week. See Figure 3h.
LOW end
Figure 3f
Figure 3h
10
11
USING THE SPINEDOK™ continued
To get off of the SpineDok™, gently roll off either way onto your side, and get
onto your hands and knees. Stand up slowly, taking your time to reach full
height. If you feel dizzy at any point, stop where you are until the dizziness
subsides, then continue getting up.
The included instructional DVD demonstrates the safest way to get on and off the
SpineDok™ as well as beneficial stretches and exercises using the SpineDok™.
SPINEDOK™ RECOMMENDED EXERCISES
(Refer to the Quick Start Guide for a visual demonstration of exercises)
Once your back has become accustomed to the SpineDok™, you may wish to
do some mild exercises while laying on the SpineDok™.
Move carefully and slowly and do only a few repetitions at first. As your back
condition improves, you can increase speed, motion, and repetitions.
Only do as much as is comfortable.
In all of the following exercises, the legs are bent. Your feet are resting flat on
the floor, and your knees are about a shoulder’s width apart.
“Vertical Arcs”
• Raise your arms until your fingers point to the ceiling. Your arms are about
one shoulder’s width apart. This is your starting position.
• Keeping your arms straight, gradually lower them behind you, opening up
your arm pits. Let your arms go as far behind you as is comfortable. Then
raise them back to your starting position.
• Lower your arms towards your feet as far as you’re comfortable, then raise
them back to your starting position.
• Repeat (as many times as you are comfortable with).
• Keeping your arms on the floor, continue sliding your arms above your head
as far as you’re comfortable. Slide your arms back to the sides of your body.
• Repeat (as many times as you are comfortable with).
“Arm Circles”
• Raise your arms until your fingers point to the ceiling. With your hands
together start drawing circles in the air with your hands.
• Start with small circles, and gradually make bigger circles (so long as you are
comfortable). Make clockwise and counterclockwise circles.
• Repeat (as many times as you are comfortable).
“Mini Crunch”
• Bend your knees, placing your feet on the floor.
• Place your hands behind your head, or cross your arms over your chest.
• Contract your abdominal muscles and lift your head off the floor as far as
you are comfortable.
• Relax abdominal muscles and lower your head back onto the floor (or pillow).
• Repeat (as many time as you are comfortable).
30-DAY MONEY-BACK GUARANTEE
We want you to be fully satisfied with every item that you purchase from
SpineDok™. If you are not satisfied with an item that you have purchased, you
may return the item within 30 days of delivery for a full refund of the purchase
price, minus the shipping, handling or other additional charges.
The item must be returned in good condition, in original boxes, and with all
paperwork, parts and accessories to ensure full credit. Please call customer
service at 1- 877-999-8909 to arrange the return.
“Horizontal Arcs (Flapping Wings)”
• Start with your arms by the sides of your body. Keeping your arms
extended, slowly slide your arms along the floor until your arms are
perpendicular to your body.
12
13
Return Rules and Restrictions
• Items must be returned within 30 days of delivery.
• Shipping and handling costs and other additional charges are non-refundable.
• We will not accept CODs or third party billing for returned merchandise.
• If there is extensive damage to an item upon delivery, call a Customer Care
Representative immediately at 1-877-999-8909.
• You can expect a refund in the same form of payment originally used for
purchase within 10-15 days of our receiving your returned product.
SPINEDOK™ Five -Year Limited Warranty
ALTRUEON, LLC maker of SPINEDOK™ warrants only to the original purchaser of this
product that this product will be free from defects in material and workmanship
under normal use and service for five years after date of purchase. Altrueon
reserves the right, before having any obligation under this limited warranty, to
inspect the damaged Altrueon product, and all costs of shipping the Altrueon
product to Altrueon for inspection shall be borne solely by the purchaser. In order
to recover under this limited warranty, Purchaser must make claim to Altrueon
within 60 days of occurrence, and must present acceptable proof of original
ownership (such as original receipt, warranty card registration, on-line registration,
or other documentation Altrueon deems acceptable) for the product. ALTRUEON,
at its option, shall repair or replace the defective unit covered by this warranty.
Please retain the dated sales receipt as evidence of the original purchaser’s date
of purchase. You will need it for any warranty service. In order to keep this limited
warranty in effect, the product must have been handled and used as prescribed
in the instruction manual accompanying this warranty. This limited warranty does
not cover any damage due to accident, misuse, abuse, negligence or failures which
result from accident, misuse, mishandling, misapplication, alteration, modification,
or damage that is attributable to acts of God or force majeure.
This limited warranty is valid only if the product is used with the equipment
specified on the product box. Please check product box for details or call
ALTRUEON customer service. This limited warranty is non-transferable and does not
apply to any purchaser who bought the product from a reseller or distributor not
authorized by Altrueon, including but not limited to purchases from internet auction
sites. This warranty does not affect any other legal rights you may have by operation
of law. Contact ALTRUEON 1-877-999-8909 for warranty service procedures.
14
GEL PACK SIX-MONTH WARRANTY
Your Gel Pack is covered by a 6-month warranty. If you experience a malfunction
with your Gel Pack (it breaks, tears, leaks, etc) within the first 6 months of receipt,
you may contact customer service at 1-877-999-8909 for a free replacement. After
6 months, you may purchase a replacement Gel Pack at www.SpineDok.com.
Keep track of your exercises
SpineDok™ recommends beginning with 5-10 minutes of use at a time, twice
a day, increasing by 5 minutes per week as is comfortable. Use the calendar
below to track your total minutes of usage per day. Remember to listen to your
body and only stay on the SpineDok™ as long as feels comfortable!
Visit www.SpineDok.com to download additional calendar pages.
Day 1
Day 2
Day 3
Day 4
Day 5
Day 6
Day 7
_________
_________
_________
_________
_________
_________
_________
Day 8
Day 9
Day 10
Day 11
Day 12
Day 13
Day 14
_________
_________
_________
_________
_________
_________
_________
Day 15
Day 16
Day 17
Day 18
Day 19
Day 20
Day 21
_________
_________
_________
_________
_________
_________
_________
Day 22
Day 23
Day 24
Day 25
Day 26
Day 27
Day 28
_________
_________
_________
_________
_________
_________
_________
Day 29
Day 30
Day 31
_________
_________
_________
Visit www.SpineDok.com to download additional calendar pages.
US Patent #5,925,003 & U.S Design Patent D-398-399
Patent Pending
©All rights reserved.
15
1- 877-999-8909
www.SpineDok.com