1
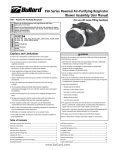
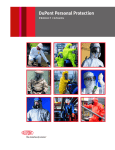
DuPont Personal Protection
Instruction Manual for Universal
Pressure Test Kit No. 990810
Effective: October 2006
BE SURE TO READ AND UNDERSTAND THESE INSTRUCTIONS BEFORE ATTEMPTING TO
PERFORM AN INFLATION TEST. CALL CUSTOMER SERVICE AT 800-931-3456 (843-335-8211)
IF YOU HAVE QUESTIONS.
Kit Overview
The DuPont™ Tychem® Universal Pressure Test Kit is designed for testing
DuPont™ Tychem® Level A ensembles according to ASTM F 1052, Standard
Test Method for Pressure Testing Vapor Protective Ensembles, or the
method described in 29CFR1910.120, Hazardous Waste Operations
and Emergency Response (HAZWOPER) and EN 464, Determination of
Leak-tightness of Gas-tight Suits. The kit can be used with other Level A
garments fitted with Pirelli or Auer exhaust valves.
The Universal Pressure Test Kit is contained in a black suitcase. Inside the
suitcase you will find:
• Self-contained blower unit
• Pressure gauge (Magnehelic) calibrated to 8 inch water gauge pressure
• Timer
• Four metal bayonet-style connectors: two marked with the letter “A” for
Auer, and two marked with the letter “P” for Pirelli
• Two black rubber caps
• A large diameter corrugated hose
• A small diameter, clear plastic hose
• Power cord
• Standard testing device
Garment Inspection and Pressure Testing
Level A garments should be visually inspected and inflation tested as
described in the DuPont™ Tychem® User Manual. You can download a
current copy of the Tychem® User Manual at http://www.personalprotection.
dupont.com or contact Customer Service at 800-931-3456 to have a copy
mailed to you.
DuPont Personal Protection recommends inspection and pressure testing of
Level A ensembles at the following times:
• Upon receipt from supplier
• At least once per year
• After the garment is worn and before the garment is worn again. Note
that contaminated, damaged or altered garments should not be re-used.
Operation of the test kit can be verified with the Self Test Device (DuPont
Part No. 999800). Instructions for use of the Self Test Device are provided
on page 10 of this manual.
Air Pressure Testing Instructions
1) Testing area — You must provide a large enough area to allow the
garment to be fully inflated with arms extended and to allow placement
and operation of the inflation test kit. This area should be clean and free
of abrasive and sharp objects that may damage or tear the garment. It is
recommended that you cover the testing location with clean cloth. The
testing area should not be in the direct path of heating or air-conditioning
outlets; a change in temperature during testing may change the internal
pressure of the suit.
2) Unfold garment face down on the smooth, clean testing surface.
Remember how the garment is folded and stored — you will refold and
store the tested garment in the same manner.
3) With NFPA 1991 compliant Tychem® TK and Tychem® Responder®
ensembles, take the inner chemical suit out of the overcover. Access to
the exhaust valves will be easier and the inner and outer garments need
to be separated for visual inspection.
4) If the garment is equipped with air-line pass-thrus, make sure these
are capped or blocked.
5) Exhaust Valve Preparation — The test kit can be used to test
Level A garments according to ASTM F 1052, 29CFR1910.120 or
EN 464, if the garments are fitted with either Auer or Pirelli exhaust
valves.
Auer Exhaust Valve
Pirelli Exhaust Valve
There are separate instructions for preparing the exhaust
valves on:
• DuPont™ Tychem® TK Level A garments
• DuPont™ Responder® Level A garments
• Other Level A garments fitted with Pirelli Exhaust valves
a) Preparation of DuPont™ Tychem® TK Level A garments. DuPont manufactured Tychem® TK garments are fitted with Auer
exhaust valves:
i) Remove and save foam materials attached to the inside of the
exhaust valves. These will be replaced after testing.
ii) Working from the outside of the garment, remove the flexible,
outer rubber covers from all exhaust valves. Set these aside to
be re-installed after testing.
iii) Carefully remove the rubber diaphragm from each exhaust
valve by rolling the edge of the diaphragm towards the center
and peeling it off the center stem. These diaphragms should
be replaced every 2 years from the date of suit manufacture.
Examine diaphragms that are not scheduled for replacement
for cracks or deterioration with a magnifying glass. Damaged or
deteriorated diaphragms should be replaced.
iv)Tychem® TK garments compliant with NFPA 1991 and
Tychem® TK garments compliant to the Class 1 of the 2001
edition of NFPA 1994 have 4 exhaust valves. Two of these 4
exhaust valves must be sealed during inflation testing. After
removing the flexible outer cover and inspecting the diaphragm
from each of the 2 extra exhaust valves, these exhaust valve
bodies are sealed during inflation testing with the flat rubber
covers provided with the inflation test kit.
v) Choose the correct metal bayonet-style connectors to fit the
valves of the garment being tested. Adapters engraved with
“A” fit Auer exhaust valves installed in DuPont manufactured
Tychem® TK Level A garments.
vi)From the outside of the garment, firmly push each connector
into an exhaust valve from which the diaphragm has been
removed. Twist the adaptor clockwise approximately 1/8 turn
to lock it in place. DO NOT FORCE. If the adapter is not locked
in place, a seal will not occur and the garment will not hold
pressure. HOWEVER: FORCING THESE CONECTORS CAN
PERMANENTLY DAMAGE THE EXHAUST VALVE.
After inserting the two connectors, proceed to step (6) of these
instructions.
b) Preparation of DuPont™ Tychem® Responder® and Tychem®
Reflector® garments, fitted with Pirelli exhaust valves:
i) Working from the outside of the garment, unsnap the
perforated, round outer covers from all exhaust valves. Set
these aside to be re-installed after testing.
ii) Carefully remove the rubber diaphragm from each exhaust
valve. These diaphragms should be replaced every 2 years
from the date of suit manufacture. Examine diaphragms that
are not scheduled for replacement for cracks or deterioration
with a magnifying glass. Damaged or deteriorated diaphragms
should be replaced.
iii) Tychem® Responder garments compliant with NFPA 1991 and
Tychem® TK garments compliant to the Class 1 of the 2001
edition of NFPA 1994 have 3 exhaust valves. One of these 3
exhaust valves must be sealed during inflation testing. Install
one of the inspected or new diaphragms into the inside of that
third exhaust valve body to seal it for the inflation test.
iv)Choose the correct metal bayonet-style connectors to fit the
valves of the garment being tested. Adapters engraved with
“P” fit Pirelli exhaust valves installed in Tychem® Responder®
and Tychem® Reflector® garments.
v) From the outside of the garment, firmly push each connector
into an exhaust valve from which the diaphragm has been
removed. Twist the adaptor clockwise approximately 1/8 turn
to lock it in place. DO NOT FORCE. If the adapter is not locked
in place, a seal will not occur and the garment will not hold
pressure. HOWEVER: FORCING THESE CONECTORS CAN
PERMANENTLY DAMAGE THE EXHAUST VALVE.
The inflation hose connector for Pirelli valves has a 90° angle.
The sensing hose connector for Pirelli valves is straight.
After inserting the two connectors, proceed to step (6) of these
instructions.
c) Preparation of other Level A garments fitted with Pirelli
exhaust valves: (see illustrations immediately above)
i) Working from the outside of the garment, unsnap the
perforated, round outer covers from all exhaust valves. Set
these aside to be re-installed after testing.
ii) Carefully remove the rubber diaphragm from each exhaust
valve by rolling the edge of the diaphragm towards the center
and gently pulling the stem of the diaphragm out of the center
of the valve body.
iii) Some Level A garments are fitted with more than two Pirelli
exhaust valves. Carefully remove the diaphragm from the
outside of the additional exhaust valves and re-install them on
the inside of these additional exhaust valve bodies.
iv)Choose the correct metal bayonet-style connectors to fit the
valves of the garment being tested. Adapters engraved with
“P” fit Pirelli exhaust valves.
v) From the outside of the garment, firmly push each connector
into an exhaust valve from which the diaphragm has been
removed. Twist the adaptor clockwise approximately 1/8 turn
to lock it in place. DO NOT FORCE. If the adapter is not locked
in place, a seal will not occur and the garment will not hold
pressure. HOWEVER: FORCING THESE CONECTORS CAN
PERMANENTLY DAMAGE THE EXHAUST VALVE.
6) Connect the large diameter, corrugated inflation hose to the
appropriate exhaust valve connector on the garment.
7) Connect the small diameter, clear sensing hose to the other
exhaust valve connector on the garment.
8) Pull the garment closure closed. Hold the garment closure
near the slider while firmly pulling the garment slide. Pull in the
direction of the open portion of the closure.
Lubricate the slider, if necessary and according to instructions in
the Closure Lubrication section of the Tychem® User Manual.
9) Place the test kit suitcase near the garment.
10) Plug the Test Kit into an electrical outlet. The blower motor is
designed for 110 V at either 50 or 60 electrical service. A voltage
converter (not included) may be required to supply 110 V service to
the unit.
11) Press the large red button once to test blower operation Press
the large red button again to shut off the blower.
12) Attach the larger diameter inflation hose to the black Air
Outlet on the test kit. This outlet is located above the red button
on the test kit. Lock it into place by folding up the two silver levers
on either side of the end of the air hose.
13) Connect the clear sensing hose to the sensing fitting on the
test kit. Check that the connector clicks in place and that the hose
can not be easily pulled off the connector.
Inflation Testing per ASTM F 1052
The following briefly describes the inflation test method in
ASTM F 1052. You can purchase a copy of the complete method
at www.ASTM.org or by calling ASTM at 1-800-262-1373 (USA and
Canada) or 610-832-9578. The method described in ASTM F 1052
exceeds the requirements specified in 29CFR1910.120. ASTM F 1052
is not a substitute for the procedure found in European standard
EN 464.
1) Press the large red button on the test kit to turn the
blower on.
2) Turn the large red valve lever one-quarter turn counterclockwise to the “SUIT FILL” position for garment inflation.
NOTE: the pressure gauge will not start to register pressure
until the garment is nearly inflated.
3) When the pressure gauge indicates between 5 and 6 inches
of water, turn the large red valve handle one-quarter (1/4) turn
clockwise, placing the handle in the “SUIT TEST” position.
4) Turn the blower off by pressing the large red button on the
face of the test kit. NOTE: EXCESSIVE, INTERNAL POSITIVE
PRESSURE CAN DAMAGE THESE GARMENTS. DO NOT OVER
INFLATE THE GARMENT.
5) Let the suit remain at a pressure of greater than 5 inches
water gauge pressure for at least one minute.
6) Set the timer on the test kit for 4 minutes.
7) Reduce the air pressure in the suit to 4 inches of water by partially
turning the red lever counter-clockwise towards the “SUIT FILL”
position. Then return the valve to the “SUIT TEST” position.
8) Start the timer. NOTE: DO NOT TOUCH OR MOVE THE SUIT
DURING THE TEST PERIOD.
9) At the end of 4 minutes, read the pressure gauge. The garment is
considered to “pass” if the pressure remains at or above 3.2 inches
(80%) after 4 minutes.
10) Complete a visual inspection as described in the Garment
Inspection Section of the Tychem® User Manual before
deflating suit.
11) Complete the garment inspection log form. Record the ending
pressure on the suit test log sheet found in the User Manual that
accompanied the garment. Include the date, time inspector’s name
and results of the inspection and testing.
Instructions for Locating Leaks
1) If the garment does not pass the inflation test:
a. Check the installation of the connectors inserted in the exhaust
valves. DO NOT FORCE.
b. Check that the inflation and sensing hose are securely
connected.
c. Check that the closure is fully closed.
d. Visually check the closure for mis-aligned teeth.
e. Check that pass-thru’s are adequately blocked.
f. If there are extra exhaust valves, check that the caps are in place
on the extra Auer exhaust valves or that the flappers are in place
and sealed on extra Pirelli exhaust valves.
g. Verify that the test kit is operating properly with the Self Test
Device (DuPont Number 999800). See instructions on page 10 of
this manual.
2) Inflate the garment to a pressure of between 5 and 6 inches water
gauge pressure.
3) Check for leaks using children’s soap bubble solution.
Mix equal parts of water and the bubble solution. Brush the solution
on the garment in the suggested locations. Look for formation and
growth of bubbles. This will pinpoint the location of the leak. This
picture shows bubbles created by a pinhole leak purposely created at
the edge of the seam tape for demonstration purposes.
a. Soles and seams of the garment socks
b. The end of the sleeve and interface with the attached gloves.
c. Around exhaust valves. (This pictures show leakage around an exhaust valve connection intentionally loosened for demonstration purposes.)
d. The closure, starting with the area around the slider.
e. Along seams, staring from the head and systematically moving down the garment to the socks.
f. Other seam or fabric locations that show signs of wear or abrasion.
Tychem® garments are intended for a limited number of wears
and must be replaced when damaged, altered or contaminated.
Uncontaminated garments that fail the inflation test can be marked
with a permanent marker and used for training garments.
Returning the Inspected Garment to Service
1) Disconnect the inflation and sensing air hoses from the garment
and from the test kit. Coil the hoses for storage in the test kit case.
2) Open the garment closure completely. Hold the garment closure
near the slider while firmly pulling the garment slide. Lubricate
the slider if necessary and according to instructions in the closure
lubrication section of the Tychem® User Manual.
3) Remove the bayonet connectors from the exhaust valve bodies.
Place the connectors in the appropriate location on the face of the
test kit.
4) From the outside of the garment, replace the exhaust valve
diaphragms. REMINDER: Both Auer and Pirelli recommend
replacement of the exhaust valve diaphragm every 2 years. Visually
inspect the diaphragms for cracks and deterioration with a magnifying
glass during each suit inspection.
To replace the diaphragms in Pirelli valves, insert the stem of the
new diaphragm into the center of the valve body. Gently pull on the
diaphragm stem from the inside of the garment while gently pushing
in on the center of the diaphragm until the diaphragm clicks into place.
You can damage the Pirelli diaphragm by pulling too hard on the
flapper stem.
To replace the diaphragms in Auer valves, center the new diaphragm
over the stem and push down gently until the diaphragm snaps
in place.
5) Replace the exhaust valve covers.
To replace the flexible outer cover of Auer exhaust valves, turn the
cover inside out, place it over the center of the exhaust valve body and
roll the edges over the exhaust valve body until it snaps in place. Snap
the round, perforated Pirelli valve covers onto the exhaust valve body.
6) For NFPA compliant, DuPont Manufactured Tychem® TK garments
remove the flat test covers from the remaining exhaust valves and
re-install the flexible outer covers.
7) For NFPA compliant Tychem® Reflector® and Tychem® Responder®
garments, remove the diaphragms from the inside of the exhaust
valves, install the diaphragms on the outside of the exhaust valves and
re-install the exhaust valve covers.
WARNING: FAILURE TO PROPERLY REINSTALL THE EXHAUST VALVE
DIAPHRAGMS CAN LEAD TO CHEMICAL VAPOR EXPOSURE AND
POTENTIAL INJURY.
8) Reinstall any foam padding on the inside of Tychem® TK exhaust
valves only if the garment will not be used immediately.
9) Fold the garment in the same fashion as it was originally folded.
10)Place the garment in its storage bag or container.
a) Fill out the inspection tag with the date and the name of the
person who tested and inspected the garment. Be sure to also
place the user manual in the bag.
b) You may also want to use a string or anti-tamper seal on the
storage container or bag after inspection.
11) Unplug the test kit. Coil the power cord. Store the cord, hoses and
extra caps in the lid of the kit. Close the case lid and secure
the latches.
Self Test Device Instructions
Self Test Device
DuPont Part No. 999800
1) Plug the Test Kit into electrical outlet.
The blower mower is designed for 110 V at either 50 or 60 electrical
service. A voltage converter (not included) may be required to supply
110 V service to the unit.
2) Press the large red button once to test blower operation. Press the
large red button again to shut off the blower.
3) Attach the larger diameter inflation hose to the black Air Outlet on
the test kit. This outlet is located above the red button on the test kit.
Lock it into place by folding up the two silver levers on either side of
the end of the air hose.
4) Connect the clear sensing hose to the sensing fitting on the test
kit. Check that the connector clicks in place and that the hose can not
be easily pulled off the connector.
5) Connect the inflation hose to the Self Test Device.
6) Connect the sensing hose to the Self Test Device.
7) Set the timer for 4 minutes.
8) Turn the large red valve to the “SUIT FILL” position by turning
the lever one-quarter turn counter-clockwise.
10
9) Turn on the blower by pressing the large red button. The Magnehelic
gauge will immediately register a pressure in excess of 6 inches water
gauge.
10)Immediately turn the large red valve to the “SUIT TEST” position
by turning the lever one-quarter turn clockwise.
11) Turn the blower off by pressing the large red button.
12)Adjust the pressure to 4 inches water gauge by partially opening the
inflation valve.
13)Start the countdown timer which you previously set to 4 minutes.
14)The pressure should hold at 3.2 inches
or higher after 4 minutes. If after 4 minutes, the pressure reading has
fallen below 3.2 inches water gauge, contact Customer Service to
discuss repair or replacement options.
11
Level A Inflation Test Kit Gauge Calibration
The pressure gauge installed in the DuPont™ Inflation Test Kit (p/n 990810) is calibrated by the manufacturer, Dwyer Instruments, before
shipment and installation. According to Dwyer Instruments, under normal operating conditions no periodic servicing or lubrication is
necessary to insure proper function of the gauge.
Occasionally the gauge may require re-zero adjustment. This requires setting the pointer exactly on the zero mark by way of adjusting
the external zero adjust screw on the cover at the bottom. This must be done while the gauge diaphragm is in the horizontal position
(as installed in the kit).
In order to check calibration, a second gauge or manometer of known accuracy and range would be required and connected “in-line”
with this gauge and pressurized. Readings of both would be compared for acceptability. If the accuracy is unacceptable, contact
DuPont Personal Protection Customer Service to discuss repair or replacement options.
Product safety information is available upon request. This information corresponds to our current knowledge on the subject.
It is offered solely to provide possible suggestions for your own determinations. It is not intended, however, to substitute for any
testing you may need to conduct to determine for yourself the suitability of our products for your particular purposes. It is the
user’s responsibility to determine the level of risk and the proper protective equipment needed for the user’s particular purposes.
This information may be subject to revision as new knowledge and experience becomes available. Since we cannot anticipate all
variations in actual end-use conditions, DUPONT MAKES NO WARRANTIES AND ASSUMES NO LIABILITY IN CONNECTION WITH
ANY USE OF THIS INFORMATION. Nothing in this publication is to be considered as a license to operate under or a recommendation
to infringe any trademark or patent right.
Copyright © 2007 DuPont. The DuPont Oval Logo, DuPont™, The miracles of science™, Tychem®, Responder®, and Reflector® are
registered trademarks or trademarks of E. I. du Pont de Nemours and Company or its affiliates. All rights reserved.
K-16150-1 (06/07) Printed in the U.S.A.
Customer Service:
Canada 1-800-387-9326
Mexico (52) 55 57 22 1222
United States 1-800-931-3456
www.PersonalProtection.DuPont.com