1
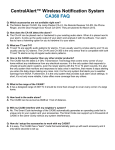
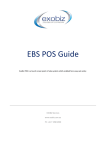
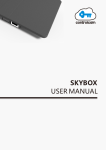
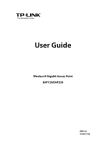
Xtreme Accounting
Recurring Invoice
User Manual
Manual Version 1.0
Release Date : 31/10/2013
Developed By :
Stark Software
1
TABLE OF CONTENTS
Welcome to Recurring Invoicing ....................................................................................................... 3
Introduction .................................................................................................................................... 3
Overview of the Module Features .................................................................................................. 3
Setting Up the Recurring Invoice ................................................................................................... 3
Accessing the Recurring Invoice Options .................................................................................. 3
Create a Recurring Batch Template for a Customer .................................................................. 4
Printing the Pre-Run Report ........................................................................................................... 8
Generating the Recurring Invoices................................................................................................. 9
2
Welcome to Recurring Invoicing
Introduction
Congratulations on your purchase of Xtreme Accounting from Stark Software. This additional Manual has
been written to enable you to be able to get the full benefit of this Module without a significant learning
curve.
We have attempted to make the tedious yet necessary process of recurring billing simple to set up and
generate periodic invoices effortlessly
Overview of the Module Features
The main features of this module are :
1. Create an invoice template per customer and utlise these details to generate recurring invoices
when required
a. Invoice line items can link back to General Ledger codes or Inventory Item Codes
b. Unlimited number of lines per customer
c. Remarks line available. This is a non-financial remarks line that will enable you to include
additional details pertaining to an invoice line. Examples of this would be Unit Numbers in
a Body Corporate Company, serial numbers for rented equipment etc
2. Control the time period over which the individual line item is to be run. The system will allow you to
enter a start and end date for each line item.
3. Offer the ability to add a once-off line item.
4. Offer the ability to be able to not invoice a line item despite it being part of the normal recurring
invoice.
5. Print a pre-run report to verify that the data for recurring invoices to be generated are correct.
6. Print and/or email the generated invoices automatically.
Setting Up the Recurring Invoice
Accessing the Recurring Invoice Options
All the functionality associated with this module can be found under the Customers …Processing Button.
There are 3 tabs available :
1. Recurring Invoice
2. Print Recurring Invoice Batch
3. Process Recurring Invoice Batch
In addition, under Customer Maintenance, there is a shortcut directly to the Recurring Invoice Batch
option.
3
Create a Recurring Batch Template for a Customer
Click on Recurring Invoice Button
Select the Customer by either typing in the Account number or by clicking on the search facility and
selecting the required Customer
.
4
The customer account and name will be displayed to enable you to verify that you have chosen the correct
Customer.
Capture the first recurring Invoice Line.
Type – This field details the invoice line type. The possible values are :
G = G/L Code – A G/L Code will be used for the invoice line
I = Item Code – An Inventory Item Code will be used for the invoice line
R = Remarks – This is not an actual invoice line, but a Remarks line that can be used to add
further detail to the preceding invoice line.
Code – The code that must be entered will be determined by the Type value entered above. Clicking on
the icon will generate a list of all applicable Codes. Click on the Code you require. Alternatively, if you
know the Code, you may enter it directly without going via the search list option.
Quantity – The value entered here is the number of units. The default quantity is 1. Any amount in the
range -9999 to 999999 can be entered.
Description – This describes the invoice line entry. If the “G” Type is used, the G/L Code Description will
be automatically entered in this field. If the “I” Type is used, the Inventory Description will be automatically
entered in this field. Using the “R” Type leaves this field blank and the field becomes the “Remarks” field.
The Description can be amended by you as required.
Tax – The Tax Type applicable to this Invoice line is entered here. The default Tax Type for this customer
will be selected as the default. You can change the Tax Type by clicking on the entry field. This will bring
up a list of all the valid Tax Types loaded. Choose the required Tax Type.
Disc % - The discount percentage applicable to this line of the invoice can be entered. The system defaults
to 0.
5
Each – The price of the item is entered here. The maximum amount that can be entered for each line of the
invoice is 9,999,999.99.
Amount – This value is calculated by multiplying the Quantity value by the Each value. This amount is
entered by the system and cannot be altered by a user.
Inv – This field determines whether the line item is to be invoiced when the recurring invoices are
generated. Changing the value from Y to N will result in the line item not being included in the invoice.
Once – This field indicates that the line item is to be invoiced once only. Provided that the Inv field is filled
with a “Y”, the line will be included in the invoice, for 1 run only. Once the recurring invoice has been
generated, the system will automatically change the Inv field to “N” to prevent this line for inadvertently
being included in future runs. However, should you wish to include this line in a future run, all you would
need to do, is change the Inv field back to “Y” again.
Start Date – This field stores the starting date of the date range that will determine the time period in which
the recurring invoice is valid. A recurring invoice run date that falls before the start date will mean that the
line will not be included in that run.
End Date - This field stores the end date of the date range that will determine the time period in which the
recurring invoice is valid. A recurring invoice run date that falls after this date will mean that the line will not
be included in that run.
The use of the start and end dates will enable you to accurately control when each line of the invoice should
be included, and when it should be excluded.
To capture additional lines, click the Add Line Button and enter the details as you did for the first line.
To Delete a line, click on or select the line to be deleted and click the Delete Line button.
6
Once you have captured all the invoice details for the customer, click OK to Save. Clicking Cancel will exit
the screen without saving your changes.
The system will confirm that your changes have been saved.
7
Printing the Pre-Run Report
Prior to generating your recurring batches, it would be prudent to view or print this report before generating
the invoices.
To access this report, click on the Print Recurring Invoice Batch button.
Invoice Period - The current period (current period for debtor processing) that you are working in will be
selected. You can change the period for the invoice report being generated.
Invoice Date – The date which will appear on the generated invoices. This date must be valid for the
Invoice Period selected.
Print Report (Ignore Dates) – The report will normally filter out the lines whose start and end dates fall
outside the required range for this report. By ticking this box, the system will ignore those start and end
dates, and print out every line. If this box is ticked, the report totals may not be the amount that would be
invoiced.
Period in which Start or End Data must fall inbetween – These dates are determined by the Period
definitions for the company. Select the Period you require and the dates associated with that Period will be
used to determine if a line is included in an invoice or not. This period selected need not be the same as the
Invoice Period selected.
Click the Print Invoice Batch button to generate the PDF report which can then also be printed.
Click the Close button to return to the Menu.
8
Generating the Recurring Invoices
This option will generate all the lines on all the invoices that meet the date range criteria and which have
been flagged as “Y” in the Inv field.
To access this option click on the Process Recurring Invoice Batch button.
9
Invoice Period - The current period that you are working in will be selected. You can change the period for
the invoices to be generated.
Invoice Date – The date which will appear on the generated invoices. This date must be valid for the
Invoice Period selected.
Period in which Start or End Data must fall inbetween – These dates are determined by the Period
definitions for the company. Select the Period you require and the dates associated with that Period will be
used to determine if a line is included in an invoice or not. This period selected need not be the same as the
Invoice Period selected.
Invoice Message – The invoice-specific message that will be printed on the current invoice only.
Emailing/Printing
Depending on the Document Processing settings for each customer, the system will automatically print
and/or email the generated invoices.
These settings can be changed in Customer Maintenance as follows :
Customers … Customer Maintenance … View/Edit/Delete …Document Processing … Document Printing
Subject – The subject that will appear on the email to the customer
Body – The contents of the body of the email to be sent to the customer.
The name of the person who will receive the email can be specified in the “Name of person emails will be
addressed to” field under Customer Maintenance as follows :
Customers … Customer Maintenance … View/Edit/Delete …Document Processing
Printer – The system allows you to select the printer you want to use to print the hardcopy invoices.
To generate the recurring invoices, click on the Process Invoicing button.
10
The system will prompt you to confirm that you want to generate these invoices.
Once the processing is complete, click Close.
If there were any invoices created for customers that had the Document Processing set to email, the
system will prompt you to start sending of these invoice emails.
All queued and unsent emails will be displayed.
Number of emails to be sent – This feature allows the software to limit the number of emails that will be
sent per the specified number of minutes.
Per Minutes – This sets the interval to be used.
The reason for these setting are that most ISP’s have a limit as to the number of emails that can be sent in
an hour. If your ISP’s limit is 200, we suggest you set the limits as follows :
Number of emails to be sent : 50 per 15 minutes
BCC your email address (send a copy to yourself – If this box is ticked, every email sent to the email
address loaded for the user generating the recurring invoices.
The email address can be stored or changed under User Maintenance as follows :
Admin … User Maintenance … Access Control … Email Settings
Refer to the Detailed User Manual for instructions to set up these email account settings.
11
Other Options – Clicking this button will bring up 2 further options :
Delete Selected Entries – Highlight the email you want to delete. Clicking on this option, will bring
up the prompt to confirm that you want to delete the selected email. Clicking Yes will detele the
highlighted email.
Delete All Emails – All emails in the queue will be deleted.
To send all the emails in the queue, click the Send Emails button. The system will send the emails and
inform you of the progress.
12
Once the email sending is complete, should there be any send errors, these will be written to an Excel
spreadsheet which you can review.
13
To return to the Email Outbox, use the top tabs as follows :
Customers … Processing … Email Outbox
This will allow you to delay sending of the email invoices, and to be able to send them when convenient.
14