1
ASSEMBLY
Assembly requires two people. Place all parts of the elliptical crosstrainer in a cleared area and remove the
packing materials. Do not dispose of the packing materials until assembly is completed. In addition to the two
included allen wrenches, assembly requires a phillips screwdriver
, an adjustable
wrench
, a rubber mallet
, and pliers
.
As you assemble the elliptical crosstrainer, use the drawings below to identify the small parts used in assembly.
The number in parenthesis below each drawing refers to the key number of the part, from the PART LIST on
page 22. The second number refers to the quantity used in assembly. Note: Some small parts may have been
pre-attached for shipping. If a part is not in the parts bag, check to see if it has been pre-assembled.
M8 x 19mm
Screw (30)–4
M10 x 25mm
Screw (102)–3
M10 x 43mm Screw (65)–4
M8 Split
Washer (58)–4
M10 Split
Washer (22)–11
M10 x 56mm Screw (60)–4
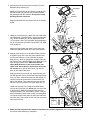
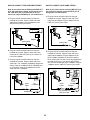
1. Identify the Rear Stabilizer (59), which has Leveling
Feet (14) threaded into it. Attach the Rear Stabilizer to
the Frame with the four M10 x 56mm Screws (60) and
four M10 Split Washers (22).
M8 Washer
(33)–4
M10 Washer
(63)–2
M10 x 33mm Carriage Bolt (61)–2
1
60
60
22
1
59
22
14
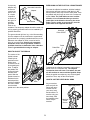
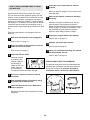
2. Attach the Front Stabilizer (90) to the Frame (1) with
the four M10 x 43mm Screws (65) and four M10 Split
Washers (22). Make sure that the Front Stabilizer is
turned so the Wheels (45) are not touching the
floor.
2
65
22
65
22
1
45
90
5