1
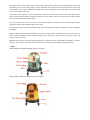
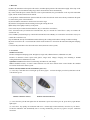
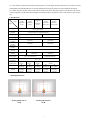
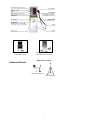
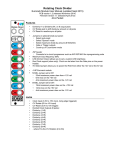
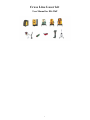
Cross Line Laser kit
User Manual for EK-226P
1
1. Class & Function
Remark: R model: With remote control(wireless & infrared red) & 360°motorized rotation.
Class
Number of lines
Horizon
Verticaltallaser
laser
Working
Environment
Leveling
System
EK-117P
1
1
Indoor &
Outdoor
Gravity
pendulumMagnetic dampimg
EK-226P
1
2
Indoors &
Outdoor
Gravity
pendulumMagnetic damping
EK-211P
1
2
Indoors &
Outdoor
Gravity
pendulumMagnetic damping
EK-266P
1
2
Indoor &
Outdoor
Gravity
pendulumMagnetic damping
EK-888P
1
4
Indoor &
Outdoor
Gravity
pendulumMagnetic damping
EK-234P
1
4
Indoor &
Outdoor
Gravity
pendulum–
Magnetic Damping
EK-234R
1
4
Indoor &
Outdoor
Gravity
pendulum–
Magnetic Damping
EK-436P
3
4
Indoor &
Outdoor
Gravity
pendulum–
Magnetic Damping
ECHO-9P
1
Indoor &
Outdoor
Electronic
Sensor
ECHO-777
4
Indoor &
Outdoor
Electronic
Sensor
4
4
Figure
2. Introduction
All the above products are equipped with the laser semi-conductor diodes with wavelength of 635nm (wavelength of
down dot: 650nm); and the laser beams are extremely visible.
These products can provide two or more fan-shaped surfaces of laser beam and a down dot. When the laser beams are
projected onto a wall, they will form a horizontal line and one or more vertical lines (So-called multiline/cross line laser).
The intersection angle between any two vertical lines is 90 degrees and the cross point is the zenith point .
Our company’s instruments have bigger leveling ranges than the same kind of instrument produced by other companies,
so the instrument only needs adjusting roughly level and it can be rotated freely to make the laser beam aim in any
direction. When turning the fine adjustment knob, the laser beam can locate the target quickly and more precisely.
2
The unique design of "out-of-level" alarm of these products makes the laser beam switch off immediately the slope of the
instrument goes out of the leveling range. And the instruments will self-lock and stop working because of the power
switch (Only in the products of Magnetic Damping) with self-protect apparatus. Due to this design, the instrument will
be free from damage of shocking.
And also the red laser glasses (accessory) will raise the visibility of the laser beam, and the effect of the glasses will be
better especially when wearing it in bright environment or in the distance. And the red target mark (accessory) will fix
the laser beam easily and show them clearly.
The 5/8 screw-hole in the center of the base can be used to stabilize the instrument on the elevated tripod, and then
adjusting the height of horizontal line will be more easily.
The instrument is easy to operate and reliable, which will be widely applied in indoor-construction as well as equipment
installation.
Notice 1: When the instrument are used outdoor or in the far working distance, and the laser line can’t be seen with eyes,
please switch to modulating mode (outdoor-working) and use the FD-9 or FD-6 detector (accessory) to locate the
position of the laser beams.
Notice 2: The customers who have purchased the products of Electronic Sensor System(EHCO-9P;ECHO-777) listed in
the above table can order the products of 3V1H with the same leveling system according to their requirement.
3. Figure
Taking EK-266P of Magnetic Damping System for example
Taking FLE441 of Electronic Sensor System for example:
3
4. Direction
(1) Place the instrument on the tripod or flat surface, and then adjust position of the instrument roughly. If the slope of the
instrument goes out of standard leveling range, all the diode will close down automatically.
(2) i. Turn around the power switch clockwise to start up the instrument, the green indicator on the top of the instrument
lights, and also the laser beams will be emitted.
ii. The products of Electronic Sensor System models do not have the self-lock switch. Press the Key ON/OFF on the panel
to switch on the power of the instrument.
(3) Turn around the instrument to aim the laser beam to the target.
(4) Twist the fine adjustment knob searching for the right working direction.
(5)The utility of the lightly-touch key on the panel:
Class 1V1H: Key-H controls the horizontal laser; Key-V controls the vertical laser;
Class 2V1H-4V1H: Key-H controls the horizontal laser; Key-V1 controls the vertical laser V1;Key-V2 controls the
vertical laser V2;
Class 4V4H:Key-H (Switching key) controls the horizontal laser H1 & H2;Key-V1 controls the vertical laser V1;Key-V2
controls the vertical laser V2;
Key-OUTDOOR: (Except non-modulation model):Selecting the working model: indoor-working or outdoor-working.
(6) At the end of the work: i. Turn around the switch counter-clockwise to close down the instrument (Magnetic damping
system).
ii. Press the Key ON/OFF to close down the instru- ment (Electronic sensor system).
5. Accessories
Standard Accessories:
Products of Magnetic Damping system: Red glasses, Target mark, alkaline batteries, Aluminum case, Belt.
Products of Electronic Sensor system: Red glasses, Target mark, Charger, Charging case: Including 4 NI-MH
rechargeable batteries Aluminum case, Belt.
Optional Accessories: Fd-9 Detector (with clamp), Fd-6 Detector (with clamp)
Notice: Standard accessory of remote control function cross line laser include remote control besides the standard
accessories for Electronic Sensor system.
Remote control(available after the instrument is power on )
(1) Press key V will make the V1 laser light press the key again V2-laser also light press the key third time all the
vertical lasers go out.
Remote control for wireless
Remote control for infrared
(1) Press the H key (the H laser lights after the instrument is power on) H-laser goes out, press the key again H-laser
lights again.
(2) Press the L key quickly, the instrument will move a certain angle counter-clockwise, Press the key for about 1
second the instrument will automatically start to moving continuously press the key again to stop the continuous
movement.
4
(3) Press the R key quickly the instrument will step-move a certain angle clockwise Press the key for about 1 second
the instrument will automatically start to moving continuously press the key again to stop the continuous movement.
(4) When using the wireless remote control at the distance more than 10m, please pull out the antenna of the remote
control completely, and keep the antenna upright. For infrared remote, the distance effect is not obvious as the wireless
one.
6. Specifications
Class
Item
1V1HPendulum
system
2V1H
Pendulum
system
Working
Distance
Leveling Range
Approximately ±2.5°
Emitting Angle
Power Supply
Working
temperature
Continuous
working time
Dimension
Weight
4V4H
4V1H
Electronic
Electronic
sensor system sensor system
Vertical laser & Horizontal laser: 635nm
Down point: 650 nm
Indoor: radius: approximately 10m;
Using laser detector:: approximately 50m
Wavelength
Horizontal
Accuracy
Vertical
Accuracy
Down point
Accuracy
Perpendicular
Accuracy
Zenith
Accuracy
4V1H&4V3
H
Pendulum
system
Approximately ±4°
Approximately 110°
±1mm/5m
±1mm/10m
±1mm/5m
±1mm/10m
±1mm/1.4m
/
90°±1′
/
±2mm/3m
4.5V (3 pcs 5# batteries)
±1mm/3m
4.8-6V 4 pcs NI-MH
rechargeable batteries
-10 -- +45
Approx.
8 hours
Φ
90x190mm
1.4Kg
(Including
batteries)
Approx.
8 hours
Φ
140x185mm
1.9Kg
(Including
batteries)
Approx.
6 hours
Φ
40x220mm
2.0Kg
(Including
batteries)
Approx.
8 hours
Φ
150x230mm
1.5Kg
(Including
batteries)
7. Working illustrations
Working illustration of
1V1H
Working illustration of
2V1H
5
Φ
140x190mm
1.9Kg
(Including
batteries)
Working illustration of
3V1H
Working illustration of
4V1H
Working illustration of
4V3H
Working illustration of
4V4H
Additional: Introductions of Detector
Photoelectric cell
Clamp
Clamp
FD-9
FD-6
Direction:
1. Press the key ON/OFF to switch on the detector.
2. When receiving horizontal laser, set the detector upright; for vertical laser, set the detector horizontally.
3. Aim the detector to the laser beam, move it up and down(for horizontal laser)or left and right (for vertical laser).When
the red indicator lights, it shows the laser lines stay in the receiving range. When the green indicator lights, it shows
the position of the lines have been located precisely (referring to the position of the red lines on the detector).
Illustration of function
6
Carrying case & accessories
for pendulum system
Carrying case & accessories
for electronic sensor system
Optional accessories
Authorized Dealer:
FD-9 Laser Detector
Elevated Tripod
7