1
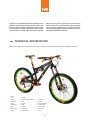
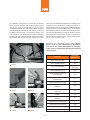
M anual warranty
WARNINGS AND IMPORTANT INFORMATION
WARNING: This bicycle is not meant for public
road use. It is meant for off road use only. This bicycle is designed for aggressive riding on rougher surfaces. You may use it for man-made dirt jumps,
skate parks, ramps, as well as other places where
you will need skill and bike control. Please note that
by this type of riding unpredictable forces are put
on a bicycle which may overload the frame, fork, or
parts. The fact that you use a dirt jumping bike does
not mean you have skills to jump.
Therefore, to minimise the risk of serious or even
fatal accidents, maintenance and assembly work on
your bike should be carried out by an authorised bicycle workshop.
IMPORTANT NOTICE: This manual is not intended
as a comprehensive use, service, repair or maintenance manual. Please consult your dealer for advice
and your dealer may also be able to refer you to classes, clinics or books on bicycle use, service, repair or
maintenance.
WARNING: If you intend to use the bike on public
roads, you must prepare the bicycle to meet the local requirements for items such as lights and reflectors. Always follow all local traffic laws and regulations in force on public roads as well as off-road,
including regulations about bicycle lighting, reflectors, licensing of bicycles, riding on sidewalks, laws
regulating bike path and trail use, helmet laws, child
carrier laws and other special bicycle traffic laws.
WARNING: The bike box contains instructions for
components made by third parties. You must study
these carefully and follow the directions before riding your bike. For the info about recommended setup and maintenance of NS Bikes suspension frames
please check the frame instruction. Frame tech
manual is added to every suspension frame / bike.
You can find it also on www.nsbikes.com.
WARNING: Extreme riding is a very dangerous
sport; it requires an amazing amount of skill. By engaging in this type of activity, you are accepting the
risk of possible injury or even death. Even the best
bike will not help you land a clean trick. Even the best
protective gear will not guarantee complete safety.
Remember that in this kind of riding, you can only
trust your own abilities and you must accept the inherent risk. While extreme riding you can reach significant speeds and therefore face similar hazards
and risks. Inspect your bicycle and equipment carefully and be sure that it is in perfect condition. If possible consult with area site personnel, expert riders
and race officials on conditions and equipment advisable. Always wear appropriate safety gear, including an approved full face helmet, full finger gloves,
body armour, bright, visible clothing that is not so
loose that it can be tangled in the bicycle or objects
at the side of the road or trail, shoes that will stay on
your feet and will grip the pedals (make sure that
shoe laces cannot get into moving parts, and never
ride barefoot or in sandals). Always use protective
eyewear, to protect against dirt, dust and bugs.
INFORMATION : The maximum total weight allowed (rider + clothing + protective gear + backpack,
luggage etc.) is 100 kg.
WARNING: Never carry anything which obstructs
your vision or your complete control of the bicycle,
or which could become entangled in the moving
parts of the bicycle.
WARNING: The stem & handlebar must be connected firmly with the fork. Otherwise the whole
steering system may fail and cause you to lose control of the bicycle. This may result in injury and death.
WARNING: Do not extend the seat post above
the minimum insertion mark.
WARNING: Alloy handlebars should be replaced
at least once a year because the can snap suddenly
with no warning if submitted to fatigue stress for a
prolonged period of time.
WARNING: As with all mechanical components,
the bicycle is subjected to wear and high stresses.
Different materials and components may react to
wear or stress fatigue in different ways. If the de-
WARNING: Some of the service procedures require specialist tools and good mechanical skills.
2
sign life of a component has been exceeded, it may
suddenly fail possibly causing injuries to rider. Any
form of crack, scratches or change of colour in highly stressed areas indicate that the life of the component has been reached and it should be replaced.
When replacing any components, especially the
safety-critical ones, genuine spare parts complying
with your bike specifications are to be used only.
The manual provided by the part manufacturer contains full comprehensive details.
TECHNICAL INFORMATION
Make yourself familiar with the names of all the main parts of the bicycle by studying the diagram below:
24
5
7
7
6
8
9
4
8
23
22
3
13
1
10
12
21
18
13
14
17
20
19
21
2
16
10
15
12
14
11
1/ frame
2/ fork
3/ shock
4/ headset
5/ stem
6/ handlebar
7/ grip
8/ brake lever
9/ shifter
10/ brake
11/ tire (with tube inside)
12/ rim
13/ spoke
14/ hub
15/ pedal
16/ crankset
17/ chainwheel
18/ cassette
19/ chain
20/ rear derailleur
21/ chainguide
22/ seat clamp
23/ seat post
24/ seat
3
11
ASSEMBLY OF THE NEW BICYCLE
This should always be carried out by the dealer where
you purchased your bicycle. If you buy a bicycle that
is disassembled, or only partially assembled the warranty will be void. Assembly should be done in your
presence, in order to make the necessary adjustments
correctly, such as saddle height, handlebar angle and
stem height. It is also important to note that even if
the bicycle is built up perfectly when new, it will need
some additional adjustments a few weeks (or around
50km) later. You should visit your dealer and ask him
to check the bicycle for you after this period. This is
essential to keep your warranty.
TOOLS REQUIRED
4mm,5mm, 6mm allen keys
Philips head screwdriver
8mm, 15mm open end wrench
Pliers with cable cutting ability
Torx 25 wrench
Torque wrench
TOOLS REQU
4mm,5mm, 6mm allen
8mm, 15mm open end
Torx 25 wrench
philips head screwdrive
To check if the frame size is safe, the rider should straddle the bike while wearing the kind of shoes which will be used for riding
and stand straight with feet flat on the ground. The minimum distance between the rider's crotch and top tube should be 5 cm
(approx. 2 inches) for a bicycle to be ridden on paved surfaces only, and at least 10cm (four inches) for bicycles to be used off road.
This method of measuring the correct frame size does not apply to bicycles with step-through frames, or so called “lady” frames.
In case of these frames, correct frame size should be determined first on a traditional diamond frame (so called “men's” frame).
CORRECT FRAME SIZE:
4mm,5mm, 6mm allen keys
8mm, 15mm open end wrench
Torx 25 wrench
philips head screwdriver
TOOLS REQUIRED:
4
CORRECT FR
To check if the frame si
and stand straight with
(approx. 2 inches) for a
This method of measur
In case of these frames
sed for riding
ould be 5 cm
be used off road.
“lady” frames.
en's” frame).
To check if the frame size is safe, the rider should
straddle the bike while wearing the kind of shoes
which will be used for riding and stand straight with
feet at on the ground. The minimum distance between the rider’s crotch and top tube should be 5 cm
(approx. 2 inches) for a bicycle to be ridden on paved
surfaces only, and at least 10cm (four inches) for bicycles to be used o road. This method of measuring
the correct frame size does not apply to bicycles with
step-through frames, or so called
“lady”
frames. In
TOOLS
REQUIRED:
4mm,5mm,
6mm
allen keys be decase of these frames, correct frame
size
should
8mm, 15mm open end wrench
Torx 25 wrench
termined rst on a traditional diamond
frame (so called
philips head screwdriver
“men’s” frame).
CORRECT FRAME SIZE:
min. 5 cm paved surface
min. 10cm - off road
CORRECT FRAME SIZE
GENERAL RIDING INFORMATION
WARNING: When your bike is on a bike stand or
it’s upside down, never put your finger or any other
part of your body between the chain and the chainring when the wheel is spinning. This is especially
important on single speed bikes with no derailleurs,
because the chain is very tight. It is very easy to
have your finger crushed or even amputated in such
a situation!
As mentioned, riding a bike, in particular an off-road
one, can be dangerous. You must keep this in mind
and be cautious at all times. See and be seen. Use
lights and reflective clothing in low light conditions at all times. If the bike is to be used by your
child, make certain that it always wears a suitable
and approved bicycle helmet when using the bike.
If your bike has suspension, please be noted that it
can alter the way the bicycle performs. Never shift
gears when pedalling in reverse, and do not back
pedal directly after the shifter has been moved. This
could make the chain jam causing serious damage
to your bicycle. Riding with a wheel that has not
been properly secured can make the wheel wobble
or disengage from the bicycle resulting in serious
injury or death. If your bike has been equipped with
a clip-and-strap system (toe clips and straps) or clipless (step-in) pedals, make sure you know how they
work; you should remember that special techniques
and skills are to be used with such pedals. Note that
in some bicycle models the user’s toe or toe clip may
touch the front wheel when a pedal is all the way
forward and the wheel is turned. This is normal, and
your riding technique should take this into account
(i.e. you should not turn the handlebar sharply to the
left when your right foot is in the most forward position, or sharply to the right when your left foot is
in the most forward position). If your bike has been
equipped with platform type pedals that have metal
pins attached, always ensure that pins are complete
and kept in good condition. Check out the handling
and response of the bike as well as the comfort.
If you have any further questions, or if you have
doubts about the proper functioning of your bike,
consult your dealer before riding it again.
Always conduct a pre-ride check (detailed information can be found further in this manual). Never ride
the bicycle if you observe any technical problems or
have any doubts about the proper functioning of any
element in the bicycle. Keep the bike clean and well
maintained. Make sure that your parts of the body as
well as any other objects do not touch the sharp teeth
of the chainrings, chainwheels, sprockets, chain,
cranks, or spinning wheels of your bicycle. While using an off-road bike you are to comply with the following rules: you need to pay close attention and use
the specific skills required in the changeable conditions and dangers associated with off-road riding.
You should start slowly in uncomplicated terrain and
develop your skills gradually. You shouldn’t ride your
bike in remote areas unaccompanied. Even when
riding in the company of others, always let someone
know where you’re going and when you expect to
come back. Always keep some sort of identification
with you, so that you could be identified in case of an
accident; also you should always have some cash for
food, a cold beverage or an emergency phone call on
you. It may be difficult to find help when you’re riding
off-road. You should abide by the local regulations
determining the places and methods of off-road riding, and respect private property. Respect the rights
of the others you may be sharing the trail with — hikers, equestrians or other cyclists. You should reduce
your impact on the environment to minimum. Thus,
never cut your own trails or shortcuts through vegetation or streams, which could disturb the ecosystem. Don’t ride in mud or sludge or with unnecessary
sliding as such behaviour could contribute to erosion.
Always leave things as how you find them and take
out everything that you bring in with you. In case of
an accident or impact: first take care of your own
situation - check yourself for injuries, and take the
best possible care of them. Get medical help if neces-
WARNING: Reflectors are not to be used as a
substitute for required lights. You should abide by
the local bicycle lighting regulations. Riding at
times of poor visibility such as dawn, dusk, night or
others, without a proper bicycle lighting system
and reflectors constitutes a hazard and may cause
serious injury or death. You should examine the
bike lights and reflectors along with their mounting
brackets regularly to make sure that they are clean,
straight, unbroken and properly and securely
mounted.
5
sary. Then, check your bike for damage. After a crash
of any kind, you should have your bike thoroughly
checked by your dealer. You must not use the carbon
composite components, such as frames, wheels, handlebars, stems, cranksets, forks, brakes, etc. which
have sustained an impact until they have been disassembled and thoroughly inspected by a qualified mechanic. The bicycle components can undergo unusual
stress due to a crash or impact of other kind, causing
their premature fatigue. Components suffering from
stress fatigue can break suddenly and catastrophically, which may result in your losing control, serious
injury or death.
WARNING: Wet weather conditions dramatically
increase the risk of an accident as they impair traction, braking and visibility, both for the cyclist and
for other road users. Wet conditions dramatically
reduce the stopping power of your brakes (especially
rim brakes) as well as of the brakes of other vehicles
sharing the road and your tires can lose their grip.
Therefore, it is more difficult to control your speed
and you may lose control easily in such conditions. To
make sure that you are able to reduce speed and
come to a stop safely in wet conditions, try to ride
more slowly and start braking earlier and more gradually than you would under normal dry conditions.
Always carry a pump, spare inner tube, patch kit,
and a basic tool kit. You may need this in case of a
flat tire or other common mechanical problem that
is usually easy to fix if you have the right tools. If you
need to patch your inner tubes, always make sure
to follow the instruction manual provided by the
tube repair kit manufacturer. Bikes sold in UK, Japan, Australia and other left-hand drive countries,
the bikes should come with right lever operating
the front brake and left lever operating the rear
brake. In countries with right-hand drive traffic
systems, the bikes should come with right lever operating the rear brake and the left lever operating
the front brake. The user must check and make sure
which lever is connected to which brake before the first
ride because it is possible that the bicycle was imported
from a country where brakes are set up differently to
the standards applying in the country where the bicycle
will be used. If your bicycle is equipped with gears,
you can choose a gear combination that is most
comfortable for the riding conditions. Gears will
allow you to maintain a constant rate of pedalling.
Use lower gears for going uphill and higher gears
for going downhill. While shifting gears try to pedal
with less effort so as to prevent early gear and chain
wear and tear. Ask your dealer for more advice on
this issue. Protect your bike against theft by purchasing a lock and never leaving your bike unlocked
while unattended, even if you are going to leave it
only for a short while.
Bicycle Suspension
If your bicycle has been equipped with any sort of a
suspension system, make sure you read and follow
the suspension set up and service instruction manual
provided by the manufacturer. If you haven’t been
provided the manufacturer’s instruction manual,
contact your dealer or the manufacturer.
WARNING: Failure to maintain, check and properly adjust the suspension system may cause suspension malfunction, in result of which you may
lose control and fall.
If your bike has been equipped with suspension, the
increased speed you may develop will also increase
the risk of injury. For example, when braking, the
front of a bike with a suspension fork dip. You can
easily lose control and fall if you are not prepared for
this. Please, learn how to operate your suspension
system safely.
WARNING: Introducing changes in the suspension adjustment can alter the handling and braking
characteristics of your bicycle. It is forbidden to
change the suspension adjustment unless you are
thoroughly familiar with the suspension system
manufacturer’s instructions and recommendations;
you should always check for changes in the handling
and braking characteristics of the bicycle after the
suspension has been adjusted by taking a careful
test ride in a safe area.
CAUTION: Watch out for the brakes - they can be
powerful and activating them too aggressively can
result in a crash. Learn to get a feel of the brakes
practicing it on a side road or in an empty car park
before you ride your bike for the first time.
Thanks to the use of suspension the wheels can follow the terrain better, which can enhance control
and comfort. This improved capacity may provide
opportunity for riding faster, but you should be care-
6
ful not to mistake the enhanced capabilities of the bicycle for your own riding skills. Improving skills takes
time and practice.
visible rim wear marks constitutes a hazard and can
cause serious injury or death. Too hard or too sudden
application of the brakes can cause the wheel to lock
up and make you lose control and fall. Applying the
front brake too suddenly or excessively may result in
the rider’s pitching over the handlebars, potentially
causing serious injury or death. Bicycle brakes may
be very powerful, especially disc brakes or linear-pull
brakes. You should be extra careful while learning
how to operate such brakes and take particular care
while using them. Disc brakes can heat up extremely
when their application is prolonged. Don’t touch a
disc brake until it has had plenty of time to cool. Remember that brake pads in all brake types will wear
out, which will ultimately reduce their efficiency. For
information on how to operate and maintain your
brakes and when to replace the brake pads see the
brake manufacturer’s operation and maintenance
manual. If you have not been provided with the manufacturer’s instruction manual, contact your dealer
or the brake manufacturer. When replacing worn or
damaged parts the manufacturer-approved genuine
spare parts are to be used only.
CAUTION: Not every bicycle can be safely retrofitted with certain types of suspension systems. Before planning to retrofit a bicycle with any suspension system, check with the bicycle’s manufacturer to
make sure that the modification you are going to
make is compatible with the bicycle’s design. Failure
to do so can result in damage to the frame and your
bicycle may be difficult to control due to improper
geometry that results from the modification.
IMPORTANT: make sure your wheels function
properly before each use, check if the mounting bolts
are secure, check that the freewheel engages correctly. If there is any malfunction of the hubs, they
should not be used under any condition. In case of
any doubt, consult an experienced bike mechanic.
Rear hub axle bolts should be tightened alternately!
Do not over-tighten the bolt on one side without
counter tightening on the other!
Brake controls and features
It’s vital for your safety to learn and remember which
brake is controlled by which brake lever on your bike.
Acquaint yourself with the setup of your brakes by
alternately squeezing the left and right brake lever
and observing which brake lever activates the front
brake, and which one activates the rear brake. You
should be able to reach the brake levers with your
hands and squeeze them easily. If you find out that
your hands are too small to do so, you should consult
it with your dealer before riding the bike. In some
models the lever reach may be adjusted, or you may
need a different brake lever design.
If your mountain bike has been equipped with
through axle front or back wheels, make sure that
you have been provided with the manufacturer’s
instruction manual, which you are to follow when installing or removing wheels with this system. If you
are not sure what a thru-axle/through axle is, ask
your dealer for information. It is crucial for you to
understand what type of a wheel securing method
is required on your bicycle, to know how to secure
the wheels correctly, and how to apply the correct
clamping force to secure the wheel safely. Ask your
dealer to instruct you on how to remove and install
the wheel on your bicycle properly, and provide
you with any available manufacturer’s instruction
manual.
Operation of the braking system
The bicycle braking system’s function is based on
friction between two braking surfaces. To assure
it’s proper functioning you should maintain the rims,
brake pads, disc rotor and calliper clean and free of
dust, dirt, grease, lubricants, waxes and polishes.
There are special chemical cleaners available on the
market designed specifically for cleaning these surfaces. Bicycle brakes have been designed to control
the speed of your bicycle by reducing it or preventing the bicycle from moving. The maximum breaking
force for each wheel is achieved just before the mo-
Brakes
There are two main types of bicycle brakes: rim
brakes, operated by squeezing the wheel rim between two brake pads and disc brakes, operated by
squeezing a hub-mounted disc between two brake
pads. Both can be actuated by the rider squeezing a
lever mounted on the handlebar.
WARNING: Riding with brakes that have not been
adjusted properly, worn brake pads, or wheels with a
7
ment the wheel stops rotating (“locks up”) and starts
skidding. The instant it has begun to skid, the most
of your bike stopping power and all directional control is lost. Therefore, it is necessary to learn how to
slow down your bike and bring it to a halt smoothly
avoiding a wheel lockup. To do so you should learn
a progressive brake modulation technique so that
you could be able to precisely and accurately control the amount of clamp force on a rotor with a
given amount of lever input. Instead of pushing the
brake lever abruptly, squeeze it slowly and gradually increase the braking force. The instant the wheel
begins to lock up, slightly release pressure to keep it
rotating, just short of lockup. You should learn how
much brake lever pressure is needed for each wheel
at different speeds and on different surfaces. Reducing the bike speed by applying one or both brakes will
transfer the weight to the front wheel as the rider’s
body continues at the speed at which it was going.
Heavy braking will result in the transfer of weight
around the front wheel hub, which may send the rider’s body flying over the handlebars. Greater brake
pressure is needed for a wheel burdened with heavier load to lock up, whereas a wheel burdened with
less weight will lock up with less brake pressure applied. Thus, when your weight is transferred forward
when the brakes are activate, so you should move
your body backwards in order to transfer weight to
the back, simultaneously decreasing the rear braking force and increasing the front braking force. It is
especially important when you are descending. The
weight transfer is more evident on bikes equipped
with a front suspension fork as it dips under braking
and thus intensifies the weight transfer. To control
your speed effectively and bring your bike to a halt
safely you need to be in control of the wheel lockup
and the weight transfer. You should practice braking
and weight transfer techniques in safe places free
from traffic and distractions.
been moved. This could make the chain jam causing
serious damage to your bicycle.
We suggest you should find the gear relevant to
your riding skills level, to do so check which gear
will be hard enough for you to accelerate quickly
and yet at the same time easy enough for you to be
able to start your bike from a halt without wobbling.
After you have found your “starting gear” go on to
experiment with upshifting and downshifting to
learn how to operate different gear combinations.
Different conditions require different combinations, e.g. the combination of the largest rear and
the smallest front gears will work on the steepest
hills, while the combination of the smallest rear and
the largest front gears will be used for reaching the
greatest speed. Shifting gears in sequence is not
necessary. At first we suggest you practice shifting
gears on a location free from obstacles, hazards or
other traffic, until you’ve built up your confidence.
Learn to anticipate the need to shift, and shift to a
lower gear before the hill gets too steep. Difficulties
with shifting may indicate a mechanical adjustment
problem, in which case you should contact your
dealer for help.
WARNING: If the derailleur does not shift
smoothly, you should not shift further, it as it may be
out of adjustment and the chain could jam, causing
you to lose control and fall.
Failure to shift to the next gear smoothly after moving the shift control by one click repeatedly indicates
that the mechanism might incorrectly adjusted.
You should have it checked by your dealer. If your
bicycle has been equipped with a single-speed drivetrain system, the chain needs tension to make sure
it doesn’t come off the sprocket or chainring. Check
tightness of chain before every ride! (FIG. 1) The
drive train is exposed to extreme loads. Any looseness or play in the drive train may cause damage to
particular elements.
Shifting gears/Gear shifting
Shifting can be controlled by using various types of
controls and methods: by using levers, twist grips,
triggers, combination shift-brake controls and pushbuttons. Your dealer should explain what type of
shifting controls your bike has been equipped with,
and to show you how they should be operated.
Before each ride check: crank set, rear hub, cassette
and freewheel, pedals and chainrings - crank arm connection. The bicycle should be cleaned and lubricated
with dedicated grease systematically. Chain lubrication depends on weather and terrain conditions. Water and mud speed up wear of the chain. Clean and
lubricate chain after each ride in wet or muddy condi-
CAUTION: Never shift gears when pedalling in reverse, nor back pedal directly after the shifter has
8
tions. The rear derailleur should shift gears smoothly.
You can adjust gear shifting through a rear shifter barrel or by tensioning the cable under the cable anchor
washer. Increasing the tension of the cable facilitates
shifting to a lower gear, decreasing the tension of the
cable facilitates shifting to a higher gear. Check if the
pedals are properly threaded into the cranks. Looseness may cause damage of crank thread. Regularly
check looseness in pedals to crank set connection.
force on fasteners, nuts, bolts, screws on your bicycle
so as to avoid components failure or damage, which
can result in your losing control of the bike and falling. Using too little force may result in the fastener
not holding securely, moving and undergoing fatigue.
Applying too much force may cause the fastener to
strip threads, stretch, deform or break. If you observe any problems at the pre-ride check, consult a
professional bicycle mechanic instantly for advice.
You can ride the bicycle again only after the problem
has been resolved.
CAUTION: It is crucial to apply correct tightening
PRE-RIDE CHECK
Before every ride you should always make a pre-ride
check. It should include the following points: Clean
the frame and fork and examine them CAREFULLY
for any signs of cracks, corrosion, dents, paint peeling or other defects. If anything suspicious is found,
contact your local bike dealer for a proper inspection. These are important safety checks and very
important to help prevent accidents, injury and
shortened product lifespan. Do not ride the bicycle
if you see any defects in the frame and fork. Check if
the brakes are working properly by testing their efficiency in a parking lot or on a side road. When the
brake is applied with full force, the distance from the
brake lever to the handlebar should be bigger than
2cm. Check the brake pads too - you should replace
damaged and worn out elements and adjust immediately when improper function is noticed. To do this,
contact your dealer or the closest authorised bike
service. Remember that improper setup of the brake
can cause serious injury or death. Follow the brake
manufacturer’s instructions closely for setup and
maintenance. The instructions are supplied in the
box with every bicycle. If you are in doubt about their
correct function, contact your local bicycle shop.
recommended torque (see the manufacturer’s instruction manual).
Brake reach
In many bikes brake levers can be adjusted for reach.
If your hands are small or if squeezing the brake levers is difficult for you, ask your dealer to adjust the
reach or have shorter reach brake levers fitted.
WARNING: With shorter brake lever reach, correct adjustment of brakes becomes more critical, full
braking power should be applied within available
brake lever travel. Brake lever travel inadequate for
full braking power application can result in loss of
control, which may cause serious injury or death.
Check the brake cables and their housing for kinks,
rust, broken strands, or frayed ends. If you notice any
damage, you should ask a bicycle shop to replace the
cables immediately. Damaged cables can seriously
impede braking efficiency. If your bicycle has rim
brakes, inspect the rim walls to check if they are not
excessively worn out by the brakes. A groove made
by manufacturer on the sidewall of a rim should always be visible. On rims without a groove/safety
mark it is important to check if f the braking surface
has not become deformed by the brake pads. The
rims should be replaced as soon as a visible deformation of the rim surface occurs.
Control position adjustments
It is possible to adjust the angle and position of
brakes and shift controls on the handlebars. Ask your
dealer to make the necessary adjustments for you. If
you choose to adjust the control lever angle on your
own, be sure to re-tighten the clamp fasteners to the
For your information: in some jurisdictions there are
9
requirements to determine the minimum leg-length
dimension (clearance between the rider’s crotch and
the top tube of the bike when stood in front of the
saddle) in the manual. This does not apply to all bicycles, yet the so called stand over height constitutes
a basic element of bike fit and plays an important
role, especially when dismounting the bike quickly.
While determining the correct stand over height you
should straddle your bike while wearing the kind of
shoes which you are going to wear while riding, and
bounce energetically on your heels. Your crotch
touching the frame means that the bike is too big
for you. You should not ride the a bike. The minimum
stand over height clearance for the bike ridden on
paved surfaces only and never taken off-road should
be 5 cm (approx. 2 inches). The minimum stand over
height clearance for the bike to be ridden on unpaved
surfaces should be 7.5 cm (approx. 3 inches). The
minimum stand over height clearance for the bike
to be used off road should be 10cm (four inches) or
more. Stand over height does not apply to bicycles
with step-through frames. In such bicycles the range
of the saddle height determines the limiting dimension. Make sure you are able to adjust the position
of your saddle as shown in this manual herein above
without exceeding the limits set by the height of the
top of the seat tube and the minimum insertion or
maximum extension mark on the seat post. Remember that toe-clearance may vary according to any
modifications introduced to tires or cranks.
wards. There should be no play between the frame
and fork). If any play is found contact your local bike
shop. Do not attempt to make any adjustments yourself. If you are confident that you can do this yourself
then adjust the steering system according to the following instructions: loosen the steer clamp binder
bolts. Adjust preload until no binding or looseness
are present in the headset. (FIG.3) Align the stem
with the front wheel and now tighten the steer clamp
binder bolts alternately, in small increments. Once
again, check for headset play. If play exists, loosen
the steer clamp, pinch bolts, and tighten the top cap
anchor bolt 1/16th of a turn. Align the stem, and
retighten the pinch bolts Remember to tighten both
bolts alternate (FIG.4). Repeat until proper adjustment made. All parts of the stem should be regularly
checked for damage or cracks. If you find anything
suspicious, contact an experienced bike mechanic
immediately. A defective steering system can cause
serious injury or death. Check if the wheels are
straight (lift the bike and spin each wheel - the rim
should not move more than around 1mm to each
side). Check if all the spokes are tight by running
your hand around each wheel on both sides. Contact
your bicycle dealer to resolve any problems. Do not
attempt to ride a bicycle with wheels that are not
straight or with spokes that are loose, as it is a dangerous to your health and life.
Check if the tires are properly inflated (see the prints
on the side walls for instructions about the optimum
pressure: usually 3.5 – 4.5 bar depending on terrain
and weather conditions). Use a proper bicycle pump
with a pressure gauge to achieve the correct pressure. Check the overall conditions of the tires, if they
are damaged, torn or worn out you should replace
them before riding. Using worn or damaged tires is
dangerous to your health and life. Make sure tires are
correctly inflated and are in good shape. Spin each
wheel slowly and look for cuts in the tread and sidewall. Replace damaged tires before riding the bike.
Fork Proper maintenance is essential for long life and
optimal fork function. Lack of maintenance may result in faster wear and may lead to malfunction causing serious injury or death. If you are not sure how
to maintain the fork, you should consult your dealer
to help you with your maintenance requirements.
Things to check before each ride: a) Check wheel axle
to fork connection, b) Check brake clamp to fork connection, c) Check headset looseness, d) Check stem
Steering system.
The steering system includes: handle bar, stem, headset and fork. All elements should be connected firmly
for riding safety.
WARNING: Proper assembly and functioning of
the steering system is critical for your safety!!!
Your dealer is responsible for proper assembly of
the steering system for you. If you wish to make any
adjustments yourself, be warned that incorrect setup
can be very dangerous and we always advise you to
seek professional advice for this! Check the connection between the handlebars and stem. Try pushing
the handlebars up and down - there should be no
movement between these two elements. If there is
any, it is necessary to tighten the stem bolts (FIG 2).
Check the headset for play (stand next to the bicycle,
apply the front brake and push forwards and back-
10
to handlebar connection, e) Clean fork stanchion
tubes, f) Check general fork condition (take special
note of any cracks or deformations). Do not ride if
any defects noticed! For information about servicing
suspension forks mounted on the bike it is necessary
to follow manufacturer’s instructions closely. The
user manual for the suspension forks are supplied in
the box with every bicycle. Check wheel axle to fork
connection - this is critical for your safety. If you have
axle nuts they should be tightened according to the
manufacturer’s specification. If you have a quick release make sure that it is set to the CLOSED position,
and that there is a reasonable amount of resistance
when pushing the lever (FIG.5). The amount of resistance can be adjusted by turning the knob on the opposite side of the lever when the lever is in the open
position. Never leave the quick release loose, and do
not try to turn it like a screw.
Reference bolt tightening torque values (please
always refer to the manufacturer’s instruction
manual first, the values shown below do not apply
to ALL types of components that may be mounted
on the bicycle):
Bolt type:
Tightening
torque (N-m):
Stem steer tube bolt
12
Stem handlebar bolts
10
Front hub axle bolts
17 (for 10mm
axle hubs)
Rear wheel bolts/nuts
35
MTB crankset to bottom
bracket bolts
40
3pcs crankset to bottom
bracket bolts
12
FIG. 1
FIG. 2
FIG. 4
FIG. 3
FIG. 5
11
3pcs crankset pinch bolts
12
Seat binder, Seat post clamp
bolts M5
10
Seat binder, Seat post clamp
bolts M6
12
Pedals
25
Brake calliper screws to frame
and fork
10
Shifting lever, Brake lever
3
Disc brake screws to hub
6.0
Rear derailleur: main fixing bolt
10
Rear derailleur: cable fixing bolt
5
ADJUSTMENTS
It is possible to make some adjustments to your bicycle that will influence your riding position. These
adjustments can make a great difference to riding
pleasure, speed and safety - so unless you are a very
competent cyclist and mechanic, do not attempt to
execute any of these adjustments yourself. Seek advice at your local bicycle shop. The basic adjustment
points are as below:
Adjusting saddle height. This should be carried out
using an 5 mm hex wrench. Unscrew the seat binder
bolt, set the saddle at a certain height, then re-tighten the bolt and sit on the bicycle. Repeat until you
find the best position. The tightening torque of the
seat binder should be around 12Nm Check (FIG 6.)
FIG. 6
FIG. 7
WARNING: Never extend the seat post above the
minimum insertion mark that can be found on the
lower part of the seat post!
experimenting with various combinations. A general
rule is that the saddle should be set more or less in
the central position, and should be tilted slightly to
the rear (the nose should be pointing up around 3 -5
degrees). This will put more body weight on the saddle and take of some pressure from your hands.
Adjusting the rail saddle position. This should be
done using a 5mm or 6mm hex wrench. When you
loosen this bolt(s), it is possible to change the angle
of the saddle and it’s fore and aft position (FIG 7). Try
12
MAINTENANCE AND PERIODICAL CHECKS
Take care of your bicycle, and you will enjoy it for a
longer time. Also take some time to periodically inspect the bicycle in more detail - this is important for
your safety. Here is some basic information. A good
rust inhibitor should be applied to the inside of your
frame at least once a year. Regular cleaning will remove salt and other chemicals from the surface of
your bicycle minimising the likelihood of external
corrosion. It is very important that paint chips and
scratches get touched up as soon as possible with
factory touch-up paint or nail polish. Prior to painting, make sure that the surface is free of rust, clean
and dry. The frame does not require any lubrication
with the exception of the inside of the seat tube. Periodically inspect the fork for any signs of damage. If
you suspect it may be broken, bent, cracked do not
use it. Inspect if the steer tube and fork blades are
straight and dropouts for cracks or damage. Do not
ride on the damaged fork - it may cause serious injury
or death. Note: The handlebars should be replaced at
least once a year as they are submitted to fatigue.
Check the cranks for play (hold the bike with one
hand, and the pedals with the other and look for play
by trying to push the pedals from one side of the bike
to the other). If any play is found contact your local
bike shop. Periodically check hubs for play and have
the bearings adjusted if necessary by professional
bicycle mechanic. The bearings should be lubricated about once a year. Keep your chain cleaned and
lubed. This is especially important if you ride often in
wet conditions. Use proper bicycle chain lubricants,
WD-40 is not one of them!
WARNING: As for all mechanical components,
the bicycle is subject to wear and tear as well as high
stresses. The reaction of various materials and components to wear or stress fatigue may differ. Having
exceeded the life expectancy of a component may
result in its sudden failure, possibly causing injuries
to the rider. Any forms of breaks, cracks, scratches
or changes of colouring in highly stressed areas indicate that the life of the component has been
reached and it should be replaced.
NOTE Enclosing any other relevant information
will be at the discretion of the manufacturer.
NS BIKES WARRANTY
the product is purchased. This purchase must be
documented with the cash receipt plus filled in warranty card (which includes the following information:
date of purchase, serial number of frame, name of
bike model, customers name and name of dealer).
1. 7ANNA sp. z o.o. sp. k. (hereinafter on referred to as 7ANNA), manufacturer of NS Bikes,
warrants all it’s new hardtail bicycles against defects
in materials and workmanship for a period of 1 year.
All new full suspension frames and all new steel allmountain and enduro hardtail frames have a 3 year
warranty.
4. The warranty applies only to the original owner and is not transferable.
2. If any defects are noticed in the bicycle, the
Customer must stop using the product immediately
and should report this to the dealer that sold it within
14 days. Using a damaged bicycle will void the warranty, lead to more extensive damage and may pose a
serious hazard to the rider’s health and life.
5. Claims under this warranty should be made
through the dealer where the bicycle was purchased.
6. The bicycle should be submitted to a mandatory check-up between the 3rd and 5th week from
date of purchase (or after 50km of riding) to an authorised bicycle dealer. The confirmation of this
3. The warranty period starts from the day when
13
check-up should be documented in the warranty
card. Failure to do this will void the warranty.
bike. Such damage won’t be covered by the normal
warranty, however 7ANNA offers the possibility to
replace the product for 50% of the original suggested
retail price under the Crash Replacement policy. The
conditions for this are: Crash Replacement applies to
components made by 7ANNA that are mounted in
the bikes, all NS Bikes hardtail frames for a period of
1 year and all full suspension and steel enduro frames
for a period of 3 years from the date of purchase,
7ANNA reserves the right to deny Crash Replacement without further explanations, Crash Replacement does not apply to parts damaged in other situations than in riding (for example Crash Replacement
will not cover a part that has been damaged during
shipping), Crash Replacement does not apply to complete bikes. It only applies to components made by
7ANNA that are mounted in the bikes.
7. The warranty is valid only if the bicycle is sold
by an authorised dealer in a ready-to-ride condition.
8. If a certain part of the bicycle will require replacement under this warranty, parts that are similar
in function to the originals shall be provided. It may
not always be possible to provide parts that are identical. The decision if a broken part requires replacement or repair will be made by the dealer who sold
the bicycle. The dealer’s decision will be conclusive
and binding.
9. The warranty does not cover normal wear and
tear of tires, chains, brake pads, bearings, cogs and
chainrings. Wheel truing, lubricating, brake adjustment, drive train adjustment and other typical maintenance procedures are not covered by the warranty
and must be conducted by a professional bicycle
workshop at the cost of the customer.
14. This limited warranty does provide the original owner with certain legal rights and recourse and
the original owner may possess other rights or recourse, depending on the state, jurisdiction, country,
or province. Please be informed that this is a final
statement of the 7ANNA and all the remedies available to the original owner are stated herein. 7ANNA
does not allow or authorise any entity (including authorised dealers) to extend any other express or implied warranties on its behalf. An original owner
agrees that 7ANNA’s liability under this warranty
under no circumstances shall be greater than the
original purchase price. In no event shall 7ANNA be
liable for incidental or consequential damages. All
other remedies, obligations, liabilities, rights, warranties, express or implied, arising from law or otherwise, including (but not limited to) any claimed implied warranty of merchantability, any claimed
implied warranty arising from course of performance, course of dealing or usage of trade, and any
claimed implied warranty of fitness, are disclaimed
by 7ANNA and waived by the original owner. Some
states, jurisdictions, countries, and provinces do not
allow some or all of the limitations set forth herein,
or the exclusion or limitation of incidental or consequential damages. If any provision is found unenforceable, only that provision shall be stricken and all
others shall apply.
10. The warranty does not cover: labor charges
for replacing parts, paint and decals, problems that
result from excessive loads occurring during extreme
riding or from incorrect riding technique. The warranty does not cover: the cost of travel or shipment to and
from an authorised dealer. Such costs, if any, shall be
borne by the original owner.
11. This warranty is void if: the warranty card is
filled in incorrectly or incompletely, any modifications have been made to the bicycle by the customer,
damage has been caused by external parts that have
been incorrectly assembled on the bicycle, the product had not been used, maintained or repaired according the manufacturer’s instructions, the bicycle
had been sold disassembled, or only partially assembled, the product was transferred to any third party.
12. Directions on how to deal with warranty cases shall be provided by the distributor of the product
in the region where it was purchased.
13. The Crash Replacement Warranty covers
damage resulting from crashing, or excessive loads
generated by things like casing jumps or throwing the
14
PROOF OF PURCHASE – WARRANTY CARD
Dealer’s stamp
Bike, model: .....................................................................................................................................................................................
Frame serial number: ...................................................................................................................................................................
Fork serial number (if any): .......................................................................................................................................................
Price: ...................................................................................................................................................................................................
Date of purchase: ..........................................................................................................................................................................
I certify that I am acquainted with the actual specification of the bicycle (this can be slightly different than
that published by the distributor).
Buyer’s signature: ........................................................................................................................................................................
Dealer’s signature: ........................................................................................................................................................................
15
handmade in Europe