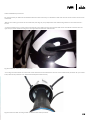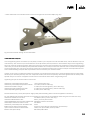
1
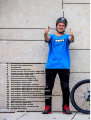
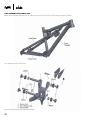
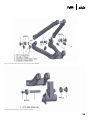
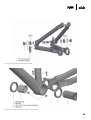
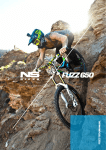
SODA EVO & SODA SLOPE
TECH MANUAL
3
4
5
6
7
8
9
10
11
13
18
19
20
21
23
24
25
26
29
30
31
32
32
33
34
Warnings and important information
General riding information
Introduction
Overview of product line
Frame concept & information: SODA EVO
Frame concept & information: SODA SLOPE
Technical sheet: SODA EVO
Technical sheet: SODA SLOPE
Replacement parts: SODA EVO
Replacement parts: SODA SLOPE
Instructions: general info
Instructions: suspension settings
Instructions: SODA EVO rear wheel mounting
Instructions: SODA EVO cs lenght adjust
Instructions: SODA SLOPE rear wheel mounting
Instructions: SODA EVO travel adjust
Instructions: SODA SLOPE BB assembly
Instructions: SODA EVO / SODA SLOPE external cable routing
Instructions: SODA EVO internal cable routing
Tightening torque
Maintenance: pre-ride & periodical checks
Box contents: SODA EVO
Box contents: SODA SLOPE
Proof of purchase – warranty card
NS BIKES warranty
SAM PILGRIM
2013 FMB TOUR
WINNER
WARNINGS AND IMPORTANT INFORMATION
ATTENTION: Please read this manual carefully. It contains important safety information!
WARNING: “Extreme” riding, often shown on TV or in bike magazines is a very dangerous sport, and requires an amazing
amount of skill. By engaging in this type of activity, you are accepting the risk of possible injury or even death. Even the best
bike will not help you can land a clean trick. Even the best protective gear will not guarantee complete safety. Remember that
in this kind of riding, you can only trust your own abilities and you must accept the inherent risk. If you want to avoid significant risk then do not ride this way. The manufacturer of NS Bikes assumes no responsibility for any injury that may arise from
using this product.
WARNING: Some of the service procedures require specialist tools and good mechanical skills. Therefore, to minimize the
risk of serious or even fatal accidents, maintenance and assembly work on your bike should be carried out by an authorized
bicycle workshop.
IMPORTANT NOTICE: This manual is not intended as a comprehensive use, service, repair or maintenance manual. Please
consult your dealer for advice and your dealer may also be able to refer you to classes, clinics or books on bicycle use, service, repair or maintenance.
WARNING: The frame box contains instructions for components made by third parties. You must study these carefully and
follow the directions before riding your bike.
ATTENTION: When using the Soda EVO frame in the long travel setting (that is when shock bolts inside rocker arm are in the
upper hole) the adapter in the droput must be set to long chain stay position! The frame will not work with long travel and
short chainstay setup. Trying to use the frame anyway with this incorrect setting can damage the frame or result in serious
accidents!!!
GENERAL RIDING INFORMATION
Riding a bicycle can be dangerous. You must keep this in mind and be cautions at all times.
See and be seen. Use lights and reflective clothing in low light conditions.
Always wear a helmet when riding. It can save your life.
Always conduct a pre-ride check (detailed information can be found further in this manual).
Never ride the bicycle if you observe any technical problems or have any doubts about the proper functioning of any elements in the bicycle.
Keep the bike clean and well maintained.
Carry a pump, spare inner tube, patch kit, and a basic tool kit - you may need this in the case of a flat tire of other common
mechanical problem that is usually easy to fix if you have the right tools. Ask your dealer for advice on this issue.
If your bicycle is equipped with gears, you can choose a gear combination that is most comfortable for the riding conditions.
Gears will allows you to maintain a constant rate of pedaling. Use lower gears for going up hill and higher gears for going
downhill. You should stop pedaling for a moment when you make each gear change. Ask your dealer to give you more advice
on this issue.
Be careful with the brakes - they can be powerful and if activated too aggressively, can cause you to crash. You should spend
some time to get a feel of the brakes on a side road or empty parking lot before first ride. Avoid riding too fast, especially
down hill. It is easy to loose control of the bicycle and crash at high speeds, and also you will find it very difficult to slow down
especially if the hill is steep.
Protect your bike from theft. Purchase a lock and never leave your bike unlocked while unattended, even if you are planning to
be away from it for just a few minutes.
MACIEK KUCBORA
NS PRODUCT DEVELOPER
/
SAN REMO, ITALY
4
INTRODUCTION
When we stepped into the full suspension scene a few years ago, we were promised ourselves that right from the start,
our products in this category would be just as solid, reliable and fun to ride as everything else that we had been making.
In fact, that is why it took so long to launch our first full suspension frame. But it payed off, and we are proud to say that
now, after a few years on the market, the Soda has proved itself in the real world. Both the Soda and Soda Slope have
been thrashed by world-class riders such as 2013 FMB World Champion Sam Pilgrim. But that’s only part of the success.
What really makes us happy is seeing normal riders using this frame on a day-to-day basis and enjoying years of heavyduty, trouble-free use. It seems like our aim has been accomplished and we hope that you will be just as happy with your
Soda as we are! Have fun!
SODA EVO & SODA SLOPE
TECH MANUAL
5
OVERVIEW OF PRODUCT LINE
EVO frameset, available with coil or air shock
category: freeride / bike park
hype: the do-it-all frameset that can be built into anything from a short travel jump bike to a mini dh machine
SLOPE frameset, available with air shock
category: slopestyle / dirt jumping / bike park
hype: radical bike for big moves, takes over where dirt
jumping hardtails are not enough
FRAME CONCEPT & INFORMATION: SODA EVO
After several years of serving as our basic workhorse, the popular Soda frameset has undergone a major revamp. Now it’s
compatible with 650B wheels, has a longer front end and slacker head angle for more stability. The main pivot has been
raised for better pedalling and square bump absorption and the frame now has more travel (adjustable from 160 or 180mm).
The frame has now evolved into a pure freeride / bike park bike which still keeps the traits that everyone loved in the older
Soda’s. That means it’s still super tough, manoeuvrable, adjustable, and loves to fly.
The frame comes with adjustable chain stay length and adjustable travel to allow riders to change of the bike’s character
significantly. This bike is exceptionally nimble and manoeuvrable in short travel and short chain stay mode (note: chain stays
are VERY short in this position, much shorter than most bikes on the market), and still stable at high speeds in long travel
with long chain stays. The frame is also very torsionally stiff - not only can it handle all rotational tricks but it also feels great
in fast corners where you can often feel other frames flexing.
In the rear end you will find a 4-bar linkage that gives several advantages:
- lateral stiffness of the rear end of the bike
- minimised side loads on the shock, eliminating excessive shock wear and friction
- an optimised shock rate curve.
For a DH / Big Mountain setup we suggest the following settings: 180mm single crown or 200mm double crown fork, coil
shock, long travel and long chain stay settings.
For trick orientated riding we suggest the following setup: 160-170mm fork, air shock, short chain stay and short travel setting.
For highest pedalling efficiency we suggest the following setup: 160-170mm fork, air shock, long chain stay and short travel setting.
The frame has an option of external or internal cable routing.
FRAME CONCEPT & INFORMATION: SODA SLOPE
The Soda Slope is a radical bike for big moves that takes over where dirt jumping hardtails are not enough. It’s most important feature is that it enables true single speed setups with no chain tensioners or standard derailleur / single front ring
setups. The Slope is exceptionally nimble and manoeuvrable with one of the shortest chain stays we have ever seen on
production full suspension bikes. It was designed to feel just like a Majesty dirt-jump frame but with a safety valve in the rear
end for big hits and high speed runs. We also tested the Slope in a more traditional DH environment, and found that with a
longer fork (around 160mm) it can actually ride downhill surprisingly well. Even though the travel is short, the quality of the
ride is great. The frame is really very stiff torsionally - we have been throwing 180’s and 360’s for days on end and experienced absolutely no problems. The suspension won’t hamper you- we bet you can pull off just about every street trick that
you can do on your hardtail.
In the rear end you will find a 4-bar linkage that gives several advantages:
- lateral stiffness of the rear end of the bike
- minimised side loads on the shock, eliminating excessive shock wear and friction
- an optimised shock rate curve.
For 2015 the Soda Slope is fitted with a Rock Shox Monarch RL shock with custom tune. The lockout is a really nice feature,
making this frame feel like a hardtail when jumping but will open up and save your butt on the biggest hits. It also means that
you don’t have to put crazy high pressure in the shock to get this characteristic, and can open the lockout if you want to ride
some rough off-road sections.
Designed to run with air shocks and very little or even no sag for street / dirt, or with standard sag settings (around 25-30%)
for a more conventional feel.
SAM
PILGRIM
/
SAALBACH
AUSTRIA
8
TECHNICAL SHEET: SODA EVO
160-180mm (6.3”-7”) adjustable rear wheel travel
AL6061+AL6066 T6 custom formed and butted tubes
smooth ‘double pass’ welding in all critical areas
rear shock: 216x63mm (8.5x2.5”),
mounting hardware: front 22.2 x 8 mm, rear 32 x 8mm
internal or external cable guide option
head tube: tapered 1.5 ZS (44mm ID/56mm ID), headtube length: 115mm
fits forks with standard 1-1/8” or tapered 1.5 - 1-1/8” steerer tubes, headset to fit both include with the frame
rear hub: 135x10mm bolt type or 135x12mm with thru axle (NS custom 12MM thru axle included)
IS-2000 disc brake mount, max rotor size: up to 200mm
BB: threaded 73mm with ISCG-05 mounts
biggest chainring: up to ~38t
rear derailleur: removable hanger included
front derailleur: not compatible
seat post/clamp: 30.9mm / 34.9mm
max tire: 27.5 x 2.6”
weight (w/o shock): ~3.35kg / 7.4lbs
GEOMETRY (with 180mm travel / 565mm fork):
top tube effective: M: 581mm (22.9”) L: 601mm (23.7”)
reach: M: 423mm L:443mm
stack: M: 596mm L: 596mm
CS with 160mm short travel: short CS / long CS adjustable 422-438mm
CS with 180mm long travel: short CS / long CS adjustable 422-438mm
seat tube: M: 409mm (16”), L: 445mm (17.5”)
head tube angle: 64.5°
seat tube angle (adjusted): 75°
bottom bracket height: +2mm
wheelbase M: 1166mm (short CS) 1182mm (long CS), L: 1192mm (short CS) 1208mm (long CS)
note on sizing: for jump-focused riders we recommend the M size for riders up to 180cm, and the L size for riders up to 190cm.
However if you wish to adjust the the seat height for optimum pedalling, we recommended the M size for riders up to 177cm and
the L size for riders up to 185cm.
* the adjusted seat tube angle is around 2.5° slacker than the actual angle due to specific seat tube shape and it’s offset position; the adjusted seat tube angle show the equivalent for a traditional frame
9
TECHNICAL SHEET: SODA SLOPE
107mm (4.2”) rear wheel travel
pivot around BB allowing true single speed setups
AL6061+AL6066 T6 custom formed and butted tubes
smooth ‘double pass’ welding in critical areas
weight (w/o shock): ~3.05kg
rear shock: 190x50mm (7.5 x 2.0”): mounting hardware: front & rear 22.2 x 8 mm
head tube: tapered 1.5 ZS (44mm ID/56mm ID), headtube length 115mm
fits forks with standard 1-1/8” or tapered 1.5 - 1-1/8” steerer tubes, headset to fit both included with the frame
rear hub: 135x10mm, suggested bolt-on hubs
IS-2000 disc brake mount, max rotor size: up to 185mm
BB: threaded 73mm with ISCG-05 mounts
biggest chainring: up to ~34t
rear derailleur: optional hanger included
front derailleur: not compatible
seat post/clamp: 30.9mm / 34.9mm
max tire: 26 x 2.4”
Geometry with 505mm axle to crown forks (~120mm travel):
top tube actual: 540mm (21.25”), effective: 553mm (21.8”)
reach: 418mm
stack: 565mm
chain stay min 387mm - 405mm
seat tube: 348mm (13.7”)
head tube angle: 68,5°
seat tube angle effective: 76°*
bottom bracket height: +7mm
wheelbase (min): 1070mm (42.1”)
* the actual seat tube angle is around 1.0° slacker than quoted due to specific seat tube shape and it’s offset position; the numbers quoted show the equivalent for a traditional frame
Sizing information:
Like our hardtails, the Soda Slope comes in one size. This size fits most riders from around 168cm to 188cm.
SAALBACH
AUSTRIA
10
REPLACEMENT PARTS: SODA EVO
Make yourself familiar with the names of all the main parts of the frame by studying the diagrams below:
Fig. 1 Soda EVO frame main parts
Fig. 2 Soda EVO frame rocker arm links details
11
Fig. 3 Soda EVO frame dropouts / dropout link details
Fig. 4 Soda EVO frame main pivot link details
12
REPLACEMENT PARTS: SODA SLOPE
Make yourself familiar with the names of all the main parts of the frame by studying the diagram below:
Fig. 5 Soda Slope frame main parts
Fig. 6 Soda Slope frame rocker arm links details
13
Fig. 7 Soda Slope frame dropout link details
Fig. 8 Soda Slope frame BB / main pivot link details
14
15
INSTRUCTIONS: GENERAL INFO
Fork: The frames are designed to work with the following forks: Soda EVO : suspension forks 150-200 mm travel, Soda Slope:
suspension forks with 80 – 160 mm travel.
Headset: Soda EVO & Soda Slope frames come with a tapered head tube with 1.5 ZS (bottom: 56mm ID* / top: 44mm ID)
and 115mm stack height. It fits forks with standard 1-1/8” steer tubes or tapered 1.5 - 1-1/8” steer tubes. Headset added to
the frame works with both 1 1/8” and 1.5” steers as there are two crown races included. The headset comes with two top-cap
-: 8mm and 15mm, tu suit riders personal preferences. Additional headset spacers can be added between the headset and
the stem. Don’t cut your steertube too low! The process of mounting headsets in the frame should be done by a qualified
mechanic.. Please note that headsets with OD55 mm bottom cups or other internal headsets won’t fit. Only headsets with a
bottom cup with 56m OD will work with Soda EVO / Soda Slope frames. Any use of wrong type of headset can be dangerous
& can damage the frame.
BB: The frames are designed to work with the following bottom bracket sizes: 73mm/113mm, or other 73mm wide BB with
a chainline of approximately 51mm. The Soda Slope will accept bmx cranks with Euro BB. Most Euro BB’s are designed with
68mm wide BB However they can be used but a 5mm spacer must be added to the central spacer between the BB bearings
(same diameters as original central spacer). Before installation make sure that the BB is clean, lightly greased, free of dirt
and paint. The installation process should be carried out according to the BB manufacturers instructions.
Chainring sizes: The frames are designed to work with the following chainrings: Soda EVO: up to 38t, Soda Slope: up to 34t.
Max chainring size is only an approx reference. It can vary depending on the manufacturer, model, cranks & BB used.
Biggest tire: The frames will fit the following tires: Soda EVO: 27.5” x 2.6”, Soda Slope: 26”x 2.3”. Note that these numbers are
for reference only as the size and shape of the tire can vary depending on the manufacturer and rim width.
Brake compatibility: Soda EVO / Soda Slope frames are disk brake compatible. Both frames come with International Standard IS-2000 disc brake mount. Both frames will fit discs up to 200mm.
Seatpost & seatclamp: All Soda frames work with 30.9mm seatposts and 34.9mm seatclamp (not included with the frame)
Do not extend the seat post above the minimum insertion mark. Maximum seat insertion is about 280mm for Soda EVO and
230mm for Soda Slope.
SODA EVO & SODA SLOPE
TECH MANUAL
16
SUSPENSION SETTINGS
Suspension settings are a matter of personal preference. Some riders like it plush, some like it firm. However here are some
suggestions of shock settings that you can use as basic guidelines.
Coil shocks:
For rider weight of 70kg a 450 lbs spring will give a medium-soft ride in the long travel position (approximate sag35%), and a
firm setting in the short travel position (approximate sag: 28%).
For rider weight of 80kg a 450 lbs spring will give a very soft ride in the long travel position (approximately 38% sag) and a
medium soft ride in the short travel position (aprox. 30% sag)
Air shocks:
For rider weight of 80kg you will get
a sag of 33% (medium-soft) at 160psi in short travel mode
a sag of 28% (medium-firm) at 170psi in short travel mode
a sag of 33% (medium-soft) at 190psi in long travel mode
a sag of 28% (medium-firm) at 200psi in long travel mode
Play around with the air pressure and spring weights until you find a setting that suits you best. Remember that the shock in
the long travel setting will always require a firmer spring (or more air pressure) to achieve the same percentage of sag as the
shock had in the short travel setting.
INSTRUCTIONS: SODA EVO REAR WHEEL MOUNTING
Soda EVO frame are compatible with both 135x10 bolt–on hubs with female oversized axle + side bolts or 135x12 hubs.
Two sets of dropouts inserts are included with the frame: 135x10, 135x12. NS 135x12 axle is also included with the frame.
ATTENTION: 135x10 or 135x12 hubs with longer thru axle + side nuts and hubs with 135x10 standard Q-R wont fit !!
For proper dropout inserts installation and chainstay length adjustment please refer first to: # INSTRUCTIONS: SODA EVO
CS LENGTH ADJUST
Mounting the rear wheel:
- Loosen the bolts on the disc brake calliper and slide the rear wheel into the dropouts (hub side bolts / Maxle axle should be
removed from the hub), then mount the chain on the chainrings.
- Align the wheel.
- Mount the 135x10 bolts or 135x12 axle and tighten according to hub manufacturers instructions (just before this, make
sure the wheel is positioned symmetrically in the stays).
- Adjust the position of the disc brake caliper so that it does not interfere with the disc but at the same time make sure that it
will use the maximum area of the brake pads when the brake is applied.
Wheel removal:
To remove the wheel just loosen the hub bolts or 12mm axle and the wheel will come out of the frame.
BARTEK KRZYSZTON
“JAWS”
/
SUPERNATURAL
SESSION
20
INSTRUCTIONS: SODA EVO CS LENGTH ADJUST
Choosing correct dropout inserts set:
- For 135x10 bolt-on hubs use dropout inserts with 10mm holes there are no difference between left and right inserts.
- For 135x12 hubs use dropouts inserts with 12mm holes: the smaller insert with tread inside is for the drive (right) side dropout. (see Fig.9) The bigger insert w/o thread inside is for the non-drive (left) side.
Fig. 9 135x12 dropout inserts – right side with thread inside
Adjusting CS length:
- Make sure to start by this procedure by un-tightening the insert securing set screws (in the back part of the dropouts). Do
not remove them completely to avoid loosing them! (Fig. 10)
- Put the correct dropout inserts into the frame 135x10 or 135x12 .They should be pushed into the frame untill they are flush
with the surface of the drotpous.
- Tighten the securing screws (in the back part of the dropouts) immobilizing the dropouts inserts. Do not over tighten!
Fig. 10 Insert securing set screws
21
Insert securing
set screws
Adjusting derailleur hanger and disk brakes:
Note that short and long chainstay positions have coresponding positions for derailleur hanger.
The drawings below explain how they should be mounted.
Fig. 11 Shows dropouts inserts in the long CS setting (please notice correct derailleur hanger setup)
Fig. 12 Shows dropouts inserts in the short CS setting (please notice correct derailleur hanger setup) Fig. 11 Long CS setting
* always set the same CS length for both sides! * always set derailleur hanger in proper position referring to CS length! * always use threaded 135x12 dropout insert in the drive side (right) dropout!
* Soda EVO frame comes with 135x12mm NS thru axle, optionally Rock Shox Maxle 135x12mm could be used.
* always set long CS for long travel setup. frame will not work with long travel and short CS setup.
Trying to use the frame anyway with this incorrect setting can damage the frame or result in fatal accidents!!!
Fig. 12 Short CS setting 22
INSTRUCTIONS: SODA SLOPE REAR WHEEL MOUNTING
TIP: for frames with horizontal dropouts & single speed we always suggest bolt on hubs or hubs with thru axles and track
nuts. This way you can get much more clamping force than with any QR hub. Most riders don’t even use the axle positioners /
chain tensioners when running bolt on hubs.
Mounting the rear wheel:
- Loosen the bolts on the disc brake caliper and slide the rear wheel into the dropouts (track nuts / bolts should be removed
from the axle), then mount the chain on the chainrings.
- Align the wheel so that the chain becomes tight.
- Mount the bolts and tighten according to hub manufacturers instructions (just before this, make sure the wheel is positioned symmetrically in the stays).
- Adjust the position of the disc brake caliper so that it does not interfere with the disc but at the same time make sure that it
will use the maximum area of the brake pads when the brake is applied
BARTEK KRZYSZTOŃ
“JAWS”
23
INSTRUCTIONS: SODA EVO TRAVEL ADJUST
Fig 13 shows the long travel position (shock bolts inside rocker arm in upper hole) Note that in this setup the dropout inserts
must be set to the long chainstay position! The frame will not work with long travel and short chainstay setup. Trying to use
the frame anyway with this incorrect setting can damage the frame or result in fatal accidents!!!
Fig 13. Long travel position
Fig 14 shows the short travel position (shock bolts inside rocker arm in lower hole). In this setup you can use the long or short
chainstay position in the dropouts.
Fig 14. Short travel position
Changing the travel:
-unscrew the shock mounting bolt in the rocker
(use a 6mm allen key),
-remove bolt
-rotate rocker inserts / washers, -move shock to another hole in the rocker arm,
-install bolt again,
-tighten to proper force. 24
INSTRUCTIONS: SODA SLOPE BB ASSEMBLY
The Soda Slope frame comes with the main pivot around the BB to allow real singlespeed setups. In order to assemble the
swingarm and cancel play in the assembly:
-insert bearings into frame with the spacer between them (if removed) or check if bearings are pressed and sit well inside
the frame and the spacer is straight
-slide CS yoke into place
-install BB shell paying attention to the position of the blocking tooth (fig. 15)
-install 2.5mm bb spacer (or bb mounted chain tensioner) under the drive side bb cup -tighten drive side BB cup till play /slack on CS disappear
-tighten compressing bolts slightly (to 4 NM)
-tighten both BB cups to specific torque
-tighten compressing bolts to specific torque (to 6-8NM)
Fig 15. BB shell with cut and chainstay yoke with blocking tooth
MACIEK KUCBORA
NS PRODUCT DEVELOPER
/
SAN REMO, ITALY
25
INSTRUCTIONS: SODA EVO/ SODA SLOPE EXTERNAL CABLE ROUTING
Cables should be attached under the top tube, between the shock mounts, over the shock, over the rocker arm then on the
inside part of the chainstays (as on Fig. 16). In case of hydraulic brakes the rocker arm needs to be disassembled from top
tube and cable put over rocker arm and under top tube (see Fig. 17). In case of mechanical brake there is no need to disassemble rocker arm. Disassemble rocker arm using using a 2x6mm allen key. Make sure you don’t loose washers that are
mounted between toptube and rocker.
Fig 16. Soda EVO / Soda Slope external cable routing
Fig 17. Rocker arm disassembled from top tube (hydraulic brakes)
Please use small zip-ties to attach brake cable to the cableguides (we do not suggest click-on clips)
26
INSTRUCTIONS: SODA EVO INTERNAL CABLE ROUTING
The Soda EVO frame has an option of running the cables inside the frame.
In order to avoid damage of the cables and the steertube we added a kit of protectors for internal routing (see Fig. 18):
-Headtube groomets (2pcs)
-Steertube protectors (2pcs: each one working with specific standard:: 1& 1/8” or tapered 1.5” to 1 & 1/8” steertubes)
-Cable housing (2pcs) to protect the area between DT/BB/CS.
Fig 18. Soda EVO frame: internal cable rounting kit
MACIEK KUCBORA
/
SAM PILGRIM
Cable installations procedure:
For this process you will need to disassemble the brake hose and / or derailleur cable and remove the fork from the from the
head tube.
-Mount the rubber grommets in the head tube (see Fig. 19). They will protect the cable being kinked on the head tube entrance
- Insert the cable and / or hose into the head tube. The cables coming from the left side of the handlebar should enter the
right hole, and the cables coming from the right side should enter the left hole.
Fig 19 Headtube rubber grommet protector
-As on Fig. 20 Lead cables on each side of the steertube to the downtube. Use the correct steertube protector for your steertube (we include protectors for standard and taperted steertubes).
Fig 20. Internal cable rounting inside headtube. Steertube protector
28
- Lead cables through the down tube and exit through the holes near the BB, as in photo. Make sure derailleur cable exits the
downtube on the drive-side, and the brake cable exits from the downtube on the non-drive side. Use included cable housing
to protect this area on both sides (Fig. 21). Insert the cables into the chainstays yoke. Adjust the position of the cable housing
protector so both it’s ends enter the DT & CS yoke evenly. Use a zip-tie on the drive side to make sure the derailleur cable
doesn’t get caught on the chainrings.
Fig. 21. Internal cable routing in DT/ BB / CS yoke area. Cable housing protector.
-derailleur cable exits on the end of chainstays near right dropout and goes to the derailleur (Fig. 22)
Fig. 22 Internal cable routing for rear derailleur
29
- brake cable exits on the inside surface of the CS and goes to the brake caliper (Fig. 23)
Fig. 23 Internal cable routing for rear disk brake
TIGHTENING TORQUE
Correct tightening force on fasteners, nuts, bolts, screws on your bicycle is crucial. Too little force, and the fastener may not
hold securely. Too much force, and the fastener can strip threads, stretch, deform or break. Either way, incorrect tightening
force can result in component failure, which can cause you to loose control and fall. If any problems are found during the preride check you should immediately seek professional advice from a bicycle mechanic. See also the manuals of the suppliers
of the suspension fork, rear shock, and other parts that come with this frame Do not ride the bicycle until all problems have
been resolved. Riding a bicycle with any defects can be a hazard to your health and life!
Unless you are every competent cyclist and mechanic, do not attempt to execute any of these adjustments yourself. Seek
advice at your local bicycle shop. The rear suspension bolts (rear shock and pivots) have been tightened in the factory with
specific torque. In case of re-adjustment extreme care should be taken when re-tightening them.
Tightening torque for various bolts on the frame:
Soda EVO / Soda Slope Shock bolts:
Soda EVO / Soda Slope Suspension Pivots: Soda EVO derailleur hanger Soda EVO dropout blocking screws: Soda Slope BB tightening bolts: 10 Nm (6mm allen key)
12-13 Nm (2x 6mm allen key)
3-4 Nm (do not overtighten!) (3mm allen key)
2-3 Nm (do not overtighten!) (2.5mm allen key)
6-8 Nm (4mm allen key)
DO NOT lubricate any of the pivot points. High quality self lubricating Teflon has been applied in the factory.
For the following parts please first refer to manufacturer instructions. The following values are given for reference only:
Soda EVO 135x10 rear hub bolt:
20-25Nm (6mm / 8mm allen key)
Soda EVO 135x12 NS thru axle :
10Nm / security bolt 2-3Nm
Soda 135x12 Maxle rear hub quick-release axle: follow Rock Shox instructions
Soda Slope 135x10mm bolt-on hubs: 29-35Nm
Soda EVO / Soda Slope rear derailleur bolt 9 Nm
MTB crank to bottom bracket bolts:
40 Nm (or according to manufacturer instructions)
3pcs cranks to bottom bracket bolts: 12Nm, then pinch bolts (if used)–12Nm
Bolts in seat post clamp: : M5: 10Nm, M6: 12Nm
30
MAINTENANCE: PRE-RIDE & PERIODICAL CHECKS
Take care of your frame and you will enjoy it for a longer time. Before every ride you should always make a pre-ride check. It
should include the following points: clean the frame (note that high-pressure washing may cause damage to some components on the bicycle so it should be avoided) and examine it CAREFULLY for any indications of potential failures including cracks, corrosion, dents, paint peeling and any other indications of potential problems, inappropriate use or abuse. If
anything suspicious is found, contact your local bike dealer for a proper inspection. These are important safety checks and
very important to help prevent accidents, injury and shortened product lifespan. DO NOT RIDE THE BICYCLE IF IT YOU SEE
ANY DEFECTS.
Things to check before each ride:
Check all frame bolts are correctly tightened – refer to # TIGHTENING TORQUE
Check wheel axle to frame & fork connection - this is critical for your safety. If you have axle bolts they should be tightened
according to the manufacturer’s specification. If you have a quick release make sure that it is set to the CLOSED position,
and that there is a reasonable amount of resistance applied.
Check headset looseness, check stem to handlebar connection and stem to steertube connection. Steering system: The
steering system includes: handle bar, stem, headset and fork. All elements should be connected firmly for riding safety. If you
wish to make any adjustments yourself, be warned that incorrect setup can be very dangerous and we always advise you to
seek professional advice for this! Check the connection between the handlebars and stem. Try pushing the handlebars up
and down - there should be no movement between these two elements. Check the headset for play (stand next to the bicycle, apply the front brake and push forwards and backwards. There should be no play between the frame and fork). If any play
is found contact your local bike shop. Do not attempt to make any adjustments yourself. If you are confident that you can do
this yourself then adjust the steering system according to the headset/stem manufacturer instructions. All parts of the stem
should be regularly checked for damage or cracks. If you find anything suspicious, contact an experienced bike mechanic
immediately. A defective steering system can cause serious injury or death.
Check BB connection to the frame. There should be no play between the frame and bb. Inspect closely bb cups / bearings.
For Soda Slope please also try to re-adjust bb following # INSTRUCTIONS: SODA SLOPE BB ASSEMBLY
Check cranks connection to bb and pedals connection to cranks.
Check chain line and chain tension.
Check derailleur connection with the frame and make sure the function is proper before every ride.
Check brake clamp to frame & fork connection
Clean rear shock & forks stanchion tubes
Check general condition of rear shock and front fork(take special note of any cracks or deformations).
Check shock / fork preassure (for air shoks). Refer to the # SUSPENSION SETTINGS and manufacturers instruction. Make
sure SAG don’t exceed the reasonable limit. Make sure the air pressure do not exceed limits provided by sock / fork manufacturer
Before every ride check the brake cables and their housing for kinks, rust, broken strands, or frayed ends. If you notice any
damage, you should ask a bicycle shop to replace the cables immediately. Damaged cables can seriously impede braking
efficiency.
For information about servicing suspension shock and other parts (135x12 Maxle axle, headset etc) mounted on the bike it
is necessary to follow manufacturers instructions closely. The user manual for the additional parts are supplied in the frame
box.
BOX CONTENTS: SODA EVO
BOX CONTENTS: SODA SLOPE
-Soda EVO frame
-Headset (2 crown races, 2 topcaps)*
-Shock mount bolts (2pcs)
-Dropout inserts 10mm (L+R)*
-Dropout inserts 12mm (L+R)
-135x12mm NS thru axle
-Derailleur hanger (with 2 bolts)
-Internal cableguide kit
-Zipties for cable routing
-Instruction
-Soda Slope frame
-Headset (2 crown races, 2 topcaps)*
-Shock mount bolts (2pcs)
-Derailleur hanger*
-Zipties for cable routing
-Instruction
*Only for aftermarket frame
SAALBACH
AUSTRIA
32
Frame model
: ................................................................................................
Frame serial number
: ................................................................................................
PROOF OF PURCHASE - WARRANTY CARD
Shock serial number (if any) : ................................................................................................
Price
: ................................................................................................
Date of purchase
: ................................................................................................
I certify that I am acquainted with the actual specification of the
bicycle (this can be slightly different than that published by the distributor).
Buyer’s signature
: ................................................................................................
Dealer’s signature
: ................................................................................................
SODA EVO & SODA SLOPE
TECH MANUAL
Dealer’s stamp
NS BIKES WARRANTY
1. 7ANNA, manufacturer of NS Bikes, warrants Soda suspension frames have a three year
warranty.
2. If any defects are noticed in the product, the Customer must stop using it immediately and should report this to the dealer
that sold it within 14 days. Using a damaged product will void the warranty, lead to more extensive damage and may pose
a serious hazard to the rider’s health and life.
3. The warranty period starts from the day when the product is purchased. This purchase must be documented with the cash
receipt for all products plus a filled in warranty card for frames (which includes the following information: date of purchase,
serial number of frame, customers name and name of dealer).
4. The warranty applies only to the original owner and is not transferable.
5. Claims under this warranty should be made through the dealer where the product was purchased.
6. The warranty is valid only if the component is sold by an authorized dealer and assembled by a qualified bicycle mechanic.
7. The warranty does not cover:
- normal wear and tear
- labour charges for replacing parts,
- paint and decals,
- problems that result from excessive loads occurring during extreme riding or from bad riding technique,
- problems that result from incorrect assembly or installation.
8. This warranty is void if:
- the warranty card is filled in incorrectly or incompletely,
- any modifications have been made to the product by the customer,
- the product had not been used, maintained or repaired according the the manufacturers instructions,
- the product was transferred to any third party.
9. Directions on how to deal with warranty cases shall be provided by the distributor of the product in the region where it was
purchased.
10. The crash replacement warranty covers damage resulting from crashing, or excessive loads generated by things like casing jumps or throwing the bike. Such damage won’t be covered by the normal warranty, however 7ANNA offers the possibility
to replace the product for 50% of the original suggested retail price under the Crash Replacement policy.
The conditions for this are:
- Crash Replacement applies to NS full suspension frames for a period of 3 years from the date of purchase.
- 7ANNA reserves the right to deny Crash Replacement without further explanations,
- Crash Replacement does not apply to parts damaged in other situations than in riding
(for example Crash Replacement will not cover a part that has been damaged during shipping),
- Crash Replacement does not apply to complete bikes. It only applies to components made by NS that are mounted in the bikes.
34
manufactured by: 7anna sp. z o.o. sp. k., Raciborskiego 123, 80-215 Gdansk, POLAND
tel +48 520 18 04 / mobile + 48 533 01 90 80
WWW.NSBIKES.COM
[email protected]
Always wear a helmet when riding. It will not make you deathproof, but will increase your chances to avoid serious
injury if you crash (and you WILL crash). A broken leg can be fixed. A broken brain cannot! Even if you see some of
our riders without a helmet, it’s only because they are complete idiots!