1
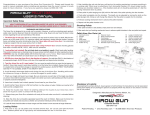
Setting up your Aerovane Jig
1. Attach the Neck to the Base by the brass 1.
Attach the adjustable neck to the base by the
brass knob located on the bottom side of the
jig base.
2. Attach the adjustable neck to the back of the
jig body at the neck attachment point using
the brass knob on the adjustable neck.
3. Place the jig body at your desired fletching
angle. Perfectly horizontal is recommended.
You can achieve the perfect horizontal position by using the level bubble on the jig body.
4. Draw a straight line that is no less than 3
inches long on an unfletched arrow. A silver
Sharpie pen works well for this step.
5. Hold the dial adjustment for the index settings knob in your right hand and push the
marked arrow onto the chuck while slowly
twisting counter-clockwise (away from you).
Ensure the arrow is completely seated on
the chuck.6. Check to ensure your marks
on the arrow line up with the guidelines
7. Place an Aerovane in the clamp. 7. (Note:
If you shoot a compound or recurve bow,
place the back end of Aerovane to the back
end of clamp as far as possible. If you shoot
a crossbow, place the back end of Aerovane
to the letter “K” on the clamp.)
8. Attach clamp to jig body / frame. Push the
clamp down and let it rest completely on the
arrow and make sure the rear end of the
clamp is touching the rear inner section of
the jig body / frame.
9. Look through the top of the clamp, down at
the vane, to line up the marks you made on
the arrow.
10.If you need to adjust the magnets to ensure
the vane lines up with the marks, loosen the
adjustment screw (do not remove), and then
use a small screwdriver to adjust the magnet
either in or out.
11.Once the magnets are set, tighten the magnet tightening knob.
3.2
3.3
3.1
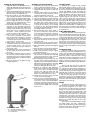
Production neck
3.1 Neck/Base attachment points
3.2 Neck/Jig body attachment points
3.3 Mount screws
Fletching your first Aerovane
1. Once your jig is set with your desired offset,
check to ensure the dial index reads “0”.
2. Thoroughly clean the surface of the shaft by
dipping the shaft into a bottle of 100% pure
acetone.
3. Swirl the shaft in acetone for 10 seconds to
remove all the particles and dissolve all the
possible contaminates on the shaft.
4. Wipe the shaft dry with a clean paper towel.
5. Let air dry till the shaft is ready for fletching.
6. Hold the dial adjustment knob in your right
hand and push the unfletched arrow onto
the chuck while slowly twisting counterclockwise (away from you) and be sure not
to touch the area where you are fletching
as the oils on your hand will contaminate
the shaft). Then check whether the arrow is
completely seated on the chuck.
7. Place an Aerovane in the clamp. (Note: If
you shoot a compound or recurve bow line
up the Aerovane with the back of the clamp
as far as possible. If you shoot a crossbow
line up the Aerovane with the letter “K” on
the clamp.)
8. Dip one end of a Q-tip into the acetone and
wipe down the base of the vane from one
end to the other.
9. Take the dry end of the Q-tip and wipe the
vane dry with the same direction as above.
10.Apply a small bead of glue down the length of
the vane.
11.Place the back end of the clamp against the
inner wall of the jig just above the arrow.
12.Slowly lower the clamp until the magnets
grab hold of the clamp.
13.Firmly push the clamp all the way to the arrow, and wait the allotted time depending
on the type of glue you are using. (Firenock
Aerovane Glue sets in 15 seconds.)
14.After waiting the required time for your specific glue, remove clamp by pinching the top
together with your left hand, then twist the
dial adjustment knob towards the next index
with your right hand. When the arrow rotates about 30 degrees lift the clamp up.
15.Continue to rotate the Dial Adjustment
Knob counter-clockwise (towards yourself)
until you see “120” in the index that aligns
with the rear guide line (Note: this only
pertains for a three fletch arrow. For a two
fletch arrow, proceed directly to “180”.)
16.Follow steps 2-14 above rotating the index
to “240” for the final fletching.
17.Once you have completed fletching the arrow, and it is time to remove the arrow from
the jig body / frame, rotate the Dial Adjustment Knob clockwise slightly, enough to go
in between index settings, rotate the arrow
counter-clockwise slightly, and pull straight
off the chuck.
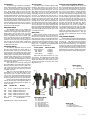
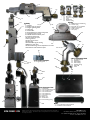
Jig Body/Frame
Aerovane Jig is capable of high precision
fletching with degree variances of 1/72 of a degree. This is possible because Aerovane Jig’s index
is made of titanium hard coated CNC aluminum
matted with ABEC#5 ceramic ball bearing for
perfect alignment and smoothness. For added durability, we added an index plug. Therefore, even
though the jig has been used for years, just refresh the plug and your index will be accurate
within 1/72 of a degree again. The Aerovane jig
uses a dual magnet design that allows precision
angle adjustment. Each magnet is supported by an
independent 1 mm per turn brass machine screw
which can be further tightened by hand for fine
adjustment and locked down via an Allen key. The
Aerovane jig also has a bulls eye level installed on
the top. This allows the user to adjust their jig to
be perfectly level.
4 Way Adjustable Neck
Attach the adjustable neck by using the brass
knob on the base plate and screw it on by tightening it. Once you have done that, place the jig body
on the 4 Way adjustable neck attachment point
and tighten the bass knob into place. Once you
have tightened the knob enough, you can adjust
the neck over 4 axis giving you any position possible to fletch your arrows. Keeping the jig horizontal gives you the best results. Use the bulls eye
level on the jig to help adjust it to the horizontal
position.
Production Neck
Attach the production neck to the base plate
via production neck base attachment points using the screws provided. After attaching the neck
to the base plate, use the production neck jig
attachment points to attach the neck to the jig
body. This is a neck in a fixed position. It is for the
people who don’t need anything fancy or are on a
budget. It does the job just as good as the 4 way
adjustable neck except without angle adjustment.
Base
The base will allow the user to mount the
jig to the neck and make it easier to fletch an arrow. The base has three holes in it allowing it to
be compatible for both the 4 way adjustable neck
and the production neck. When using the 4 way
adjustable neck it will have a brass knob coming
through the bottom of it to attach the neck to
it. The brass knob itself will have a mil spec Oring that sits in a groove not allowing the brass
knob to be accidentally removed. When using the
production neck, there will be mounting screws
attaching the neck to the jig.
Clamp
The Aerovane clamp is made of high precision die-casted and machined 303 stainless steel
with precision straightness up to 0.001”. For
the pivot point, we utilize zirconium ceramic ball
bearings for smooth operation, durability, and anti-rust. The extra thick spring system with a self
aligning clamp provides a good hold of any vane
even if the vane does not have an air channel like
Aerovane does. The clamp is also made shorter
to better fit today’s popular shorter vane, but can
still fletch vanes as long as 3.75”. Perfectly straight
fletching can be easily done with the use of the
Aerovane clamp.
Note: You can use the Bitzenburger straight
and helical clamps and other manufacturers’
clamps with the Aerovane Jig. When fletching the
Aerovane 2 with another clamp, please be sure to
install 1/16” brass bar to the clamp.