1
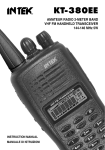
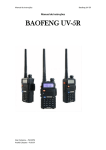
User’s Instruction
υ
υ
Please read this manual carefully before use.
Do not operate or charge the transceiver in an inflammable, explosive and banned area (gas station,
hospital, airport, etc.).
υ
υ
υ
υ
Do not transmit the transceiver in the government administrated area without permission.
Do not expose it in the direct radiate sun for a long time, or put it nearby the heater
Do not put it in the extreme dusty, wet or splashed places, or on the unsteady surface.
If find the peculiar smell or mist giving off from the transceiver, cut off the power supply at once and
remove the battery, then contact our company or local distributor.
υ
Maintenance can only be undertook by professional technicians
Content
Unpacking and Checking Equipments 01
Supplied Accessories
Preparation 02
Charging the Transceiver
Installing the Battery Pack
Installing the Antenna
Installing the Belt Clip
Install the External Speaker/Microphone
Getting Acquainted 05
Sketch Map
Basic Operation 06
Auxiliary Functions 07
Technical Specification 15
1
PDF 文件使用 "pdfFactory Pro" 试用版本创建 www.fineprint.cn
Unpacking and Checking Equipments
Carefully unpack the transceiver. We recommend that you identify the items listed in the following
before discarding the packing material. If any items are missing or have been damaged during shipment,
please contact the deliveryman or your dealers immediately.
Item
Qty
Antenna
1
Hand Strap
1
Battery Charger
1
Battery Pack
1
Belt Clip
1
User’s Manual
1
Antenna
Battery Pack
Hand Strap
Battery Charger
Belt Clip
Preparation
Charging the Transceiver
Please follow these steps:
1. Take out special interphone charger, plug the AC connector of the adapter into the AC outlet socket,
then the green light is on, red light twinkles.
2. Slide the battery pack or transceiver with battery pack into the charger. Make sure the battery pack
contacts are in good contact with the charging terminals. Now, green light goes out, while red light is
on, charging begins.
3. After finish charging, green light is on, red light goes out. (Charging time depends on the battery
capability).
Note:
υ
Do not recharge if the battery pack has been fully charged, otherwise it may shorten the battery
service life and reduce the performance of the battery.
υ
Initially charging the battery pack can not reach its normal capacity after purchasing or extended
storing (for more than 2 months), Charging & discharging the battery pack twice or three times is
needed, then it can reach the normal capacity.
2
PDF 文件使用 "pdfFactory Pro" 试用版本创建 www.fineprint.cn
Installing the Battery Pack
1.
Make the battery aim at the slide way of transceiver back, then push forward the battery till the
release latch is on the base of transceiver lock. (Picture 1)
2. To remove the battery pack, press the release latch and slide the battery away from the transceiver.
(Picture 2)
Picture 1
Picture 2
Note:
υ
υ
Do not short circuit the battery terminals or dispose of the battery in fire.
Never attempt to remove the case from the battery pack.
Installing the Antenna
Hold the base of the antenna, then screw the antenna into the connector at the top of transceiver
clockwise, until it is firmly engaged. On the contrary, screw out the antenna. (Picture 3)
Picture3
Installing the Belt Clip
If necessary, fix the belt clip at the tapped hole of the battery back for convenient carrying. To remove
the belt clip, just screw out 2 screws (Picture 4).
Picture 4
Install the External Speaker/Microphone
Plug the external speaker /Microphone into the jack of ‘SP.&MIC’ of the transceiver.
3
PDF 文件使用 "pdfFactory Pro" 试用版本创建 www.fineprint.cn
Getting Acquainted
A. State Indicator: the green light keeps lighting while receiving a selected signal. The red light twinkles
while receiving designated signal. Red light twinkles while the transmitting is to be time out , green
light twinkles while scanning.
B. Channel selector: Rotate to select channels. In the different positions, press PF1 to switch on or off a
variety of functions, and channel group code selection.
C. PWR/VOL Switch: Turn clockwise to switch on the transceiver. Turn counterclockwise to switch off
the transceiver. Rotate to adjust the volume level.
D. PTT (Push-To-Talk) Switch: Press and hold PTT button to call a station, then talk to the microphone
in your normal voice. Release it to receive a call.
E. Function Button (PF1): According to different switch positions of channel number, press this button
to switch on the transceiver to turn on or off a variety of functions, and channel group code selection.
During the state of dual watch, it is PTT button of designated channel (Written by PC programming
software)
F. MONI Button (MONI): Press and hold this button to monitor circularly the signal from the selected
channel and designated channel,
G. Speaker /Microphone rubber plug: Cover the jack while SP & MIC is free.
Power On:
Rotate PWR/VOL Switch clockwise, you will hear a sound “Beep”,
report the present channel, the transceiver is ready for working
Adjusting Volume:
Press and hold MONI button, meanwhile rotate PWR/VOL Switch
to adjust the volume
Channel Selection:
Rotate Channel Selector to select your channel or select
a new channel, (Press PF1 to power on) to turn on or off other functions
PTT Button: Press and hold PTT button to call a station,
then talk to the microphone in your normal voice.
Note:
Keep the Microphone approximately 1.5 inches (3-5cm) from your lips
4
PDF 文件使用 "pdfFactory Pro" 试用版本创建 www.fineprint.cn
Auxiliary Functions
Working Channel Number 128
128 channels into eight groups and 16 channels for each group.
Channels 1-16
1st group
Channel 65-80
5th group
Channels 17-32
2nd group
Channels 81-96
6th group
Channels 33-48
3rd group
Channels 97-112
7th group
Channels 49-64
4th group
Channels 113-128
18th group
Channel selector can only select the channel in the current group. In different selector positions, press
and hold [PF1] to power on and begin the group settings.
Selector position
Group
Channel Range
1
1
1-16
2
2
17-32
3
3
33-48
4
4
49-64
5
5
65-80
6
6
81-96
7
7
97-112
8
8
113-128
For example:
The 1st first group (channel 1-16). First turn off the transceiver, rotate the channel selector at “No.1”, then
press and hold [PF1] button to power on. Set the group channel like this.
While Channel switch in the “No.9”,” No.10”,” No.11”,” No.12”,” No.15” position,
button to switch on or off the following functions.
Channel Switch Position
Function
9
VOX ON/OFF
10
TDR(Dual watch/dual reception) ON/OFF
11
Confirmed Tone via Repeater ON/OFF
12
Ending Tone of Transmitting ON/OFF
15
Chinese /English Switch
press and hold [PF1]
Working Frequency
VHF/UHF dual band frequency can be set via PC programming software in any VHF/UHF designated
range within 128 channels. Different frequencies can also be set up in the same channel, and eventually
cross band transmitting and receiving can be done.
Dual Channel Standby
υ
This transceiver can acheive dual channel standby in the selected channel (selected by selector
position) and designated channel(another channel designated by PC programming software .
When dual standby is switched on, both selected channel and designated channel stay in the
transceiver and dual watch).
υ
Rotate the selector at “No.10”, press and hold [PF1] button to switch ON/OFF dual channel standby
function. If the designated channel by PC programming software has no parameters, dual channel
standby can’t be switched on.
υ
υ
While dual channel standby is switched on, FM radio has to be closed.
[PF1] becomes [PTT] button of designated channel. While dual channel standby is switched on,
green LED keeps lighting while selected channel receive a signal, press and hold 【PTT】to reply;
red LED twinkles while designated channel receive a signal, press and hold 【PF1】to reply.
5
PDF 文件使用 "pdfFactory Pro" 试用版本创建 www.fineprint.cn
Channel Copy (Cable Copy)
Press and hold 【MONI】button to copy the channel parameters into another transceiver.
Before copying, connect the two transceivers by a copy cable. During the copy, red light of the copying
part continuously twinkles; green light of copied part continuously twinkles. Copying completed, indicator
lights go out. When copying is in progress, please release【MONI】button.
Aging Test Program
Press【PTT】and【MONI】button simultaneously to switch on the transceiver, aging test program begins
VOX Transmitting
Rotate channel selector at “No.9” , press and hold 【PF1】button to switch ON/OFF VOX transmitting.
VOX transmitting channel is for the entire channel (128 channels) opening or closing. (Note: PC software
VOX transmitting level must be set among Level1-10, VOX transmitting can be only valid. Factory setting
is Level 5.)
Roger (Ending Tone of Transmission)
Rotate channel selector at “No.12”, press and hold 【PF1】button to switch ON/OFF ending tone of
transmission.
Relayed Forwarding Confirmation
Rotate channel selector at “No.11”, press and hold 【PF1】button to switch ON/OFF confirmed tone via
Repeater.
Note: The details of PC programming software setting in communication via repeater as follow:
OFF
CTCSS
DCS
STE(Tail Tone Elimination)
ON
ON
ON
RP_STE (Tail tone elimination via repeater) ms
OFF
OFF
OFF
Tail Tone Detection via repeater
ms
400
400
600
Confirmation Switch via repeater
ON
ON
ON
Confirmation Switch via repeater can operate manually, 【PF1】+ Channel 11 to switch ON/OFF.
Frequency Channel Report
To know the transmitting and receiving frequency of selected channel, and CTCSS of transmitting and
receiving, press and hold【MONI】to squelch, then press【PF1】.
Report order:
“Transmitting Storage”, Transmitting Frequency, Transmitting CTCSS. “ Receiving Storage”, receiving
frequency, receiving CTCSS.
After reporting the frequency, if DCS or CTCSS is not reported, it means no CTCSS is set in this channel.
Otherwise, continue to report DCS or CTCSS. While reporting frequency and CTCSS, a sound “Beep”
comes out, it indicates a “ frequency point”. After reporting DCS, a sound “Beep” indicates positive DCS,
while a sound “Beep, Beep” indicates reverse DCS.
High/ Low Power Switchover
With the state of FM radio unactivated, press【MONI】to make noise, then press 【PTT】 can
temporarily switch High/Low power of selected channel(selected by selector). Meanwhile report the state
of Dual Band Dual Watch Mode (TDR mode). If it is on, report “TDR ON”, it is off, report “TDR
OFF” .Voice prompt “Transmitting Power 1” is low power transmitting , “Transmitting Power 5” is high
power transmitting
MONI channel
With the dual standby state, keep holding 【MONI】button to take turns to monitor the signal of
designated channel and selected channel. If the green LED keeps lighting, the signal is from designated
channel, if the green LED twinkles, the signal is from selected channel.
6
PDF 文件使用 "pdfFactory Pro" 试用版本创建 www.fineprint.cn
Scanning
The transceiver can scan group channel or full channels. The green LED twinkles rapidly while scanning.
Press and hold 【MONI】,【PF1】button simultaneously to start scanning group channel or full channels
Rotate the channel selector at “No.1”, after scanning; scanning channel No. is 1-16.
Rotate the channel selector at “No.2”, after scanning; scanning channel No. is 17-32.
The rest can be done in the same manner.
If rotate the channel selector at “No.16”, after scanning; scanning channels are 128 channels.
a. Press transmitting key of selected channel(【PTT】button). Under the time and carrier scanning
mode, it turns back to the current channel (selected by selector) and transmit, meanwhile stop
scanning. Under the search scanning mode, if a signal is scanned, also in the suspended scanning
state(green LED twinkles slowly), then transmit in the current channel, otherwise it will turn back to
the current channel (selected by selector ) to transmit.
b.
Press transmitting key of designated channel [Middle key], In the dual standby state, scanning
stops and go back to designated channel to transmit. Without dual standby state, transmitting is
invalid
c. Pressing [MONI] is invalid.
Scanning modes (scanning modes must be selected via PC programming software):
1. Under the time scanning mode, it would be paused for 5 seconds, then continue to scan after
scanning a signal.
2. Under the carrier scanning mode, scanning stops after a signal is scanned. And then continue
to scan after carrier signal lost for 3 seconds.
3. Under the search scanning mode, after scanning a signal, scanning pauses, the green LED
twinkles slowly, at this time press [PTT ] button, transmit only in the current scanned channel.
In the suspended scanning state, press [MONI] button to continue scanning (green LED
twinkles rapidly) until scan your desired channel. After scanning a signal, voice prompt the
scanned channel number.
FM Radio Function
In the single reception state, press [PF1] switch on FM radio. After FM Radio starts, press [PF1] to
search FM radio. Press [MONI] for FM band switch. If press [MONI], a sound “Beep” is heard, then FM
works in 65-75.9 FM band range, at this time press [PF1] radio frequency search in the range of
65-75.9MHz. If press [MONI] ,a sound “Beep, Beep” is heard, FM works in 76-108 FM band range, at
this time press [PF1] radio frequency search in the range of 76-108 MHz. Shutdown and restart or rotate
the selector can permanently turn off the radio.
Emergency Alarm
Press [MONI] twice rapidly and continuously, emergency alarm function starts. Alarm modes include
scene alarm, warning tone, warning codes (Must be selected by PC programming software). Alarm
channels are only selected channel.
Relay Forwarding Signal 1750 HZ
In the transmitting state, press [MONI] to send out 1750 HZ relay forwarding signal.
Chinese /English Switchover
Rotate the channel selector at “No.15”, press [PF1] to switch on the transceiver, then enter language
selection function, namely: Chinese /English Switchover
PTT ID Transmitting Way (must be set by PC programming software)
1.
OFF
2.
Press [PTT ] button to transmit BOT.
7
PDF 文件使用 "pdfFactory Pro" 试用版本创建 www.fineprint.cn
3.
4.
Release [PTT ] button to transmit EOT.
Press and release [PTT ] button to transmit BOTH.
DTMF ST(must be set by PC programming software)
1.
2.
3.
4.
OFF
DT-ST
ANI-ST
DT+ANI
Unity Section:
136.00-174.00 MHz
Frequency Range:
400.00- 480.00MHz
Storage Channel
128
Step Frequency
2.5/5/6.25/10/12.5/20/25KHz
Rated voltage
DC 7.4V (Chargeable Li-ion Battery)
Battery Capacity
H-1800 m Ah (Li-ion Battery)
Frequency Stability
±2.5ppm
-20 ℃ to +60℃
Work Temperature
Antenna Impedance
50 Ω
Work Mode
Same Frequency
simplex Operation or Different Frequency
simplex Operation
Transmitter
Output Power
5W/1W
Modulation Mode(W/N Band)
FM (F3E)
Maximum Frequency Deviation (W/N Band)
<5KHz(W), <2.5KHz(N)
Spurious Radiation
≤7.5 µW
Adjacent channel power
≤-65dB (W) / ≤-60dB (N)
Radiation
<-60 dB
Audio Distortion
<5 %
SNR
45dB(W), 42dB(N)
CTSCC/DCS
Frequency
Deviation(W/N
0.7±0.1KHz (W), 0.4±0.1KHz (N)
Band)
Modulation Sensitivity
8-12mV
Transmitting Current
≤1500mA
Receiver
Sensitivity
<0.20 µ V (12dB
SINAD)
Audio Power
1W
Audio Distortion
5%
Inter modulation Interference Resistance
≥65dB (W), ≥55dB (N)
Adjacent channel Sensitivity (W/N Band)
≥65dB (W), ≥55dB (N)
Spurious Response
≥60dB
Receiving Current
≤ 380m A
Note:
■ Specifications are subject to change for technology improvement without notice
8
PDF 文件使用 "pdfFactory Pro" 试用版本创建 www.fineprint.cn
Busy Channel Lockout
Switch on or off each effective channel busy lockout function via PC programming software. When the
setting is ON, signal from the current channel is banned to transmit.
Battery Voltage Detection
a. Voltage too high: when high voltage transmission is banned. If the voltage is too high, it is ineffective
to press [PTT ] key, transmit VOX or send Emergency Alarm, meanwhile the prompt sound “Beep”
won’t stop until you release [PTT ] key, stop VOX transmission or emergency alarm.
b. Low Battery Alarm: when the voltage goes below a certain voltage value, voice prompt low battery,.
transmission is still effective.
C. Voltage too low: when the voltage goes below a certain value, voice prompt low battery, transmission
is ineffective, and the prompt sound “Beep” would be heard.
If low voltage transmission is banned, it is ineffective to press [PTT ] button ,transmit VOX or send out
Emergency Alarm.
Battery Saving Function (Set by PC Programming Software)
ON: without any operation for 5 seconds, enter into the battery saving state automatically
OFF: Battery saving is off.
QT/DQT
QT/DQT signal can be pre-programmed by programming software in the transceiver’s channels. If a
channel is set up with QT/DQT signal, squech can only be opened when receiving the same QT or DQT
signals from the other transceiver. If you make a call with different QT/DQT signals in the same channel,
the squech is bare, the light is green.
QT/DQT lists as followed:
A.QT(50 groups )
67.0, 69.3, 71.9, 74.4, 77.0, 79.7, 82.5, 85.4, 88.5, 91.5, 94.8, 97.4, 100.0, 103.5, 107.2, 110.9, 114.8,
118.8, 123.0, 127.3, 131.8, 136.5, 141.3, 146.2, 151.4, 156.7, 159.8, 162.2, 165.5, 167.9,
171.3, …………
B.DQT (210)
D023N,D025N,D026N,D031N,D032N,D036N,D043N,D047N,D051N,D053N,D054N,
D065N,D071N,D072N,D073N,D074N,D114N,D115N,D116N,D122N,D125N,D131N,
D132N,D134N,D143N,D145N,D152N,D155N,D156N,D162N,D165N,D172N,D174N,
D205N,D212N,D223N,D225N,D226N,D243N,D244N,D245N,D246N,D251N,D252N,
D255N,D261N,D263N,D265N,D266N,D271N,D274N,D306N,D311N,D315N,D325N,
D331N,D322N,D343N,D346N,D351N,D356N,D364N,D365N,D371N,D411N,D412N,
D413N,D423N,D431N,D432N,D445N,D446N,D452N,D454N,D455N,D462N,D464N,
D465N,D466N,D503N,D506N,D516N,D523N,D526N,D532N,D546N,D565N,D606N,
D612N,D624N,D627N,D631N,D632N,D645N,D654N,D662N,D664N,D703N,D712N,
D723N,D731N,D732N,D734N,D743N,D754N
D023I,D025I,D026I,D031I,D032I,D036I,D043I,D047I,D051I,D053I,D054I,D065I,
D071I,D072I,D073I,D074I,D114I,D115I,D116I,D122I,D125I,D131I,D132I,D134I,
D143I,D145I,D152I,D155I,D156I,D162I,D165I,D172I,D174I,D205I,D212I,D223I,
D225I,D226I,D243I,D244I,D245I,D246I,D251I,D252I,D255I,D261I,D263I,D265I,
D266I,D271I,D274I,D306I,D311I,D315I,D325I,D331I,D322I,D343I,D346I,D351I,
9
PDF 文件使用 "pdfFactory Pro" 试用版本创建 www.fineprint.cn
D356I,D364I,D365I,D371I,D411I,D412I,D413I,D423I,D431I,D432I,D445I,D446I,
D452I,D454I,D455I,D462I,D464I,D465I,D466I,D503I,D506I,D516I,D523I,D526I,
D532I,D546I,D565I,D606I,D612I,D624I,D627I,D631I,D632I,D645I,D654I,D662I,
D664I,D703I,D712I,D723I,D731I,D732I,D734I,D743I,D754I
10
PDF 文件使用 "pdfFactory Pro" 试用版本创建 www.fineprint.cn