1
M5154-0612-HHB660_awb 6/14/12 10:55 AM Page 15
To play a recorded video, press the
button. Once the video starts playing, a running clock
will appear at the upper right of the display to track the playback position. A red (pause)
icon will also appear, at lower left. To pause the video, press the
button. This will cause the
red pause icon to change to a green (play) icon. To resume playing the video, press the
button again. This will cause the pause icon to reappear. To exit the video being played,
push the joystick up.
To view recorded videos and pictures on a PC directly from the MicroSD memory card,
open the waterproof door on the side of the monitor. Eject the memory card by firmly pushing
on it with a fingertip until the card springs back and you hear a click. If you are in Real-Time
Viewing mode, the SD card icon with a red “X” overlay will reappear at the upper left of the
display. If you are in Playback mode, the HHB660 will switch to Real-Time Viewing mode. If you
press the ( ) button briefly to try to switch back into Playback mode, the display will go dark,
except for the words “No File” at the center.
Many newer PCs (and flat-screen TVs) are equipped with a slot for a standard-size SD card. If
you want to plug your MicroSD card into such a slot, you will need a MicroSD to SD adapter.
They are widely available for $5 or less from most consumer electronics retailers.
Plug the MicroSD card with your recorded inspection videos and picture into the adapter, and
then plug the adapter into your PC’s SD card slot.
If you have configured your PC to automatically play external media, plugging in the adapter
will open an AutoPlay box that verifies insertion of an “SD card”. Clicking on “Open folder to
view files” reveals one folder, named “CCTV”, which contains all of the videos and pictures
stored on the card. Double-click on the CCTV folder icon to view the subfolders containing the
individual video and picture files. The subfolders’ names use the YYMMDD00 format to reflect
the date on which files were added to them. For example, a subfolder named “11103100”
would contain media recorded on October 31, 2011. Video clips are in .AVI format and pictures
are in .JPG format.
To view recorded videos and pictures on a PC via a USB connection, open the waterproof
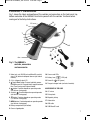
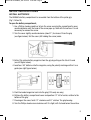
door on the side of the monitor, using the photos and instructions on p. 9 to guide you. Retrieve
the supplied USB cable from the carrying case and insert the mini-USB plug at one of the
cable into the mini-USB jack behind the door. Plug the full-size USB plug at the other end of
the cable into a USB port of your PC.
Inserting the USB plug should cause an icon in your PC’s system tray to become active.
Clicking on the icon opens an on-screen Driver Software Installation dialog box to track the
automated process of finding software drivers for the HHB660’s memory. The PC treats the
unit as a removable disk drive. The unit responds by turning its display all blue, except for the
letters “MSDC” (for Mass Storage Device Class) overlaid in white.
When the PC has finished downloading drivers for the HHB660, the notification “Installing
Drivers” will change to “Your device is ready to use” and green “Ready to use” check marks
will appear next to “USB Mass Storage Device” and “Generic USB Storage USB Device” in the
Driver Software Installation dialog box. Click the Close button.
15