1
M5154-0612-HHB660_awb 6/14/12 10:55 AM Page 13
To undo video inversion, push the joystick down and hold it for at least one second.
Real-time video exported to a TV monitor cannot be "flipped", but it can be zoomed and
panned.
Because the probe is flexible-obedient, you can maneuver it into various positions to aim at
different targets and it will hold its shape.
The HHB660 is designed to be powered for up to ten hours by a set of four “AA” batteries.
When the batteries’ total charge drops below a preset threshold, the red Battery Low indicator
LED (Callout 11) will flash. To replace the batteries, follow the procedure in the Setup
Instructions section of this manual on p. 8.
The HHB660 can be set up to power off automatically after ten minutes of inactivity (during
which no buttons are pushed). To enable the Auto Power Off function, follow the instructions in
the table for the Advanced Setting menu on p. 16.
To manually power off the HHB660, press and hold the
display a “Goodbye” message.
button. The screen will turn blue and
RECORDING AND VIEWING VIDEOS AND STILL IMAGES
In addition to capturing real-time video, the HHB660 can document—via high-resolution
videos and images—what the probe “sees.” Pressing the front-panel
button stores either
a still image or an AVI video (depending on how long the button is pressed) of the probe’s field
of view on a 2GB MicroSD memory card supplied with the system. The same button is used to
view (play back) recorded images and videos on the grip’s 3.4 in. LCD. Alternatively, recorded
images and videos can be viewed on a larger screen by ejecting the memory card and
plugging it into a laptop or desktop PC, or by connecting the HHB660 to a PC via the supplied
USB cable.
Taking Pictures and Recording Videos
Before you can record videos and still images, you must do two things:
• Insert the 2GB MicroSD memory card supplied with the system (or another MicroSD
card of up to 16GB capacity) into the HHB660. Until the memory card is inserted, an SD
card icon with a red “X” overlay will appear at the upper left of the display, below the
battery charge icon
• Set the current date and time
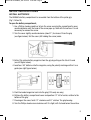
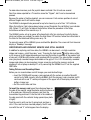
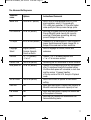
To insert the memory card, open the waterproof door on
the side of the monitor, using the photos and instructions on
p. 9 to guide you. Retrieve the memory card from the
accessories bag and insert it into the slot in the middle of
the side panel with the contacts facing upward (see photo
at right).
Push the card in until you feel it spring back and hear a
click. If the card has been inserted properly, the SD card
icon with the red “X” will disappear from the display.
13