1
PARAMOUNT FITNESS
7.55T/7.85T
Treadmill Owner’s Manual
Safety Warnings .................................................................................................. 4
Introduction ......................................................................................................... 7
Overview........................................................................................................... 7
Power Requirements ........................................................................................ 8
Service and Support Information ...................................................................... 9
Initial Setup........................................................................................................ 10
Warnings......................................................................................................... 10
Overview......................................................................................................... 11
Identify Parts................................................................................................... 12
Assemble the Treadmill .................................................................................. 13
Install the Uprights...................................................................................... 14
Install the Display Console ......................................................................... 16
Connect Wiring ........................................................................................... 17
Position and Level the Treadmill..................................................................... 18
Check and Adjust the Level of the Treadmill .............................................. 18
Check and Adjust Belt Tracking...................................................................... 20
Check and Adjust Belt Tracking ................................................................. 20
Inspect the Treadmill .................................................................................. 22
Perform a Visual Inspection ....................................................................... 22
Manager Mode and Statistics........................................................................... 23
Overview......................................................................................................... 23
Manager Mode................................................................................................ 24
Access Manager Mode............................................................................... 24
Navigate Manager Mode ............................................................................ 25
Set Language ............................................................................................. 25
Set Maximum Workout Time ...................................................................... 26
Set Goal Count Down or Goal Count Up.................................................... 26
Set Maximum User Speed ......................................................................... 27
Set LED Display Intensity ........................................................................... 27
Set English or Metric Units ......................................................................... 28
Set Pause Time .......................................................................................... 28
Set Cool Down Time .................................................................................. 29
Set Lift Calibration ..................................................................................... 30
Set New Calibration Distance..................................................................... 31
Input Custom Program ............................................................................... 32
Set Heart Rate Selection ............................................................................ 33
Diagnostics Statistics...................................................................................... 34
Access Diagnostic Statistics....................................................................... 34
Basic Operation................................................................................................. 35
Overview......................................................................................................... 35
Display Console Panel ............................................................................... 35
Easy Start ....................................................................................................... 36
Use Easy Start ........................................................................................... 36
Programs ........................................................................................................ 38
Select a Manual Program ........................................................................... 39
Select a Heart Rate Program ..................................................................... 41
Select a Hill Program.................................................................................. 43
Select a Fit Test Program........................................................................... 44
Select a Course Program ........................................................................... 45
Select a Custom Program .......................................................................... 47
Stop and Pause Operation ............................................................................. 48
Using Emergency Stop............................................................................... 49
Using Standard Stop .................................................................................. 50
Using Pause Mode ..................................................................................... 50
Basic Maintenance............................................................................................ 51
Warnings......................................................................................................... 51
Overview......................................................................................................... 52
Proper Maintenance ....................................................................................... 53
Maintenance Schedule ................................................................................... 54
Weekly........................................................................................................ 54
Monthly ....................................................................................................... 54
Update Software ............................................................................................. 55
Update treadmill software........................................................................... 55
Walking Belt Tracking ..................................................................................... 57
Check and Adjust Belt Tracking ................................................................. 57
Walking Belt and Deck Replacement ............................................................. 58
Remove Covers.......................................................................................... 59
Remove Deck ............................................................................................. 61
Replace Walking Belt ................................................................................. 63
Install Deck ................................................................................................. 66
Tension Walking Belt.................................................................................. 67
Check and Adjust Belt Tracking ................................................................. 68
Install Covers.............................................................................................. 69
Serviceable Parts List ..................................................................................... 70
Electrical Wiring Schematic ........................................................................ 71
Wiring Key .................................................................................................. 72
Additional Information................................................................................. 72
Safety Warnings
All precautions should be taken to minimize the risk of injury and to prevent damage to
the equipment. Read the entire Owner’s Manual before using the treadmill and always
observe the following safety precautions.
SERIOUS INJURY CAN OCCUR ON THIS MACHINE IF PRECAUTIONS ARE NOT OBSERVED. READ ALL INSTRUCTIONS
BEFORE USING THIS TREADMILL.
TO REDUCE THE RISK OF FIRE OR ELECTRIC SHOCK
ALWAYS DO THE FOLLOWING:
1. Before performing any maintenance, turn off the power switch
and unplug the treadmill. If the treadmill will not be used for an
extended period of time, turn off the power switch and unplug the
unit from the wall.
2. The electrical settings for this treadmill are factory set. Verify that
your facilities meet these requirements before connecting the treadmill to the electrical outlet. Do not use an adapter to connect the
treadmill to the electrical outlet. Do not modify the power cord
shipped with the treadmill. If the plug will not fit the outlet on the wall,
contact a qualified electrician to make the appropriate changes to
the circuit and the wall outlet.
1. Keep children away from this machine. Supervise use by teenagers.
2. Stop exercising immediately if you feel pain, become dizzy, faint
or short of breath.
3. Obtain a medical exam before beginning an exercise program.
4. Heart rate monitoring systems may be innaccurate. Over exertion
may result in serious injury or death.
Paramount 755T/785T Owner’s Manual
4
5. To avoid falls or injury, use extreme caution when stepping onto or
off of a moving belt. DO NOT turn around on a moving belt.
6. Keep all body parts, hair, clothes, towels and headphone cables
clear of moving parts. Bystanders must stay clear of the front sides
of the treadmill as it is inclining and declining.
7. DO NOT use if the machine appears damaged or inoperable.
Report problems to staff.
8. Only use the treadmill for its intended use as described in this
manual. Do not perform any modifications to the treadmill.
9. Obtain instruction and/or refer to the manual before using. Read
all warnings before using. Be certain the STOP operation is understood.
10. The treadmill must be in position to cycle and operate smoothly
and allow appropriate entry and exit from the machine. Make sure
that there is at least 0.5 meters (20 inches) of clearance on both
sides of the treadmill and at least 2 meters (79 inches) of clearance
behind the treadmill.
11. Max. user weight: 400lbs/182kg
12. Make sure that the treadmill is in a dry location before operating
or connecting to power. Do not use the treadmill outdoors.
13. Make sure that the power cord is clear of the wheel track for the
lift mechanism so that it does not get run over. Also, make sure that
the power cord is not on top of the lift frame where it could get
pinched. Never use the treadmill if the power cord is crimped, cut or
damaged in any way. Keep the power cord away from heated surfaces.
14. Be certain that the front motor cover is clear of obstructions to
allow proper air flow into the unit.
15. Warning of possible radio frequency interference (RFI)
This treadmill has been designed and tested to comply with FCC
rules, Part 15, Class A digital devices. The limits in these rules are
designed to provide reasonable protection against harmful radio frequency interference when the unit is installed and operated in a
commercial establishment. This equipment generates, uses, and
can radiate radio frequency interference which may cause harmful
interference to radio frequency communications if not installed and
used in accordance with the owner’s manual instructions. If interference does occur in an installation it is the owner’s responsibility to
correct the interference at their expense. Any changes or modifications to this equipment could void the product warranty and
cause the unit to exceed the FCC limits.
Paramount 755T/785T Owner’s Manual
5
1. Do not attempt any maintenance procedure unless you are qualified and properly equipped to perform the procedure properly and
safely. Otherwise, contact a service technician to service your treadmill.
2. Be careful not to pinch your fingers when removing the deck.
3. Make sure that the walking belt is kept clean and dry.
Paramount 755T/785T Owner’s Manual
6
Introduction
Overview
This section contains information about:
• Power Requirements
• Service and Support Information
Thank you for purchasing the Paramount 7.55T/7.85T. This manual will show you
how to assemble, operate, and maintain your treadmill.
The manual is intended as a reference only. All warnings and cautions should be
heeded when assembling, maintaining, or operating the treadmill. Contact a qualified service technician for any procedure that you cannot perform correctly, completely, and safely.
Follow all instructions carefully.
The 7.55T/7.85T treadmill is a commercial treadmill intended for use in health
clubs, gyms, and physical therapy facilities. This manual will help you discover
and use the treadmill’s features.
VISIT OUR WEB SITE REGULARLY: WWW.PARAMOUNTFITNESS.COM
FOR UPDATES TO THIS MANUAL, IMPORTANT SAFETY NOTICES, MANDATORY SERVICE BULLETINS AND PRODUCT DESIGN ENHANCEMENTS.
RETAIN THIS MANUAL FOR FUTURE REFERNCE.
Paramount 755T/785T Owner’s Manual
7
Power Requirements
This treadmill has specific requirements for electrical power. It is critical that you
verify that your facilities meet these requirements before connecting the treadmill
to an electrical source. Adherence to these requirements is necessary to ensure
the user’s safety and to prevent damage to your treadmill.
Electrical Specifications and Precautions
This treadmill requires a grounded 20-amp/120-volt NEMA 5-20 receptacle [North
America] or 15-amp/ 230-volt NEMA 6-15 receptacle [Europe] dedicated circuit for
each machine. The treadmill ships with the appropriate cord and plug to permit
connection to the proper electric circuit. The treadmill must be plugged into an
outlet designated to accept the appropriate plug and voltage configuration. Do
not, under any circumstances, use an adaptor to make this connection. Do not
modify the plug provided with the treadmill. If it will not fit the outlet, contact an
electrician to have the circuit and outlet changed to accept the plug. The voltage
rating for the treadmill is included in the serial tag that is affixed to the rear cross
member of the treadmill.
Circuits with a Ground Fault Interrupter (GFI) are not recommended for use withthe Paramount 7.55T/7.85T.
Grounding Instructions
This product must be grounded. If it should malfunction or breakdown, grounding
provides a path of least resistance for electric current to reduce the risk of electric
shock. This productis equipped with a cord having an equipment-grounding conductor and a grounded plug. The plug must must be plugged into an appropriate
outlet that is properly installed and grounded in accordance with all local codes
and ordinances.
Paramount 755T/785T Owner’s Manual
8
Service and Support Information
This treadmill has specific requirements for maintenance and care. Contact Paramount Customer Service at 1-800-721-2121 or 1-323-721-2121 if you have an
issue regarding maintenance, repair, or operation of the treadmill. Also, if you
need to replace components on the treadmill, call Paramount to order a replacement component.
The Paramount Customer Service line is available from 7:30 a.m. to 4:30 p.m.
PST Monday through Friday to answer your questions regarding the 7.55T/
7.85TT/785T. If you need assistance or service for the treadmill, a customer service representative can help you find a qualified repair technician in your area.
Paramount 755T/785T Owner’s Manual
9
Initial Setup
Warnings
1. Do not attempt any procedure unless you are qualified and
properly equipped to perform the procedure properly and
safely. Otherwise, contact an authorized service technician to
service your treadmill.
2. Make sure that the power cord is clear of the wheel track
for the lift mechanism so that it does not get run over. Also,
make sure that the power cord is not on top of the lift frame
where it could get pinched.
3. The treadmill must be in position to cycle and operate
smoothly and safely. Make sure that there is at least 0.5
meters of clearance on both sides of the treadmill and at least
2 meters of clearance behind the treadmill.
4. The electrical settings for this treadmill are factory set. Verify that your facilities meet these requirements before connecting the treadmill to the electrical outlet. Do not use an
adapter to connect the treadmill to the electrical outlet.
Paramount 755T/785T Owner’s Manual
10
Overview
Initial setup of the treadmill is a a five-part process. This section will show you how
to perform the following procedures:
• Identify Parts
• Assemble the Treadmill
• Level the Treadmill
• Check and Adjust Belt Tracking
• Perform a Visual Inspection
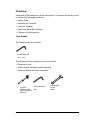
Tools Needed
The following tools are included:
ALLEN WRENCH
5mm 6mm
The following tools are needed but are not included:
• Carpenter’s level
• Socket wrench and allen sockets [optional]
• Open end 22mm and 26mm wrenches.
SOCKET
WRENCH AND
ALLEN SOCKETS
[Optional]
ALLEN WRENCH
8mm
Paramount 755T/785T Owner’s Manual
WRENCHES
22 MM
26MM
11
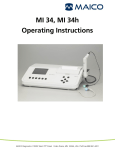
Identify Parts
This section will show you how to locate and identify the following parts:
• Display Console
• Uprights
• Upright Covers
• Hardware: 4 ea-8mm x 30mm BHCS, 6 ea-8mm x 30mm SHCS, 6 ea-8mm
lockwashers, 6 ea-8mm flatwashers.
BHCS - BUTTON HEAD CAP SCREW
SHCS - SOCKET HEAD CAP SCREW
25
50
75
100mm
DISPLAY CONSOLE
RIGHT UPRIGHT
LEFT UPRIGHT
UPRIGHT COVERS
WALKING BELT
FOOT RAILS
LEVELING FOOT
POWER CORD
Paramount 755T/785T Owner’s Manual
LIFT FRAME
12
Assemble the Treadmill
This section will show you how to install components to the treadmill:
• Install the Uprights
• Install the Display Console
• Connect Wiring
Paramount 755T/785T Owner’s Manual
13
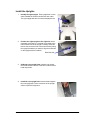
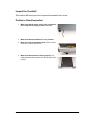
Install the Uprights
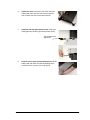
1.
Identify the right upright. Each upright has a notch,
when installed the notches should face each other.
The right upright will have a notch as displayed here.
2.
Position the right upright on the right side. As an
assembly convenience, a small tab is provided at the
lower forward end of the upright. Carefully insert this
tab into the slot at the front of the base frame by tilting
the upright forward as you install it. Align the bolt holes
on the upright with the treadmill.
Rear Bolt Hole
3.
Outfit two rear upright bolts. Install a lock washer
then a flat washer onto two of the 8mm x 30mm socket
head cap screws.
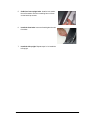
4.
Install the rear upright bolt. Insert and hand-tighten
the rear upright bolt. Some movement of the upright
will be required for alignment.
Paramount 755T/785T Owner’s Manual
14
5.
Outfit four front upright bolts. Install a lock washer
then a flat washer onto the remaining 8mm x 30mm
socket head cap screws.
6.
Install the front bolts. Insert and hand-tighten the two
front bolts.
7.
Install the left upright. Repeat steps 2-6 to install the
left upright.
Paramount 755T/785T Owner’s Manual
15
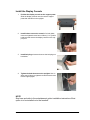
Install the Display Console
1.
Position the display console on the support posts.
Slide the display console onto the console support
posts that extend from the uprights.
2.
Install bolts to secure the console. On both sides,
insert and tighten the two 8mm x 30mm [1 1/4’’] button
head bolts that secure the display console to the support post.
3.
Install bolt plugs. Insert and secure the bolt plugs on
both sides.
4.
Tighten the bolts that secure the uprights. Use an
Allen wrench (6mm) to tighten the bolts that secure the
left and right uprights.
NOTE
Stop here and refer to the entertainment option installation instructions if that
option is to be installed on to the treadmill.
Paramount 755T/785T Owner’s Manual
16
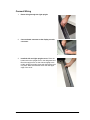
Connect Wiring
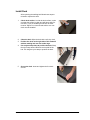
1.
Route wiring through the right upright.
2.
Connect board connector to the display console
connector.
3.
Install the left and right upright covers. Place the
bottom tab on the upright cover in the designated slot.
Bend the upright cover so that it bows slightly in the
middle, align the top edge, then push the upright cover
into place. Make sure that the wires clear the upper
edge of the cover.
Paramount 755T/785T Owner’s Manual
17
Position and Level the Treadmill
This section will show you how to adjust the treadmill so that it is level.
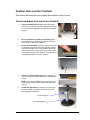
Check and Adjust the Level of the Treadmill
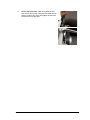
1.
Lift the treadmill from the rear. Locate the handle
below the rear roller. Grab the bar with both hands and
lift. It is recommended that two people lift the treadmill
together.
2.
Move treadmill into position in the facility. Make
sure that the floor is flat and level, with no bumps or
level changes, where the treadmill is.
3.
Power up the treadmill. Plug the treadmill in and turn
on treadmill using the power switch, which is located
near the front right corner of the treadmill. Be certain
that the power cord is routed to the front of the treadmill and that it is clear of the liftframe. The treadmill will
automatically adjust to its ‘home’ position.
4.
Check level on the right side. Place a carpenter’s
level on the right side rail to determine if the right side
is level.
NOTE: The units are adjusted to be “nominally” level
at the factory and any further adjustments should be
minimal.
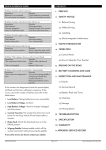
5.
Locate the right side leg. The top nut on the leg is
the level-locking nut (26mm), the bottom nut is the
level-adjusting nut (22mm).
Level-locking nut
Level-adjusting nut
Paramount 755T/785T Owner’s Manual
18
6.
If necessary, adjust the right side leg to make the
right side level. First, loosen, the level-locking nut.
Next, adjust the level-adjusting nut until the right side
seems to be level.
7.
Recheck level on right side. Adjust until the right
side is level, then tighten the level-locking nut.
8.
Level the left side. Repeat steps 4-6 on the left side
to make it level.
9.
Recheck level on both sides. Adjust until both sides
are level.
10.
Check to make sure that all four corners are in
contact with the floor.
Paramount 755T/785T Owner’s Manual
19
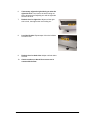
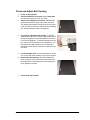
Check and Adjust Belt Tracking
This section will show you how to adjust the treadmill so that the walking belt
tracks properly.
Check and Adjust Belt Tracking
1.
Power up the treadmill. Plug the treadmill in and turn
on treadmill using the power switch, which is located
near the front right corner of the treadmill. Be certain
that the power cord is routed to the front of the treadmill and that it is clear of the liftframe. The treadmill will
automatically adjust to its ‘home’ position.
2.
Set the treadmill to slow speed. Press Easy Start
and adjust the speed to 4 mi/h (6.5 km/h).
3.
Observe the walking belt in motion. Stand directly
behind the treadmill, looking down at the rear roller.
The walking belt should be centered on the rear roller.
If the rear roller is visible one either side of the walking
belt, the belt tracking needs to be adjusted.
4.
If necessary, adjust the belt tracking. To shift the
walking belt to the right, loosen the right retention bolt
(8mm) one eighth-turn, and then tighten the left retention bolt one eighth-turn. To shift the walking belt to the
left, loosen the left retention bolt one eighth-turn, and
then tighten the right retention bolt one eighth-turn.
Adjust the belt tracking until the belt is centered on the
rear roller.
Paramount 755T/785T Owner’s Manual
20
5.
Let the treadmill cycle. Increase the speed to 10 mi/h
(16.1 km/h) and let the treadmill cycle for five minutes.
6.
Recheck the belt tracking. After the treadmill has
been cycling for five minutes, observe the tracking of
the walking belt. If the walking belt is not tracking correctly, adjust the tracking.
Paramount 755T/785T Owner’s Manual
21
Inspect the Treadmill
This section will show you how to inspect the treadmill prior to use.
Perform a Visual Inspection
1.
Make sure that the power cord is clear of the treadmill so that it will not get pinched or run over.
2.
Make sure that the treadmill is in a dry location.
3.
Make sure that the treadmill is level. All four corners
must be in contact with the floor.
4.
Make sure that the belt is tracking properly. The
walking belt should be centered on the rear roller while
cycling.
Paramount 755T/785T Owner’s Manual
22
Manager Mode and Statistics
Overview
This section contains information for:
• Manager Mode
• Diagnostics Statistics
Manager Mode allows staff to set advanced settings that affect the use of the
treadmill by the everyday user. Such settings would include length of workout, display settings, and measurement units.
NOTE
The 7.55T/7.85T has the capability of displaying custom graphics, such as a club
logo, on the startup screen. To use this capability contact Paramount Customer
Service at 1-800-721-2121.
Paramount 755T/785T Owner’s Manual
23
Manager Mode
Manager Mode includes the following options, in order:
• Set Language
• Set Maximum Workout Time
• Set Goal Count Down or Count Up
• Set Maximum User Speed
• Set LED Display Intensity
• Set English or Metric Units
• Set Pause Time
• Set Cool Down Time
• Run Lift Calibration
• Set Calibration Distance
• Input Custom Programs
• Set Heart Rate Selection
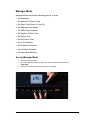
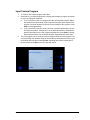
Access Manager Mode
1.
Go to the startup screen.
2.
Press and hold the Incline up, Speed up, and Time up buttons, then select
Easy Start.
3.
After a brief pause the Welcome screen should appear.
1 2
3 4
5 6
Paramount 755T/785T Owner’s Manual
7 8
9 10
11 12
24
Navigate Manager Mode
1.
To cycle through the options in Manager Mode, select Enter until you reach the
appropriate settings screen.
2.
Select Go Back to return to previous screen.
Set Language
1.
Select + or — to change the current language setting. The default language is
English.
2.
Select Enter to confirm.
Paramount 755T/785T Owner’s Manual
25
Set Maximum Workout Time
1.
Use the numeric keypad or the up and down Time buttons to enter the time limit
for individual workouts. The default setting is 60 minutes [not including cool
down time].
2.
Select Enter to confirm.
Set Goal Count Down or Goal Count Up
1.
Select + or — to change to Goal count up or Goal count down. The default setting is Goal count down.
2.
Select Enter to confirm.
Paramount 755T/785T Owner’s Manual
26
Set Maximum User Speed
1.
Use the numeric keypad or the up and down Speed buttons to enter the top
speed limit for workouts. The default setting for both models is 10 mi/h (16.1
km/h).
2.
Select Enter to confirm.
Set LED Display Intensity
When entering settings for a workout the primary goal settings will display brighter
on the console. The secondary settings will display dimmer. This allows the user
to distinguish the primary and secondarygoal settings from secondary settings.
1.
The Time readout displays the primary display brightness. Use the up and
down Time buttons to adjust the brightness.
2.
The Speed readout displays the secondary display brightness. Use the up and
down Speed buttons to adjust the brightness.
3.
Select Enter to confirm.
Paramount 755T/785T Owner’s Manual
27
Set English or Metric Units
1.
Select + or — to change to English or Metric units. The default setting is
English units.
2.
Select Enter to confirm.
Set Pause Time
1.
Use the numeric keypad to enter the Pause time for the treadmill. This is the
time that the treadmill will maintain the current user’s settings before resetting.
The default setting is one minute for pause time.
2.
Select Enter to confirm.
Paramount 755T/785T Owner’s Manual
28
Set Cool Down Time
The treadmill will enter Cool Down mode at the end of the workout. In Cool Down
the treadmill will decrease workout intensity, allowing the user to cool down. Cool
Down time is added at the end of the workout, thus a user might exceed the maximum workout time in Cool Down.
1.
Use the numeric keypad to enter the Cool Down time for the treadmill.
2.
Select Enter to confirm.
Paramount 755T/785T Owner’s Manual
29
Set Lift Calibration
1.
[Note: This procedure is not required during initial set up of the treadmill due to
factory calibration] To run lift calibration select Yes.
2.
Allow the treadmill to lift to an incline of 10% - this is done automatically by the
treadmill - no user input is needed for this step.
3.
Once the lift has stopped moving, measure vertically from the floor to the rear
lower corner of the treadmill [note the measurement] and from the front lower
corner of the treadmill to the floor. Subtract the two numbers and note the
value. Push “clear” on the keypad to erase the number currently displayed.
Now enter the height difference in inches (or cm) using the numeric keypad
when “Input height differences in inches [or cm] ” is displayed.
4.
Select Enter to accept new value and move to next screen.
Paramount 755T/785T Owner’s Manual
30
Set New Calibration Distance
1.
To set a new calibration distance select Yes.
2.
Remove the top motor cover and make a visible mark on the flywheel next to a
consistent reference point.
3.
Place a piece of tape near the front of the treadmill belt with another piece of
tape on a stationary section of the frame next to it.
4.
Place a mark on both pieces of tape with the marks lined up with each other
when the mark on the flywheel is at its reference point.
5.
Manually rotate the flywheel in the direction of normal rotation (so the tape on
the belt is moving toward the back of the treadmill) 10 full rotations stopping
when the mark on the flywheel aligns with the reference point.
6.
Measure the distance from the stationary mark on the frame of the treadmill to
the now moved mark on the tape on the walking belt.
7.
Input that distance in inches (or cm) when “Input measured distance in inches”
appears.
8.
Press Enter to accept and move to the next screen.
Paramount 755T/785T Owner’s Manual
31
Input Custom Program
1.
To create a new custom program select Yes.
2.
Select either (1) to learn the program by actually performing the program as desired,
or (2) to input program segments
3.
a.
If (1) is selected to learn, the program will start an Easy Start program. Adjust
the parameters to the desired levels for speed and incline when desired in the
program. Continue adjusting as desired for the duration of the program. Press
Stop to end programming.
b.
If (2) is selected to input, the screen will come up with a default speed, incline,
and segment duration. Change any or all of these parameters to establish the
workout parameters for the first program segment then select Enter to accept.
Repeat this procedure until all desired program segements have been input.
The new program can be stored as a custom program number via the keypad, or by
scrolling through the alphabet using the illuminated up and down arrow keys to get
the desired letter and then selecting Enter, repeating this until the desired title is
spelled out the select Stop to move to the next screen.
Paramount 755T/785T Owner’s Manual
32
Set Heart Rate Selection
1.
To change the heart rate selection select one of the options:
-Both on, Hands priority
-Both on, Wireless priority
-Hand sensor only on
-Wireless only on
-All HR sensing off
The default setting is Both on, Hands priority.
2.
Select Enter to confirm.
Paramount 755T/785T Owner’s Manual
33
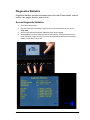
Diagnostics Statistics
Diagnostic Statistics provides information about the use of the treadmill, such as
incline, user weight, duration, and so forth.
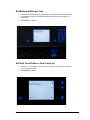
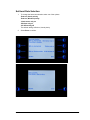
Access Diagnostic Statistics
1.
Go to the startup screen.
2.
Press and hold the incline down, speed down, and time down buttons, then select
Easy Start.
3.
After a brief pause the Diagnostic Statistics screen should appear.
4.
Select Next to view error codes recorded on this machine. Contact Paramount Customer Service at 1-800-721-2121 for error code explanations and further reccommendations. Press “QUIT” key to exit.
2
3
4
5 6
7
Paramount 755T/785T Owner’s Manual
8
9 10
11 12
34
Basic Operation
Overview
This section will show you how to use the following features:
• Display Console Panel
• Easy Start
• Programs
• Stop Operation
The 7.55T/7.85T is a commercial treadmill with many functions and features to
help your clients reach their fitness and health-related goals. This section will
introduce you to the features available on the treadmill. It will also explain these
features and how to use them.
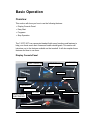
Display Console Panel
FUNCTION KEYS
WARNINGS
LCD DISPLAY
KEYPAD
DISTANCE
PAUSE
CALORIES
HEART RATE
INCLINE
TIME
SPEED
STOP BUTTON
HEART RATE
ELECTRODES
EMERGENCY STOP
Paramount 755T/785T Owner’s Manual
35
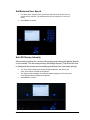
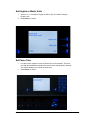
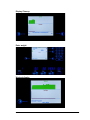
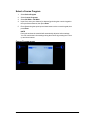
Easy Start
The Easy Start function is intended to allow the user to start a workout immediately without selecting programs or settings. This allows the user to begin a workout more quickly.
Use Easy Start
1.
Select Easy Start. The treadmill will start with the following settings:
30-minute workout, 0% incline, and 1.0 mi/h or 1.0 km/h.
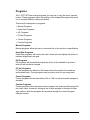
2.
Adjust settings on the fly. Use the up and down buttons to adjust the Speed,
Incline, and Time settings. You may use either the keypad or the arrow keys to
make your selection. Press Enter when done Time is the default goal if you
select to change Calories or Distance you will be asked if you wish to make
these your new goals. Approximately 15 seconds into the program you will be
asked to enter your weight so that the calories displayed will be accurate. Your
workout progress and history will be displayed on the screen. At anytime you
can press change program to change to one of the other programs available.
The program that you are currently in is always displayed at the bottom of the
screen.
3.
Press STOP when finished.
Startup screen
Easy Start display
Paramount 755T/785T Owner’s Manual
36
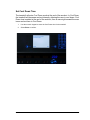
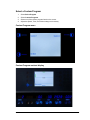
Display Closeup
Enter weight
Workout display
Paramount 755T/785T Owner’s Manual
37
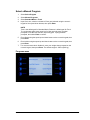
Programs
The 7.55T/7.85T has several programs you can use to vary the user’s exercise
routine. These programs adjust the settings of the treadmill throughout the workout to simulate different running conditions.
These are the categories of programs:
• Manual Programs
• Heart Rate Programs
• Hill Programs
• Fit Test Programs
• Course Programs
• Custom Programs
Manual Programs
Manual programs allow the user to customize his or her workout to specification.
Heart Rate Programs
Heart Rate programs will monitor the user’s heart rate and adjusts the incline to
maintain target heart rate goal.
Hill Programs
Hill programs will automatically adjust the incline of the treadmill to provide a
workout with elevation changes.
Fit Test Programs
Fit Test programs are based on the fitness tests of the armed forces and law
enforcement units. These programs can be used to train for upcoming tests.
Course Programs
Course programs will simulate either a 5K or 10K run with automatic changes in
elevation.
Custom Programs
Custom programs allow club personnel to program any workout profile desired for
the club’s users. Access for setting up the custom program is through the Manager’s Menu, while the programs are accessed through the normal program
selection screen.
Paramount 755T/785T Owner’s Manual
38
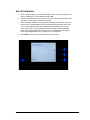
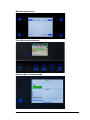
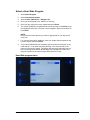
Select a Manual Program
1.
Select Select Program.
2.
Select Manual Programs.
3.
Select Standard Mode or Track.
4.
Input Goal, time, calories or distance. Enter goal selected using the numeric
keypad or the up and down buttons, then press Enter.
NOTE
Time is the default goal for Standard Mode; Distance is default goal for Track.
To use alternate goals press arrow key for that goal and press yes when
prompted to use this new selection as primary goal. Input goal when
prompted, then select Enter to confirm.
5.
Enter Speed using the speed up and down buttons or the numeric keypad, then
press Enter.
6.
Enter Incline using the speed up and down buttons or the numeric keypad, then
press Enter.
7.
For more accurate caloric feedback, enter your weight when prompted on the
numeric keypad, then press Enter. The default weight is 150 lbs (68.0 kg).
Programs menu
Paramount 755T/785T Owner’s Manual
39
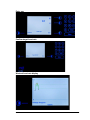
Manual program menu
Track Mode workout display
Standard Mode workout display
Paramount 755T/785T Owner’s Manual
40
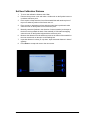
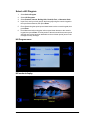
Select a Heart Rate Program
1.
Select Select Program.
2.
Select Heart Rate Programs.
3.
Select Cardio, HR-Interval, or Weight Loss.
4.
Enter your desired goal [ time, distance or calories].
5.
Enter your age using the numeric keypad then press Enter.
6.
The screen will display a suggested heart rate for your age. Press Enter to use
the suggested heart rate, or use the numeric keypad to input a heart rate then
press Enter.
NOTE
Be sure that the heart rate that you select is appropriate for your age and fitness level.
7.
For more accurate caloric feedback, enter your weight when prompted on the
numeric keypad, then press Enter.
8.
To give the treadmill heart rate feedback grab and hold the electrodes on the
heart rate bar, or use heart rate strap telemetry. Your heart rate will be displayed on the numeric display. The display will show three bars while the system is acquiring the heart rate. Below target rate is graphed as a black line;
target as a green line and above target heart rate as a red line.
Heart Rate program menu
Paramount 755T/785T Owner’s Manual
41
Enter age
Confirm target heart rate
Workout heart rate display
Paramount 755T/785T Owner’s Manual
42
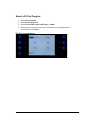
Select a Hill Program
1.
Select Select Program.
2.
Select Hill Programs.
3.
Select Random, Interval, Rolling Hills, Foothills Trek, or Mountain Climb.
4.
Input Goal, enter your time goal [or alternate goal] using the numeric keypad or
the up and down buttons, then press Enter.
5.
Enter Speed using the speed up and down buttons or the numeric keypad, then
press Enter.
6.
Enter Maximum Incline using the incline up and down buttons or the numeric
keypad, then press Enter. The first portion of the workout will be a warm up and
after the goal or time has been attained then the cool down period [as set in the
manager’s menu] will begin.
Hill Program menu
Hill workout display
Paramount 755T/785T Owner’s Manual
43
Select a Fit Test Program
1.
Select Select Program.
2.
Select Fit Test Programs.
3.
Select Fit Test, PEB, Army, USAF, Navy, or USMC.
4.
When prompted enter your age and sex using the numeric keypad and function keys, then press Enter.
Fit Test program menu
Paramount 755T/785T Owner’s Manual
44
Select a Course Program
1.
Select Select Program.
2.
Select Course Programs.
3.
Select 5K RUN or 10K RUN.
4.
Input Goal, enter your distance [or alternate] goal using the numeric keypad or
the up and down buttons, then press Enter.
5.
Enter Speed using the speed up and down buttons or the numeric keypad, then
press Enter.
NOTE
During the workout the treadmill will automatically adjust its incline settings.
You can override the incline settings during the workout by pressing the incline
up and down buttons.
Course Program menu
Paramount 755T/785T Owner’s Manual
45
Course workout display (5K)
Course workout display (10K)
Paramount 755T/785T Owner’s Manual
46
Select a Custom Program
1.
Select Select Program.
2.
Select Custom Programs.
3.
Select one of the custom program listed on the screen.
4.
Adjust the Speed, Time, and Incline settings as necessary.
Custom Program menu
Custom Program workout display
Paramount 755T/785T Owner’s Manual
47
Stop and Pause Operation
Stop operation is intended for situations that require the treadmill to be stopped
immediately. When activated the stop operation will immediately stop the treadmill’s walking belt. It is imperative that the user understands the stop operation
before using the treadmill. Please review this section carefully.
There are two ways to activate the stop operation: emergency stop and standard
stop. Both methods will stop the treadmill immediately, but emergency stop is
designed for hazardous situations whereas standard stop is designed for typical
use.
The Pause button allows the user to temporarily pause the operation of the treadmill. When activated the pause button will stop and maintain the treadmill in the
program that the user was last in. When pressed again the program will resume
where the user left off. If the pause button is activated and the user fails to press it
again after the number of minutes set in the managers menu for pause mode
duration then the treadmill will clear the program and return to the startup screen.
Paramount 755T/785T Owner’s Manual
48
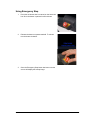
Using Emergency Stop
1.
Press the red button that is centered on the heart rate
bar. Once the button is pressed it will lock down.
2.
Release the button to operate treadmill. To release
turn the button clockwise.
3.
Once the Emergency Stop button has been reset the
screen will display the startup image .
Paramount 755T/785T Owner’s Manual
49
Using Standard Stop
1.
Press the STOP button on the console.
2.
Select the “Press to reset” option to return to the startup screen.
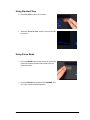
Using Pause Mode
1.
Press the PAUSE button on the console to temporarily
pause the treadmill operation and preserve the program information.
2.
Press the PAUSE button again or the “RESUME” function key to resume treadmill operation.
Paramount 755T/785T Owner’s Manual
50
Basic Maintenance
Warnings
TO REDUCE THE RISK OF FIRE OR ELECTRIC SHOCK
Before performing any maintenance, power down and unplug
the treadmill.
Do not attempt any maintenance procedure unless you are
qualified and properly equipped to perform the procedure
properly and safely. Otherwise, contact a service technician
to service your treadmill.
Paramount 755T/785T Owner’s Manual
51
Overview
This section includes the following information:
• Maintenance Schedule
• Update software
• Walking Belt Tracking
• Walking Belt and Deck Replacement
The treadmill requires regular maintenance to ensure that it runs properly and
smoothly. This is also necessary to extend the life of the treadmill and its components. Failure to complete routine maintenance can void your warranty.
Paramount 755T/785T Owner’s Manual
52
Proper Maintenance
To ensure the safety and functionality of your treadmill remember the following:
• Regular maintenance is required to ensure the safety and proper operation of
the treadmill.
• The owner/user of the treadmill is responsible for ensuring that the treadmill is
properly maintained.
• Worn or damaged components on the treadmill may cause injury or further
damage to the treadmill and must be repaired or replaced immediately.
• If the treadmill appears to be damaged take measures to ensure that no one
uses the treadmill. Turn the unit off at the power switch, disconnect and remove
the power cord.
• Contact Paramount customer service at 1-800-721-2121 to order replacement
components.
• Do not use components that are not approved for replacement.
Paramount 755T/785T Owner’s Manual
53
Maintenance Schedule
It is recommended that the facility adopt a regular cleaning and maintenance
schedule that the staff can follow. Following a cleaning and maintenance routine
will ensure that the treadmill runs smoothly. Log and maintain any service records
for the treadmill.
Daily
• Wipe down the walking belt and display console with a soft cloth. You may find
it helpful to use a brush on the walking belt.
• Check the walking belt for proper tracking. Refer to Check and Adjust Belt
Tracking.
• Verify that the power cord is routed free and clear of the liftframe and wheel
track.
• Verify that the treadmill has the clearance required for safe operation.
Weekly
• Vacuum the area surrounding the treadmill.
• Check the handrails and display console to see if they are loose. Tighten if necessary.
• Inspect the walking belt and deck for wear. If the walking belt appears worn,
replace the walking belt and deck. Refer to the Walking Belt and Deck Replacement section of this manual.
• Check the error log for any recorded errors.
Monthly
• Remove the top motor cover and the front motor cover. Clean and vacuum
debris from around motor and other internal components.
Do not attempt any maintenance procedure unless you are qualified and properly equipped to perform the procedure properly
and safely. Otherwise, contact an authorized service technician
to service your treadmill.
Paramount 755T/785T Owner’s Manual
54
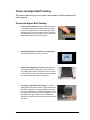
Update Software
Once you have the USB flash drive with the software update stored on it, you can
use it to update the treadmill’s software.
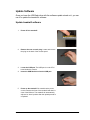
Update treadmill software
1.
Power off the treadmill.
2.
Remove the rear console plug. Locate and remove
the plug on the back of the console panel.
3.
Locate the USB port. The USB port is on the CPU
board inside the console.
4.
Insert the USB flash drive into the USB port.
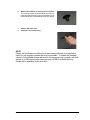
5.
Power up the treadmill. Be certain that the power
cord is routed to the front of the treadmill and that it is
clear of the liftframe. The treadmill will automatically
adjust to its ‘home’ position after the upload process is
completed.
Paramount 755T/785T Owner’s Manual
55
6.
Wait for the software to load, up to five minutes.
The treadmill screen will appear blank until the software has finished loading, when th software has finished loading the normal startup screen will appear.
7.
Remove the flash drive.
8.
Install the rear console plug.
NOTE
Please visit the Paramount Web site at www.paramoutfitness.com regularly to
check for any program updates that may be available. To update the treadmill
software, the available update will need to be accessed via a computer with web
access to a USB memory stick having at least 10 MB of available memory.
Details will be available on the Web site.
Paramount 755T/785T Owner’s Manual
56
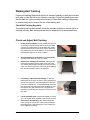
Walking Belt Tracking
Proper belt tracking means that the belt is centered laterally on both the front and
rear roller so that the belt is not shifted to one side. Proper belt tracking ensures
that the belt can cycle smoothly and efficiently. Proper belt tracking is necessary
to ensure safety and to extend the life of the walking belt.
Check Belt Tracking Regularly
The walking belt on the treadmill should be checked routinely to ensure that it is
tracking correctly. Belt tracking should also be adjusted on an as-needed basis.
Check and Adjust Belt Tracking
1.
Power up the treadmill. Plug the treadmill in and turn
on treadmill using the power switch, which is located
near the front right corner of the treadmill. Be certain
that the power cord is routed to the front of the treadmill and that it is clear of the liftframe. The treadmill will
automatically adjust to its ‘home’ position.
2.
Set the treadmill to slow speed. Press Easy Start
and adjust the speed to 4 mi/h (6.5 km/h).
3.
Observe the walking belt in motion. Stand directly
behind the treadmill, looking down at the rear roller.
The walking belt should be centered on the rear roller.
If the rear roller is visible one either side of the walking
belt, the belt tracking needs to be adjusted.
4.
If necessary, adjust the belt tracking. To shift the
walking belt to the right, loosen the right retention bolt
(8mm) one eighth-turn, and then tighten the left retention bolt one eighth-turn. To shift the walking belt to the
left, loosen the left retention bolt one eighth-turn, and
then tighten the right retention bolt one eighth-turn.
Adjust the belt tracking until the belt is centered on the
rear roller.
5.
Let the treadmill cycle. Increase the speed to 10 mi/h
(16.1 km/h) and let the treadmill cycle for five minutes.
6.
Recheck the belt tracking. After the treadmill has
been cycling for five minutes, observe the tracking of
the walking belt. If the walking belt is not tracking correctly, adjust the tracking.
Paramount 755T/785T Owner’s Manual
57
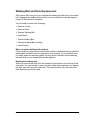
Walking Belt and Deck Replacement
This section will show you how to replace the walking belt and deck on the treadmill. Replacing the walking belt and deck on your treadmill should take approximately 45-60 minutes to complete.
You will need to perform the following:
• Remove Covers
• Remove Deck
• Replace Walking Belt
• Install Deck
• Tension Walking Belt
• Check and Adjust Belt Tracking
• Install Covers
When to replace walking belt and deck
Factors such as usage and environmental conditions will determine how often the
walking belt and deck must be replaced on your treadmill. If your treadmill does
not easily attain and maintain speed, this may be an indication that the walking
belt and deck on your treadmill should be replaced.
Reusing the walking deck
When you remove the deck from the treadmill turn the deck over and look at the
other side. You may be able to reuse the deck rather than replacing it, by flipping
the deck over and using the other side. This assumes that only one side of the
deck has been previously used.
Paramount 755T/785T Owner’s Manual
58
Remove Covers
1.
Remove the left and right end caps. Loosen but do
not remove the two inside screws (4mm) that secure
the end cap. Push up the bottom tabs, then pull the
end cap off from the bottom.
Paramount 755T/785T Owner’s Manual
59
2.
Remove top motor cover. Loosen and remove the
three screws (4mm) in front, next loosen but do not
remove the two screws (3mm) in the rear, then lift the
from the rear edge to remove the cover.
3.
Remove the left and right foot rails. To remove the
foot rail loosen and remove the four screws (3mm) that
secure the foot rail, then slide the foot rail toward the
center of the treadmill and remove.
Paramount 755T/785T Owner’s Manual
60
Remove Deck
After removing the covers follow the steps below to
remove the deck.
Leave insert attached
to cover screw to aid in
installation
1.
Loosen the walking belt. Loosen and remove the left
retention bolt (8mm), then loosen and remove the right
retention bolt.
2.
Locate and remove the deck screws. Lift the walking belt and locate the two deck screws on each side.
Loosen and remove the deck screws.
3.
Remove the deck. Lift the deck (you may need to pry
it up) and slide it out from the treadmill.
Be careful not to pinch your fingers when removing the
deck.
Paramount 755T/785T Owner’s Manual
61
4.
Remove the front roller retainer plate. Loosen and
remove the two bolts (5mm) that secure the plate, then
remove the plate.
5.
Remove the front roller bolt. Loosen and remove the
left-side front roller bolt (5mm).
Paramount 755T/785T Owner’s Manual
62
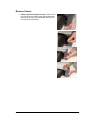
Replace Walking Belt
After removing the deck follow these steps to replace
the walking belt.
1.
Remove the rear roller. Lift the rear roller up through
the rear roller slots, then remove the roller from the
walking belt.
2.
Slide belt off front roller. Tilt the front roller up on the
right side, then slide the walking belt off the roller.
3.
Discard the old walking belt.
4.
Locate the arrow on the new walking belt. Look for
the arrow on the smooth side of the walking belt. The
arrow points in the direction in which the belt should
travel.
5.
Install belt on the front roller. Tilt the front roller up
on the right side, then slide the walking belt onto the
roller.
Paramount 755T/785T Owner’s Manual
63
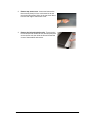
6.
Install rear roller. Position the rear roller inside the
walking belt, then lower the rear roller through the
slots. Position the roller in the roller brackets.
7.
Install the left and right retention bolts. Insert and
hand-tighten the left and right retention bolts (8mm).
Use screwdriver to
align holes
8.
Remove excess slack from the walking belt. Lift the
walking belt and make sure that the walking belt is
positioned in the v groove of the belt guides.
Paramount 755T/785T Owner’s Manual
64
9.
Secure the front roller. Install and tighten the bolt
that secures the left side. Place the front roller retainer
plate in position, then insert and tighten the two bolts
(5mm) that secure the plate.
Paramount 755T/785T Owner’s Manual
65
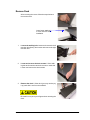
Install Deck
After replacing the walking belt follow these steps to
reinstall or replace the deck.
1.
Check deck surface. Look at the deck surface, make
sure that the surface is clean and still has a shiny finish. Note: If you are installing a new belt, the deck
must be “flipped” to a new unused surface or a new
deck must be installed.
2.
Clean the deck. Wipe the deck with a soft, dry cloth.
3.
Position the deck on the right side of the treadmill
with the walking belt over the inside edge.
4.
Use a nylon strap clamp to position the deck. Wrap
the nylon strap around the deck and top half of the
belt. Lift using the nylon strap to position the deck.
5.
Secure the deck. Insert and tighten the four deck
screws.
Paramount 755T/785T Owner’s Manual
66
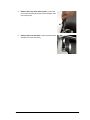
Tension Walking Belt
After installing the deck follow these steps to tension
the walking belt.
1.
Place a piece of masking tape on the belt near the
right side rear roller slot.
2.
Make one mark adjacent to the front edge of the
slot.
3.
Make a second mark 0.5 inches (13 mm) in front of
the first mark.
NOTE
The walking belt must not shift while tensioning for this
to be accurate. If the belt does shift, loosen the belt
and start over.
4.
Tension the walking belt. Tighten the right retention
bolt (8mm) one half-turn, then tighten the left retention
bolt one half-turn.
5.
Repeat until the second mark is adjacent to the
rear roller slot.
Paramount 755T/785T Owner’s Manual
67
Check and Adjust Belt Tracking
1.
Power on the treadmill.
2.
Set the treadmill to slow speed. Select Easy Start
and adjust the speed to 4 mi/h (6.5 km/h).
3.
Observe the walking belt in motion. Stand directly
behind the treadmill, looking down at the rear roller.
The walking belt should be centered on the rear roller.
If the rear roller is visible one either side of the walking
belt, the belt tracking needs to be adjusted.
4.
If necessary, adjust the belt tracking. To shift the
walking belt to the right, loosen the right retention bolt
(8mm) one eighth-turn, and then tighten the left retention bolt one eighth-turn. To shift the walking belt to the
left, loosen the left retention bolt one eighth-turn, and
then tighten the right retention bolt one eighth-turn.
Adjust the belt tracking until the belt is centered on the
rear roller.
5.
Let the treadmill cycle. Increase the speed to 10 mi/h
(16.1 km/h) and let the treadmill cycle for five minutes.
6.
Recheck the belt tracking. After the treadmill has
been cycling for five minutes, observe the tracking of
the walking belt. If the walking belt is not tracking correctly, adjust the tracking.
7.
Power down the treadmill.
Paramount 755T/785T Owner’s Manual
68
Install Covers
After checking and adjusting belt tracking follow these
steps to install the covers.
1.
Install foot rails. Position the foot rail into place, then
insert and tighten the four screws (3mm) that secure
the foot rail.
2.
Install rear end caps. Position rear end cap into
place, and then snap the bottom half to secure. Then
insert and tighten the two inside screws (4mm).
3.
Install the top motor cover. Position the top motor
cover into place, then insert and tighten the two well
nuts (3mm). Then insert and tighten the three front
screws (4mm).
Paramount 755T/785T Owner’s Manual
69
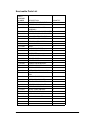
Serviceable Parts List
PART /
ASSEMBY
NUMBER
DESCRIPTION
QUANTITY
T1-12-001
BASE FRAME WELDMENT
1
T1-11-027
LIFT FRAME ASSEMBLY
1
T1-11-035
MOTOR AND FLYWHEEL
ASSEMBLY
1
T1-11-036
SPEED SENSOR AND BRACKET
1
T1-11-037
POWER BOARD AND BRACKET
1
T1-73-001
120 VOLT LIFT ACTUATOR
1
T1-11-014
FRONT ROLLER ASSEMBLY
1
T1-11-004
REAR ROLLER ASSEMBLY
1
T1-71-001
WALKING BELT
1
T1-71-002
DECK
1
CC-66-001
MOTOR DRIVE BELT
1
T1-11-029
LIMIT SWITCH ASSEMBLY
1
T1-14-001
LINE FILTER
1
T1-74-003
MOTOR CONTROLLER
1
CC-41-001
POWER SWITCH
1
T1-62-002
POWER CORD
1
T1-22-083
POWER CORD BRACKET
1
CC-61-013
LIFT FRAME WHEELS
4
CC-61-004
LEVELING FEET
2
T1-11-012
LEFT UPRIGHT AND HANDRAIL
1
T1-11-011
RIGHT UPRIGHT AND HANDRAIL
1
T1-11-018
CONSOLE ASSEMBLY
1
T1-24-002
LEFT UPRIGHT COVER
1
T1-24-001
RIGHT UPRIGHT COVER
1
T1-24-010
CENTER MOTOR COVER
1
TI-24-013
LEFT FRONT ENDCAP
1
T1-13-037
RIGHT FRONT ENDCAP
1
T1-24-014
RIGHT REAR END CAP
1
T1-24-015
LEFT REAR END CAP
1
T1-11-028
TOP MOTOR COVER
1
Paramount 755T/785T Owner’s Manual
70
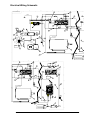
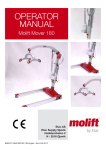
Electrical Wiring Schematic
[[HOHFWULFDODVV\
*5((1
- -
-
*1'
-
-
-
-
&1
-
-
&1
-
(
81,21
-
/%
/%
/:
/:
1(875$/
:+7
7202725
+286,1*
4'
&211(&772
3,*7$,/
+27
%/.
:$//
3/8*
*1'
+$1'*5,36(1625
4'
/&'
- -
-
4'
-
/&'
'21276&$/('5$:,1*
+$1'*5,36(1625
'
-
-
-
-
-
-
-
(
-
81,21
-
728&+3$1(/
5('
:+,7(
*5((1
%/$&.
&
3 3 6 )
7202725
+286,1*
%
:+7
%/.
%/.
X Y Z / /
:+7
5('
4'
*1'
+$1'*5,36(1625
4'
+$1'*5,36(1625
4'
-
Paramount 755T/785T Owner’s Manual
-
$
71
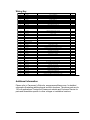
Wiring Key
,7(012
3$57180%(5
'(6&5,37,21
47<
02725(0(5621
$&78$725
021,725+($575$7(
.%&21752//(5
32:(5),/7(586
3&%$66(0%/<&38
32:(56833/<92)
6:,7&+68%0,1,$785(
&,5&8,7%5($.(56:,7&+
&283/(5$33/,$1&(3$1(/02817
32:(5%2$5',1'(6,*1
(0(5*(1&<67236:,7&+
7
7
7
7
7
7
7
&&
&&
&&
7
&&
7
6(1625$1'%5$&.(7+$0/,1
7
32/$5%2$5'72&38%2$5'
7
(6723&$%/(
7
.%$&/,1(+$51(66
7
&387232:(5%2$5'
7
.%&21752/+$51(66
7
&387232:(5%2$5'
,167$//('3,*7$,/
7
.%02725+$51(66
7
+20(6:,7&+&$%/(
,167$//('3,*7$,/
7
32:(5%2$5'72'&32:(59$&
7
32:(5%2$5'72/,1(),/7(5287387$1'($57+*5281'
7
/,1(),/7(5*5281':,5(
7
,(&&211(&72572&%%/.
7
/,1(),/7(572&%:+7
7
:$//3/8*
7
,(&&211(&72572&%:+7
7
/,1(),/7(572&%%/.
7
.%&21752//(5*5281':,5(
7
,(&&211(&725*5281':,5(
7
32:(5%2$5'72'&32:(59'&
&&
237,21$//&'7981,7
7
',63/$<$66<&2162/(
&&
)(55,7()25&(5
&&
)(55,7((0,0286(5$$
&&
)(55,7()25&(/)%
&&
)(55,7((0,0286(5$$
&&
',*,.(<)/$75,%%21&$%/(+))81'
Additional Information
Please refer to Paramount’s Web site, www.pramountfitness.com, for detailed
schematics illustrating additional parts and their locations. The above parts are for
120-volt applications. Contact the Paramount website and Customer Service for
parts and assemblies specific to other voltages or installation locations.
Paramount 755T/785T Owner’s Manual
72
A
Assembly 13
B
Basic Maintenance 51
Basic Operation 35
Belt and Deck Replacement 58
Belt Tracking 20, 57
C
Calibration Distance 31
Cool Down Time 29
Course Program 45
Custom Program 32, 47
D
Diagnostics Statistics 34
Display Console 16
Display Console Panel 35
E
Easy Start 36
Emergency Stop 49
F
Fit Test Program 44
G
Goal Count Down/Up 26
Grounding Instructions 8
H
Heart Rate 33
Heart Rate Program 41
Hill Program 43
I
Initial Setup 10
Introduction 7
L
Language 25
LED Display 27
Lift Calibration 30
M
Maintenance Schedule 54
Manager Mode 24
Manual Program 39
Maximum User Speed 27
Maximum Workout Time 26
P
Pause Mode 50
Pause Time 28
Power Requirements 8
Programs 38
Proper Maintenance 53
S
Safety Warnings 4
Service and Support Information 9
Serviceable Parts 70
Software 55
Standard Stop 50
Stop operation 48
T
Treadmill levelling 18
U
Units, English/Metric 28
Uprights 14
V
Visual Inspection 22
W
Wiring 17, 71