1
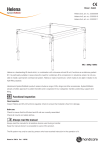
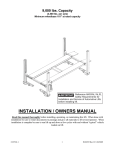
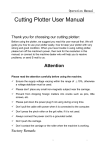
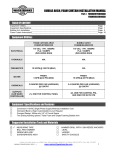
Handles Accessory
Installation Instruction Sheet
INTRODUCTION
Use the following instructions when installing the Handles Accessory Kit to Roadie 25K projectors.
The handles are designed to provide a sturdy method of lifting and transporting the projector a short
distance. With the optional Rigging Clamp Kit (available separately), the handles can be used for
hoisting or rigging a single projector.
Without the need to remove any covers, installation of the handles accessory is relatively straightforward. Accessing the bottom of the projector is the only requirement.
KITS REQUIRED
• Handles Accessory Kit (#113-101101-01, includes handles and 4 bolts for installation)
• optional Rigging Clamp Kit (#113-102101-01, required for hoisting/rigging)
SAFETY AND WARNING GUIDELINES
Always unplug the projector prior to installation and servicing.
This procedure must be completed by qualified personnel only.
Four or more people can lift and hand-carry one projector a short distance using the handles.
Never use the handles to carry/hoist/rig a stack of projectors.
Never exceed the load rating specified for the handles.
Please read all instructions before you begin installation.
Handles Accessory Installation Instruction Sheet
020-100131-01 Rev. 1 (08/07)
1 of 4
INSTRUCTIONS
1. ELEVATE THE PROJECTOR: Install safe supports under both ends of the projector so there is
approximately 12” clearance over the floor or other stable surface. Do not lift at the center.
WARNING
Do not lift at the center of the projector. The bottom panel of the projector may crush
and damage internal components.
2. ALIGN HANDLES: Orient handles so that when installed,
the “FRONT” label aligns with the end of the front of
the projector. With two people supporting the
projector, carefully slide handles into position, lifting
the projector off the blocks as needed to position
handles within the channels at the bottom.
Figure 1 - Align Handles
3. SECURE HANDLES: Using the four bolts provided in the
kit, secure the handles to the bottom of the projector.
Figure 2 - Secure handles
2 of 4
Handles Accessory Installation Instruction Sheet
020-100131-01 Rev. 1 (08/07)
USING HANDLES TO HOIST/RIG A SINGLE PROJECTOR
You can safely hoist and/or suspend a single projector by its handles, using the rigging clamps
available separately in the Rigging Clamp Kit (#113-101101-01).
Read the following safety warnings before hoisting/rigging ONE projection head.
WARNING
Remove the projection lens before hoisting/rigging a projector.
WARNING
Use the projector’s handles for hoisting/rigging ONE projector only. Never use the
handles to carry/hoist/rig and stack of projectors.
WARNING
Maximum load rating of handles is 385 lb./174.63kg.
Use straps and/or cabling with load capacity adequate for the total weight of the
projector and handles when lifting/hoisting. Never exceed the load rating specified.
WARNING
When flying a single projector using the handles, the overhead truss must have a
minimum load rating of 1925 lb. (873kg). Support structure/truss must comply with
applicable local codes. An inadequate truss may cause serious injury or death.
When hoisting/rigging a single projector using the handles, do the following:
1. Remove projector lens.
2. Clamp the 4 rigging
clamps to the projector’s
handles staying within the
assigned rigging zones
shown in the figure below.
Allow 12 inches between
clamps for proper stability.
Make sure rigging clamps
can swivel freely - do not
tighten the cross-bolt of the
clevis arm. NOTE:
Symmetrical placement of
the clamps on each side of
the handles is strongly
recommended. (See Figure
3. and Figure 4.)
Handles Accessory Installation Instruction Sheet
020-100131-01 Rev. 1 (08/07)
Figure 3 - Install Rigging Clamps
3 of 4
WARNING
Critical Safety - Minimum of 4 rigging clamps required
for a single projector. Always use redundant safety
straps and cables. Observe load ratings and all
applicable local codes when hoisting/rigging a
projector.
Figure 4 - Rigging Zones
3. Secure the other end of each clamp to the primary support structure.
4. Secure the projector with an additional two safety straps. Using one safety strap per crossbeam,
route the strap through the 2 bottom eyebolts and bring them up and around the outside of the
handles.
Figure 5 - Secure Projector with Safety Straps
5. Install the projection lens and secure it with it’s
safety ring and tether strap. (Figure 6.) See also
the User Manual for more lens installation
details.
Figure 6 - Secure Lens with Ring Clamp
and Tether
4 of 4
Handles Accessory Installation Instruction Sheet
020-100131-01 Rev. 1 (08/07)