1
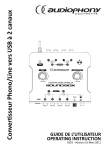
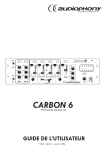
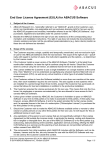
High-torque Professinal turntable system
OPERATING INSTRUCTION
6259 - Version 3.0 October 2012
English
TT-2930 - High-torque Professinal turntable system
1 - Safety Instructions
Important Safety Information
This unit was created to operate in place heated and
insulated from any form of moisture or water spray.
Any use in wet locations, unprotected, or subjected to
temperature changes represent a significant low risk
to both the device for anyone nearby.
This device contains within its housing, uninsulated
portions under tension high enough to pose a risk of
electric shock. Do not under any circumstances perform maintenance on this unit when it is turned on.
Only the relevant technical services and recognized
by HITMUSIC are authorized to perform maintenance
on this unit. Routine maintenance actions must follow
the precautions in this manual
CAUTION : To reduce the risk of electric shock, never remove the covers.
There are no user-serviceable parts inside. Contact a qualified service
technician for maintenance of this unit.
Risk of electrocution
To prevent electric shock,do not use extension cord, power strip or other system without
connecting metal parts in contact are completely out of reach.
Noise levels
The sound systems are capable of delivering
a sound level (SPL) harmful to human health.
The sound pressure levels are apparently
noncritical damage hearing if the person is exposed over a long period.
Do not park close to the speakers in operation.
Environnemental Protection
• Your product is composed of materials to be recycled, do not throw in your trash, bring it to a collection center set up near
your residence. The service centers you will resume your device at the end of life to proceed to its destruction in compliance
with environmental rules.
• For more information http://www.hitmusic.fr/directives-deee.php.
• The environment is a cause that defends HITMUSIC, we sell only the products fit, conform to ROHS.
Used symbols
IMPORTANT symbol indicates an
important recommendation for use.
The CAUTION symbol indicates a risk of product degradation.
The WARNING symbol indicates a risk of harm to the physical integrity of the
user and any other person present.
The product can also be damaged.
Page 2
TT-2930 - High-torque Professinal turntable system
English
Instructions and recommendations
1 - Read the instructions :
It is advisable to read all instructions and operating instructions
before using the device.
2 - Retain instructions :
It is advisable to keep the instructions for use and operation
later.
3 - Consider the warnings :
It is advisable to carefully consider all warnings and
instructions for operating the product.
4 - Follow the instructions :
It is recommended that you follow all operating instructions
and use.
5 - Water and moisture :
Do not use near water, for example near a bathtub, sink or
basin, or in a damp place or near a swimming pool, etc.. ..
6 - Installation :
Do not place this product on a rolling stand,
tripod, bracket or table. The product may
fall seriously injuring a child or an adult and
seriously damaged. Use only a cart, stand,
tripod, bracket or table recommended by
the manufacturer or sold with the apparatus.
In any case to install the equipment it is advisable to
follow the manufacturer's instructions and use instruments
recommended by it.
It is strongly advised to move with caution when rolling the
cabinet the unit is over. Quick stops, excessive pushing and
rough surfaces might topple the whole.
7 - Mount on a wall or ceiling :
It is recommended that you contact your dealer prior to
installation.
8 - Vents :
Slots and openings in the cabinet are provided
for ventilation, to ensure use of the product with
confidence and to avoid overheating. These
openings must not be blocked or covered.
We must be careful to never block the openings by placing the
product on a bed, sofa, rug or other surface of this style. This
device should not be placed in an enclosed facility such as a
bag or rack unless aeration was provided or the manufacturer's
instructions were followed.
9 - Heat :
It is advisable to keep the product away from heat sources
such as radiators, stoves, heat reflector or other products
(including amplifiers) that produce heat.
10 - Power supply :
This product works only on the voltage on a label
on the back of the product. If you are unsure of the
voltage of your electrical installation, consult your
dealer or local power company.
11 - Protection of Electrical cables:
You must ensure that electrical cables are not likely
to be walked on or pinched by items placed upon
or against, paying particular attention to plugs and
their exit point on the unit.
12 - Cleaning :
Unplug the unit before cleaning. Do not
use attachments not recommended by the
manufacturer. Use a damp cloth on the surface of
the device. Do not pass the apparatus underwater.
13 - Period of no use :
Unplug the power cord of your appliance if you do not use it
for a long period.
14 - Penetration by objects or liquids :
Do not enter into any kind of objects into this
product through openings as they may cause fire
or electric shock.
Never spill liquid of any kind on the product.
15 - Damage requiring service :
Ask qualified persons in the following cases:
- When the power cord or plug is damaged (e).
- If liquid has been spilled or objects have fallen
into the apparatus.
- If the product has been in contact with rain or
water.
- If the product does not operate normally by
following the instructions.
- If the product took a shock.
16 - Maintenance / overhaul :
Do not attempt to review this product yourself.
This will expose you to dangerous voltage. Talk to
qualified personnel.
17 - Operating environment :
Temperature and humidity environment Operating:
5-35 °, relative humidity below 85% (vent not
blocked).
Do not install the unit in a poorly ventilated area or
in a place subject to high humidity or direct sunlight
(or strong artificial light)
Page 3
English
TT-2930 - High-torque Professinal turntable system
2 - Specifications
TURNTABLE SECTION
• 3-speed full manual
• Motor : 8 pole, 3 phases
• Driving : Direct
• Platter : 332 mm dia. aluminium
• Speed : 33, 45 and 78 rpm
• Wow and Flutter : Less than 0.2% WRMS with 33 rpm
• S/N ratio : More than 50dB (DIN-B)
• Pitch : +/-10%, +/-20%
TONEARM SECTION
• Type : S-shaped tonearm with detachable headshell
• Effective arm lenght : 230.5 mm
• Applicable cartridge weight : 3.5~8.5g
• Anti-skating range : 0~7g
• Phono output : 1.5~3.6mV @ 1KHz 5cm/sec (HP4005)
• Line output : 90~216mV @ 1KHz 5cm/sec (HP-4005)
• Frequency Response : 20Hz - 20KHz
• Channel Separation : More than 15 dB
• Channel Balance : within 2.5 dB at 1 KHz
• High of Tonearm adjustment range : 0~6mm
• Stylus pressure adjustment range : 0~4g
3 - Preparation
1 - Check the package contents
The package should contain the following elements :
- 1 Audio-Technica® Headshell
- 1 Counterweight
- 1 Platter
- 1 Dust cov
- 1 Slipmat
- 1 RCA - RCA cord
- 1 45 rpm adaptor
- 1 AC Power Cord
- 1 User manual
Page 4
GENERAL CHARACTER
• Power Supply : AC115/230V, 60/50Hz
• Power Consumption : 11W
• Dimensions : 450 x 352 x 157mm
• Weight : 10,5 kg
TT-2930 - High-torque Professinal turntable system
English
4 - Device overview
1 - Power Dial
On - Rotate Right
Off - Rotate Left
2 - Start/Stop
Press this button to start or stop the platter.
3 - Platter revolution speeds
33 rpm – Press 33
45 rpm – Press 45
78 rpm – Press 33 and 45 buttons simultaneously. To
return to 33 or 45-rpm play mode, just press the desired
button.
4 - Platter
Place this on the center spindle.
5 - Center spindle
This spindle holds the turntable PLATTER records stable
and centered.
6 - Strobe dots
7 - Target light
Press the button to the right and a light will pop up
directed at the stylus position.
8 - Pitch button
Press this button to switch 10%, 20% pitch.
9 - Quartz button
On - will hold the revolution speed 0%
Off - will allow use of the pitch adjust
10 - Extra stylus holder
This cut out has been designed to safely store an extra
stylus headshell.
11 - Direction button
Controls platter’s rotational direction.
12 - Pitch adjust
Use this to change the speed of the platter when quartz
lock is inactive.
13 - 45 rpm adapter
Place on center spindle for playing 7" records with large
center holes.
14 - Pre-amp selector switch
Allows the internal stereo phono pre-amp to be
bypassed when the turntable is used with equipment
having magnetic phono inputs.
Page 5
Français
TT-2930 - Platine disques high-torque direct avec cellule
24
23
22
21
20
19
18
22 - Anti-Skate Control
Applies a small inward force to the tonearm, counteracting
the tendency of the tonearm to move outward due to
forces created by the stylus in the record groove.
23 - Tonearm assembly height lock
Locks the tonearm height setting attempting to make a
height adjustment.
24 - Counterweight
Balances the tone arm and provides adjustment for
proper downward tracking force on the stylus.
25
25 - Phono output
This is the standard analog output (RCA jacks), which
can be connected to phono input on any DJ mixer.
17
16
15
15 - Headshell
It is used to connect your cartridge with the tonearm.
16 - Headshell locking nut
After attaching the headshell to the tonearm, this locking
nut will securely hold the headshell to the tonearm.
17 - S-shaped tonearm
18 - Tonearm assembly height adjust
Raises and lowers the entire tonearm assembly to allow
the tonearm to remain parallel to the record surface.
19 - Tonearm lift
This elevates the tone arm above the record surface.
20 - Tonearm clamp and rest
Use this rest for the tone arm and clamp it in position
during transportation.
21 - Tonearm lever
Controls the up and down action of the tone arm lift.
Page 6
TT-2930 - High-torque Professinal turntable system
English
5 - Assembly
1 - Remove the main unit with the packing from the box
and take off the packing.
2 - Set the 45rpm adaptor on the main unit.
3 - Insert the turntable platter onto the centre spindle.
4 - Set the slip mat on the platter.
5 - Installation of cartridge:
When installing a cartridge, refer to the operating
instructions of that cartridge. During installation, attach
the stylus protector to guard the stylus tip from damage.
(a) Connect the lead wires to the cartridge terminals. The
terminals of cartridge are colour coded.
Connect each lead wire to the terminal of the same
colour.
White (L+) Left channel +
Blue (L -) Left channel –
Red (R+) Right channel +
Green (R-) Right channel –
(b) Install the cartridge to the headshell and tighten it
with screws provided with the cartridge.
6 - Insert the headshell into the front end of the tonearm,
then turn the lock nut clockwise with the headshell firmly
held horizontally.
7 - Slide counterweight onto tonearm.
Twist it lightly and it will screw onto the rear shaft of the
tonearm.
8 - Adjustment of horizontal zero (0) balance and stylus
pressure:
(a) Remove the stylus protector, do not touch the stylus
tip during the adjustment.
(b) Set the cueing lever to the lower position.
(c) Release the arm clamp and lift the tonearm from the
arm rest to free it.
(d) Rotate the counterweight until the tonearm is
approximately balanced horizontally (floats freely).
(e) Refasten the tonearm with the arm clamp.
(f) Hold the counterweight stationary with one hand and
rotate only the stylus-pressure ring to bring the number
"0" of the ring into alignment with the centre line on the
tonearm rear shaft.
(g) Rotate the counterweight clockwise until the scale
shows the value corresponding to the pressure of the
used stylus. The stylus pressure of the installed pick-up
system is 2 g. If you use a separate pick-up system,
please follow the manufacturer’s instructions.
9 - Set the anti-skating control knob to the same value as
the stylus pressure.
10 - Install the dust cover to the main unit
6 - Operating
1 - Turn the power dial to turn on and the speed indicator
and the strobe-illuminator will light up.
2 - Turn on and raise the target light for illumination the
stylus tip by pushing the target light button.
3 - Place a record on the turntable mat. When playing a
45rpm record with a large center hole; place the 45-rpm
adapter on the center spindle.
4 - Set the rotation speed (33/45/78) to match the record.
11 - Adjust the pitch to a desirable speed. During play,
observe the strobe dots. If the strobe dots appear to the
right, the pitch is slower than the rated speed. If they flow
to the left, the pitch is faster than the rated speed.
If the strobe dots appear stationary, which means the
platter is in normal turntable speed, move the pitch
control slider up or down to adjust the speed.
12 - To suspend play, lift tone arm with cueing lever.
6 - Set the cueing lever to the up position.
13 - When play is finished, raise the cueing lever, move
the tone arm to the armrest and secure the tone arm with
the arm clamp.
7 - Press the Start/Stop button and the turntable platter
will start to rotate.
14 - Turn the target light off by pushing the light back
down.
8 - Move the tone arm over the desired groove.
15 - Press the Start/Stop button to stop the platter
rotating.
9 - Set the cueing lever to the down position, the tone arm
will descend slowly onto. The record and play begins.
16 - Turn the power dial to turn off the power.
5 - Release the arm clamp.
10 - Set the desired pitch adjusts range by depressing
the Quartz buttons until the desired pitch is reached.
Options are +/-10% or +/-20%
Page 7
Because AUDIOPHONY® takes the utmost care in its products to make sure you only get the best possible quality, our products are
subjects to modifications without prior notice. That is why technical specifications and the products physical configuration might differ
from the illustrations.
Make sure you get the latest news and updates about the AUDIOPHONY® products on www.audiophony.com
AUDIOPHONY® is a trademark of HITMUSIC S.A. - Zone Cahors sud - 46230 FONTANES - FRANCE