1
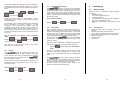
GENERAL USER’S MANUAL 3462.501.02 TIM022 Version 1.0 SWISS TIMING LTD P.O. Box 138, Rue de l’Envers 1 CH-2606 Corgémont, Switzerland Phone ++41 32 488 36 11 Fax ++41 32 488 36 09 e-mail: [email protected] Web: http://www.swisstiming.com A COMPANY OF Index 1 INTRODUCTION....................................... 6 1.1 Safety Recommendations ............................. 6 1.2 Contents ......................................................... 6 1.3 System peripherals........................................ 7 1.4 Keyboard: Use of the keys............................ 7 1.5 Switching the device on ................................ 7 1.6 Switching the device off................................ 7 1.7 Navigating through the menus ..................... 7 2 TECHNICAL SPECIFICATION ................ 7 3 GENERAL FUNCTIONS .......................... 7 3.1 Type of contacts ............................................ 7 3.2 Synchronisation............................................. 8 3.3 Arming ............................................................ 8 3.4 Resolution and Rounding ............................. 8 3.5 Scoreboard and PC output ........................... 8 3.6 Printer ............................................................. 9 3.7 Controlling the memory ................................ 9 3.8 Corrections..................................................... 9 4 TIMEKEEPING ......................................... 9 4.1 Before the Race ............................................. 9 4.2 For each race ................................................. 9 5 OTHER FUNCTIONS ............................. 10 5.1 Paper Replacement ..................................... 10 5.2 Battery Replacement ................................... 10 5.3 Loading new version ................................... 10 6 TROUBLESHOOTING ........................... 11 7 ACCESSORIES AND OPTIONS ............ 11 8 CABLING DIAGRAM ............................. 11 9 TECHNICAL CHARACTERISTICS ........ 12 10 DESCRIPTION........................................ 12 Please refer to the last pages of this manual for a description of the different components. -1- 1 Introduction The is a hand-held, battery powered timing device. The four line display, and 18 key keyboard make it very user friendly. Five plugs allow the device to be connected to various peripherals. reflects all the know how and experience The of Swiss Timing Ltd, official timekeeper at more than 25 Olympic Games. Benefiting from the latest innovations in micro-electronic, the device more than meets the wishes of every user. Only use the printer paper recommended by Swiss Timing Ltd. The printer uses rolls of thermal paper, 58mm wide and with a maximum diameter of 29mm. 1.2 Contents The is delivered in a transport bag, with the system software already installed. is absolutely a futuristic device, whilst The remaining very easy to use. New timekeeping programs developed to meet divers sporting disciplines may all be loaded from a personal computer. provides a practical solution for all The disciplines requiring the measurement of time, including the time of day, the duration of a race, lap time, match time or speed. is characterised by its ease of use, its The high precision, its compact size and low power consumption – making it suitable for every timekeeper, from amateurs to professionals, having already been used at the Olympic Games. 1.1 Safety Recommendations To avoid all risk of electrocution, or damage to the device, never connect an external power supply directly onto the sockets; it is only permitted to connect a mains adaptor when it complies with all safety criteria. 1. 2. 3. 4. 5. 6. 3361.618 3361.618.AU 3361.618.GB 3361.618.US 9035.6109 7. 3361.605 8. 9. 3361.603 3361.610 Never use a solvent or aggressive detergent to clean your . Never pull the paper through the printer in anything other than the direction. Protect the from rain and water jets. Never open the the internal electronic circuits. 3361.620 3462.700 3462.606 9051.6042 Transport bag Mini CD with standard system software Rolls of thermal paper (2 units) Power adaptor (option) 230V Europe 230V Australia 230V Great Britain 115V U.S.A. Alkaline batteries 1.5V, 1500 mAH, type AA / LR6 / UM3 (4 units) Start & Stop connection cables (2 units) (mono jack Ø3.5mm – 2x4mm sockets) PC connection cable (RJ 10p – RJ 10p) PC adaptor (RJ 6p – Sub-D 9p F) case due to risk of damaging -2- -3- 1.3 System peripherals 1.6 To carry out a totally automatic timing operation it is necessary to connect a start system and a device to detect arrivals. Any device having a volt free normally open or normally closed contact, can be used (for example start gates, start transducer, photocells, contact strips etc.) Switching the device off 3 General Functions Note: Return to the main menu by pressing Off selection and press the ; then go to the programs, not developed by Some Swiss Timing Ltd, may use different menus. key. 3.1 For initial familiarisation with the device, or where high button precision timing is not absolutely essential, the allows direct entry of start and arrival impulses directly from the keyboard. 1.7 The actual selection is shown on the screen by means of the character . Use the cursor keys ( 1.4 Navigating through the menus and ) to make a selection and the key to confirm. If a menu choice is no longer shown on the screen, the vertical arrows ( or ) on the top or bottom of the screen indicate that the screen display may be scrolled by the cursor keys. Keyboard: Use of the keys Paper Advance key START/STOP key: switches on the device and allows manual recording of starts and finishes. Correction key: this replaces the timekeepers pencil and allows the modification of times. Any correction is printed (change of competitor number, erasing a time, manual entry of a time). ON/OFF key: renders active/inactive (arming) the external channel shown by the cursor . 1.5 2 Normally closed (NC): 1 0 1 0 Technical Specification Press Data storage: even when switched off, the saves all data. For this, it uses a capacitor mounted on the main circuit board. This guarantees that no information is lost when changing the main batteries. Cursor keys: allow movement through the menus. ESC key: cancels a modification or exits a menu. Distribution of information: the serial output allows results to be transmitted to a scoreboard or PC either during, or after, races. Switching the device on button until the end of the operation, during this time press the Take the case of a simple push button to explain this concept. To record an arrival signal, press the button then release it. Depending on the type of push button we have the two following possibilities: Normally open (NO): depending on the program that Memory: the is installed, allows several hundred times and heats to be stored, with a maximum of 2000 results. Press and hold down the Type of contacts A contact is defined by the change of state of an electric switch. button briefly. Release Normally Open Normally Closed It is a fundamental feature of the device that the type of contact must be correctly interpreted: in other words will the timing pulse be recorded when the signal changes from 0 to 1 or from 1 to 0? With regard to above diagram, it is easy to understand that if we configure the contacts incorrectly we will falsify the results by several tenths of a second. In this case the device will interpret the arrival time as the moment that the judge releases – rather than presses – the push button. How to configure a contact: Settings Contact Start/Stop NO/NC Where Start/Stop is the input you wish to configure and NO/NC defines whether the contact will be normally open or normally closed. -4- -5- -6- 3.2 Synchronisation Timing signifies precision ! If you are timing with only one , make sure that the date and time of day are correct. If you are timing with several devices, it is necessary to synchronise them before the competition starts, to ensure that they will all give the same result. To do this it is necessary that the « Start » of the synchronisation is the same on each device (Note: have you correctly chosen the type of contact – normally open or normally closed ? See 3.1). How to synchronise Settings Synchro Date DD-MM-YY Day, month, year all with two characters; for example nd st 02-03-98 for the 2 March 1998, 01-01-00 for the 1 January 2000. Hour HH.MM:SS hours, minutes, seconds, each time with 2 characters; for example 17.30:00 (use the 24 hour clock no am/pm). will now be ready and will display ?start. The The internal clock will be synchronised when a start signal is given, which can be either by the « start » socket. To help understand this concept, here is an example: Take a 1500m where the finish times are recorded by a photocell. The race is about to start: the finish channel should be disarmed. An official walks in front of the cells, and the athletes are on their first lap; none of the times are recorded. On the last lap the finish channel is armed and all times are recorded. When the last athlete has passed, disarm the channel again. The result can now be printed. allows operation in manual arming The mode, this means that the operator must press the OFF/ON key before the times can be recorded, or in automatic arming mode where the time will automatically be recorded after a pre-determined arming delay of x seconds. In the first case enter 0 as the arming time, alternatively the number of seconds before automatic rearming. If you enter 10, the arms the arrival channel 10 seconds after the start impulse is received. Arming Arming time is a concept that increases the reliability of a timing service whilst simplifying the task of the operator. Understanding the concept of arming time and using it correctly is an important feature of high quality timekeeping. For example, for a time measured to one thousandth of 12.128 with a precision of one tenth we will have: truncated: 12.1 rounded: 12.1 rounded IAAF: 12.2 How to configure the resolution: Settings How to configure the rounding mode: How to set an arming time: 3.5 Settings Contacts Arming xx Where xx is the arming time in seconds, in the range from 0 to 99. 3.4 Resolution and Rounding The rules of the different sporting federations stipulate a timing resolution and method of rounding that can vary substantially. Type of race Swimming Athletics 100m Athletics 20 Km walk Resolution 1/100 1/100 1/10 Rounding Type rounding rounding IAAF rounding IAAF Resolution Choose required resolution Settings Several examples: 3.3 rounded (if the fractional part is equal or superior to 0.5, the whole part is increased by one) rounded IAAF (if the fractional part is more than 0.0, the whole part is increased by one) Note that all events occurring when the inputs are disarmed are still stored in the memory (stack). The operator can see these times and select them by using the modification menu accessed by the « correction » key. key or the external To synchronise several devices together: Connect all the start sockets together – remembering to respect the polarity (red plugs connected together, black plugs connected together). Program each device as detailed above. Give an external start impulse. Rounding Choose required rounding Scoreboard and PC output The allows the distribution of timing data on two separate lines – the scoreboard output and the PC output. The scoreboard output uses an RS422 protocol and the PC output uses an RS232 protocol. The scoreboard output is defined by the data protocol used and the desired scoreboard format. Depending on the application, different protocols will be used, to control scoreboards of which allow the different types (refer to specific program manuals for further details). The menu Settings Scoreboard allows the selection of the type of scoreboard as well as the manner in which the data will be displayed on the scoreboard. How to select the type of Scoreboard: Settings Scoreboard Choose the type of scoreboard can be used for each method of The calculating a result by offering a resolution from 1/1000 of a second up to a whole second, and the following rounding methods: truncated (the fractional part is simply ignored) -7- -8- -9- Type As examples consider the RollerTime protocol scoreboard or the Multi-line protocol which enables the use of up to 8 lines of scoreboard at the same time (for example the Calypso or UNT7). Scoreboard Settings Type Multiline number of lines Where the number of lines is a value between 1 and 8 corresponding to the number of scoreboard lines that are connected together. The resolution of the scoreboard specifies which information will be transmitted. For example, consider a six digit scoreboard. If you are timing a track athletics event, the scoreboard should display minutes, seconds, tenths and hundredths (mm:ss:th). For the walk the display will be in hours, minutes, seconds and tenths (h:mm:ss:t). However, for a marathon, the display will be in hours, minutes and seconds (hh:mm:ss). How to Configure the resolution of the scoreboard output: Settings Scoreboard Resolution Choose the resolution Note that one of the resolution choices is OFF which disconnects the scoreboard output. 3.6 Printer The printer is considered a vital tool in the provision of official results. All data « captured » during the event is printed in time of day; all relevant data (for example the finish time) is then processed and the prints the effective race time. If printing during the event is not essential, the printer may be switched off and then reactivated at the end of the race to print the final result. 3.7 Controlling the memory The stores in its memory all the information recorded during all the timed competitions. This information will remain available until the operator decides that it is no longer required. At that point it will be necessary to clear the memory. An erase function is available to clear the data in the memory, but it should be noted that all the information will be permanently erased. How to erase the memory Settings 3.8 Erase Yes or No 4 4.1 has a menu that enables In these cases, the the operator to modify the registered data so that the final results are correct. Before the Race Before the races, it is necessary to check the basic set-up information: The date and time The type of contacts being used The timing resolution The presentation of information on the scoreboard The printer – switched ON or OFF Erase the results already in the memory from previous races 4.2 Corrections Every timekeeper hopes for a trouble free event. However, in reality, it may be necessary to modify some of the data that has been automatically recorded by the device. For example, someone other than an athlete may pass through the finish line photocells. A bib number may be read incorrectly. Many other unpredictable situations can arise without warning. Timekeeping For each race Select the timing mode: for example by lane or single finish line. Select or edit the event and heat number. Arm or disarm the external start and stop channels. Edit the bib numbers (unless timing in lane mode) Make any corrections. Print the results. Exit the race. Note that all data modifications or manually entered start or finish times are indicated on the printer with an asterisk (*). Use the mode. key to enter the « modification » Normally, it is possible to modify or insert a start time, modify or insert a finish time, exchange times, or recover in the memory (stack) an information that was not considerated as useful. stores in a special memory (the stack), The all information that is not immediately required to produce a result. For example a finish time, when the arrival channel is not armed or a start time before the race has started. Note that access to this special memory (stack) is only possible if the data has been memorised. How to switch the printer ON and OFF Settings Printer ON or OFF - 10 - - 11 - - 12 - 5 5.1 5.2 Other functions Paper Replacement Battery Replacement The works with 4 1.5 V alkaline batteries (1500 mAh, type AA / LR6 / UM3). It is also possible to use appropriate sized and rated rechargeable cells. Note that Open the paper compartment cover. Lift out the remaining part of the existing paper roll and carefully cut the paper leaving a piece of paper several centimetres in length, which will help to load the new roll. Never try to pull the remaining paper through the print head with any force. This will damage the printer. Make a diagonal cut at the end of the new paper roll. Whilst pressing the paper advance key, slide the end of the new roll of paper into the paper guide on the printer. Gently push the paper forwards until the advance mechanism grips it. Continue pressing the paper advance key until the paper is fed right through the printer. You may now – gently – pull about 10 cm of paper through the printer. Pass the end of the paper between the main body of the device and the paper compartment cover. these cells cannot be recharged by the if the mains adaptor is connected. Open the battery compartment cover. Printer OFF - 13 - Loading new version (for example Different programs exist for the Standard, Ski, Top-8). You can find these on the Swiss Timing Ltd web-site (www.swisstiming.com). Here are the step by step instruction of how to load a new version, or a : new program into your Connect your using the delivered cable to an available serial port on your computer. Be sure that this last is not used by any other running program. Note: an equivalent USB to Serial Port can also be used. , the Click on the line “Update your installer will be loaded and the connection will be done automatically. When the connection between Remove the four batteries. Do not throw these batteries into the dustbin but send them for recycling. is established the computer and the Insert four new batteries (never replace just some of the batteries – always four at the same time) and note the correct polarity as shown in the base of the battery compartment. a red icon with a The internal Lithium battery must only be changed at a Swiss Timing Ltd service centre. is shown. The corresponding automatically. The connection is automatic, if an error occurs it means that the connected com port is not available, not correctly installed or already used by another PC application. Close the battery compartment cover. Never use the printer when there is no paper, as this will damage the printer. If it is not possible to replace the paper immediately, then switch off the printer Settings even allows you to change the batteries even The when a race is in progress. However, the start and finish signals will not be registered whilst the actual battery replacement is under way. Having replaced the batteries, return to the race using the function menus. Close the paper compartment cover. 5.3 serial will be found The installation software will show you the serial port used for the connection and the version (1 or 2). To upload a new program set the radio button to “Software”, the list of available programs is shown. Select the desired program to load and then press “Download”. At the end of this process, the program asks you if you want to save changes; just answer YES. . - 14 - port - 15 - 6 Troubleshooting The condition. 7 won’t switch on: check the battery The display flashes: the battery voltage is too low – replace the batteries. The printer doesn’t work: check that there is paper. Check that the printer is switched on (initialisation menu, printer). Note that the printer is automatically switched off if the battery voltage is low. The connection doesn’t work: check the connection cable between the and the PC is connected and that the transmission protocol parameters are correctly selected (9600 Bauds, 8 data bits, 1 stop bit, no parity) and that the correct COM port is selected. following accessories are available 8 for Cabling diagram the (this list is not exhaustive): PC The Accessories and options There is no display: check the batteries are installed and that the polarity is correct, then press and hold the C1 C2 C3 C4 C5 F1 P2 S1 3361.603 3361.628 3361.626 3361.627 3361.605 3361.608 3361.609 3361.610 2872.003 3361.611 9051.6042 9051.6042PK 3449.961 3449.991 3456.901 button until the end of the operation, during this time press the button briefly. The external start and stop channels are not working: check – on the display – that they armed. Test each input by creating a short circuit with a metallic object (key or nail). Menu access and operation impossible: press the RESET (located on the bottom of the device, just by the START identification) with the tip of a pen. Note: this will erase all results in the memory, and the setup process will need to be repeated. However, the date and time are not modified. The program version (operating will display the boot system of the 3456.902 Connection cable Dual output adaptor for SCB & PC SCB adaptor Adaptor for 2x SCB Start & Stop connection cable Extension box, 1xStart, 4x Stop or Extension box, 1x Start, 8x Stop PC adaptor (RJ 6p – Sub-D 9pF) Pushbutton with 3m coiled cable Swimming harness 1x Start, 8x Stop Printer paper (1 roll) Printer paper (20 rolls) GEMINI, 6 digits display using 7 segment amber LED digits (24cm) or GEMINI, 9 digits display using 9 segment amber LED digits (24cm) Marathon clock single-sided display using 8 segment amber LED digits (16cm) See photo below. Or Marathon clock double-sided display using 7 segment amber LED digits (16cm) Note: To connect one of the extension boxes, you have to open the battery compartment cover. Computer connection (PC) 3399.911 StartTime III, acoustic start system 230V. See photo below. Scoreboard and computer connection ). If the problems continue, please contact your nearest service centre. Scoreboard connection (SCB) Connection of 2 scoreboards - 16 - - 17 - - 18 - Mains adaptor 9 Mains power Technical Characteristics Display 230V AC 50 Hz or 115V AC 60 Hz depending on model LCD 4 lines of 16 alphanumeric characters Keyboard 10 numeric keys, 8 function keys Acoustic signal Output voltage 9V DC 1.2A ~ 1 kHz Printer 24 alphanumeric characters per line Thermal paper software CD-ROM, Windows compatible from 2000 up. width 58 mm, Ø < 29 mm Time base thermally compensated Switched off: ± 1 ppm at 20°C; ± 10 ppm between -20°C and +40°C Turned on: ± 1 ppm between -10°C to +50°C Resolution 1 sec to 1/1000 s Memory capacity maximum 2000 competitors 10 Description These numbers refer to the drawing on the next page. 1. Paper compartment cover. 2. Paper cutter. 3. Paper compartment External start mono jack socket, Ø 3.5 mm External Stop mono jack socket Ø 3.5 mm 4. correction menu Extension of external sockets 10 pole RJ socket 5. manual start/stop or switch on. Serial output for PC and scoreboard RJ 12 6 pole RJ socket, Sub-D 9p 6. arm the start and stop channels Scoreboard TxD+ (out) pin 1 pin 1 RS 485 TxD- (out) pin 3 pin 9 7. 8. GND pin 2 pin 5 9. validation PC TxD (out) pin 6 pin 3 RS 232 RxD (in) pin 5 pin 2 10. escape without modification. 11. down cursor. 9600 Bauds, 8 data bit, 1 stop bit, no parity Internal power 4 alkaline batteries 1.5 V, 1500 mAh, type AA/LR6/ UM3 Operating time Without serial output: >30 hours and 2000 printed lines at 20°C With running time on PC and Scoreboard: >12 hours and 2000 printed lines at 20°C External power power jack plug Ø 3.5 / 1.9 mm for 9 V power adaptor Operating temperature Weight -10°C to +50°C 500 g with batteries Dimensions 12. 13. 15. 16. 17. 18. 19. 20. 21. 22. 23. 24. up cursor. Numeric keyboard. paper advance. LCD screen. Reset. External START socket. External STOP socket. Battery compartment cover. Battery compartment. Socket for external power supply. Socket for connection to PC and scoreboard. Socket for extension of input channels Cable route. serial number 210 mm x 95 mm x 40 mm Note: if the device is turned off, the 1/1000th of a second is lost. - 19 - - 20 - - 21 -


![English [2012v1]](http://vs1.manualzilla.com/store/data/005666127_1-015c2c1b906ab908850f1f1f8721a849-150x150.png)