1
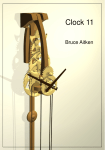
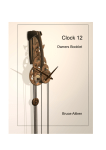
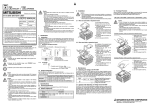
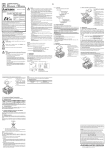
Clock 10
Bruce Aitken
This user manual accompanies one of the ‘Clock 10’ series of
clocks designed and made by Bruce Aitken.
Written, published, printed and bound by Bruce Aitken,
Old Tram Depot Studio, 25 Rutland Street, Matlock DE4 3GN.
01629 580622
[email protected]
http//www.bruceaitken-clockmaker.co.uk
Copyright © Bruce Aitken 2009
All rights reserved. No part of this booklet my be reproduced in
any form or by any electronic or mechanical means including
information storage and retrieval systems without written permission from the publisher.
Before starting to unpack and install the clock,
please gather the following items:
•
An old towel, blanket or similar
•
A pillow
•
A crosshead screwdriver
•
A pair of scissors or wirecutters
contents
Opening the crate
Pages 4 - 5
Fitting the Wall Bracket
Pages 6 - 7
Removing and Handling the Clock
Pages 8 - 9
Fitting the Clock
Pages 10 - 11
Fitting the weight cord
Pages 12 - 13
Hanging The Weights
Pages 14 - 15
Adjusting The Clock
Pages 16 - 17
Timekeeping
Page 18
Running
Page 19
Dismantling the and
Re-packing the Clock
Page 20
Naming of Parts
Pages 21 - 22
Opening the crate
The crate that contains your clock is a singularly scruffy bit of woodwork.
Please protect the surface you intend to place the crate upon by spreading an
old towel first. To open the crate a small crosshead screwdriver is required.
The screws that hold the crate closed are
numbered, they should be removed in
order.
First, remove the four screws securing the
lid - before removing the lid note that it will
only fit one way round (tell-tale marks near
screw 1 will help when you come to replace
the lid).
Locate and set aside the bag containing the
drive cord.
Next, remove the two screws indicated to
allow one end of the crate to fold down (the
end that holds the Wall Bracket)
Now remove the single screw (indicated)
and fold down the side of the crate.
Now remove the final screw - be aware that
this one screw holds the last two sides of the
crate in place, and these both house heavy
parts of the clock. They will come to no harm if
they do fall, but it is preferable to support them
and let them down gently.
The Opened Crate and its Contents
Clock Movement
Main Driving Weight
Upper Pendulum
Counterweight
Lower Pendulum
Wall Bracket
Uscrew and remove the Wall Bracket, the
Upper Pendulum and the Lower Pendulum
from the opened crate.
You’ll need use the screwdriver to remove the individual parts from the crate - be
sure to screw any detachable parts of packaging back in place in the crate before
they are lost. The empty crate can either be stored flat or rebuilt.
Fitting the Wall Bracket
Two screws set into the wall 100mm
apart hold the clock in place.
The clock was designed to be viewed
with the bottom screw roughly around
eye level.
The Wall Bracket is drilled to accept 4mm
diameter screws (8 gauge) - choose suitably
sized wallplugs or heavy duty cavity wall
fixings for your wall.
Effort spent ensuring the bracket is mounted
vertically will be well rewarded - the clock will
run perfectly with a wonky bracket, but the
bracket will be, well, wonky.
Fit the upper pendulum as shown. Ensure
the pendulum mounting block is properly
located on the mounting lugs.
Screw in place
with the screw
(supplied).
The lower pendulum is quite heavy, and it is quite easy to drop it the
first time you try to put it in place. It is a good idea to place a pillow
on the floor just in case.
Removing and Handling the Clock
The main body of the clock is robust, but does require special
care.
In it’s crate the clock is mounted on a brass rod, and held in
place by a plastic cable-tie. This needs to be cut to remove the
clock. (a new cable-tie will be needed when the clock is
re-packed).
Once the cable-tie is cut, lift the clock mechanism holding the
top of the clock frame as arrowed - it’s a snug fit and needs to
be eased upwards gently.
The clock is an awkward object to
handle - it is best held by the top plate
or by the pulley yoke at the bottom of
the clock, as arrowed.
Be aware that the most fragile part of
the clock is vulnerable to damage at
this point - this is the crutch, which is
the little tab protruding from the back
of the clock frame. To avoid damage
to this part don't lay the clock down on
its back.
Should you need to put the
clock down place it upside down
on its top plate where it will sit
precariously balanced. It will
also survive being placed on the
pillow we used earlier. Watch
that crutch, though.
Fitting the Clock
Mounting the clock on the wall bracket is straightforward.
Rotate the brass mounting bar (found in the wall bracket) so it points slightly upwards, and hold the clock so that the rear mounting hole lines up with the mounting
bar.
Locate the bar in the hole and gently slide the clock home. Take care to ensure
that the bracket arms pass below the top plate and above the escapement anchor.
Gently rotate the clock into
place.
The crutch needs to locate
correctly with its slot in the
pendulum rod - the end of the
crutch is tapered to allow this
to happen easily; it is wise
however to watch closely and
take this part slowly.
When the clock is hanging
vertically with the crutch engaged, give the top of the
frame one final push toward
the wall to make sure it is fully
in place.
Fitting the weight cord
1
First, hold the two wooden terminals and let the cord hang - make sure there are
no knots, and identify the shorter of the terminals.
Slide the shorter terminal into the hole on the left hand side of the pulley yoke.
Let the cord hang in a loop as you hold the other terminal.
2
Second, from the right side, pass this terminal through the clock frame, pulling
the cord after it.
The cord should run on the small pulley and on the groove in the drive arbour,
which will rotate noisily as the cord is pulled.
3
Now, from the left again, loop the cord around the two pulley wheels as shown.
Pull enough cord through so that there is a loop hanging at about the height of
the pendulum bob.
4
Back to the right hand side, pop the terminal into its hole, and arrange the cord
into its groove.
The two loops of cord can be persuaded to hang with no kinks or twists by rotating the terminals in their holes one way or the other. Do this until the cord hangs
neatly.
Hanging The Weights
The weight cord
should be hanging as
shown in the first
illustration.
Before hanging the
weights, double check
to ensure that the
cord sits in its groove
in the drive arbour.
Slip a thumb into the
smaller of the two
loops and apply a little
downward pressure
as you hang the large
drive weight in the
remaining loop.
Now hang the
counterweight in
the smaller loop.
The clock is wound by
placing a thumb in the
counterweight hole
and pulling downwards, lifting the drive
weight. A good deal of
force is required to
raise the weight;
expect the ratchet
mechanism to make a
moderately loud noise
during winding.
For the clock to run correctly, two
separate adjustments need to be made:
Firstly, It needs to hang vertically with
respect to the wall.
Secondly, It needs to run “in beat”.
Both adjustments are made using the two
allen keys provided, which fit into the
grub-screws (in the holes furthest forward
in the clocks top plate).
Hanging the Clock Vertically
This adjustment allows the clock to be installed on a wall that is not quite vertical.
You can tell at a glance if you need to perform this stage.
The pendulum is already hanging vertically
from the bracket - if the rear frame member
is hanging parallel to the pendulum you may
skip the rest of this page.
If both allen keys are rotated in the same
direction at the same time, the mechanism
will slowly rock towards or away from the
wall. Adjust the allen keys together until the
mechanism hangs vertically (as viewed from
the side).
Adjusting the Beat
Leave the allen keys in place to make the second adjustment. If these are
now rotated in opposite directions (as shown below), the clock mechanism is
made to rock from one side to the other.
First make a quick visual check to see that the front frame member is more
or less vertical, using the allen keys to correct as needed (turning both keys
by the same amount but in opposite directions).
Start the clock by gently swinging the pendulum. Watch the escapement
carefully, in particular observe the how far the anchor pallets swing out away
from the teeth - this maximum should be the same on both sides. The
illustration shows which direction to turn the keys to bring the clock into
balance. Make small adjustments, remembering to turn both keys by the
same amount and in opposite directions.
The clock should now be running “in beat” and should produce a balanced
“tick - tock - tick - tock” sound (rather than “tick … tock tick… tock tick”. This
is a precise adjustment - expect to spend a little time making sure that the
swing of the anchor in and out of the escape wheel is the same on both
sides.
Timekeeping
To adjust the clock hands •
First grasp the adjuster and press it
towards the clock (this disengages
the hands from the main movement).
•
Rotate the adjuster clockwise while
continuing to press - the hands
follow.
•
Set the time.
The clock is capable of keeping time accurately. If the clock is running slow
rotate the bobnut as shown in the left hand illustration, follow the right hand
illustration if it is running fast.
If the Clock Runs Slow
daily
difference
adjustment
(in minutes)
(bobnut turns)
1
2
5
2
4
10
weekly
difference
adjustment
(in minutes)
(bobnut turns)
1
0.3
2
5
0.6
1.5
If the Clock Runs Fast
Running
The clock is designed to be wound at roughly the
same time each day - it will run for 30 hours on one
complete wind.
Apply a firm even downwards force, but try not to
rush the winding - aim to have wound the clock by
the time you have counted to five.
Allow the drive weight to meet the bottom of the
clock frame gently as you complete the winding.
If the clock is allowed to run down it will stop, the
counterweight held neatly by the bottom of the
frame. Wind the clock again, and gently restart.
The normal running of the clock can be disrupted by
a few circumstances. Should it become reluctant to
work try these procedures:
•
Restart the clock - if it runs, check that it is running ‘in
beat’ (the escapement anchor swings away from the escape wheel by the same amount on each side). This adjustment can drift over time - re-adjust with the allen keys
if needed.
•
If the clock won’t start (the escape wheel doesn’t rotate
when the pendulum is swung) several steps can be taken
- first take the escape wheel and gently jiggle it in and
out, and repeat for the intermediate wheel. Now rotate
the clock hands a full 12 hours before setting the time
and re-starting the clock.
Normally these methods will enable the clock to return to
its normal stable running. If it continues to require
frequent re-starts, however, it may need to be returned to
the workshop. Please do not hesitate to get in touch if
you experience any difficulty with the clock.
Dismantling the and
Re-packing the Clock
At some time it will be necessary to dismantle the clock for
storage, moving house or returning to the workshop for
maintenance.
You will need the crate, the old towel, pillow and crosshead
screwdriver used when the clock was first unpacked, plus a
new plastic cable-tie and a pair of pliers.
•
•
•
•
•
•
Wind the clock so that the main weight is close to its
highest position, as shown.
Set the time to read 12:00 (1).
Stop the clock by gently arresting the pendulum bob(2).
Remove the counterweight (3) followed by the drive
weight (4).
Remove the cord terminals from the frame (5).
Gently pull the cord out in the direction shown (6).
If the clock is being returned to the workshop, our telephone
discussion will have clarified which items need to be included
- probably just the clock mechanism. If this is the case, the
weights will need to be stored safely outside the crate. If the
entire clock is being packed, fix the weights in their places
now, wind up the cord and bag it.
Now remove the clock mechanism from the wall bracket. This
is the reverse of the process detailed on pages 10 - 11. Rest
it on the pillow as required.
Carefully lower the clock mechanism onto the vertical brass
rod in the crate, taking care to locate the rod properly with the
clocks mounting hole and ensuring that the crutch sits within
its protective slot.
Slide the cable-tie through its hole in the crate (just next to the
crutch slot), feed it back through the clock frame and tighten
with the pliers it so it holds the frame back securely.
If the clock mechanism alone is being returned, the crate
sides can now be re-assembled by reversing the process
shown on pages 4 - 5. The wall bracket and pendulum can
remain in place on your wall.
If the entire clock is to be packed, removing the pendulum and bracket is
simply a matter of reversing pages 6 - 7. Remember to be careful when
removing the pendulum joining peg as the lower pendulum is heavy and can
fall - the pillow placed underneath is a good precaution.
The pendulum mounting block is a tight fit and can be difficult to remove.
There is a slight groove on at the rear of its top surface for a fingernail to
pull it, please don’t exert force on the upper pendulum as the pivot can be
damaged.
If the entire clock is being packed, please ensure that the individual parts
are well secured in their places. Place the capping piece in the bag alongside the cord, the dusting brush and the allen keys, and tape (staple, ideally) this bag inside the crate lid.
Although the clock can withstand wide temperature variations, storage at a
cool room temperature is preferred. Please ensure that it is stored in a dry
place, especially for long term storage.
Naming of Parts
Wall Bracket
Clock Mechanism
Pendulum
Drive Weight
Counterweight
Naming of Parts
Bracket Cheek
Bracket Back
Upper Pendulum
Frame Back Member
Pendulum Joiner
Lower Pendulum
Bracket Top Plate
Anchor Mount
Frame Front Member
Going Train Wheels
Clock Hands
Motion Work Wheels
Frame Yoke