1
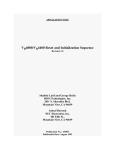
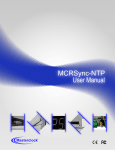
CONNECTING THE RC200 to the TCD or NTD series II clock INSTALLING BATTERIES Key Chart RC200 REMOTE CONTROL DATA & POWER Connection Connect the RC200 to the TCD clock DB9 connector labeled “CONTROL” using the supplied DB9:RJ12 adapter and standard 6P6C (6 position, 6 conductor) cable. DATA Only Connection Connect the RC200 to the TCD clock DB9 connector using the supplied DB9:RJ12 adapter and standard 4P4C (4 position, 4 conductor) USER GUIDE INTRODUCTION The Masterclock RC200 remote control is designed to work with Masterclock Series II Time Code Display (TCD) and Network Time Display (NTD) Digital Clocks. The RC200 allows the user to control the mode of the clock and to utilize the Count-Down Timer, Count-Up Timer, Stop-Watch, and Clock functions. Package Contents: 1 RC200 digital clock remote controller 1 DB9 to RJ12 adapter for TCD series II digital clock. 1 50ft (15m) 6 conductor, 6P6C cable 1 User Guide 2 AA Alkaline Batteries POWERING OPTIONS The RC200 can either be powered from a) a Masterclock TCD or NTD series II digital clock, using standard 6P6C (6 conductor) cable b) an (optional) external transformer supply, or c) two AA batteries [Alkaline recommended]. FEATURES AND FUNCTIONS DATA & POWER Connection Connect the RC200 to the NTD clock RJ12 connector labeled “RS-485” using standard 6P6C (6 position, 6 conductor) cable. DATA Only Connection Connect the RC200 to the NTD clock RJ12 connector labeled RS-485 using standard 4P4C (4 position, 4 conductor) cable Powering the RC200 from an external (optional) transformer supply Optional transformer supply – sold separately 1. On the rear of the RC200, push the battery compartment cover and pull in the direction of the arrow to access the battery compartment. 2. Insert two (2) fully charged AA batteries. [Alkaline Recommended] Match the + and – marks on the batteries to the + and – marks in the battery compartment as shown. 3. Press the battery compartment cover back into place. The tab should click when the cover is locked. 4. Test the unit by pressing the Clock mode button twice, without the external power supply or tether attached. If the batteries are inserted correctly, the LED indicator above the Clock mode will blink once per second. Battery Conservation Features The RC200 is designed to utilize battery power when a 4P4C, 4 conductor cable is used for communications. The RC200 has been designed with special features to conserve the battery power. Note: The RC200 will flash the LED indicator above the currently selected mode once per second when using battery power. External Power Battery Disable The RC200 will disable the battery circuit when powered from either from the TCD or NTD clock using the 6P6C, 6 conductor cable, or when using the optional external transformer supply. Sleep Mode If the RC200 is left on for 1 (one) hour with no keypad activity, the RC200 will go into sleep mode to conserve battery power. The LED indicator will turn off. Note: To wake the RC200 from sleep mode, press any key once. The LED (red light) mode indicator lights up above the current mode selected. • Blinks to indicate that the unit is operating in battery mode. • On solid to indicate that the unit is operating from an external supply. Count Down Timer Mode Select Use to initiate a count down timer from a set value to zero. Press once to enter mode. Press and hold for 3 seconds to program time. Count Up Timer Mode Select Use to initiate a count up timer from zero to a set value. Press once to enter mode. Press and hold for 3 seconds to program time. Stop-Watch Mode Select Use to start a timer from zero with no set point. The display/count stops at 23:59:59 after 24 hours. Press once to enter mode. Press and hold for 3 seconds to program time. Clock Mode Select Use to view the clock time. Press once to enter mode. Press and hold for 3 seconds to program time. Up Arrow – Increment Use to increment the value of the currently selected digits Press once to increment by 1 (one) Press and hold to increment rapidly. Down Arrow – Decrement Use to decrement the value of the currently selected digits Press once to decrement by 1 (one) Press and hold to increment rapidly. Restart – Use to Stop the current timing sequence and re-initialize to the last set value. Play/Pause Use to start or initiate a timing cycle. Use to pause and/or continue a timing cycle. Use to advance forward to the next set of digits while programming the timer value. PROGRAMMING Select the desired mode by pressing one of the four mode select keys. The LED indicator above the mode key will light indicating the current mode of operation. Enter/program the desired time/timer value while viewing the front LED display of the clock. Select Display MODE Enter Program Mode to Set the Time/Timer Sequence • Press and Hold the desired mode key for 3 seconds to enter the program mode. Set Hours + Set Minutes • • key once to accept Start the timing sequence by pressing the • Play/Pause key once. The timing sequence may be paused by Pause pressing the Play/Pause key once. The timing sequence may be resumed by Resume pressing the Play/Pause key once. The clock display will flash 3 (three) times to indicate that the timing sequence is complete. Sequence Complete The timing sequence may be stopped and/or reset to the start point by pressing Restart Sequence + Problem: The RC200 unit does not power up when using a 6 conductor, 6P6C data/power cable. Answer: If the above items do not correct the problem, the internal fuse of the clock, which allows for powering the RC200, may have blown. OPERATION Start Sequence Answer: The RC200 may be in sleep mode after being left inactive for 1 hour. Press any button on the RC200 to wake the unit from sleep mode. Press Play/Pause key once to accept the value and advance to the MM (minutes) digits. The time is now programmed. The clock display will no longer flash the digits. Program Complete Answer: Check batteries. Replace with new batteries. Answer: Ensure that the power to the clock is turned ON. The RC200 requires that the clock be powered in order to draw power. Press Play/Pause the value. + Communications: Type: RS-485 Connection: RJ12 Cable: (works with standard flat phone cable) Length (max) 500 ft (152 m) DATA only 4P4C, 4 conductor DATA & POWER 6P6C, 6 conductor Enter the desired HH (hours) using the UP/DOWN arrow keys. Enter the desired SS (seconds) using the UP/DOWN arrow keys. Set Seconds Problem: The RC200 unit does not power up when using a 4 conductor, 4P4C data cable. The mode indicator will blink once and the front LED display of the clock will flash the HH (hours) digits. Press Play/Pause key once to accept the value and advance to the SS (seconds) digits. + SPECIFICATIONS Answer: Check that the cable is connected to the proper port on the clock. • If using a TCD series II clock, the cable must be connected to the DB9 connector labeled “Control” using the DB9 to RJ12 adapter supplied. • If using an NTD series II clock, the cable must be connected to the RJ12 port labeled “RS-485”. Enter the desired MM (minutes) using the UP/DOWN arrow keys. • TROUBLESHOOTING the Restart key. Then, Press the Play/Pause to start the sequence. key once • You may continue to use the RC200 by switching to the battery power or by using an optional external AC:DC power supply. • Or, you may return your clock for service. Contact technical support at Masterlclock. support@masterclock to return the clock for repair. Note: the clock has no user serviceable parts inside and must be returned for service. Physical: Size Weight 3.11”x4.615”x 0.975” (7.9cm x 11.7cm x 2.47cm) 6 oz (170 g) ; batteries installed Batteries: External DC input: Power Consumption (2), AA, Alkaline Recommended 9-28VDC, center pin + 18mA, at 12VDC Power: Environmental: Operating Temperature Storage Temperature Relative Humidity 0°C to +40 °C -40 °C to +70 °C up to 90%, non-condensing@25 °C PRECAUTIONS: • Do not immerse any part of this unit, power &/or data cord or plug in water or other liquid. • Do not operate this device with a damaged data &/or power cord or plug • Use this device only for its intended use and only with intended equipment. • Do not use this device on wet or hot surfaces, or near a heat source. • Do not connect this device to home telephone or business phone lines Problem: The RC200 cannot be powered by my NTD or TCD clock ; or when operating with an alternate supply such as batteries or optional external AC:DC supply, the clock cannot be controlled by the RC200. DISCLAIMER The information contained in this document is subject to change without notice. Masterclock, Inc. (hereinafter MC) makesno warranty of any kind with regard to this material, including, but not limited to, the implied warranties of merchantability and fitness for a particular purpose. MC shall not be liable for errors contained here in or for incidental or consequential damages in connection with the furnishing, performance, or use of this material. See important limited warranty information at the end of this document. Answer: Check that you are using a Masterclock NTD or TCD series II model digital clock. Previous versions of the NTD or TCD clock cannot power or communicate with the RC200. You may be able to upgrade your clock to work with the RC200. The serial number label of your unit will help identify the model type. Please contact technical support for additional information. [email protected] CONCERNING THE ACCURACY OF THE TIMER Depending on many factors beyond the control of MC, the signals that are provided by and received from the RC200 are subject to interference, noise, loading effects and other influences that could cause the RC200 or the attached clock (s) to provide erroneous time and/or date information and, under some conditions, could prevent it from providing time/date information. It is the responsibility of the user to determine the adequacy and suitability of this device for the intended use. Problem: I programmed the mode and the clock timer, but the TCD clock unit periodically reverts to clock mode or the timer of 15 seconds. Answer: This is normal operation if the clock has experienced a power cycle. You have likely powered off the clock or have had a power failure. The TCD clock will not retain the mode or timer values thru a power cycle. You can set the default display mode of the TCD clock using the DIP switches on the rear of the unit. The unit will read the switch settings upon power up and set the display accordingly. Please consult the user’s manual for the TCD clock for details Note: The default value for the timer which has been pre-programmed into the unit is 15 seconds. This has been designed for use by broadcasters to time out of a 15 second commercial. Problem: I was running a timer sequence in count-up [count-down] mode. When I pressed any of the mode keys to set another timer sequence, the currently running timer sequence stopped. Answer: This is normal operation. The RC200 can run or set/program only one timer sequence at a time. You cannot con-currently program another timer sequence while the current sequence is running or paused. When pressing any of the mode keys, the currently running sequence will be stopped and set to the initial count value. Allow the currently running sequence to complete before changing modes or programming new timer values. LIMITED WARRANTY This Masterclock, Inc. (hereinafter MC) product warranty extends to the original purchaser. MC warrants the RC200 against defects in materials and workmanship for a period of one year from date of sale. If MC receives notice of such defects during the warranty period, MC will, at its option, either repair or replace products, which prove to bedefective. Should MC be unable to repair or replace the product within a reasonable amount of time, the customer's alternate remedy shall be a refund of the purchase price upon return of the product to MC. This warranty gives the customer specific legal rights. Other rights, which vary from state to state or province to province, may be available. Exclusions The above warranty shall not apply to defects resulting from improper or inadequate installation or maintenance by the customer, customer-supplied software or interfacing, unauthorized modification or misuse, operation outside of the environmental specifications for the product or improper site preparation and maintenance (if applicable). Warranty Limitations MC MAKES NO OTHER WARRANTY, EITHER EXPRESSED OR IMPLIED, WITH RESPECT TO THIS PRODUCT. MC SPECIFICALLY DISCLAIMS THE IMPLIED WARRANTIES OF MERCHANTABILITY OR FITNESS FOR A PARTICULAR PURPOSE. In any state or province which does not allow the foregoing disclaimer, any implied warranty of merchantability or fitness for a particular purpose imposed by law in those states or provinces is limited to the one-year duration of the written warranty. Exclusive Remedies THE REMEDIES PROVIDED HEREIN ARE THE CUSTOMER'S SOLE AND EXCLUSIVE REMEDIES. IN NO EVENT SHALL MC BE LIABLE FOR ANY DIRECT, INDIRECT, SPECIAL, INCIDENTAL, OR CONSEQUENTIAL DAMAGES, WHETHER BASED ON CONTRACT, TORT, OR ANY OTHER LEGAL THEORY. In any state or province which does not allow the foregoing exclusion or limitation of incidental or consequential damages, the customer may have other remedies. COPYRIGHTANDACKNOWLEDGMENTS Copyright © 2006 Masterclock, Inc. All rights reserved. Masterclock, Inc. 2484 West Clay St. St .Charles, MO 63301 U.S.A. The information in this guide is believed to be correct as of the date of publication. However, our policy is one of continuous development and so the information is subject to change without notice, and does not represent a commitment on the part of Masterclock, Inc. Masterclock is a trademark of Masterclock, Inc. All rights reserved. This guide was produced by Masterclock, Inc. http://www.masterclock.com