1
User manuaI
βefore
you turn the app丨 iances on,p|ease read the userIs manua|carefu丨
and keep itforfuture reference‘
y,
丨
Contents
lMP0RTANT¨
¨¨¨¨¨………………¨¨¨
…
1
sAFETY NOTICE
1
¨¨…¨¨¨……¨ ¨
¨¨¨¨¨…………………………¨¨¨
UsE REsTRICTl0Ns
DEsCRIPTlON
sUPPLlED C0NTENTs
………………………………
… ……
……………………… …………………… ¨ ¨
…………………………………………… ………¨¨¨¨¨¨¨¨………¨……… 4
sPEClFlCATION¨ ¨¨¨¨¨¨¨
4
¨¨¨¨ ¨
GUlDE0F0PE RATI0N
¨¨¨¨…………… …
1 Battery charging ¨ ¨¨¨¨ ¨¨ ¨¨……… …… ¨ ¨
2j Using the product
2
¨ ¨¨ 3
¨¨¨¨¨¨
¨¨¨¨¨……………………… 5
¨ ¨¨… …
¨
¨¨ …¨¨¨…¨ ¨… …… ¨¨¨ ¨¨ ¨¨
¨¨ 5
¨¨¨ 6
3,Display defin"ion・ ¨………… …¨ ¨¨¨¨¨¨…………………………………… ¨¨¨¨¨¨¨ 7
4 0peration of docking station
8
5 0peration of space isolator
9
6 Rem° te contro|paneI
CLEANlNG AND MAlNTENANCE
10
¨¨¨¨¨¨¨¨ ¨¨¨¨¨…………………¨¨¨¨¨¨……・
11
1 RemovaI,insta"ation and cleaning ofthe dust container ¨¨ ¨¨¨¨ ¨¨ ¨ ¨
2 Cleaning the fan motor ¨ ¨¨ ¨¨……………¨¨
¨¨ ¨… …………¨¨¨ ¨
…… 11
3,Cleaning and replaCe the f"ter
4, Usingthe mop
¨¨¨¨¨ ¨
11
11
¨…………………… ¨
¨¨ ¨¨¨¨……… ¨ ………… 12
5, Removal and insta"au° n。 fthe main brush ¨ ¨¨ ¨¨ ¨¨ ¨ ¨¨¨ ¨¨ ¨ … … 12
6.Removal and insta"ation ofthe side brush ¨¨¨¨¨¨¨¨…………………¨…………… 13
REPLACEMENT OF BATTERY
14
1 Battery replacement ofthe Cleaner ¨¨¨¨ ¨ ¨ ¨¨ ¨… ………… ¨
2.Battery replacement of space Isolator
TR0UBLEsHooTING
¨¨¨¨ ¨…………¨¨¨¨¨¨ ………
………
14
…¨
14
¨¨¨¨¨……¨ ¨¨¨¨¨¨¨¨¨¨¨¨¨……¨…¨¨……………………
15
I铷
● This product contains Ni-M H battery,do notincinerate ba1tery or eXpose to high
p0RTANt
temperature,asthey may eXplore
● lA/hen the battery packis notin use,keep away from other metal objects,such as∶
Please read aH user manual before you use
Warning:Use the product onIy as described in this manua1fa"ure to fo"ow a"
instructions listed beIoW may resuk in electric shock,fire and`or serious injury.
● Do nottake apart any accessories,ihcluding remote control and spaCe isolator 0nIy use
acement parts or accessories provided orrecommended by the manufacturer
● This productis designed for household use Do not use tin industria|surroundings or
outdoors!
● The appⅡ ances must be disconneCted from the lη ains supply when removing the battery
● ln an emergency s"uation contact professional help immediately
● Repairs should be carried out by a service agent or a su"able qua"fied person in
accordance with releVant safety regulations Repairs by unqua"fied persons could be
dangerous
● DOn’ t use this product on Water ground surface
I鼯
one ternη ina丨 to anothe∴
● The battery must be removed from the app"ance before itis disCarded
● The battery is to be disposed of safety
Attention:
rep丨
paper
c"ps,cons,keys,na"s,screVVs or other sma"m eta|objects that can make connection from
Keep itfor future reference
● 0n!y use replacement parts or accessories proVided orrecommended by the manufacturer
罅衤灬娴姆冖
-usE∷
● This ρroduct contains a rechargeable battery "is charged by provided charging deVice
R庄 s卞 良iC亍 :0Ns
This produCt only used W"h DC24∨ 500mA adapter
● ⊙nly forindoor use,do not use outdoors or on balconies
● DO notusethe app"ancesif any partis damaged or defectiVe
● This app"ance is notintended for user by persons(including chⅡ
physica丨
dren)vvith red uces
,sensory or mental capab""ies,orlack of experience and knowledge,unless they
● Device is not a toy,do nots"or stand on it,sma"ch"dren and pets should be supervised
vvhen the robotis Cleaning
have been giVen superVision orins】 ruction concerning use ofthe app丨 iances by a person
● DO not pick up anything thatis flanη mable,burning or smoking
responsible fortheir safety
● Do not use this device to pick up anything wet
● Ch"dren must be supervised to ensure thatthey do not play with the product
● Do not use withlong-p"ed carpets
● Before connecting this productto the wa"socket,make surethe main Vo"ageisthe same
as that stated on the rating p|ate
● Keep the charge powercord aⅥ
`ay from hotsurfaces and sharp edges
● NeVer use accessories,do not aItemptto use the aCCessories Ⅵ
`ith any other product nor
attemptto charge this product with anothρ r charge
● Before use,checkthe charge cord forsigns ordamage or ageing,"is forbidden to use the
productif"has a damaged powercord or plug
● Never use the productifyou have wet hands orfeet
● Do not spray the product With water or any other"quid DO not put water or any other"quids
into the product DO notsubmerge the productin Water orin any other"quid
● This productis designed for household use,do not use itin industrial surroundings or
outdoors
● store in a dry place always
● Ifthe productis being used,do not block the airinflovv and outflow openings,blocked air
vents can cause oVerheating and motordamage
● Do not vaCuum large pieces of paper or plastic bags,they can eas"y clog the app"ances
● Never use the vacuum cleaner Withoutfilters orthe dust container being inserted
● Using a chargerfronη a different product may cause a risk offire
-1—
-2~
圄
n
tec°
m°
R
●0
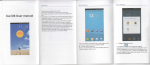
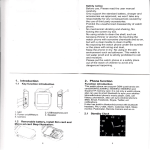
Vacuum cleaner
0
DOCking station
Adapter
User manual
Battery Type
144∨ DC,Niˉ MH1700mA
Θ Θ
Charge output
24W
Charge input
AC100ˉ 240V
NOise IeVel
≤ 58dB
First charging tirne
1 Infrared sensor
9POWersw"ch
2Handle
10,Main ROtating Brush
NOrmal charging time
8HOurs
4¨ 5HOurs
3 AutomatiC charging contacts
4 LED D∶ splay
11 Button of dust container
VVOrklng time
60¨ 90h/lin
12Moρ &VaCuum lnlet COver
Battery for space isolator
5Bumper
13 Battery Charger socket
14 Dust container
Dust container capacity
#1(LR20x2)
330mI
Remote Control distance
≤ 5m
15Rechargeable Battery
Unit sizO
⑦34Cmx85cm
6 1/Va"sensor
7step sensors
8side Brush
16U∨ Lamp
-3_
-4—
赏
囊
事
∶
∶藩
Il,I|∶ I,,奋
1,Battery charging (ManuaI charging and Automatic charging)
ll丨
l|
2.Using the product
Before using,ρ ick up objects like clothing,loose papers,pu"coros for b"nds or curtains,
povver cords,and any frag"e objects as they may entangle with cIeaning brushes
Manual charging
丨
fthe
device passes oVer a powercord and dragsit,there is a chance an object could fa"off a
Attention!
Charge the battery for8h° urs before first use,and manual charging is suggested when
the firsttime uso.
table or shelf
●Ensure the battery is charged
●Putthe robot cleanerin the room VVhich is needed to be cleaned
● Connectthe
end ofthe adapterto the DC socket on the vacuum cIeaner and it w"lbe
charged directly,see be丨
●Turn on the main poVVer sWitch,don’ tturn it on in front ofthe space isolator signaI Ⅱght
●once turn on the main poVVer sVvitch,command“
ow picture
sML“ button Wi"flash,please press button
untilthe flash stopping
lf you press the button″
L″
during the flashes, the deVice wi"search for dock station and
charge automatica"y, itis for showing how to charge automatica"y funtion purpose
Δ
warning:
High Vo"age!Danger ofinjury
by e|eotHo shock!You must
haVe dry hands before use!
● 0nce the battery is fu"charged,unplug the adapterfrom the socket DO not pu"the power
R/lain power switch
cord,grasp the adapter and pu"to disconnectfrom the socket Then take o矸 terminal of
adapter(DC plug)fr° m vacuum cleaner
Automatic charging
●To startthe robot Cleaner,press one ofthe buttons(sML)t。 choose the desired Cleaning
● FirmIy seatthe docking station on and even surface against a VerticalVVa"
●There
mode
mustnoˇ va"s or cavities in the range of3m from the front ofthe docking station,and
Ⅱkewise O5m must be keptfree along its sides
●The vacuun∩ cleaner Ⅵ
`ould not be able to locate the station ifthe infrared signal sensor was
covered
●In$ertthe adapter end into the DC socket on the docking station(see pic1)
燹
`>_____
鲺
△ №r"nj:
High Vo"age!Danger ofinjury
by eIect"c shook!Υ ou must
haVe dry hands before use丨
● TO
PAUsE cIeaning robot, press one of the command buttons
● TO Resume c丨 eaning robot,press one ofthe command buttons again
● TO Turn off cleaning robot,pressthe main powersw"ch
● First charging time is8hours,then regular charging time is4-5hours
Warning:0nly use a replacement battery as suppⅡ ed by manufacturer.
-5-
-6-
」
2。
DispIay dofin∶ tion
3.operation of docking station
lfthe battery goes flat during the vacuunη ing proCess, the vacuum cleaner wi"automatica"y
locate the docking station so thatthe battery can be charged
④ ⑥ °
0⑧
⑨
Ξ臼唧虞
胃
■■■■■
J|:∶
k《》
Ⅱ。
cIi^RGl"G
Θ
Θ
ρ∶P!ey
n?。 :sp∶ ay
卩
fⅡ ctl??FefinⅢ 。
●
②
③
④
⑤
⑥
⑦
③
⑨
sP0T
spot Working mode
AUT0
M orL Working mode
DOCK
RObotis seeking for docking station
|ˉ
Robotis under c丨
Robotis under charging
gg“
RObot working time
leaVes dock station,
system Press Auto one more tirne to cance|"
s
— Again
press“ Clock” button,the minute icon∶
area is2square metersρ ace,Ⅱ is su"able for spot
cleaning in one certain area “S” working mode,if you
use dock station,product automatica"y charges the
Θ
M
for sma"room“
— Again
press“ Time” button,the minute icon∶
vacuunη ing to be done by using
“
L”
0
L
Then“
∫
VVorking mode,robot keeps running untiI power
weak,if you use dock station,thon cleaner
automatica"y charges the battery and Work again
ltis su"able forlarge room
The vacuum cleaneris in charging,the】 Ve“ ■■■■■”、
ash circulaHy numeral means charging time
^`"1】
(four minute as a un"display)
”
The vacuunη cleaneris fu"charged,the five“ ■■■■■ Wi"fla$h atthe same time,"CO"shows on display
In addition,there is anothertimed working mode,we can setto cIean automatica"y according to the
pre-se⒒ ing time This function need to be set on docking station,p丨
Userintroduction ofthe timed cleaning function(Page8)
-7—
ease refer to the docking station
“ ”
召Ξ wi"sta
ash,setthe currenttime by
r⒒ o刊 ash,setthe current minute
“
+”
or“
-”
“
£
孑
Jrl”
+” or“ -”
buttons
startto刊 ash,in which you wish
wi"sta rt to刊
ash,in Which you Wish
buttons
— After compIeting the time setting,press“ Time” again,“ oFF” vvi"be showed on display,
then press“
product automatica"y charges the battery after Work
”
∶
will start to刊
”wⅢ
日日 ∶
the“ Time” button,the houricon“
Working modθ ,robot cleans for43nη in;"is su"able
’
’
、
闪 Working mode,if you use dock station,
ocr button,the houricon“ JJrf日
— Press
battery after work
“
M”
C丨
● Timo:Pre-setting th0vacuum time∶
Working mode,robot cleans for5min,and working
s”
the“
— Again press“ Clock” button,current day ofthe week Can be se丨 ected by press“
— After completing the settings press the“
Clock” button to be down
POWer,not fu"powerifthe icons flash
“
— Press
by pressing the +” or-” buttons
Robot With error
CAPAClTY
巛
》
”
● Auto:Press Auto button onCe,the icon“ 1磁 。shows on disρ lay,startto automatic cleaning
N
TR0UBLE NR
:is咴
it Wi"flash a"the time(No mattertho battery fu"charged or not)u nt"the cleaner
eaning mode
CHARGING
i∶
《
》
’
蕊’
Ready for Working by press any button
CLEANlNG
iⅡ
Attention:when dock station is Work∶ ng,for battery charging,the icon“
is刊 ashing,
itjust means dock station is in charging procedure,N0T means battery capaCity status,
● Clock:setting currenttime
READY
《
》 心
●lnsertthe adaρ ter end into the DC socket on the docking station(refertO Automatic charging
⒇阳∞5),takethe c ea⒃ r∞ nmdthe∞ ck stat o△ 岫en山 e伽 e"蕊 "刊 Ⅱh atthe朗 me
@
No。
⑩
・¢j由 丨 。
。
|
—
2”
+” ,“ 0N”
shoWs on display,then press“
Tilη e”
to complete the time function
shows on disp|ay
you can cancelthe pre-setting by cut offthe poWer
Attention:
C)If d° ck
station is not fu"Charged or automatic charging time is less than5hours,butthe
pre-setting time is reached,the pre-setting time function cou丨
d notvvork,the pre-set tirne
sha"be more than5hours
C|After finished setting,the docking station can’
● lf
y° u
t be power offbefore vacuum time
have chose Time function,please cancel Auto funCtion,otherwise the Time function
V̌"l not be Workable
C)lt may hapρ en thatthe Vacuum cleaner does notfind the docking station because of
obstacles,a flat battery or because of complex Conditions in a large area
● P|s charge the vacuum cleaner on the docking station、
-8—
″hen setthe vacuum time
4.operation of space isoIator
cleaneris moving
The space isolator can Iimitthe rnovement ofthe Vacuum cIeanerⅥ
The distance between the space isolator and thρ
`hen itis vacuuming to
only a certain area by sending out an infrared signaI and thereby preventing the VaCuum
cleanerfrom entering otherrooms or other p丨
charger should be greaterthan3m° therWise
they could cause each otoerinterference
DO not place the docking station within the signalrange ofthe space isoIator
ace(areas)
5.Remote control panel
③
Power
Cleaning modes
{:}弘 :
sML
Direction button
Ⅲ
叶
1PowersWⅡ ch
2PoWerindicator"ght
3Range setting switch
41nfrared signaltransmi$sion
① .Power switch:press the button to turn on orturn o矸
pic1
② .Powerindicator"ght:ifthe Vacuun∩ cleaneris Ⅵ
`orking properly,the indicator"ght Wi"
f|ash approximately untilthe battery g°
es flat
● 1 0pen the battery cover and then replace the battery (Referto pic1)
2P丨 ace the ρositive and negatiVe poles correctly forfear ofthe damage due to Wrong poles!
(Refert° ρic2)
3Take outthe battery if"was unused for a IOng tirne
③ .Range setting sWitch:
— move the switch tm口
ρositi。 nto seta range of maX8m
— move the switch tonposition to set a range of maX6m
— moVe the sWitch toE position to set a range of max3m
● Before using remote ControI,make sure to turn on the poWer svvitch on robot cleaner
Power:Press powerto turn on the VaCuun1cleaner,if you press again,the vacuum cleaner
WiIl turn off
④ .lnstaⅡ ation ofthe space isolator
Before using spaCe isolator,open the battery compartment coVer and in$ert2batteries(type D)
(notincluded in as accessories),make sure that you adhere to the correct poIarity,otherVVise
the space i$oIator wⅡ l not Work
Direction button:Change the vacuuming direction by V▲
<)
Clean modes:sML,press s All Lto selectthe cleaning model
Attention∶
Place the space isolator atthe entry to a staircase or genera"yinto the doorofa room
You can pIace the spaCe isOIator at a certain location so thatthe Vacuun∩
cleaner stops and
Remote controI and space isolator are working by infrared,it might cause each other
interference,so do notputthem atsame area.
does not moVe oVer certain locations
To ensure thatthe space iso丨 atorVVorks properIy,remove a"possible obstacles from"s vicinity
杩
△
pic2
the space isolator
warning:
YOu mustlocate the space isolator atthe same IeVel on the floor as at which the Vacuum
-9—
-10-
— open the transparent sheet(see pic8), take outthe f"ter(see pic9)
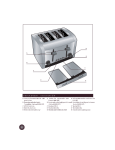
1.Remoˇ aI,insta"ation a"d cIoani"g ofthe dust container
s"de outthe dust container by pressing the button on the Vacuunη
cIeaner(see ρic1and
Pic2),then empty the rubbish
Transparent
sheet
PiC8
— CIean the f"ter by hair dryer or brushes
(see ρic10)
— After cleaning the f"ter,put"backin dust
container, oryou can replace new f"ter
PiC2
PiC1
4.Using the mop
2, CIeaning the fan motor.
—ˉPress the blaCk button on the container,the fan wi"be released automatica"y(see pic3)
— Turn the fan upside down,reIeases2catches and open the cover(see pic4and Pic5)
— Use the cleaning brushes to clean the edge ofvent,
of dustbin(pic2),
Mop hanger
M躔
PiC4
111
Bucklethe Moρ hanger° n the bottom
da"y cleaning mixture to cIean mop
Moρ
崂鲴
…
— StiCkthe MOp on the hanger(pic1) Use
— Putthe dustbin into Vacuun∩ cleaner (pic3)
丿
Atte"tion:
Do not use the rnop on carpets or other
PiC5
uneven surfaces,
Attention∶ DO not use water or wet mop to cIean the fan rnotor∶
3.Cleaning and replace the fⅡ ter
— 0ρ en the hoIder and pu"out a litue (see pic6),take outthe trash.
-ˉ
Use the dust brush to cIean the dust container (see pic7)
pic3
5 Removaland insta"ation ofthe main brush
RemoVal and insta"ation ofthe main brush and the fIoor brush∶
_Push the safety Iatch forward and Iiftthe CoVervvith the rightthumb,then using the Ieft hand
Ⅱ
ftthe rod ofthe middIe brush(see pic1and pic2)
PiC6
PiC7
-12-
~~~Π
-Take outthe main brush and the floor brush
(see pic3)
~~
REPLACEⅢ ENT OF BATTERΥ
-Before closing the cover ofthe bottom part
ofvacuum clean,attach the main brush and
1 Battery repIacement ofthe CIeaner:
the floor brush into the appropriate openings
Ⅱ
D Use fingersto presstWo ends of
battery buckle, take outthe battery
vertiCa"y upWard
Attentio n!
(Referto Figure1and Figure2)
"is Veryimportantto clean the hair on main
brush regular y itˇ vi"improve
c丨
Ⅲ
→
Attention:if need to Change the
the Vacuum
battery,please contact
eaner performance!
the after-sales service
center or professional
FOr what cyclone hair oryarn on main brush,
maintenance stafffor changing
please turn around the main brush to take out
pic 1
逗)P|ease p丨 ace the pos"iVe and negative
or cutit off
pic 2
electrode correctly forfear ofthe damage due to VVrong electrode!
ife When
O)lf"、 Ⅳ
"l be unused forlong,please charge the battery fu"to extend the battery丨
nexttime use,charge iffor8hours to make sure itin the best use state
6.RemovaIand insta"ation ofthe
sIde brush
④ Use the battery proVided orrecommended by manufoCturer,oritIη
(D Battery NO∶ Nl-MHˉ 017144
1 Before replacing the side brush,
ay cause damage
6months
⑥ Warranty∶
2.Battery repIacement of sρ ace lsolator:
日
re|ease the screˇ V onthe main
shaft ofthe side brush
2 Push the side brush to the main
餮
2P|ease place the batteries
捌
(Referto pic1)
黛
isolator and oρ en the battery cover
after cleaning (See Pic1 )
日
1 Unplug the base button ofthe space
shaft and then tighten the screw
Ⅵ
`th correCt
polar"y(+/)(Refert° pic2and pic3)
°
ic3
piC1
unused forlong
pic2
3Please take outthe battery if"was
Attention:
1 Please don1forgetto take outthe battery before discarding the cleaner
2P丨
ease rememberto turn o仟 the svvitch before taking outthe battery from the Cleaner and
space lsolator
3Please don’ t place the battery in the high-telη
perature environment aboVe45° Corin the Water
4Please don’ t exert externalforce to the battery or drop them from high plaCe
5The battery should be recycled、 ⅣⅡh safe disposal P|ease don1discard it free丨 y orthroVv"
into fire for fear of explosion!
6|fthe battery leakage,be careful avoid the|iquid to skin or clothes,use dry mop to cleanif
touched and send the battery to recycle bin or maintenance service,do notthroⅥ
7Please don’ tuse non-rechargeable battery forthe Cleaner
- 13—
-14-
`anywhere
tR0UBL日 sH0oTlNG
1.Theˇ acuunn cleaner keePs backward orturns left(right)duly turn on.
1 1Turn offthe vacuun∩
c丨
eaner
1 2Check thatifthe sensor Ⅵ
c丨
rty;clean the sensorVVith the cotton sWab or soft
`indow is d∶
oth
1 3Check the front bump ifitis not wOrk Press the left,middle and right part ofthe front
bump step by step,ensure they wi"spring back automaticaⅡ y
2.The Vacuun∩ cleaner gets in troubIe as roadbloCk,
21The vaCuun∩
c丨
eaner may getin trouble as roadb丨 oCk when it cleaning,"wi"try to get out
ofthe trouble by"self firstly If not,please he|p the robot cleaner and clean the roadblock
by hand
22The vacuun∩ cleaner maytwine by powercord
23The vacuum cleaner maˇ clog by the edge of dropping curtain or carpet
24Checkifthere are too many roadblocks around the vacuum cleaner
3The vacuun∩ cleanerfe"doWn the stairs
31Genera"y speaking,step sensor could detect8cnη
a""ude difference of mo$t kinds stairs
HOwever,ifthe stair edge is too smooth and evasiVe,or highly reflectiVe,the sensor
detection functions vvi"be Ⅵ
`eek,and please putthe space isOIator here
cleaner
32Clean the c"ffsensors in the front part ofVacuun∩
4,The Vacuum cleaneris not working ortheˇ acuunη ing quaⅡ ty is poor,
41 Turn offthe vacuunη cleaner and take outthe dust oontainer
42 Checkthatthe dust containeris empty,the suction and f"ter are cIean,and thatthe side
brush is Ⅵ
`orking properly
43 Checkthe main brush thatifit was clogged by halr orfibre Clean itthe fiX"baCk
44 Checkthe rubberⅥ
`heelsifthey Were clogged by rubbish
45 Clean the wa"sensorsin the front part ofthe vacuum cleaner
5.lncreased noiseIeVeI When vacuuming
51 Clean the dust container and f"ter
52 Check thatthe main or side brushes are not excessively so"ed
53 Check the suCtion portif"was blocked
54
丨
fthe increased noise level persists,send the Vacuunη
cleanerto an after-sales center
Vi"be refi"ed
、
^`here the lubricantˇ
on:
lfthe fa"ure st"l exist afterthe aboVe check,pIease contactthe afterˉ sales sorVice
Attent∶
center,pr° fessional maintenance staff orthe techniCaI center ofthe company,do not
disassembIe and maintain it by yourself,
-15~