1
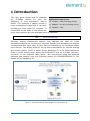
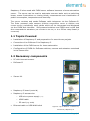
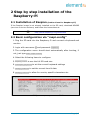
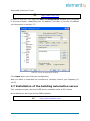
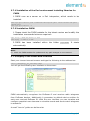
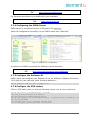
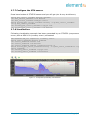
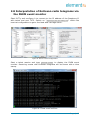
EnOcean Sensor Kit Bringing Home Automation to the Raspberry Pi BY & User Manual Version 1 Dated: 21st May 2014 Revision History: Version Date Description 1.0 22/05/2014 Original Version Table of Contents 1 Introduction ...................................................................... 1 1.1 Topics Covered ............................................................... 2 1.2 Necessary components .................................................... 2 2 Step by step installation of the Raspberry-Pi ..................... 3 2.1 Installation of Raspian (Debian Linux for Raspberry-Pi) ...................... 3 2.2 Basic configuration via “raspi-config”................................. 3 2.3 Software and Firmware update ......................................... 4 2.4 Connecting Raspberry-Pi and the EnOcean-Pi ..................... 4 2.5 Discover the IP address of your Raspberry-Pi ..................... 5 2.6 Remote control of your Raspberry-Pi ................................. 5 2.6.1 Setting up PuTTY ................................................... 5 2.7 Installation of the building automation server ..................... 6 2.7.1 Installation of the Perl environment including libraries for FHEM .................................................................. 7 2.7.2 Installation FHEM .................................................. 7 2.7.3 Display of the FHEM Web Interface .......................... 7 2.7.4 Configuring the FHEM Server .................................. 8 2.7.5 Configure the EnOcean-Pi:...................................... 8 2.7.6 Configure the PTM switch: ...................................... 8 2.7.7 Configure the STM sensor: ..................................... 9 2.7.8 Visualization: ........................................................ 9 2.8 Interpretation of EnOcean radio telegrams via the FHEM ........ event monitor ..................................................................... 10 Appendix 1: Useful Links .................................................... 11 1.1 EnOcean radio modules: ................................................. 11 1.2 element14 Raspberry Pi and accessories: ......................... 11 1.3 Raspberry-Pi ................................................................. 11 1.4 FHEM: .......................................................................... 11 Appendix 2: Regulatory Compliance and Safety Information12 1 Introduction This user guide shows how to integrate the EnOcean Sensor kit with the Applicable Frequencies: Raspberry Pi and EnOcean-Pi add-on 315MHz Asia (excluding China) board. The example is based around a 868MHz Europe (including China) home automation system but it can form the basis of many other IoT projects. It 902MHz USA uses FHEM as the basis of the server but other open systems are also available such as openHAB www.openhab.org Wireless, energy autonomous sensors and switches are ideal for home automation projects as no cabling is required. Sensors and actuators can directly communicate with each other or they can be controlled by an intelligent smart home server. This allows users to set up home automation for remote sensing and remote control via PC or smart phone. Raspberry-Pi is the ideal platform to setup a smart home server where the EnOcean-Pi acts as a bridge (GatewayController) to the EnOcean radio world. We recommend using self-powered switches and sensors from the EnOcean starter kit ESK300/ESK300U or the Sensor Kit for Raspberry-Pi. Figure 1: Home Automation Using Raspberry Pi & EnOcean Pi Page | 1 Raspberry-Pi when used with FHEM server software becomes a home automation server. The server can be used to automate common tasks such as switching lamps, scene illuminations or closing blinds, measurement and visualization of power consumption, temperature and humidity. The server receives and sends EnOcean radio telegrams via the EnOcean-Pi. The Solar powered radio sensors (STM330 temperature sensor & STM320 reed contact sensor) periodically send values which will be interpreted and displayed via the FHEM web interface. Self-powered switches and FHEM send on/off and dim commands to actuators (not included in the kit) or to a PiFace relay board (if connected) 1.1 Topics Covered Installation of Raspberry-Pi and preparation for smart home projects Connection of an EnOcean-Pi to Raspberry-Pi Installation of the FHEM server for home automation Configuration of FHEM for EnOcean switches, sensors and actuators contained in the Sensor Kits 1.2 Necessary components PC with internet browser EnOcean-Pi Sensor Kit Raspberry-Pi board (model B) Raspberry-Pi accessories: o USB micro power supply o HDMI cable o SD card (e.g. 4GB) (~1A) Ethernet cable or USB WLAN stick Figure 2: Top to Bottom - EnOcean-Pi, Sensor Kit, Raspberry Pi Page | 2 2 Step by step installation of the Raspberry-Pi 2.1 Installation of Raspian (Debian Linux for Raspberry-Pi) If the Raspian image is not already installed on the SD card, download NOOBS (New Out of the Box Software) and follow the instructions at: http://www.raspberrypi.org/downloads 2.2 Basic configuration via “raspi-config” 1. Plug the SD card into the Raspberry-Pi and connect a keyboard and monitor 2. Login with username pi and password raspberry 3. The configuration menu should start automatically after booting, if not, just type sudo raspi-config 4. Select the following items to configure: 5. expand_rootfs to use the full SD card size 6. configure_keyboard to set the correct keyboard settings 7. change_timezone to set the correct time & date 8. change_location to allow for country specific characters etc. Figure 3: Raspi-config Menu Page | 3 2.3 Software and Firmware update Prior to updating you need to connect to internet. This can be done in one of two ways: 1. Via Ethernet, plug into the connector and let the Raspberry Pi handle the rest 2. WiFi (if drivers are available), start the GUI (using the startx command) and click on WiFi config. Follow the on screen prompts. Raspian (the Linux operating system) can be updated via APT (Advanced Package Tool). RPi-update: https://github.com/Hexxeh/rpi-update is used to update the firmware (hardware driver) of Raspberry-Pi. In order to have an up to date system (e.g. to recognize the EnOcean-Pi) both updates are required. Get the latest updates of Raspian and Raspberry Pi firmware: sudo apt-get update sudo apt-get upgrade sudo apt-get install rpi-update Then reboot: NOTE: Several shell commands need root (super user) rights; therefore “sudo” is used as a prefix. sudo restart 2.4 Connecting Raspberry-Pi and the EnOcean-Pi 1. Connect EnOcean-Pi on top of Raspberry-Pi board via its connector 2. Disable Linux using the serial port NOTE: As default the serial port of the GPIO interface is used for console debug outputs. In order to use this port for EnOcean-Pi, this feature has to be disabled. Read more about this at: http://elinux.org/RPi_Serial_Connection Page | 4 A script can be downloaded from Github which will automatically adapt boot up settings: https://github.com/lurch/rpi-serial-console 3. Download the script: sudo wget https://raw.github.com/lurch/rpi-serial-console/master/rpiserial-console -O /usr/bin/rpi-serial-console && sudo chmod +x /usr/bin/rpi-serial-console 4. Execute the script: sudo rpi-serial-console disable 5. You can test the connection via the FHEM event monitor (Refer to section 2.8) 2.5 Discover the IP address of your Raspberry-Pi In most cases the IP address is provided via the DHCP server. For remote control via TTY (e.g. via PuTTY) or HTML server connections (FHEM server) the IP address of Raspberry-Pi is required. You can discover the allocated (by the DHCP server) IP address by typing in the following command: ifconfig Example output: You can see that in this example output text the IP address is 192.167.1.121 2.6 Remote control of your Raspberry-Pi If your desktop is too small for an additional Raspberry-Pi display screen and keyboard, remote control of your tiny computer is the best solution. This allows you to access the command line or Linux shell via an SSH client on the PC. 2.6.1 Setting up PuTTY PuTTY is a virtual terminal which can receive and display the working information of the Raspberry Pi. It needs to be configured on your PC before it can communicate with the Raspberry Pi. Follow the steps listed below to ensure correct configuration. Page | 5 Download “putty.exe” from: http://www.putty.org/ to your PC and run it to open the PuTTY Configuration window then configure it as shown below, substituting the IP address (192.168.7.2) for the IP address you discovered in section 2.5 Figure 4: PuTTY Configuration Settings Click Open when you finish the configuration Now you have a command line interface to remotely control your Raspberry Pi via PC 2.7 Installation of the building automation server This example project uses the FHEM server available under a GPL license. More details can be found on the FHEM website: http://fhem.de/fhem.html Page | 6 2.7.1 Installation of the Perl environment including libraries for FHEM 1. FHEM runs as a server on a Perl interpreter, which needs to be installed. sudo apt-get install perl libdevice-serialport-perl libio-socket-ssl-perl libwww-perl sudo apt-get install –f 2.7.2 Installation FHEM 1. Please check the FHEM website for the latest version and modify the installation commands below as required: wget http://fhem.de/fhem-5.5.deb sudo dpkg –i fhem-5.5.deb 2. FHEM has been installed within the folder /opt/fhem. It starts automatically. Note: Check the FHEM website for updates and any path changes in new versions. 2.7.3 Display of the FHEM Web Interface Start your chosen internet browser and type the following to the address bar: http://<Raspberry_Pi_IP>:8083/fhem You will get the following user interface on the screen: Figure 5: The FHEM Web Interface FHEM automatically recognizes the EnOcean-Pi and receives radio telegrams from EnOcean devices. Additionally it generates by default device entities for each new received EnOcean ID. With the user interface you can visualize and configure graphical user elements to visualize events and send control telegrams to actuators. A small “how to” guide can be found at: Page | 7 http://fhem.de/HOWTO.html For German users there is an additional forum available: http://forum.fhem.de/ 2.7.4 Configuring the FHEM Server FHEM server is configured via the configuration file fhem.cfg. Start the configuration file editor via the FHEM menu item “Edit files”. Figure 6: FHEM Server Configuration A reference of FHEM commands for EnOcean can be found at: http://fhem.de/commandref.html#EnOcean 2.7.5 Configure the EnOcean-Pi: FHEM might not recognize the EnOcean-Pi as an EnOcean Gateway-Controller. To fix this you can manually enter following definition: define TCM310_0 TCM 310 /dev/ttyAMA0@57600 2.7.6 Configure the PTM switch: Click on PTM switch and you will get following entries (the ID may be different): define EnO_switch_001396B9 EnOcean 001396B9 attr EnO_switch_001396B9 room EnOcean attr EnO_switch_001396B9 subType switch define FileLog_EnO_switch_001396B9 FileLog ./log/EnO_switch_001396B9-%Y.log EnO_switch_001396B9 attr FileLog_EnO_switch_001396B9 logtype text attr FileLog_EnO_switch_001396B9 room EnOcean Page | 8 2.7.7 Configure the STM sensor: Press learn button of STM330 sensor and you will get (the ID may be different): define EnO_contact_0181FA67 EnOcean 0181FA67 attr EnO_contact_0181FA67 room EnOcean attr EnO_contact_0181FA67 subType contact define FileLog_EnO_contact_0181FA67 FileLog ./log/EnO_contact_0181FA67%Y.log EnO_contact_0181FA67 attr FileLog_EnO_contact_0181FA67 logtype text attr FileLog_EnO_contact_0181FA67 room EnOcean 2.7.8 Visualization: Following visualization example has been generated by an STM330 (temperature sensor) with a HSM 100 (humidity sensor) connected: #ID:0088F03E STM_330 temperatur & humidty sensor define Sensor_0088F03E EnOcean 0088F03E attr Sensor_0088F03E manufID 00B attr Sensor_0088F03E room EnOcean attr Sensor_0088F03E subType roomSensorControl.01 define FileLog_EnO_sensor_0088F03E FileLog ./log/EnO_sensor_0088F03E-%Y.log Sensor_0088F03E attr FileLog_Sensor_0088F03E logtype text attr FileLog_Sensor_0088F03E room EnOcean Figure 7: Temperature/Humidity Visualization Page | 9 2.8 Interpretation of EnOcean radio telegrams via the FHEM event monitor Start PuTTy and configure it to connect to the IP address of the Raspberry-Pi with telnet and port 7072. Switch on “implicit CR in every LF” within the terminal configuration to get a line feed after carriage return. Figure 8: PuTTY Telnet Configuration Start a telnet session and type inform timer to display the FHEM event monitor. Receiving events with EnOcean telegrams will be shown with a time stamp. Figure 9: FHEM Event Monitor Page | 10 Appendix 1: Useful Links 1.1 EnOcean radio modules: http://www.enocean.com/en/enocean_modules/epk-350/ http://www.enocean.com/de/enocean_module/usb-300-oem/ http://www.enocean.com/de/enocean-pi/ http://www.enocean.com/en/knowledge-base/ 1.2 element14 Raspberry Pi and accessories: http://www.element14.com/raspberrypi http://www.element14.com/enocean_pi 1.3 Raspberry-Pi http://www.debian.org/doc/manuals/refcard/refcard.en.pdf http://www.danielspage.de/index.php/technik/raspberry-pi-blog/44enocean-auf-dem-pi http://developer-blog.net/hardware/raspberry-pi-backup/ http://www.datenreise.de/raspberry-pi-wlan-einrichten-edimax/ http://www.mikrocontroller.net/articles/Raspberry_Pi http://pibeginners.com/ftp-server/ 1.4 FHEM: http://fhem.de/fhem.html http://forum.fhem.de/ http://fhem.de/Heimautomatisierung-mit-fhem.pdf Page | 11 Appendix 2: Regulatory Compliance and Safety Information The Sensor Kits are available in several frequency variants: SENSOR KIT 868 (868MHz for Europe, including China) includes: STM 330 / STM3 329 / PTM 210 SENSOR KIT 315 (315MHz for Asia, excluding China) includes: STM 330C / STM 320C / PTM 200C SENSOR KIT 902 (902MHz for US / Canada) includes: STM 330U / STM 320U / PTM 210U WARNINGS: Devices or Modules containing RF components must meet the essential requirements of the local legal authorities. The modules must not be used in any relation with equipment that supports, directly or indirectly, any form of life or with applications that can endanger life or value. Any changes or modifications not expressly approved by the party responsible for compliance may ‘void’ the user’s authority to operate this equipment These modules must not be modified or used outside of their specification limits These modules may only be used to transfer digital or digitized data; Analogue speech and/or music is not permitted The modules must not be used with gain antennas, otherwise resulting in exceeded ERP or spurious emission levels. COMPLIANCE INFORMATION: The Sensor Kit for Raspberry-Pi complies with the relevant provisions of the RoHS Directive for the European Union. WEEE Directive Statement for the European Union In common with all Electronic and Electrical products the Sensor Kit should not be disposed of in household waste within the European Union Components of the modules are considered and should be disposed of as hazardous waste. Alternative arrangements may apply to local jurisdictions. EMC COMPLIANCE STATEMENTS: European Union (EU) Electromagnetic Compatibility Directive Compliance Statement This product is in conformity with the protection requirements of EU Council Directive 2004/108/EC on the approximation of the laws of the Member States relating to electromagnetic compatibility. This product has been tested and found to comply with the limits for Class B Information Technology Equipment according to the European Standards EN 55022 & EN 55024. Page | 12 FEDERAL COMMUNICATIONS COMMISSION (FCC) EMISSIONS COMPLIANCE STATEMENT This equipment has been tested and complies with the limits f or a Class B digital device, pursuant to Part 15 of the FCC Rules. These limits are designed to provide reasonable protection against harmful interference when the equipment is operated in a domestic environment. Operation is subject to the following two conditions: (1) this device might not cause harmful interference, and (2) this device must accept any interference received, including interference that might cause undesired operation. STM320C (315MHz) / STM320U (902MHz) / STM330 (868MHz) – Scavenger Transmitter Modules: These modules have been tested to fulfil the approval requirements for CE and conform to the R&TTE (EN 300 220) EU-directive on radio equipment (for STM330) and (CFR-47 Part 15) FCC (for STM320C / STM320U) based on the built-in firmware. PTM200C (315MHz) / PTM210U (902MHz) / PTM210 (868MHz) – Pushbutton Transmitter Devices: These modules have been tested to fulfil the appropriate approval requirements for CE and conform to the R&TTE (EN 300 220) EU-directive on radio equipment and FCC (CFR47 Part 15). INDUSTRY CANADA EMISSIONS COMPLIANCE STATEMENT This Class B digital apparatus complies with Canadian ICES-003. Cet appareil numérique de la classe B est conforme à la norme NMB-003 du Canada Compliant with: www.element14.com/legislation Premier Farnell UK, 150 Armley Road, Leeds LS12 2QQ, United Kingdom Revision 1.1 April 2012 Page | 13