1
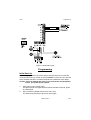
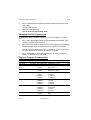
9448
Installation and User Guide
Compatible Equipment
9040
660
Internal Sounder
Speech communicator
496327 Issue 1
1 of 6
9448
INTRODUCTION
The 9448 is a 3 zone control panel with separate Entry/Exit and PA zones,
designed specifically for domestic installations. The control unit PCB is built
into a polycarbonate box with keypad and eight indicator LEDs on the front of
the lid.
Technical Specification
Dimensions
Weight
h x w x d 212 x 212 x 68mm.
Approx 1.1kg (without stand-by battery).
Power Supply
System Power Supply
Quiescent Panel Power
Standby Battery
230VAC (Ambient Temp. 20 º C).
70mA nominal.
12 Volt, 2.1AH rechargeable lead-acid, Gel
Type battery.
Outputs
Bell, Strobe, and O/P are open collector transistor outputs.
Bell, Strobe
500mA Max.
AUX (for detectors)
300mA, 12VDC.
Communicator Outputs
PA, Intruder*.
Outputs
PIR Set Latch/Shock Sensor Reset.
LS
9040 (1 max).
Fuses
F1 - Battery
F2 - 12V AUX
2A Quick Blow.
1A Quick Blow.
Caution: When replacing fuses use the ratings quoted above.
* The control panel has none of the required software functions to allow it to
conform with the required standards for remote signalling in the UK.
Scantronic recommend that you use this system for "bell only" installations.
Wiring
Figure 1 shows the layout of the 9448 PCB and its connector.
2 of 6
496327 Issue 1
9448
Programming
Figure 1. 9448 PCB Layout
Programming
Initial Start Up
Before applying power to the control panel, ensure that all zone circuits are
connected (link out any circuits not used). DO NOT connect the 12V terminal
to the external sounder or 12VAUX terminals to the detectors at this stage.
Caution: You may damage the panel if you connect bell and AUX power
before you power up the system.
1.
2.
Apply mains to the control panel.
The green power LED lights and the internal sounder will sound. Ignore
any other lights.
Key-in the factory default user access code: 1234.
The internal sounder stops. Ignore any other lights.
496327 Issue 1
3 of 6
Changing Default Programming
3.
4.
9448
Key-in 0 then ENTER followed by the factory default engineer access
code: 7890.
The Day LED goes off.
Open the control panel lid.
You are now in programming mode.
Changing Default Programming
To change the factory defaults, the panel must be in programming mode.
Then:
1. Key in a two digit programming command followed by "ENTER". (See
"Engineer Program Command List".)
2. Key in the correct digit for the option you want, and then press ENTER.
The panel beeps twice to show that it has accepted the command.
The panel gives a single error tone if you enter an incorrect command
(or if you close the lid). Re-enter the correct command.
3.
Key in "99 ENTER" to leave programming mode when you have finished. You will then be in user mode.
Engineer Program Command List
To change:
Engineer Code
Key-in: Followed by:
Notes
20 ENTER new code ENTER 4 digits
User Code 1
Zone 2 Entry
Route
21 ENTER new code ENTER 4 digits (see note 1)
36 ENTER 0 ENTER
Normal Alarm
1 ENTER
Entry Route
Auto Re-Arm
40 ENTER 1 ENTER
4 ENTER
42 ENTER 1 ENTER
2 ENTER
3 ENTER
4 ENTER
Never rearm
Rearm three times
90 seconds
3 minutes
10 minutes
20 minutes
y
43 ENTER 1 ENTER
2 ENTER
3 ENTER
4 ENTER
44 ENTER 1 ENTER
2 ENTER
3 ENTER
4 ENTER
20 seconds
1 minute
2 minutes
4 minutes
10 seconds
30 seconds
1 minute
2 minutes
y
50 ENTER 0 ENTER
1 ENTER
SAB
SCB
y
Bell Duration
Entry time
Exit time
Bell Trigger Type
4 of 6
496327 Issue 1
Defaults
7890
1234
y
y
y
9448
Leaving Programming Mode
Prog O/P
51 ENTER 0 ENTER
1 ENTER
y
PIR set latch
Shock reset
y
Zone 1 in Part Set 52 ENTER 0 ENTER
Normal Alarm
1 ENTER
Entry/Exit
Walk Test
97 ENTER Trigger detectors. Press OMIT to exit test.
Leave Program
99 ENTER
(See note 2.)
Notes:
1. The end user may change the user codes (see separate user guide).
2. If the internal sounder activates when you use this command then check the
lid tamper, bell tamper, and the global zone anti tamper.
Leaving Programming Mode
1.
2.
Connect the battery.
Complete the connections between the 12V terminal and the external
sounder, and 12VAUX and the detectors.
Note: The SAB module in the external sounder will continue to ring until the hold off
supply is connected, or until the bell cover lid tamper switch is closed.
3.
4.
Close the panel lid.
Key in "99 ENTER" to leave programming mode.
You are now in user mode.
To Re-enter Programming Mode
You can re-enter programming mode at any time when the panel is in the
unset mode:
Key-in 0 then ENTER followed by the engineer access code.
Open the control panel lid.
You are now in programming mode.
Restoring Factory Defaults
The control panel can retain all programmed information and access codes if
both mains and battery power fail. When power is restored the panel will
simply need resetting with the customer or engineer's access code.
If the installer wants to return the panel to the factory default settings, then:
1. Power down the control panel, mains and battery.
2. Locate the pair of Molex pins marked 'RST' near the microcontroller.
3. Place a small screwdriver blade to short between the 'RST' pins.
4. With the blade still across the pins, apply battery power then mains.
The system loads the factory default user and engineer's access codes.
496327 Issue 1
5 of 6
Eningeer Walk Test
5.
6.
7.
8.
9448
Remove the screwdriver blade.
Key in 1234.
Key in 0 then ENTER followed by 7890.
You must now reprogram the system.
Engineer Walk Test
Allows the engineer to test all devices on the system.
1. Enter programming mode.
2. Key in "97 ENTER".
The panel gives a continuous tone.
3.
Open and close each detector contact in turn.
When a detector contact is open the panel gives an interrupted tone and
flashes the zone LED.
4. Press OMIT to stop the walk test.
Note that the Engineer's walk test allows you to test all zones including PA
zones, zone tampers, and panel and bell tampers. The user's walk test does
not allow this.
User Commands
Set/Unset System
User code
Omit zone/Part set
2 + OMIT and/or 3 + OMIT + User code
Test Bells
4 + ENTER + User code
The system sounds the internal sounder for three
seconds, followed by the bell and strobe for three
seconds.
Walk Test
5 + ENTER User code
Key in User code to end test
Change User code
6 + ENTER + current user code
new user code + ENTER
6 of 6
496327 Issue 1