1
E
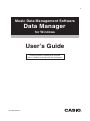
Music Data Management Software
Data Manager
for Windows
User’s Guide
Use this manual in combination with the
User fs Guide that comes with the Instrument.
DATAMANAGERE1C
Contents
Introduction .....................................................................................3
What is Data Manager? ........................................................................................................ 3
Minimum Computer Operating Environment ..................................................................... 4
Precautions ........................................................................................................................... 5
Getting Ready ..................................................................................6
Using Data Manager........................................................................7
Starting Up and Quitting Data Manager.............................................................................. 7
Operation Window and Data Folders .................................................................................. 8
Saving Instrument Data to a PC ........................................................................................ 12
Copying PC Data to the Instrument .................................................................................. 13
Deleting Instrument Data ................................................................................................... 14
Error Messages .............................................................................15
2
Introduction
What is Data Manager?
Data Manager is music data management software that you can run on your PC to perform the following three tasks.
z Save Instrument* data to a PC (page 12).
z Copy PC data to the Instrument* (page 13).
z Delete Instrument* data (page 14).
* “Instrument” in this User’s Guide refers to one of the following CASIO electronic musical instruments.
CTK-4000, CTK-5000, LK-205, LK-270, WK-200, WK-210, WK-500, CDP-200R
• Data Manager does not support saving of songs added to the Instrument’s Song Bank (User Songs) to a PC.
• Do not use other applications or disconnect the USB cable while Data Manager is running. Doing so not only will
cause Data Manager to operate abnormally, it also can corrupt data and cause malfunction of the Instrument and/or
your PC.
3
Minimum Computer Operating Environment
■ Operating System
Windows® XP (SP2 or later)
Windows Vista®
■ Display Settings
Resolution : 1024 × 768 pixels or greater
Color
: Medium (16 bit) or greater
• The above minimum environment does not guarantee proper operation of this software.
4
Precautions
• All rights to the software that accompanies this documentation (Software) revert to CASIO COMPUTER CO., LTD. (CASIO).
You are not allowed to modify this Software either in part or its entirety without permission from CASIO.
• Distribution of any version of this Software created by altering the structure, content, or any other aspect of the original
Software is prohibited.
• This Software is provided “as is,” and CASIO makes no express warranty concerning the suitability of the Software functions
for any particular purpose. In no event shall CASIO be liable for any damages whatsoever (including, without limitation,
damages for loss of profits, business interruption, loss of information) arising out of the use of or inability to use this
Software, even if CASIO has been advised of the possibility of such damages.
• You are granted the right to use this Software free of charge. You are also granted the right to distribute this Software freely,
as long as such distribution is not for profit.
• Note that CASIO will not provide any support for this Software or its functions.
• The contents of this Software are subject to change without notice.
• Actual PC screen contents may differ from the screen shots shown in this manual.
5
Getting Ready
1. Connect the Instrument to your PC in accordance with the instructions in the Instrument’s
user’s guide.
• Be sure to follow the instructions in the Instrument’s user’s guide carefully. Incorrect connections can make data
copy and save impossible.
• Connect only one Instrument at a time. Data Manager will not operate correctly if multiple Instruments are
connected.
2. Download the Data Manager software file from the CASIO website to your PC’s hard disk.
3. Double-click the file you downloaded.
• This will expand the compressed file and create a file named “CASIO DataManager50” on your PC’s hard disk. This
completes the preparation phase for running Data Manager.
6
Using Data Manager
Starting Up and Quitting Data Manager
To start up Data Manager
1. Make sure that none of the following operations are being performed on the Instrument
before starting up Data Manager.
Also, never perform any of the following operations while a data communication operation is being performed between your
PC and the Instrument.
Data copy, save, and delete with Data Manager will not be possible if any of the following operations are being performed
on the Instrument.
• Record operation (Recorder)
• Auto Accompaniment editing operation
• Sampling operation
• Split point change operation
• SD memory card save, copy, or delete operation
2. Quit all other applications running on your PC.
Data Manager will not run correctly if any other application is running on your PC.
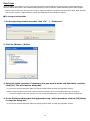
3. Double-click the folder named “CASIO DataManager50” (page 6).
• This will open the folder.
4. Inside the folder, double-click “DataManager.exe”.
• This will start up Data Manager and display its operation window.
• Starting up Data Manager will create a setup file in the same location as “DataManager.exe”. Make sure to keep the
setup file in the same location as “DataManager.exe”. Storing them in different locations will cause Data Manager
operation problems.
To exit Data Manager
Click the close (×) button in the upper right corner of the window, or select the “Exit” command on the “File” menu.
7
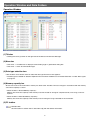
Operation Window and Data Folders
Operation Window
(1) Title bar
• Clicking the close (×) button on the right side of the title bar will exit Data Manager.
(2) Menu bar
• Click “File” 3 “Preference” to display the data folder (page 11) preference dialog box.
• Click “File” 3 “Exit” to exit Data Manager.
(3) Data type selection box
Click the down arrow button and then select the data type from the list that appears.
• The data types available for selection depend on the Instrument model that is connected. See note *2 under “Data Types”
on page 10.
(4) Memory capacity bar
Shows how much of the Instrument’s memory has been used. The title of this bar changes in accordance with the memory
area whose capacity is shown.
• When the title is “Shared Memory Capacity”:
Memory bar shows the capacity of the memory area that shared for storage of sampled sounds, user songs, and user
rhythms.
• When the title is “Recorder Memory Capacity”:
Memory bar shows the capacity of the memory area for storage of songs recorded on the Instrument.
(5) PC toolbar
: Reload button
Click this button to refresh the PC data file list (6) with the newest information.
8
(6) PC data file list
This is a list of the data stored in the PC data folder (page 11).
• See “Data Types” on page 10 for information about the meanings of the icons that appear to the left of the file names.
(7) Instrument toolbar
This toolbar shows the model name of the connected Instrument (WK-500 in the sample) on the left. The following
describes the functions of the two buttons on the right.
: Delete button
Use this button to delete (page 14) the data selected in the Instrument data file list (8) from Instrument memory.
: Reload button
Click this button to refresh the Instrument data file list (8) with the newest information.
(8) Instrument data file list
This is a list of the user data stored in Instrument memory. See “Data Types” on page 10 for information about the meanings
of the icons that appear to the left of the file numbers.
• The SMF (Standard MIDI File) file name (up to eight characters) is displayed here when copying an SMF from your PC to
Instrument memory.
(9) Protect mark area
“P” is displayed in this area for any user area in Instrument memory that is protected.
(10) Copy (
) button
Copies the data selected in the PC data file list (6) to Instrument memory (page 13).
(11) Save (
) button
Saves the data selected in the Instrument data file list (8) to your PC (page 12).
(12) Data folder path bar
Shows the location of the data folder (page 11) on your PC.
9
■ Data Types
Listing (Icon and Name)
Data Type
USER RHYTHM
User rhythms*2
USER SONG
User songs
RECORDED SONG
Recorded songs*1
RECORDED SONG (PLAY-ALONG)
Songs recorded along built-in song play*1
SAMPLED SOUND (MELODY)
Sampled melody sounds
SAMPLED SOUND (DRUM)
Sampled drum sounds
REGISTRATION
Registration setups*1 *2
USER SCALE MEMORY
User scales*2
ALL DATA
All data*1
*1 : This data can be copied only to the same model Instrument that originally created the data.
Registration data created with a CTK-5000, for example, can be copied to a CTK-5000 only.
*2 : When an Instrument model that does not support a particular type of data is connected, the unsupported data type is
indicated in the data type selection box as shown below. Never try to select an unsupported data type.
Example: When a model that does not support storage of user scales is connected
Indicates a non-supported data type.
10
Data Folder
The data folder is the location on your PC that contains the data to be copied to Instrument memory using Data Manager.
The initial default data folder is the “CASIODataManagerData” located inside the “CASIO DataManager50” folder (page 6).
• Always make sure that any data you plan to copy to Instrument memory is located in the current data folder. Note, however,
that any data stored in a folder inside the current data folder will not be available for copying.
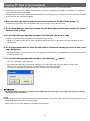
■ To change the data folder
1. On the operating window menu bar, click “File” 3 “Preference”.
2. Click the [Browse...] button.
3. Select the folder (and drive if necessary) that you want to be the new data folder, and then
click [OK]. This will close the dialog box.
• If you want to close the dialog box without changing the data folder, click the [Cancel] button instead.
• Select a folder and drive whose path* contains only the characters shown in the table under step 4 on page 12.
* Character string that indicates a location on a PC. The Data Folder path is shown on the Preference dialog box.
4. On the Preference dialog box that appeared in step 1 of this procedure, click the [OK] button
to close the dialog box.
• If you want to close the dialog box without changing the data folder, click the [Cancel] button instead.
11
Saving Instrument Data to a PC
Use the procedure below to save user data* from Instrument memory to your PC.
* Sampled sounds and recorded songs. See the user’s guide that comes with the Instrument for details.
1. On the Data Manager operation window, use the data type selection box to select the type of
data you want to save.
• Note that user songs (songs added to the Song Bank) cannot be saved to a PC. Never try to select user songs as the
data type here.
2. Use the Instrument data list to select data you want to save.
• Select only one data item. Data items can be saved one-by-one only.
3. On the Data Manager operation window, click the save (
) button.
• This causes the “File Name:” dialog box to appear.
4. Enter the file name to assign to the data when it is stored on your PC.
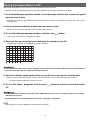
• The following characters are supported for input in a file name.
0
a
k
u
E
O
Y
{
1 2
b c
l m
v w
F G
P Q
Z S
} @
3
d
n
x
H
R
&
~
4
e
o
y
I
S
_
`
5
f
p
z
J
T
'
6
g
q
A
K
U
(
7 8 9
h i
j
r s t
B C D
L M N
V W X
) - ^
• Use only the characters shown above. Inputting any character other than those above will result in malfunction of
the saved data (file) when it is copied to Instrument memory.
5. Select the location (folder and/or drive) on your PC where you want to save the data.
• Select a folder and drive whose path* contains only the characters shown in the table under step 4, above.
* Character string that indicates a location on a PC.
6. On the “File Name:” dialog box, click the save (
PC.
) button to start save of the data to your
• Do not operate the Instrument or disconnect the USB cable while data save is in progress. Doing so can corrupt
data stored on your PC.
• Do not operate the Instrument while the “File Name:” dialog box is displayed.
• Refer to page 15 if an error (ERROR) occurs during this operation.
12
Copying PC Data to the Instrument
Use the procedure below to copy data (file)*1 stored on your PC to the user area*2 in Instrument memory.
*1 : Instrument user data that has been saved to the PC for storage, standard MIDI file (SMF), etc. See the user’s guide that
comes with the Instrument for details.
*2 : Sampled sound, user song, or other numbered location in Instrument memory for storage of user data. See the user’s guide
that comes with the Instrument for details.
1. Move the data you want to copy to Instrument memory to the data folder (page 11).
• Use only the characters shown in the table under step 4 on page 12 for a data file name.
2. On the Data Manager operation window, use the data type selection box to select the type of
data you want to copy.
3. On the Data Manager operation window, click the data you want to copy.
• Select only one data item. Data items can be copied one-by-one only.
• Never try to select any data whose name is dimmed in the PC data file list. Such data cannot be copied because it is
corrupted, etc.
4. On the Instrument data list, click the user area in Instrument memory you want to use as the
copy destination.
• Never try to select a user area if it has a “P” mark (page 9), which indicates it is protected. Either unprotect the user area
or select a different one.
5. On the Data Manager operation window, click the copy (
) button.
• This starts data copy to the Instrument.
• The confirmation dialog box shown below will appear if the copy destination user area already contains data.
Note that if you overwrite existing data, it will be deleted and cannot be recovered.
If you want to overwrite the existing data with the new data, click the [OK] button.
• Do not operate the Instrument or disconnect the USB cable while data copy is in progress. Doing so can corrupt
data stored on the Instrument.
• If you advance to step 5 in the above procedure without selecting a user area in step 4, the lowest numbered user area will
be selected automatically as the copy destination.
• Refer to page 15 if an error (ERROR) occurs during this operation.
13
Deleting Instrument Data
Use the following procedure to use Data Manager to delete user data in Instrument memory.
1. On the Data Manager operation window, use the data type selection box to select the type of
data you want to delete.
• Note that only the data shown below can be deleted. Never try to select any other type of data for deletion.
USER RHYTHM
USER SONG
RECORDED SONG
RECORDED SONG (PLAY-ALONG)
SAMPLED SOUND (MELODY)
SAMPLED SOUND (DRUM)
2. Use the Instrument data list to select data you want to delete.
• You can select multiple data items, if you want.
• Never try to select a user area if it has a “P” mark (page 9), which indicates it is protected. Such areas are protected
against deletion.
3. On the operation window Instrument toolbar, click the [Delete] button.
• This will delete the selected data from Instrument memory.
• Note that once data is deleted, it cannot be recovered. Double-check the data you have selected for deletion before
clicking the [Delete] button.
• Do not operate the Instrument or disconnect the USB cable while data deletion is in progress. Doing so can corrupt
data stored on the Instrument.
• Refer to page 15 if an error (ERROR) occurs during this operation.
14
Error Messages
The following table tells you what you need to do whenever the ERROR dialog box appears. Corrective action depends on the
error text in the dialog box.
Example: “Already Started” error
Message
Message
Cause
Required Action
Already Started
You are trying to start up Data
Manager while it is already running.
Use the instance of Data Manager that is already
running.
Can’t create Data Folder: *******
The data folder cannot be created in
the location specified by *******.
Make sure the “DataManager.exe” file is in a
location on your PC where new folder creation is
enabled (page 7).
Can’t create the File: *******
A file cannot be created for data
storage at the location you specified
on your PC.
• Check if the location you specified is writedisabled. If it is, change it to write-enabled or
select a different location.
• Check the specified path to make sure it
contains only the allowed characters (page 12
step 5).
Can’t open the File: *******
The file you selected (named
*******) cannot be opened.
Check if the file is being used by another
application. If it is, exit the other application.
Disk Full
The location on your PC where you
are trying to save data is full.
• Delete some of the data at the location to make
room for new data.
• Select a different location on your PC to save
the data.
Memory Full
1. Remaining available Instrument
memory is low.
1. Delete some or all user data from memory to
make room for new data.
• If “Shared Memory Capacity” is displayed in
the memory capacity bar (page 8) when this
message appears, try deleting some no
longer needed sampled sounds, user songs,
or user rhythms.
• If “Recorder Memory Capacity” is displayed
in the memory capacity bar (page 8) when
this message appears, delete some songs
recorded with the Instrument.
2. The song data you are trying to
copy is larger than the maximum
capacity of Instrument memory.
15
2. Reduce the size of the data being copied to
Instrument memory to the maximum allowable
size for song data: Approximately 320 kb.
Message
No Data
No Response
Cause
Required Action
1. You are attempting to save data
to your PC while a user area that
does not contain any data is
selected on the Instrument.
1. Select a user area that contains data.
2. You are attempting to copy data
to the Instrument while a file that
does not contain any data (Size:
0) is selected on your PC.
2. Select a different file. Files of size 0 cannot be
copied to the Instrument.
Data copy and save are not possible
for some reason.
• Check to make sure that the Instrument and
PC are connected correctly. See the user’s
guide that comes with the Instrument for
details about connection.
• See step 1 under “To start up Data Manager”
on page 7.
• If the Instrument is connected to your PC via a
USB hub, connect directly without going
through the hub.
No Selected Data
You are attempting to save data to
your PC while there is no Instrument
data selected.
Select some data (page 12).
No Selected File
You are attempting to copy data to
Instrument memory while there is no
data (file) selected on your PC.
Select data (a file) (page 13).
Reload And Try Again
The PC data file list (6) on the Data
Manager operation window is not
refreshed with the newest
information.
• On the Data Manger operation window, click
the [Reload] button on the PC toolbar (page 8)
and then try again.
Setup Error
A setup file (page 7) cannot be
created or written to the disk for
some reason.
Correct the problem (enable writing, increase
capacity, etc.) so a setup file can be created or
written in the same location as
“DataManager.exe” (page 7).
Protected Data
You are trying to copy data to an
Instrument user area that is
protected.
• Unprotect the user area. See the user’s guide
that comes with the Instrument for details.
16
• Select a different (unprotected) user area.
MA0903-C
DATAMANAGERE1C