1
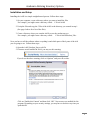
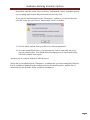
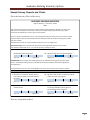
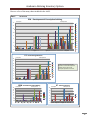
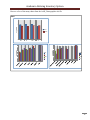
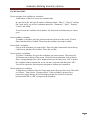
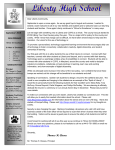
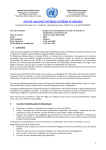
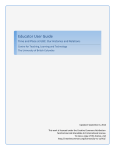
Academic Advising Inventory System A User’s Manual David A. Freitag 7/26/2008 Academic Advising Inventory System Contents Preface……………………………………………... 2 Permission to Use Permission to Adapt Overview…………………………………………... 4 Requirements Files Installation and Setup……………………………… 5 Taking a Survey……………………………………. 9 Creating Reports…………………………………… 10 Advanced Uses of the AAIS…………………….... 12 Sample Survey, Reports and Charts……………….. 13 Basic Excel Skills You Need to Know…………….. 18 © 2008 David A. Freitag Published by David A. Freitag All Rights Reserved 2 Academic Advising Inventory System Preface The AAI System is adapted from the Academic Advising Inventory (AAI) developed by Roger B. Winston, Jr., Ph. D. and Janet A. Sandor, Ph. D. at The University of Georgia. This manual explains how to use the software – not how to understand the data collected from the Academic Advising Inventory assessment instrument. The user of this software should read the AAI User’s Manual on the NACADA website to understand the information generated by the Academic Advising Inventory. Here is a link to the AAI User’s Manual: http://www.nacada.ksu.edu/Clearinghouse/Links/AAI%20Manual-02.pdf Permission for Use The permissions for use as described in the AAI User’s Manual remain in force for the AAIS software implementation of the AAI. As stated in the User’s Manual for the AAI, “The Academic Advising Inventory System (AAIS) is provided to the academic advising profession under the auspices of the National Academic Advising Association and its Web Site as a means of promoting good practices through thorough, theory-based evaluation. The AAI is provided for the non-commercial use of advising practitioners at no costs…. No specific permission is required for institutional uses or for research studies.” The AAIS is provided for the non-commercial use of advising practitioners at no cost by permission of David A. Freitag. Permission to Adapt As stated in the User’s Manual for the AAI, “Users have permission to use AAI Parts I and II in their entirety, that is, either or both of these parts may be used in their entirety, but individual items may not be removed from these two parts for use in other instruments. Users, however, have permission to use individual items from Parts III and IV. Items in Parts III and IV may be altered or eliminated to fit local conditions.” The software implementation of the AAI follows those restrictions and pass on those restrictions to the users of this software. 3 Academic Advising Inventory System Overview The purpose of the Academic Advising Inventory System is to minimize the time needed in administrating AAI surveys to students, and to minimize the time needed to consolidate all the student surveys and report the results. The software provides options for using any or all parts of the survey. Requirements: MS-Excel 2003 or MS-Excel 2007 Windows skills: o Ability to navigate around in a Windows directory structure o Ability to create a new sub-directory o Ability to open, save, and close a file Specific skills in MS-Excel: o Ability to enter data in worksheets o Ability to navigate from worksheet to worksheet o Ability to unhide a worksheet o Ability to protect and unprotect a worksheet o Ability to save a file. If you do not know how to do these specific actions in Excel, you can refer to the “Excel Skills You Need to Know” section of this manual for instructions. Files: The AAIS consists of 5 files: File Name Purpose of each file AAIS_Student_Survey.xls Used by students to complete their survey. AAIS_Survey_Reader.xls Reads student survey files and creates reports and charts. AAIS_Demographics.xls Reads the AAIS_Student_Survey.xls file and creates reports by demographic data. AAIS_Blank_File.xls A blank survey file used to create student surveys. AAIS_Users_Manual.pdf This file. Note that while the .xls files are in MS-Excel 2003 format, they can be used in MS-Excel 2007 in compatibility mode. 4 Academic Advising Inventory System Installation and Setup Installing the AAIS is a simple straightforward process. Follow these steps: 1. On your computer, create a directory where you want to install the files. For example, you might create a directory called: C:\Excel\AAIS 2. Unzip the files and copy the 5 files of the AAIS to the directory you created in step 1. (See page 4 above for a list of the files). 3. Create a directory where you want the AAIS to save the student surveys. For example, you might create a directory called: C:\Excel\AAIS\Student_Files Now you have to tell the software where everything is and which parts of the 4 parts of the AAI you are going to use. Follow these steps: 4. Open the AAIS_Student_Survey.xls file. 5. If macros are not enabled in Excel, you may see this warning: If you do see the above warning, click on “Options” and you will see this: Click on “Enable this Content” and then click “OK”. Now macros are enabled for this program. Depending on your security settings, you may have to do this every time you open this file. 5 Academic Advising Inventory System If you don’t see the above warning message, you may see this security notice: Click on the “Enable Macros” button. Now macros are enabled for this program. Depending on your security settings, you may have to do this every time you open this file. Your computer may have slightly different warnings, but the basic idea is to enable macros – however you have to do it on your computer. 6. Go to the “Parameters” worksheet. If you do not see the “Parameters” worksheet tab at the bottom of the screen, then it is hidden and you must unhide it. Now you have to tell the software where everything is and which of the 4 parts of the AAI you are going to use. 7. In cell B4 you can change the name of the survey. Whatever you enter here will appear at the top of the “Main” worksheet. As an example, you can enter “Hypothetical University Advising Survey” 8. In cell B7 indicate if you want to require students to enter their Student ID, Last Name, or nothing to identify their survey. If you select Student ID or Last Name, the student will be prompted to enter that information before taking the survey. That information will be used as the first part of the file name for their survey. Student surveys are saved in this format: (Student ID or Last Name or Nothing) 20YY-MM-DD Thh_mm_ss Where YY=year, MM=month, DD=day, hh=hour, mm=minutes, and ss=seconds. For example, this is a survey file name: A111222333 2008-5-10 T11_38_30.xls This format allows every survey to have a unique file name. 9. In cell B9, enter where you want student files to be saved. You created that directory in step 3 above. For example: C:\Excel\AAIS\Student_Files\ (and don’t forget the “\” at the end!) 6 Academic Advising Inventory System 10. In cell B10, enter the location of the AAIS_Blank_File.xls file. Note that this file is one of the five files of the AAIS. You already created the directory in step 3 above and copied the AAIS files to that directory. For example: C:\Excel\AAIS\ (and don’t forget the “\” at the end!) 11. In cell B14, you can allow the student to leave survey questions blank by entering a “N”. Be aware that if you enter “Y” to check for blank answers, not all questions are checked. These are the questions that are checked: Part I: the first and last questions are required. Part II: the first and last questions are required. Part III: all 5 questions are required. Part IV: 4 questions are required. (gender, age, academic class, and cultural/racial background.) This is not intended to actually make the student answer each question on Part I and Part II. It is intended to at least make the student go to the various worksheets and answer some questions. 12. In cells B17-B20 you indicate if the various Parts of the survey are being used by entering a “Y” or a “N”. At least one part of the survey must be selected. 13. Once you have finished entering information on the “Parameters” worksheet, you can Save the file. 14. After you have saved the file, go to the “Main” worksheet, and click on the “Save my Survey” button to setup this worksheet. If you did not enter the correct information on the “Parameters” worksheet, then you will see an error message window. Depending on the error, it could look like this: In this specific case, I incorrectly omitted the “\” at the end of the directory path name. If you do receive an error, you will need to read the error message (maybe even write it down), and click on “OK”. Then you need to unhide the “Parameters” worksheet, go fix 7 Academic Advising Inventory System the problem, and click on the “Save my Survey” button on the “Main” worksheet again to test everything again. Repeat this process until all errors are fixed. If you entered valid information on the “Parameters” worksheet, you will see this after you click on the “Save my Survey” button on the “Main” worksheet: 15. Save the AAIS_Student_Survey.xls file to save all your parameters. 16. Go to the student files directory you created in step 5 above, and verify the survey you just created is there. You should delete any student surveys you created so they will not be counted in the reports. And now you are ready for students to take the survey. Notice that if you indicated on the “Parameters” worksheet that you are not using Part II then the Part II worksheet is hidden from the students (same for the other Parts also). And the line of instructions for Part II on the “Main” worksheet is hidden too. 8 Academic Advising Inventory System Taking a Survey When you are ready for students to take a survey, open the AAIS_Student_Survey.xls file and go to the “Main” worksheet. The software is ready to go. Now you just have to put a student in front of the computer and let them follow the instructions and complete the survey. If a student does not know how to use MS-Excel, you have a teaching opportunity! You can show them how to click on worksheet tabs to go to each part of the survey, how to page down, and how to click on the “Save my Survey” button when they are finished. Most students will catch on quickly. When a student clicks on the “Save my Survey” button, their survey is renamed and the file is saved where you told it to be saved on the “Parameters” worksheet. Note that a new file is created for each student taking the survey. The software then clears the survey answers, clears the student’s ID or last name on the “Main” worksheet and is ready for the next student. There is no need for the advisor to do anything between students taking the survey. At the end of the day you can just close the file. It can’t get much more simple than that. 9 Academic Advising Inventory System Creating Reports OK, so now you have a bunch of student surveys that have been saved in the location you indicated in step 3 above. Follow these steps to create reports and charts of the data: 17. Open the file AAIS_Survey_Reader.xls 18. You may have to enable macros just like you did in step 5 above. 19. On the “Main” worksheet, enter the location of the student files in cell B12. 20. Click on the “Process AAIS Student Files” button. Depending on the number of student files being processed, this step may take a few minutes. Look at the status bar near the bottom of the screen on the left for the number of files that are being processed and which file is processed now. On a reasonably fast computer it should take about 3 minutes to process 1000 student files. To process 9000 student surveys, the maximum number of student files the AAIS can process, the process should take about 27 minutes to complete. 21. If you did not enter the correct student file directory path on the “Main” worksheet, you will see an error message. Correct the location data on “Main” and try again. 22. If everything runs successfully, you will see this message: Click on “OK” and then you are ready to view the report and chart worksheets. Enjoy! Refer to http://www.nacada.ksu.edu/Clearinghouse/Links/AAI%20Manual-02.pdf for information on how to interpret the results of the AAI assessment instrument. But what if you want to see the data by demographic group? For example, you may want to compare the answers of males and females. Or to compare freshmen with other academic classes. To generate those reports, follow these steps: 23. Open the file AAIS_Demographics.xls This may take a few minutes while it recalculates. 24. You may have to enable macros just like you did in step 5 above. 25. On the “Main” worksheet, enter the location of the AAIS_Survey_Reader.xls file in cell B10. 26. Click on the “Create Detailed AAIS Reports” button. 10 Academic Advising Inventory System Regardless of the number of student files being processed, this step will take about 3 minutes. Look at the status bar near the bottom of the screen for a progress percentage. 27. If you did not enter the correct directory path on the “Main” worksheet, you will see an error message. Correct the location data on the “Main” worksheet and try again. 28. If everything runs successfully, you will see this message: Click on “OK” and then you are ready to view the report and chart worksheets. 11 Academic Advising Inventory System Advanced Uses of the AAIS Organizing your Files After a while you may want to copy the student files somewhere else to make reporting easier and to be able to compare survey results by semester or by year. Here is an example of directory names you might use: C:\Excel\AAIS\Student Files\2008_Fall C:\Excel\AAIS\Student Files\2008_Spring C:\Excel\AAIS\Student Files\2008_All Be creative! Having different directories will enable you to run reports for individual semesters or for entire years. If you copy the 4 AAIS files to each directory then you will have reports to refer back to later. But as long as you have the student surveys, you can always regenerate the AAIS reports at any time. Customizing the Student Survey If you want to remove some of the questions in Part IV of the survey, rows 46-92 for example, you can unprotect the “Part IV” worksheet with the password “aais”. Then you can hide the rows of the questions you do not want the students to answer. Be sure to protect the worksheet with the password “aais” again so students cannot change the worksheet later. To hide rows in MS-Excel, unprotect the worksheet and then select the rows you want to hide and right click your mouse. Select ‘hide’. If you want to change Part III, the password for the Part III worksheet is also “aais”. Manually completing the survey If your students do not have access to a computer to take the survey, you can print the survey pages and they can complete the survey with a pen or pencil. Then you just have to have someone enter the survey’s into the software later. 12 Academic Advising Inventory System Sample Survey, Reports and Charts This is the first part of Part I of the survey. ACADEMIC ADVISING INVENTORY Roger B. Winston, Jr. and Janet A. Sandor Part I Part I of this Inventory concerns how you and your advisor approach academic advising. Even if you have had more than one advisor or have been in more than one type of advising situation this year, please respond to the statements in terms of your current situation. There are 14 pairs of statements in Part I. You must make two decisions about each pair in order to respond: (1) decide which one of the two statements most accurately describes the academic advising you received this year, and then, (2) decide how accurate or true that statement is (from very true to slightly true). Online Instructions: Click in the cell under the question (in the light blue) where you want to enter your answer and then enter an "X". You can also use the arrow keys to move. EXAMPLE 80. My advisor plans my schedule. very true ------------------------------- slightly true OR My advisor and I plan my schedule together. x slightly true ------------------------------- very true EXPLANATION: In this example, the student has chosen the statement on the right as more descriptive of his or her academic advising this year, and determined that the statement is toward the slightly true end (response F). Try it yourself! Enter an "X" in one of the light blue cells. That is all you need to do to answer a question. 1 My advisor is interested in helping me learn how to find out about courses and programs for myself. very true ------------------------------ slightly true 2 My advisor tells me what would be the best schedule for me. very true ------------------------------ slightly true OR My advisor tells me what I need to know about academic courses and programs. slightly true ------------------------------- very true OR My advisor suggests important considerations in planning a schedule and then gives me responsibility for the final decision. slightly true ------------------------------- very true There are 14 questions in Part I. 13 Academic Advising Inventory System Here is the report from the AAIS_Survey_Reader.xls file. Part I Scales Developmental-Prescriptive Personalizing Education Academic Decision-Making Selecting Courses Score 81.9 47.1 23.8 11.0 Range (14-112) (8-64) (4-32) (2-16) Part II Scales Personal Development and Interpersonal Relationships Exploring Institutional Policies Registration and Class Scheduling Teaching Personal Skills Academic Majors and Courses (PDIR) (EIP) (RCS) (TPS) (AMC) Part III Scales Student Satisfaction Part IV Demographic Information Total Number of Student Files Males Females (DPA) (PE) (ADM) (SC) Score 2.9 Avg Score (0-5) 1.0 0.9 1.1 1.0 0.8 Scale (1-2-3-4) 24 14 8 64% 36% African Am erican/Black Hispanic American/Latino/a Asian American Native American White/Caucasian Biracial/multiracial Other Decline to respond 5 4 4 0 7 0 0 1 24% 19% 19% 0% 33% 0% 0% 5% Freshman (first year) Sophomore (second year) Junior (third year) Senior (fourth) 5th Year Senior Irregular/Transient/Special Other than any of the above 5 2 8 4 1 0 1 24% 10% 38% 19% 5% 0% 5% Exception Report Evaluation Developmental Developmental Developmental Developmental files with no errors files with errors files with at least one duplicate answer files with at least one blank answer questions with duplicate answers questions with no answers 17 7 3 5 Note: Questions with errors in Part I will lower the score for Part I scales. 74 70 14 Academic Advising Inventory System Here are a few of the many charts included in the AAIS: Part I 16 All Students Prescriptive DPA - Developmental-Prescriptive Advising Developmental Q1 14 Q2 Q3 12 Q4 Q5 10 Q6 8 Q7 Q8 6 Q9 Q10 4 Q11 2 Q12 Q13 0 very true slightly true 1 -----------------------------------------2 3 4 16 Prescriptive 5 slightly true6 -----------------------------------------7 8 very true 9 Q14 PE - Personalizing Education Developmental 14 Q1 12 All charts on this page have been adjusted to have all developmental questions on the right and all prescriptive questions on the left. Q3 10 Q4 8 Q5 6 Q8 Q9 4 Q10 2 Q13 0 very slightly true 1 true ------------2 3 4 very8true 5slightly true 6 -----------7 9 ADM - Academic Decision-Making 16 Prescriptive SC - Selecting Courses Developmental 10 14 Prescriptive Developmental 8 12 10 Q6 8 Q7 6 Q11 4 2 Q14 0 very true slightly 1 true2 ---- slightly 3 4 5 6true ------7 very 8 true 9 6 4 Q2 Q12 2 0 very true --- slightly true slightly true ---very true 1 2 3 4 5 6 7 8 9 15 Academic Advising Inventory System Here is the report from the AAIS_Demographics.xls file. Part I Scales (14-112) DPA All 81.9 (8-64) PE 47.1 (4-32) ADM 23.8 (2-16) SC 11.0 scales: (14-112) DPA African American 66.6 Hispanic 84.3 Asian American 86.8 Native American 0.0 White 84.3 Multiracial 0.0 Other 0.0 Decline 112.0 Males Females 85.0 76.8 49.8 42.6 24.5 22.8 10.7 11.4 Freshmen Sophomores Juniors Seniors 5th Year Irregular Other 63.8 81.0 83.1 90.3 100.0 0.0 112.0 37.2 45.5 48.1 50.3 62.0 0.0 64.0 19.0 22.5 24.3 27.3 25.0 0.0 32.0 7.6 13.0 10.8 12.8 13.0 0.0 16.0 PDIR 1.0 EIP 0.9 RCS 1.1 TPS 1.0 AMC 0.8 Males Females 1.2 0.7 1.1 0.5 1.2 0.9 1.1 0.9 1.0 0.6 Freshmen Sophomores Juniors Seniors 5th Year Irregular Other 0.7 0.5 0.9 0.9 1.1 0.6 0.3 0.7 0.6 1.2 0.8 0.9 1.0 0.9 1.0 0.8 0.7 0.8 0.9 0.7 0.6 0.5 0.7 0.5 0.7 5.0 5.0 5.0 5.0 5.0 African American Hispanic Asian American Native American White Multiracial Other Decline 0.6 1.1 0.9 0.8 0.5 0.7 0.7 1.0 1.0 0.7 0.8 0.8 0.4 0.7 0.5 0.8 0.7 1.0 0.9 0.7 5.0 5.0 5.0 5.0 5.0 Part II Scales All Part III Scales All Student Satisfaction 2.9 Males Females 3.1 2.6 Freshmen Sophomores Juniors Seniors 5th Year Irregular Other 2.5 2.9 3.0 3.0 2.8 (8-64) PE 39.2 48.8 48.0 0.0 48.9 0.0 0.0 64.0 (2-16) SC 6.8 11.3 13.3 0.0 11.7 0.0 0.0 16.0 scale = 0-1-2-3-4-5 # Students 14 8 5 2 8 4 1 0 1 5 4 4 0 7 0 0 1 Student Satisfaction African American Hispanic Asian American Native American White Multiracial Other Decline (4-32) ADM 20.6 24.3 25.5 0.0 23.7 0.0 0.0 32.0 scale = 1-2-3-4 2.5 3.1 2.9 3.0 4.0 4.0 16 Academic Advising Inventory System Here are a few of the many charts from the AAIS_Demographics.xls file. Part I 100% 90% 80% Males Females 70% 60% e g tanMales 50% cerFemales 40% eP 112 64 32 16 (14-112) (8-64) (4-32) (2-16) DPA PE ADM SC 85 50 24 11 77 43 23 11 DPA 76% 69% PE 78% 67% ADM 76% 71% SC 67% Males 71% Females 30% 20% 10% 0% DPA PE 100% DPA 90%Freshmen 64 80%Sophomores 81 83 70%Juniors 90 egSeniors 60% 100 tan5th Year 50% 0 ecIrregular 40% reOther 112 P 30% 20%Freshmen 57% 72% 10%Sophomores 74% 0%Juniors Seniors 81% 5th Year 89% Irregular 0% Other 100% ADM PE SC 37 46 48 50 62 0 64 ADM 19 23 24 27 25 0 32 58% 71% 75% 79% 97% 0% 100% 59% 70% 76% 85% 78% 0% 100% SC 8 13 11 13 13 0 16 48% 81% 67% 80% 81% 0% 100% DPA PE ADM SC 100% 90% 80% 70% 60%e g 50%ta n 40%e c 30%re P 20% 10% 0% DPA African American 67 Hispanic 84 Asian American 87 Native American 0 W hite 84 Multiracial 0 Other 0 Decline 112 African American 59% Hispanic 75% Asian American 77% Native American 0% W hite 75% Multiracial 0% Other 0% Decline 100% PE 39 49 48 0 49 0 0 64 ADM 21 24 26 0 24 0 0 32 61% 76% 75% 0% 76% 0% 0% 100% 64% 76% 80% 0% 74% 0% 0% 100% SC 7 11 13 0 DPA 12 PE0 0 ADM 16 SC 43% 70% 83% 0% 73% 0% 0% 100% 17 Academic Advising Inventory System Basic Excel Skills You Need to Know For MS-Excel 2007: How to navigate from worksheet to worksheet: At the bottom of the Excel screen are worksheet tabs. In a new Excel file, the file will contain worksheets named, “Sheet 1”, “Sheet 2”, and the like. In the AAIS, you will see worksheet names like, “Parameters”, “Part I”, “Reports”, “Charts” and “Main”. To move from one worksheet tab to another, left click on the worksheet tab you want to go to. How to unhide a worksheet: To unhide a worksheet, right-click on any worksheet tab and select “unhide” from the popup menu. If more than one worksheet is hidden, then you will then have to select which worksheet you want to unhide. How to hide a worksheet: To hide a worksheet, right-click on any worksheet tab and select “hide” from the popup menu. How to protect a worksheet: To protect a worksheet, click on the “Home” tab of the Ribbon. Then click on “Format”. Then click on “Protect Sheet”. A popup dialogue box will be displayed and you can either press “OK” to protect the worksheet without a password, or you can enter a password and then press “OK”. You will be required to enter the password again to confirm you remember it. How to unprotect a worksheet: To unprotect a worksheet, click on the “Home” tab of the Ribbon. Then click on “Format”. Then click on “Unprotect Sheet”. If the worksheet is protected by a password, a popup dialogue box will be displayed and you will have to enter the password and click on “OK” to unprotect the worksheet. 18 Academic Advising Inventory System For MS-Excel 2003: How to navigate from worksheet to worksheet: At the bottom of the Excel screen are worksheet tabs. In a new Excel file, the file will contain worksheets named, “Sheet 1”, “Sheet 2”, and the like. In the AAIS, you will see worksheet names like, “Parameters”, “Part I”, “Reports”, “Charts” and “Main”. To move from one worksheet tab to another, left click on the worksheet tab you want to go to. How to unhide a worksheet: To unhide a worksheet, select the Format menu item at the top of the screen. Click on Sheet, and then click on Unhide. Then select the worksheet you want to unhide. How to hide a worksheet: First go to the worksheet you want to hide. Then select the Format menu item at the top of the screen, and then click on Sheet. Then click on Hide. How to protect a worksheet: To protect a worksheet, first go to the worksheet you want to protect. Then select the Tools menu item at the top of the screen. Click on Protection and then click on Protect Sheet. A popup dialogue box will be displayed and you can either press “OK” to protect the worksheet without a password, or you can enter a password and then press “OK”. You will be required to enter the password again to confirm you remember it. How to unprotect a worksheet: To unprotect a worksheet, Select the Tools menu item at the top of the screen. Then click on “Format”. Then click on “Unprotect Sheet”. If the worksheet is protected by a password, a popup dialogue box will be displayed and you will have to enter the password and click on “OK” to unprotect the worksheet. 19