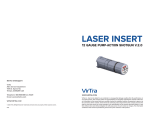
1
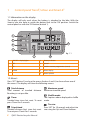
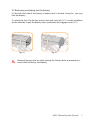
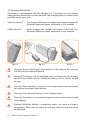
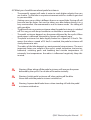
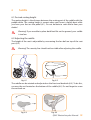
MANUAL
ELECTRIC BICYCLES
FRAME NUMBERS (VIN)
Frame numbers are to be found on the frame underneath the crankshaft,
pointed out in the image below. With this frame number the bike can be
checked.
Warning! Your bike may look different than the images in this manual.
Colofon:
QWIC is a registered trademark of Hartmobile BV. The contents of this
manual are copyright of QWIC. We reserve the right at any time and from
time to time to modify or discontinue, temporarily or permanently, our
product manual (or any part thereof ) with or without notice. QWIC has no
responsibility or liability about any content within this manual.
All Rights reserved - Copyright ©: QWIC, Amsterdam
Product manual electric bicycles, v1.0
Congratulations!
You now are the proud owner of a QWIC electric bike. The bike is equipped with
electronic pedal assistance, which will give riding your bike a new dimension. The
pedal assistance makes riding the bike more comfortable and lighter than ever.
Whether you use the bike to travel to work, transport heavy luggage or just for
recreational fun, you will always feel some extra support. With the reliable, durable
and user-friendly pedal assistance, riding your bike will no longer be a hassle, but
something you enjoy!
There is a big chance that you have not owned an electric bike before. This is why
QWIC supplies you with an extensive user’s manual. We recommend you take your
time to read through everything, especially the warranty information.
For more information and latest news have a look on our website www.QWIC.nl
Enjoy your new bike!
Kind regards,
E [email protected]
U www.qwic.nl
Contact :
Hartmobile BV
Korte Papaverweg 15
1032 KA Amsterdam
QWIC Electric bicycles Manual
1
Content INHOUD
1 Control panel Trend², Urban and Smart-E³
4
2 Control panel Base²
7
3 Battery
8
1.1
1.2
1.3
1.4
1.5
1.6
2.1
2.2
3.1
3.2
3.3
3.4
Information on the display
Menus
Adjusting the pedal assistance
Powerlaunch
Display lights
Switch off
Information on the display
Adjusting the pedal assistance
Range (optimum range)
Removing and taking out the battery
Charging the battery
What you should know about your battery
4 Pedal assistance
12
5 How to fold up the Smart-E³
13
6 Saddle
14
7 Steer
15
4.1
4.2
4.3
5.1
What is pedal assistance?
Switching the pedal assistance on and off
What you should know about pedal assistance
Action plan folding up the Smart-E³
6.1 Desired seating height
562 Adjusting the saddle
7.1
7.2
2
Desirable steer tuning
Adjusting the steer
QWIC Electric bicycles Manual
8 Lighting
16
9 Brakes
17
10 Tires
18
11 Gears
19
12 Bike lock
20
13 Maintenance
21
14 Warnings
26
15 Specifications per bicycle
28
8.1
9.1
9.2
9.3
9.4
Switching lights on and off
Desired alignment brakes (V-brakes)
Coarse tuning brakes
Brake adjustments
Replacing calliper brakes
10.1 Desired tire tension
11.1 Switching gears
12.1 Lock instructions
13.1
13.2 13.3 13.4 13.5 13.6
13.7 13.8 13.9 Gettingyourbicycleserviced
General maintenance
Cleaning
Treatment
Aanhaalmomenten
Instructions for use
Maintenance
Maintenance chart
Check up
y
QWIC Electric bicycles Manual
3
1
Control panel Trend², Urban and Smart-E³
1.1 Information on the display
The display will only work when the battery is attached to the bike. With the
Smart-e you also have to switch the battery-lock to the ‘ON’ position. Switch the
control panel on with the ‘ON’ button (button 1).
5
6
1
2
SET
S
9
3
4
fig. 1.1
7
8
1.
ON/OFF + display lights
5.
Battery indicator
2.
SET
6.
Speed
3.
UP
7.
Pedal assistance programmes (1 tot 6)
4.
DOWN
8.
Menu display
9.
Menu symbols
1.2 Menu’s
Press ‘SET’ (button 2) and use the arrows (button 3 and 4) to choose from one of
the menus. The display will show the following menus:
Total distance
Total amount of traveled distance.
Resetting is not possible.
Timer
Traveled time since last reset. To reset
press ‘Down’ for 2 seconds.
Trip afstand
Traveled distance (km) since last reset.
To reset press ‘Down’ for 2 seconds.
4
QWIC Electric bicycles Manual
Maximum speed
Maximum traveled speed
Shuffle mode
The 4 options above displayed in shuffle
mode.
Tire size
Press ‘SET’ for 10 seconds and adjust tire
size using the ‘Up’ and ‘Down’ buttons.
1.3 Adjusting the pedal assistance
Use the arrows (button 3 and 4) to choose from 7 pedal assistance programmes
(0-6). Level 6 gives the most powerful assistance, whereas 0 means that the
pedal assistance is off. Keep in mind that using a more powerful pedal assistance
programme will discharge the battery quicker compared to a lower programme.
1.4 Powerlaunch
Use Powerlaunch when driving off. This will let you cycle for about 6 km/h without
having to peddle. Sit on the bike and, with both hands, grab the handlebars. Push
the ‘UP’ button but do not peddle. After a few seconds the engine will start. As soon
as you release the ‘UP’ button the Powerlaunch will be turned off.
Warning! Only use Powerlaunch with both hands firmly gripped around the
handlebars. Powerlaunch is very powerful and dangerous when not seated
firmly on the bike.
1.5 Display lights
Press the ON/OFF button to switch the display lights on. Press ON/OFF again to
switch off.
1.6 Switch off
Press the ON/OFF button for 2 seconds to turn off the system.
Warning! You can only use the control panel when the battery is attached to
the bike. On the Smart-E the batterylock should also be in ‘ON’ position.
Warning! If the battery is in ‘OFF’ or you are using the bike without the battery,
random merits may be displayed because the engine drives small currents of
electricity. Ignore everything that is displayed when the system is off.
QWIC Electric bicycles Manual
5
2
Control panel Base²
2.1 Information on the display
Make sure the ignition lock of the battery is on ‘ON’. Switch the control panel on
with the ‘ON’ button (button 1).
2
1
mode
eco cruise max
fig. 2.1
3
4
1.
ON/OFF
2.
Battery indicator
3.
Adjust pedal assistance
4.
pedal assistance programme
2.2 Adjusting the pedal assistance
Use the ‘mode’-button (button 3) to choose from 3 assistance programmes. The 3rd
programme is the most powerful pedal assistance. Keep in mind that the battery
discharges quicker when using a more powerful assistance programme.
6
QWIC Electric bicycles Manual
3
Battery
3.1 Range (optimum range)
What size is the tank in my electric bicycle?
The total range of your e-bike without charging it in the mean time, is
called the optimum range. You would probably like to know what the
maximum distance is that you may travel with 1 full battery. This is not
easily calculated as the capacity of the battery is influenced by many factors.
Capacity battery
Batteries are often being compared based on capacity (Ampere-hour). This does
not give the right image of capacity, as the battery pack is also influenced by
battery voltage while being discharged. A single display of ’10 Ah) does not say
anything about the capacity of the battery and is misleading.
The best way of comparing batteries is to look at the amount of watt hour (Wh)
delivered by the battery. The amount of Wh regards the capacity of the battery
pack while being discharged, as well the total amount of density of the pattery
pack. The higher the amount of Wh, the higher the optimum range is.
For example: A Trend battery needs a capacity of 10 Ampere/hour (Ah) and an electric tension of 36 Volt (V). This battery provides:
10 Ah x 36 V = 360 Wh.
QWIC supplies bikes with 216 Wh and 360 Wh batteries. Have a look on page 27 for
an overview on specifications per bicycle.
QWIC Electric bicycles Manual
7
Optimum range of QWIC electric bicycles
The capacity of QWIC bikes is between 216 Wh and 360 Wh. Using the scheme on
page 27, you may easily compare different specifications off all the bikes.
The next table displays an indication of the expected optimum range based on the
eco-programme.
Optimum range indication of QWIC e-bikes.
Amount of Wh Expected optimum range
216
40 en 60 kilometer
360
60 en 100 kilometer
The most important thing is to realise which factors may influence the optimum
range. You personally influence the optimum range as well, please ask your dealer
for personal advise.
Influences on optimum range:
• Total weight (weight bicycle + cyclist + load)
• Resistance (wind force, tire tension, gearing, quality of road surface, inclination)
• Level of pedal assistance
• Driving style (switching gears and speed)
• Outside temperature
• Age of the battery ( battery capacity decreases with time)
8
QWIC Electric bicycles Manual
3.2 Removing and taking out the battery
On the left hind side of the battery a battery lock is located. Using this you may
lock the battery.
To unlock the lock: Put the key into the lock and twist left (3.1) Use the handlebar
on the backside to pull the battery from underneath the luggage carrier (3.2).
fig. 3.1
fig. 3.2
Warning! Remove the key after placing the battery back, preventing loss
and/or theft of the key and battery.
QWIC Electric bicycles Manual
9
3.2 Charging the battery
The battery is rechargeable with the charger (3.5). The battery can be charged
while placed in the bicycle or when removed. The charging point is covered with a
twistable plastic cover (3.4).
Trend² en Smart-E³
The charger will display an orange light when charging(3.6).
When this light turns green, the battery is fully charged.
URBAN en Base²
While charging the charger will display a red light (3.6).
When this light turns green, the battery is fully charged.
fig. 3.4
fig. 3.5
fig. 3.6
Warning! Remove the charger when battery is fully charged. This prevents
the life cycle from being decreased.
Warning! The battery may be damaged when not being used for a longer
period of time. Make sure you charge the battery every 3 months for half
an hour.
Warning! When the bike is out of use for a longer period, we recommend
you remove the battery from the bike.
Warning! Only charge the battery in dry, ventilated areas.
Warning! The battery is not protected against moist and/or bumps caused
by dropping it.
Warning! When the battery is completely empty, you need to charge it
immediately. When cells are empty for a longer period of time, these may
be damaged.
10 QWIC Electric bicycles Manual
3.3 What you should know about your battery
•
•
•
•
•
•
•
•
Never connect the positive pole of the battery to a negative contact.
The battery is somewhat waterproof and withstands a rain shower. There
is no problem with using you bike in bad weather circumstances. Do not
expose the battery to large quantities of water.
Electricity is a green supply of energy and does not effect the environment
heavily. However, you do have to hand in your battery after its life cycle to be
recycled.
Your battery’s achievement will decrease at low temperatures*
The battery pack will last about 1000-1200 times of full charging, under ideal
circumstances. The achievements will decrease over a matter of time and the
battery will have to be replaced after a certain time.
Do not expose the battery to higher temperatures (>50°C), like heating,
direct sunlight and fire.Haal de batterij niet uit elkaar. Raadpleeg de dealer
bij problemen.
Do not disassemble the battery. Ask your dealer for advise.
When not using your battery for a longer period of time, store the battery in
a cool, dry and dark place.
* All mentioned specifications apply to a temperature of 25°C. Rule of thumb
is that with every 1°C temperature decrease, the capacity decreases with 1%.
QWIC Electric bicycles Manual
11
4
Pedal assistance
4.1 What is pedal assistance?
The bike has been equipped with electric pedal assistance. The engine adds to your
own power, which enhances your achievements without tiring. The action of the
pedal assistance depends on the speed of the rotation of the pedals.
When there is no paddling, the engine does not work. When taking off, the power
delivered by the engine is high to it is easier to drive off.
Switching the pedal assistance on and off
When switching the control board on the pedal assistance is on its last used level.
Using the arrows the degree of power delivered by the engine is easilt adjustable.
To turn the pedal assistance off, simply put it on ‘0’ using the arrows. Keep in mind
that the battery empties out quicker when delivering more power (fig. 4.1)
Warning: The tire tension, weight of the cyclist, environment as well as the
cycling-behaviour influence the radius.
6
5
4
3
2
1
Fig.4.1 Influence on the pedal assistance program on the radius.
12 QWIC Electric bicycles Manual
4.2 What you should know about pedal assistance
•
•
•
•
•
The powerful support will make it easier to reach higher velocity than you
are used to. Try the bike in a quiet environment with less traffic to get used
to your new bike.
Getting up on your e-bike is different than on a normal bike. Driving off will
be easier and go faster. Get used to riding your bike before driving it in a
busy environment. We recommend to use assistance mode 1 for taking off
with your bike.
The bike will not cause extra resistance when the pedal assistance is switched
off. This way you will always be able to use the bike as a normal bike.
The pedal assistance depends on the power delivered by the cyclist. When
more power is delivered, the pedal assistance will support more.
The pedal assistance has been legally limited to a speed of 25 km/h. This
means that when a speed of 25 km/h is reached, the pedal assistance will
slowly decrease to zero.
The radius of the bike depends on environmental circumstances. The most
important factors are: weight of the cyclist, speed, inclination, tire tension,
backwind, switching gears and breaking and outside temperature. At
extremely low temperatures the radius is influenced negatively. Keep this
in mind.
Warning: When taking off the pedal assistance will increase the power
delivered by the cyclist. Do not take off to enthusiastically.
Warning: Switch pedal assistance off, when getting off the bike.
Never walk with the pedal assistance switched on.
Warning: Squeeze both brake levers when standing still with the pedal
assistance switched on.
QWIC Electric bicycles Manual
13
5
How to fold up the Smart-E³
5.1 Action plan folding up the Smart-E³
1.
Fold in kickstand
2.
Rotate right paddle horizontally to the front
3. Unlock seat post clamp(fig. 5.1, fig 5.2) and fold in the frame.
4. Unlock clamp in head tube(fig. 5.3 - fig. 5.4) and fold the steer in front of the saddle until it leans against the right side of the bike. (provide the cables for pinching around the sadlle).
5.
Let down the saddle
6.
Optional: Fold in the peddles.
7.
Optional: Push in the steer stem (fig. 5.5)
fig. 5.3
fig. 5.4
14 QWIC Electric bicycles Manual
fig. 5.1
fig. 5.2
fig. 5.5
6
Saddle
6.1 Desired seating height
The seating height is the distance between the seating part of the saddle with the
paddle down. The seating height is correct when your knee is slightly bent while
you have your foot on the pedal (6.1). Do not hesitate to seek advise from your
dealer!
Warning! If you are able to place both feet flat on the ground, your saddle
is too low.
6.2 Adjusting the saddle
The height of the seat is adjustable by unscrewing the hex bolt on top of the seat
post (6.2).
Warning! The security line should not be visible after adjusting the saddle.
fig. 6.1
fig. 6.2
The saddle can be rotated and adjusted on the front and backside (6.3). To do this,
unscrew the nut located on the bottom of the saddle (6.4). Do not forget to screw
the nut back on.
fig. 6.3
fig. 6.4
QWIC Electric bicycles Manual
15
7
Steer
7.1Desirable steer tuning
Rule of thumb for deciding the space between steer and saddle is that the rider
has to be able to touch the steer with his fist while leaning on the saddle with his
elbow. This rule of thumb is only a recommendation as personal preferences may
be different. Mind that a too big of a distance between saddle and steer may cause
neck, back and shoulder pain. QWIC recommends tuning the steer and saddling
with help of the dealer.
7.2 Adjusting the steer
Adjusting the height (7.1A), the depth (7.1B) and the heeling angle (7.1C) creates the
opportunity to tune the steer in any posture.
C
B
A
fig. 7.2
fig. 7.1
To change the height of the steer, remove the plastic cover. Then unscrew the
expander bolt using a hex key (7.2). Screw on the bolt after you have adjusted the
height (7.3). Carefully check whether the steer is firmly secured.
The distance between steer and saddle is adjustable by using a hex key to unscrew
the expander bolt on the bottom of the steer. Screw the bolt back on after you
have adjusted the space between the saddle and steer and check whether the
steer is firmly secured.
fig. 7.3
16 QWIC Electric bicycles Manual
fig. 7.4
It’s also possible to adjust the steering wheel ever more by changing the angle to
your personal preferences. Unscrew the (front-foldable) bolt just a twist with a hex
key (7.4). After adjusting the steering wheel in the right position, carefully screw
the bolt back on. If you have a QWIC Trend bicycle, you adjust the steering wheel
by unfolding the clamp. Slide down the security button(7.5A), to unfold the clamp
(7.5B). Now you can easily adjust the angle of your steering wheel (7.5C) and secure
the clamp. Finally, check whether your steer is firmly secured.
C
B
A
fig. 7.5
8
Lighting
8.1 Switching lights on and off
The bike is equipped with PowerLED lighting on the front as well as on the back
side. Both lights have their own batteries and switches. See 8.1 – 8.4 on how to
work the lights.
fig. 8.1
fig. 8.2
fig. 8.3
fig. 8.4
QWIC Electric bicycles Manual
17
9
Brakes
9.1 Desired alignment brakes (V-brakes)
The brakes are to be aligned so when squeezing the handle bar for a quarter (9.1),
the complete surface of the calliper brakes are pushed to the rim. (9.2)
fig. 9.1
fig. 9.2
9.2 Coarse tuning brakes
When the alignment of the brakes shows a big deviation to the desired alignment,
you will first have to adjust the coarse tuning of the brakes. The coarse tuning of the
brakes can be adjusted by using a hex key to unscrew the cable clamp bolt. Next
you will be able to use thumb and index finger to squeeze the brakes to the desired
space. (9.4) Make sure the brake cord stays under the clamp bolt and then secure
the clamp bolt by twisting.
fig. 9.3
fig. 9.4
9.3 Brake adjustments
Using the cable bolt(secured there where the brake cord leaves the brake lever)
you’re able to adjust the brakes. By twisting the cable bolt inwards the tension on
the cord is released and by twisting it outwards tension is enlarged (9.5).
9.4 Replacing calliper brakes
The calliper brakes should be replaced when the indentation have worn off (9.6)
18 QWIC Electric bicycles Manual
fig. 9.5
fig. 9.5
To replace the calliper brakes, you need to twist the cable bolt inwards, causing the
tension on the brake cable to be released (9.5). Then, using your thumb and index
finger, you squeeze the brakes (9.4) and remove the brake cable (9.7). You now have
sufficient space to unscrew the calliper brake’s bolts (9.8). Do not forget to tune
your brakes after you have replaced the calliper brakes.
fig. 9.7
10
fig. 9.8
Tires
10.1 Desired tire tension
The tire tension influences the optimum range and the comfort of your bike. It is
advisable to always inflate your tires to a level that will allow you to just indent with
your thumb. The rim of the tire indicates the maximum tire tension. The tire tension
is expressed in Bar. QWIC recommends to use a bike pump equipped with a tire
pressure indicator when inflating your bike.
Warning! Deflated tires will drastically decrease the optimum range.
QWIC Electric bicycles Manual
19
11
Gears
11.1 Switching gears
Every bike has 3 to 7 gears. The gears are to be operated when riding the bike by
twisting the right side handlebar (10.1). Do not change more than 1 level at a time.
Trend²
Trend² NX7
URBAN
Base²
Smart-E³
Smart-E³ URBAN
Shimano Acera 7 (derailleur)
Shimano NX 7 (hub gears)
Shimano NX 7 (hub gears)
Shimano Altus 7 (derailleur)
Shimano Acera 7 (derailleur)
Shimano NX 3 (hub gears)
Use of the gears: fig 11.1
fig. 11.1
Hub gears: You can always change gears, even when standing still.
Derailleur gears: Do not change gears when standing still and do not
paddle backwords while changing gears.
12
Bike lock
12.1 Lock instructions
Your bike is equipped with a ART certified frame lock. Turning the key right and then
pushing down the lock’s brace will lock the frame lock. When the brace reaches the
lowest position, pull out the key.
In order to insure your bike you will need the following specifications:
- Brand and type
QWIC, electric bicycle +bicycle name
- Framenumber
[your unique frame number]
- Brand and ART certified lock type
Trelock, RS440
- Lock number / access number
MBT4022
- Keynumber
[unique key number]
- Date of purchase
[date of purchase]
The Smart-E³ electric foldable bicycle is supplied without a frame lock.
20 QWIC Electric bicycles Manual
13
Maintenance
13.1 Getting your bicycle serviced
QWIC recommends to have your bike regularly checked with your dealer. It is
advisable to have your first check-up with the first 3 months and the second
maintenance should take place after 1 year. Please keep in mind that with regular
check ups, damage and therefore costs will be prevented. Of course you can add to
that by taking note of the following tips:
13. 2 General maintenance
1
2
3
4
5
Check tire pressure
Check brake wear and tear, minor adjustments
Clean paddling sensor with sponge and warm water.
Grease chain
If spokes are bent or damaged, immediately have it repaired by the dealer.
13.3 Cleaning
When cleaning the bike, first remove dirt with a brush or cloth bevore washing with
warm water. This will make your bike look as good as new! Regularly cleaning your
bike will improve its life-span. Be careful not to use excessive amounts of water in
the battery area. The sensor (near the crankshaft) should be clean from dirt.
Never use a high-pressure sprayer!
13.4 Treatment
Complementary to regulary cleaning your bike, we recommend to directly take
care of some parts after cleaning. We advise to grease all chromed parts, plain
aluminium and stainless-steel parts with Vaseline to prevent from oxidation (rust).
Moving elements require grease/oil. It is advisable to grease chain, cogwheel and
spindles on a regular basis. Your dealer can do this for you.
QWIC Electric bicycles Manual
21
13.5 Torque wrench
Tabel 2: Torque wrench
Handlebar bolt
12 - 15 Nm
Handle bar expander bolt
10 - 12 Nm
Saddle pin bolt/nut M8
15 - 20 Nm
Crank bolt steel
40 - 45 Nm
Crank bolt aluminium
40 - 45 Nm
Headtube bolt/nut
17 - 24 Nm
Rear hub bolt without motor (nexus)
35 Nm
Front hub bolt without motor
35 Nm
Front hub bolt (motor)
40 - 45 Nm
Rear hub bult (motor)
40 - 45 Nm
13.6 Instructions for use
•
•
•
•
•
•
•
•
•
•
Check for damage
Assemble all parts (steer, mudguards, pedals, luggage
rack, saddle) Make sure all adjustable parts are tuned.
Adjust tire pressure
Adjust brakes symmetrically, making sure enough
braking power is generated.
Tune derailleur, check if all gears run smooth.
With all Nexus models: Adjust chain pressure.
Secure tire nuts.
Check spokes and tires on small deviations and spoke
pressure. If necessary adjust.
Check electronic system (display, bracing, different
settings, lights, battery, charger)
Spray moving elements (brake joints, derailleur, biking
lock etc) with silicone spray.
22 QWIC Electric bicycles Manual
13.7 Maintenance
1st maintenance - 250km or at 3 months
•
•
•
•
•
•
•
Check weels and tires (bent spokes, spoke tension, tire tension, profile of tire)
Check - and secure if necessary - all attachments.
Brakes: Check calliper brakes and tune cord tension. Check brakes system
Check headtube for backlash. Check steering pen and if necessary adjust.
Greasing: Clean chain and grease with Teflon spray or silicone spray.
Electric system: Charge battery for 5 hours, clean paddle sensor with warm
water and a sponge. Treat contacts with contact spray. Check if everything runs
smoothly.
Derailleur: Check if all gears run smooth, if not adjust.
2nd maintenance – 1000 km – or after 1 year
3rd maintenance – 2000 km – or after 1 year
4rd maintenance – 3000 km – or after 1 year etc.
Etc.
QWIC Electric bicycles Manual
23
__/__/____
__/__/____
__/__/____
__/__/____
__/__/____
__/__/____
__/__/____
__/__/____
Date:
Milage:
Mechanic:
Date:
Milage:
Mechanic:
Date:
Milage:
Mechanic:
Date:
Milage:
Mechanic:
Date:
Milage:
: Mechanic:
Date:
Milage:
: Mechanic:
Date:
Milage:
: Mechanic:
Date:
Milage:
Mechanic:
2
3
4
5
6
7
8
Service visit
1
Visit
Stamp/
initials
13.8 Maintenance visits
24 QWIC Electric bicycles Manual
12.3 Check-up
Regularly check:
•
Whether the battery is charged
•
Whether the battery is charged
•
Are the brakes still working as they should be? Are the calliper brakes, nuts
and bolts still secured? Are the cords undamaged? Is the braking surface
clean and grease-free? Are the calliper brakes not wearing off?
•
Is my bike adjusted correctly? Are the saddle and steer not exceeding the
maximum height? Is the angle of the steer and saddle comfortable? Is my
steer lined to the front weal?
•
Are my handles still secured?
•
Is there enough tension on the spokes? Are any spokes broken or bent?
•
Tire pressure and profile.
•
Are my steering pen and saddle still secured? Is there backlash in my
wheels?
•
Are the lights working? Am I clearly visible in the dark? Are the reflecting
areas clean? Are the reflecting stripes on my tire visible and clean?
•
Is the pedal assistance and gear system working the way it should be?
•
Is the chain pressure correct?
•
Is it time to clean my bicycle?
•
Does my bicycle need maintenance?
QWIC Electric bicycles Manual
25
14
Warnings
•
Carefully read through this user manual and follow the instructions given.
•
When charging the battery, only use the appropriate charger.
•
Do not use the battery for any device other than your e-bike.
•
Do not clean your bike using a high-pressure sprayer as this may cause
damage
to the electronic parts of the bike. Your warranty will expire.
•
Inappropriate use of the bike may cause damage to you or others. Your
warranty will expire.
•
Do not use any battery packs other than the batteries supplied by QWIC. Do
not insert any objects into the battery charger and do not expose the battery,
charger or electronics to water or other liquids.
26 QWIC Electric bicycles Manual
Warranty card
Please fill out your warranty card at: www.qwic.nl/garantiekaart.
QWIC Electric bicycles Manual
27
Uitvoering
Dr = Derailleur Nx = Nexus
F = Female
M = Male
Base²
Trend²
Dr
Urban
Smart-e³
Dr
Nx
Max 60 Km
Max100 Km
Max 60 Km
Max 70 Km
Power programs
3
6
6
6
Gear
Shimano
Altus 7-speed
Shimano Shimano
Acera
Nx 7
7-speed
Shimano Nx 7
Shimano Shimano
Acera
Nx 3
7-speed
Tire sizes
38-622
(700-38C)
42-622
(700-40C)
50-622
(700-48C)
47-406 53-406
(20-1.75) (20-1.75)
Saddle
Gel
Gel
Leather
Gel
F: 48
F: 55
M: 54
n.v.t.
Range*
Nx
Detachable li-ion
battery
250W intelligent
elektric hub motor
Leather
Sprung seatpost
Sprung front fork
LED lighting
lightweight
aluminum frame
ART- certified frame
lock
F: 48
F: 55
M: 54
F: 48
F: 55
M: 54
M: 64
Sizes
F: 48
Colours
Black-Silver
Grey-Blue
Gre y-Purple
Female: White
Male: Black
White-Green
Black-Grey
Total weight bicycle
24.5 kg
26.8 kg
26.2 kg
23.2 kg
Battery weight
3.3 kg
4.2 kg
3.3 kg
3.6 kg
Shimano
v-brakes
Shimano Voor:
v-brakes Shimano
v-breaks
achter:
rollerbrakes
Voor:
Shimano
v-brakes
achter:
rollerbrakes
Shimano Voor:
V-brakes Shimano
V-brakes
achter:
rollerbrakes
Brakes
28 QWIC Electric bicycles Manual
27,8 kg
QWIC Electric bicycles Manual
29
Your dealer:
Korte Papaverweg 15
1032KA Amsterdam
E. [email protected]
www.qwic.nl