1
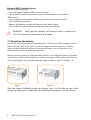
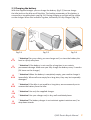
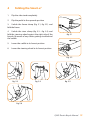
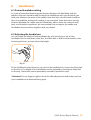
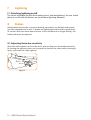
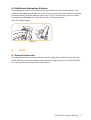
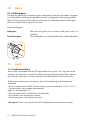
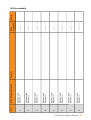
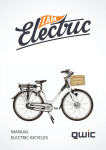
USER MANUAL
ELECTRIC BICYCLES
FRAME NUMMERS (VIN) (BARCODE)
The Framenumber (VIN) is located on the left side of the frame, down at the
bottom bracket, below the barcode.
Mijn framenummer:
EFY _ _ _ _ _ _ _
Your bike may differ from the illustrations in this manual.
Colophon
Manual electric bicycles
QWIC reserves the right to make changes in specifications and / or prices
without notice. This manual has been compiled with great care. QWIC can
not be held responsible for any inaccuracies whatsoever.
Publishers & copyright ©: QWIC, Amsterdam
Congratulations!
You have just become the proud owner of a QWIC electric bike. You probably only
want one thing right now: Get out and ride! Before you jump in your seat, we
encourage you to take a moment to read through this manual. Then you know
everything that is needed for many carefree cycling tours.
Want to know more?
For more information and the latest news, please visit our website or follow us on
facebook.
www.qwic.nl / www.qwic.eu
[email protected]
QWIC Electric Bicycle Manual
1
Table of contents
1. Display
4
2. Battery
7
1.1 Information on the screen
1.2 Menu
1.3 (Display-)lightning
1.4 Setting pedal assistance on and off
1.5 ‘Walk assist’ function
1.6 Timer / Tripdistance reset
1.7 Failure codes
1.8 Switching off
1.9 Wheel sizes (mm)
2.1
2.2
2.3
2.4
Range
Battery disconnecting and removal
Battery charging
Further information on your battery
3 Cycling with power assistance11
3.1 Wat is Trapbekrachtiging?
3.2 Setting pedal assistance on and off
3.3 Further information on pedal assistance
4 Folding Smart-e413
5 Seatpost & Saddle
14
6 Steering wheel
15
7 Lightning
16
5.1
5.2
6.1
6.2
7.1
2
Saddle height
Adjusting saddle height
Steering wheel height
Adjusting steering wheel height
Setting lighning on and off
QWIC Electric Bicycle Manual
8 Brakes
17
9 Tires
17
8.1
8.2
8.3
9.1
Adjusting brakes
Additional information rollerbrakes
Additional information V-brakes
Tire pression
10 Gears
18
11 Lock
18
12 Maintenance
19
13 Warnings
24
14 Warranty
25
10.1 Shifting gears
11.1 Additional information lock
12.1
12.2 12.3 12.4 12.5 12.6
12.7
12.8 General maintenance
Cleaning
Treatment
general inspection
Roadworthy inspection
Service check-up
Big maintenance check-up
Service chart
QWIC Electric Bicycle Manual
3
1Display
1.1 Screen information
The display will only work if the battery is in the bike. Switch the display on with the
‘ON / OFF’ Button
8
5
6
1
2
SET
+
3
4
10
-
fig. 1.1
7
1.
2.
3.
4.
5.
6.
11
On / Off & (Screen) Lighting
Selection options & Menu
Power level up & Walk assist
Power level down
Accu indicator
Speed
9
7.
8.
9.
10.
11.
Totaal afstand
Total distance traveled by bicycle
Resetting is not possible
Timer
Effective driven time since last reset
Reset: ‘MINUS’ 3 sec. pressed
Trip afstand
Driven distance since last reset
Reset: ‘MINUS’ 3 sec. pressed
Failure
See 1.3 for failure codes overview
4
QWIC Electric Bicycle Manual
Assistance level
Energy consumption indicator
Menu
Menu icons
USB (not working)
Maximum speed
Maximum driven speed
Shuffle mode
Shuffle through the four options above
Tiresize
Keep ‘SET’ 10 sec. pressed and then set
with ‘PLUS’ and ‘MINUS’ the desired
tiresize. (see table 1.9)
1.2 Menu
Selecting Menus
Press and release ‘SET’ and then use the ‘PLUS’ and ‘MINUS’ buttons to switch
between the menus. Press ‘SET’ to hold this function.
1.3 Screen lightning
Press the ‘ON/OFF’ button to turn on the (screen) lighting. Press ‘ON/OFF’ again to
turn it off again. When you turn on the screen light, the front and rear light will turn
automatically on as well. They work as well on the battery, so no extra batteries are
required.
1.4 Adjusting the pedal assistance
Use the ‘PLUS’ and ‘MINUS’ buttons to select the assistance programs (0 - 8). Power
level 8 gives the strongest assistance. In power level 0 the motor gives no assistance
but you can use the display of the bike. Please note that the battery runs out of
power faster when using a high power level than with a low power level.
1.5 Controlling the Walk-Assist
Use the Walk Assist feature to easily take the bicycle by the hand, by for example
taking it out of a bicycle cellar.
Stand firmly next to the bike and hold your hands on the wheel. If the is a brake
lever present, keep at least one hand on the brake where the brake-circuitbreaker
(interruption of the motor assistance) is present.
In general, this is the left brake lever. Keep the ‘PLUS’ button pressed while firmly
holding the steering wheel. After a few seconds the engine starts. Once you release
the ‘PLUS’ button the Walk Assist function switches itself off. The Walk Assist had a
speed of 3 Km/h.
1.6 Error codes
Code 01: Problem with 3-phase control from the controller of motor
Code 02: Problem with throttle connection (not in use)
Code 03: Motorcable 3-phase wiring loose or defective
Code 04: Motorcable Hall Sensor signal Malfunction(Malfunction in motor or
motorcable)
Code 05: Malfunction in brake sensor(signal)
Code 06: Battery voltage too low
Code 07: Motorcable is connected incorrectly
Code 08: Malfunction in display cable
Code 09: Malfunction in pedalsensor(signal)
Code 10: Malfunction in display cable
QWIC Electric Bicycle Manual
5
1.7 Switching on/off
Press the ‘ON/OFF’ button for 2 seconds to turn off the system. The control panel
can be used only when the battery is connected to the bike. When the display is
turned off while riding the bike, or when riding without battery, it is possible that
random values are displayed as the motor generates light powerstreams. Everything
that appears on the display whan the system is not activated, can be ignored.
1.8 Tire size / Wheel size (mm)
Setting the correct tiresize (mm) can be done by pressing the ‘SET’ button for 10
seconds. *The pre-set sizes can have a small deviation. This means that the amount
of driven kilometers deviates maximum 5%.
E-bike
ETRTO
Smart-e foldable bike
53-406
20x1.95
1590*
Trend 3+ / Trend 3 Lite
40-622
28x1.5
2224*
Urban 3
50-622
28x2.00
2268*
6
QWIC Electric Bicycle Manual
setting
2Battery
2.1 Range
How great is the range of my electric bike?
The total distance that you can travel per trip with you QWIC e-bike without
recharging in between is the range. To assess this properly, you should leave the bike
/ battery a whole night on the charger. The range should be measured during one
trip and not spread over several days.
* Batteries run slowly empty even if the bicycle is not used. If the battery is
connected to the bike it will run out of power faster than if it is taken out and stored
inside.
Capacity battery
The amount of enery in a battery is expressed in Watt-hours (Wh). The number of
Watt-hours is calculated by multiplying the number of Ampere-hours (Ah) times the
nominal Voltage (36V). The higher the amount of Watt-hours, the higher the range!
Calculation example: Suppose your battery has a capacity of 10 Ah and a voltage 36
Volts. This battery delivers: 10 Ah x 36V = 360 Wh.
QWIC provides bikes with 216 Wh, 360 Wh and 432 Wh batteries. Which battery you
have, you can read at the bottom of the battery. The following chart is an indication
of the expected range per battery type.
WhExpected range**
216
30 - 60 km
288*
40 - 70 km
360
50 - 100 km
432
70 - 130 km
* Only available on certain foldable bicycles
** Measured on a flat roadsurface under average conditions and with an outside
temperature of about 20 degrees, with an average speed of about 20 km/h and a
total of approximately 75kg load. No rights can be derived from these values.
There is a number of influencing factors which can significantly shorten the range.
Many of these factors can be overcome, so that the range is positively affected. Ask
your dealer for personal advice.
QWIC Electric Bicycle Manual
7
Range of QWIC electric bicycles
Factors influencing range:
* The total weight (weight of bike + rider + cargo)
* The resistance (wind, tire pressure, speed, road conditions and altitude
differences)
* Your driving behavior (timely shifting up and down and driven speed)
* The outside temperature
* Battery age (battery capacity decreases as the battery ages)
* The use of the power assistance programs (see figure below)
WARNING! Each year the capacity will decrease with a maximum of
15%. This depends on the amount of charging
2.2 Detaching the battery
On the left rear of your bike is the battery lock. This lets you lock the battery to the
bike or lets you take it out. You can use the same key as the ring lock. To unlock:
insert the key in the lock and turn it counterclockwise. Use the handle on the
bottom of the battery in order to take it out.
Remove the key when you slide the battery back in. By sliding the battery fully back
you will hear a click and the battery is locked. Locking can also be done with the key
in it, by turning the key clockwise after placing the battery. (fig. 2.1 and fig. 2.2)
fig. 2.1
fig. 2.2
With the Smart-e foldable bicycle the battery lock is at left side on top of the
battery. By flipping the saddle with the handle bar, the battery is easy to remove.
8
QWIC Electric Bicycle Manual
2.3 Charging the battery
With the supplied charger you can charge the battery. (fig 2.5) You can charge
the bike both on the bike as off the bike. The loading connection of the battery is
covered by a turnable plastic cap.(fig 2.4) During charging a red light will be visible
on the charger. When this indicator is green, the battery is fully charged. (fig 2.6)
fig. 2.4
fig. 2.5
fig. 2.6
* Attention! For your safety, you can charge and / or store the battery the
best in a (fire) safe place.
* Attention! If the battery is not used for a long time is can sustain
permanent damage. Make sure you fully charge the battery every 3 months
(24 hours on the charger)
* Attention! When the battery is completely empty, you need to charge it
immediatly. When cells are empty for a long time, they may be irreparably
damaged.
* Attention! If the bike is not used for a long time, we recommend you to
remove the battery from the bike.
* Attention! Use only the supplied charger.
* Attention! Use your charger only in dry, well-ventilated places.
* Attention! The battery charger is not resistant against moisture and / or
drop down shocks.
QWIC Electric Bicycle Manual
9
2.4 Further information about the battery
* The environmental burden is not heavy, electricity is part of clean forms energy.
Your battery should be (just like normal batteries) submitted in order to be recycled
at the end of the life cycle (look for a drop-off point in your area).
* The battery pack can, under ideal conditions, be fully charged and discharged
around 1000 - 1500 times. The performance will slowly decline by lots of use, and
eventually the battery pack should be replaced.
* The performance of the battery will decrease at low temperatures. The referred
range is optimal at a measured temperature of approximately +/-25 °C. The guideline
is that the capacity decreases by 1 % at a 1 °C temperature drop.
* Do not connect the positive contact point of the battery to the negative contact
point.
* Do not expose the battery to high temperatures
(> 50 °C), such as heat and fire.
* Do not take the battery apart. Consult your dealer by any problems. With longterm storage, place the battery in a shady, cool and dry place.
* The battery is sealed and therefore resistant to rain. So you can use you bike well in
bad weather. Try not to expose the battery to large amounts of water.
* Attention! The capacity will increase the first 4 - 10 charging cycles (e.g. up
to appoximately 1000 km with the 560 Wh battery) and only then reach its fully
specified capacity range.
* Attention! Capacity may be reduced up to 15 % per year. The decrease depends on
usage and charging cycles.
* Attention! It may happen that same bicycles purchased at the same time give a
different range. New batteries provide minimal their specified values. There can be a
slight variation, so it is possible that one of the bikes performs above specifications.
* Attention! The battery without luggage is only suitable for small loads such as
bages, up to max 10 kg.
* Attention! Child seats or heavy load (up to max 20 kg) can only be connected to
the carrier, which can be ordered optionally.
10 QWIC Electric Bicycle Manual
3
Pedal assistance
3.1 What is pedal assistance?
The bike is equipped with electric pedal assistance. The motor enhances your
efforts, thus increasing your performance while you deliver less power. The
functioning of the pedal assistance depends on whether the pedals are rotated and
the cycling speed. When accelerating from stand, the acceleration is great so have
an easy start on the way.
3.2 Setting pedal assistance on/off
Once the display is turned on the power level is set in level 0. The ‘PLUS’ and
‘MINUS’ buttons can be used to enlarge or lessen the assistance level. The motor
gives assistance in the power levels 1-8, where 8 gives the highest power assistance.
You can turn off the pedal assistance by pressing the ‘MINUS’ button on to power
level 0. Please note that the battery runs out of power faster when using a high
power level than with a low power level. (fig 3.1)
* Also the tire pressure, the mass of the user, the surroundings, the temperature and
the cycling behavior can have a major impact on the range.
8
7
6
5
4
3
2
1
QWIC Electric Bicycle Manual
11
3.3 Further information on pedal assistance
* Due to the powerful support you will easier achieve high speeds than usual. Do not
let yourself be suprised, use the bike for the first time in a low traffic environment,
to get used to the bike.
* Stepping up the bike, if the pedal assistance is turned on, is unlike a normal bike.
You will drive off easier. It is advisable to use powerlevel 1-3, for driving away from
stand.
* When the pedal assistance is turned off, the bicycle will have very minimal
resistance. In this way, the bicycle can also be used a normal bike. Be careful
however that if you ride without a battery, the lighting also can not work.
* The functioning of the pedal assistance is dependent on the cycling speed, the set
power level program and how full the battery is.
* The pedal assistance is legally limited to a speed of 25 km/h. This means that if
you are going towards a speed of 25 km/h the pedal power will decrease to zero
gradually.
* The range of the bicycle depends on the circumstances. The given values are
measured under average conditions. The most important factors are:
weight of rider, speed, slopes in the trail, tire pressure, wind, lots of accelerating and
braking (e.g. in the city) and the temperature. At very low temperatures, the range
will be influenced greatly. Take this into account.
* Attention! Turn the assistance off when you step off the bicycle. Never walk with
enabled assistance.
* Attention! Keep the left brake lever (if present and possibly also supplied with
brake circuit-breaker) pressed in when you are stationary with enabled power
assistance.
12 QWIC Electric Bicycle Manual
4
Folding the Smart-e4
1.
Flip the side stand completely
2.
Flip the pedal to the upwards position
3. Unlock the frame clamp (fig. 5.1, fig 5.2). and
fold the frame
4. Unlock the steer clamp (fig. 5.3 - fig. 5.4) and
fold the steering wheel against the right side of the
bicycle. Be aware of any cables getting stuck behind
the saddle
5.
Lower the saddle to its lowest position
6.
Lower the steering wheel to its lowest position
fig. 5.1
fig. 5.2
fig. 5.3
fig. 5.4
fig. 5.5
fig. 5.6
QWIC Electric Bicycle Manual
13
5Saddle
5.1 Desired seat height
With the seat height the distance between the saddle and pedal in the lower
position is meant. The seat height is properly adjusted when the knee is bent just a
little while you stand with your foot on the pedal (in the lower position). Please do
not hesitate to ask your dealer for advice!
* Attention! If you can put your feet flat on the ground, your saddle is too low.
5.2 Seat adjustment
The height of the seat can be adjusted by turning the Allen bolt in the seat clamp
loose with an Allen key. fig 5.2
* Attention! The safety marks should never be visible when the seat is adjusted in
height.
fig.5.1
fig. 5.2
By the saddle connection you can tilt the seat and adjust it to front as well as to the
back. To adjust the saddle use an Allen key to loosen the Allen bolt on the underside
of the saddle connection. fig 5.4
fig. 5.3
14 QWIC Electric Bicycle Manual
fig. 5.4
6
Handle bars
6.1 Desired handlebar setting
As a rule of thumb for determing the distance between the handlebar and the
saddle is that you should be able to touch the handlebars with your fist while you
hold your elbow at the point of the saddle. Note that this rule of thumb should be
seen as a guideline, because this setting is very personal. Note also that a too big
distance between the saddle and the handlebars, often can be the cause of neck,
back, and shoulder complaints. We recommend that you adjust the saddle and
handlebars to your wishes together with your dealer.
6.2 Adjusting the handle bars
You can adjust the height of the handlebars by, with the big lever up, tilt the
handlebars all the way down. After this, the Allen bolt is visible and accessible, after
loosening this bolt, you can adjust the height.
C
B
A
fig. 6.1
By the foldable bicycles (Smart-e) you can tilt the handlebars by loosen the Allen bolt
on the front. The height of the handlebars can be adjusted by turning the Allen Bolt
on the top. These bolts can be potentially covered by protective caps.
*Attention! Do not forget to tighten the bolts after adjustments and make sure that
your handlebars are attached firmly again.
QWIC Electric Bicycle Manual
15
7Lightning
7.1 Switching lightning on/off
The Smart-e foldable bicycles have battery front- and rearlightning. You can switch
these on or off with the buttons on top of these lightning elements.
8Brakes
Rollerbrakes will provide a luxurious braking experience, are durable and require
just little maintenance as well. V-brakes are lightweight and provide a good sense
of control. With too much wear and tear (if the notches are no longer visible), the
brake pads must be replaced.
8.1 Adjusting the brake sensitivity
With the cable adjuster at the brake lever, you can fine tune the brake sensitivity.
By turning the adjuster closer you increase the slack of the cable and by rotating it
open, you chuck the cable right on.
fig. 8.5
16 QWIC Electric Bicycle Manual
8.3 Additional information V-brakes
The brake pads must be mounted so that the blocks hit the side completely. The
cable can be adjusted with the set screw. There must be the same amount of space
between tboth the brake pads and the rims. If this is not the case, you can center
the brake by adjusting the screws on the side of the brake lever.
(See the image below)
fig. 8.2
9Tires
9.1 Desired tire tension
The tire pressure has a strong influence on the range and comfort of your bicycle.
QWIC advises you to always keep your tires at the right pressure. On the side of all
tires the maximum tire pressure can be found.
QWIC Electric Bicycle Manual
17
10Gears
10.1 Shifting gears
The bicycles have hub or derailleur gears, depending of the bicycle model. The gears
can be shifted by handling the gripshifter which is integrated in the right gripshifter
(fig 10.1) The display of the shifter provides you the information about which gear
you’re in. Please shift one gear at the time.
How to shift gears
Hub gear: With the hub gears you can easily shift gears, even in a
standstil.
Derailleur gear: Dont shift gear in a standstil and never cycle backwards.
fig. 10.1
11Lock
11.1 Lock information
Your e-bike is equipped with an ART approved AXA ring lock. The ring lock can be
closed by turning the key clockwise while turning the bracket down. Now take the
key from the lock when you have reached the lowest position with the bracket.
To purchase ensurance for the electric bicycle the following specifications are
requested:
- Brand and type name: QWIC, electric bicycle, type of model (D9.1 / N7.1 / A2.1)
- Frame number: your unique framenumber
(page 2), Starting with E F Y
- Brand and type ART certified lock: AXA defender
- Key number: Your unique key number
- Date of purchase: Your date of purchase
* Be aware! There is one key for the ART certified lock and the battery as well.
18 QWIC Electric Bicycle Manual
12Maintenance
QWIC advises you to take a quick check-up at the QWIC dealer on a regular basis.
QWIC advises you to submit your electric bicycle to a mayor overhaul at least once
a year. The first maintenance visit is recommended after 250 km or after 3 months
from purchasing. Additional service would be advised when necessary. For example
before the cycling season starts.
Please note that taking a check-up from time to time will decrease the possibility of
unnecessary costs and damages!
QWIC provides you with a few tips to keep the electric bicycle in the best condition
as long as possible.
* There are plenty of alternatives to be insured for service-on-the-road. For just
a small fee each year, you will be insured against any future annoyances. On our
website you will find a list of possibilities.
12.1 Regular cleaning
You should clean the electric bicycle with lukewarm water on a regular basis. Please
not that an abundance of water should not be used near the electronics and the
battery.
Please take care of providing the motion sensor the get dirty. When cleaning the
bicycle you should remove the battery. Never use a high-intensity water hose!
Many parts of the electric bicycle needs acid-free oil, grease or vaseline. When
washed away, you should bring it back on the greased parts.
Besides regular cleaning, it is recommended to treat your bicycle properly. QWIC
advises you to grease the chromes parts, uncoated aluminum and all stainless steel
components with acid-free vaseline to prevend oxidation and rust. Rotation parts
need grease or oil. QWIC recommends you to grease the chain, cassette and axels on
a regular basis.
QWIC Electric Bicycle Manual
19
12.3 Treatment
Besides regular cleaning, it is recommended to treat your bicycle properly. QWIC
advises you to grease the chromes parts, uncoated aluminum and all stainless steel
components with acid-free vaseline to prevend oxidation and rust. Rotation parts
need grease or oil. QWIC recommends you to grease the chain, cassette and axels on
a regular basis.
12.4 General control
Check the following items on a regular basis:
* Is the battery fully charged?
* Do the brakes both still work properly? Check the bolts and screws for tightness? Is
there any wear and tear visible on cables, brakes or tires?
* Is the bicycle set at the right height and position? Do you still sit in the best,
comfortable way? Does the steer wheel alignment still match with the position of
the front wheel?
* Are both the seatpost and the steer stem still adjusted properly?
* Do the handlebars still feel comfortable?
* Is there still enough tension on the spokes of both wheels? Are there any spokes
broken?
* Check the tire tension and grip
* Do the lights still work? Is the electric bicycle visible in a proper way after dark? Are
the reflectors clean and visible? Are the reflective stripes on the tires still reflective?
* Do the motion sensor and the power levels still work properly?
* Do all the gears still shift smoothly?
* Is the chain tension still correct?
* Does the electric bicycle needs a quick maintenance?
20 QWIC Electric Bicycle Manual
12.5 Inspection QWIC dealer check-up
You can take a general inspection to the (new) electric bicycle along with the
following bullet points:
* Are there any visible damages?
* Is the bicycle properly secured on the stand?
* Does the bicycle make odd noises when driving?
* Is the seatpost greased? (with vaseline)
* Is the steer stam greased? (with vaseline)
* Is there any slack in the bearings on the front fork?
* Are all bolts and nuts provided with white tectyl?
* Are the tires greased with vaseline?
* Does the lock run smoothly?
* Does the stand works smoothly?
* How does the bell sound? Is it mounted at the right position?
* Are both the pedals greased and mounted properly?
When some points are not taken care of properly, please contact your QWIC dealer.
12.6 Maintenance Service
QWIC advises you to submit your electric bicycle to a mayor overhaul at least once
a year. The first maintenance visit is recommended after 250 km or after 3 months
from purchasing. Additional servicing would be advised when necessary. For
example before the cycling season starts.
* Check the rims, spokes, tension and grip of the tires
* Tighten all mounting parts / bolts if necessary.
* Check the brakes for wear and tear, adjust the cable tension and check the brake
function.
* Check the headset for slack, check the steer stam and adjust when needed
* Lubricate and assembly the chain to the right tension.
* Full electrical system: Fully charge the battery, clean the motion sensor with
lukewarm water, use contact spray for any contacs, grease the battery terminals and
battery rails with vaseline and check the complete drive train for any malfunction.
* Derailleur: Make sure all the gears run smoothly.Adjust when needed.
QWIC Electric Bicycle Manual
21
12.7 Mayor maintenance check
QWIC advised you to submit your electric bicycle to a mayor overhaul at least once a
year.
The points below are additional to normal service:
* Deassembly, degrease, lubricate and assembly the chain and cassette back
together.
*Deassembly, degrease, lubricate and adjust the hubs back as original.
* Check the spoke tention and adjust the wheels
* Check the tires and adjust the tension.
* Deassembly, degrease, lubricate and assembly the bracket back together.
* Check the crank and pedals and adjust back as original when needed
* Deassembly, degrease, lubricate and assembly the derailleur wheel back together.
* Deassembly, degrease, lubricate and put the inner gear and brake cables back in
place.
* Check the gears and lubricate the shifters
* Check the brakes and lubricate the lever blades
* Check and lubricate the lock
* Check and lubricate the stand
* Check the lightning and adjust back to original when needed
* Deassembly, degrease, lubricate and assembly the head set back as original.
* Deassembly, degrease, lubricate and adjust the steer stam back at the right hight.
* Deassembly, degrease, lubricate (Vaseline) and adjust the seat post back at the
right hight.
* Tighten the saddle
* Wax and rub the bicycle with a protection wax
* Take a testdrive to check all changes
22 QWIC Electric Bicycle Manual
__/__/____
__/__/____
__/__/____
__/__/____
__/__/____
__/__/____
__/__/____
__/__/____
Kilometrage:
Mechanic:
kKilometrage:
Mechanic:
Kilometrage:
Mechanic:
Kilometrage:
Mechanic:
Kilometrage:
Mechanic:
Kilometrage:
Mechanic:
Kilometrage:
Mechanic:
Kilometrage:
Mechanic:
2
3
4
5
6
7
8
Date
succeeded
1
Remarks
Kilometrage / Mechanic
Visit
Stamp
12.8 Servicetable
QWIC Electric Bicycle Manual
23
13Warnings
* For charging the battery only the provided charger can be used.
* To a powerful jet of water can damage the electronics of the bike. The warranty
will expire.
* Improper use can put yourself and others at risk. With improper use, the warranty
will expire
* Do not use any other battery then the one provided by QWIC.
* Never insert objects into the charger and expose both the charger and the battery
and electronics to water or other liquids, or excessive heat.
* Both lights will work only when there’s energy provided from the battery. Without
the battery, the lightning won’t work.
* Go to your QWIC dealer to provide maintenance to all our electric bicycles
24 QWIC Electric Bicycle Manual
14 Guarantee
For optimal support we ask you to fill out the warranty card at:
www.qwic.eu/warranty
There is a 5 year warranty for the aluminum frame. All electrical components and
the batterie
The 2 years product guarantee covers the electrical driving system (incl. motor,
display, and controller, except the Li-Ion battery, which is a wearing part.
Nevertheless, an excessive wear of the battery is covered by a limited guarantee for
up to 2 years after production date (under normal operating conditions).
Any guarantee is limited with the general terms and conditions. These can be found
at our website: www.qwic.eu/warranty.
QWIC Electric Bicycle Manual
25
Your dealer