1
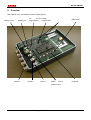
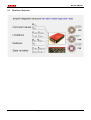
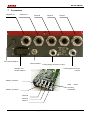
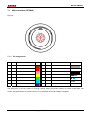
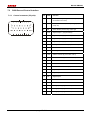
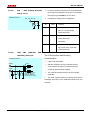
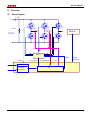
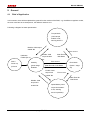
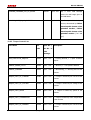
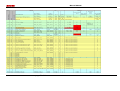
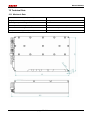
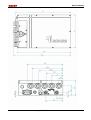
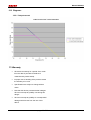
BRUSA Elektronik AG
Neudorf 14
Postfach 55
CH - 9466 Sennwald
DMC 524
User’s Manual
Version 01
DMC524_Manual_V04.doc
19.01.08
page 1 of 41
[email protected]
www.brusa.biz
Tel. +41 81-758 19 00
Fax +41 81-758 19 99
Manual DMC524
Table of contents:
1
Before operation ..................................................................................................... 4
2
For Safe Use of this Unit......................................................................................... 4
3
General Description ................................................................................................ 7
3.1
Features .................................................................................................................... 7
3.2
Applications ............................................................................................................... 7
4
Specifications.......................................................................................................... 8
5
Scope of delivery .................................................................................................... 9
6
Overview ............................................................................................................... 11
6.1
7
Functional Overview ................................................................................................ 12
Connectors............................................................................................................ 13
7.1
Motor Interface (RPS048)........................................................................................ 14
7.1.1
7.2
Pin assignment: ...............................................................................................................................14
CAN Bus and Control Interface ............................................................................... 15
7.2.1
Control connector (23-pole): ............................................................................................................15
7.2.2
Description of the Control Connectorpins ........................................................................................16
7.2.2.1
GND (Ground), Pin 1 ...............................................................................................................16
7.2.2.2
AUX (Auxiliary Supply), Pin 2...................................................................................................16
7.2.2.3
EN (Enable, Power ON), Pin 3 .................................................................................................17
7.2.2.4
DO0 – DO3 (Digital Outputs), Pins 3 - 7 ................................................................................17
7.2.2.5
PG1 – PG3 (Analog Ground), Pins 8, 14, 15............................................................................18
7.2.2.6
CNH, CNL (CAN-Bus, CAN-Interface), Pins 9, 10 ....................................................................18
7.2.2.7
TXD, RXD (RS232-Interface), Pins 11, 12 ...............................................................................19
7.2.2.8
PRO (Enable firmware download), Pin 13 ...............................................................................19
7.2.2.9
DI0 – DI2 (Digital Inputs), Pins 16 – 18...................................................................................19
7.2.2.10
8
AI1 – AI3 (Analog Inputs), Pins 21 – 23..............................................................................20
Overview ............................................................................................................... 21
8.1
9
Block Diagram ......................................................................................................... 21
General ................................................................................................................. 22
9.1
Field of Application .................................................................................................. 22
9.2
Stand by Mode, Normal Operation, Supply ............................................................. 23
9.3
Regulator Modes ..................................................................................................... 23
19.01.08
page 2 of 41
Manual DMC524
9.3.1
Torque Mode....................................................................................................................................23
9.3.2
Speed Mode (formerly torque limit mode) .......................................................................................23
9.4
Error and Warning Modes ....................................................................................... 23
9.4.1
Error definition..................................................................................................................................23
9.4.1.1
9.4.2
Short Circuit / Error .................................................................................................................23
Warning Definition............................................................................................................................24
9.5
Safety Line .............................................................................................................. 24
9.6
DMC524 Firmware Update ...................................................................................... 25
9.6.1
Requirements...................................................................................................................................25
9.6.2
Setup of DMC524 and PC ...............................................................................................................25
9.6.3
Installation of the Flash Loader Program.........................................................................................26
10
CAN Bus Protocol.............................................................................................. 30
10.1
Data Format and Range Definitions ........................................................................ 30
10.2
Error and Warning Definitions & Handling ............................................................... 30
10.2.1
Error Definition:............................................................................................................................30
10.2.2
Error List ......................................................................................................................................30
10.2.3
Warning Definition .......................................................................................................................32
10.2.4
Warning Description ....................................................................................................................32
10.2.5
Torque Control List ......................................................................................................................33
10.3
Can Bus Commands ............................................................................................... 34
10.3.1
Version: DMC5_CAN_Spec_3.0.xls:...........................................................................................34
11
Operation of the device ..................................................................................... 36
12
Technical Data................................................................................................... 37
12.1
Mechanic Data......................................................................................................... 37
12.2
Electronic Data ........................................................................................................ 40
12.3
Diagrams ................................................................................................................. 41
12.3.1
13
19.01.08
Output current..............................................................................................................................41
Warranty ............................................................................................................ 41
page 3 of 41
Manual DMC524
Specifications are subject to change without notice.
1 Before operation
Dear Customer!
With the BRUSA power inverter DMC524 you purchased a powerful and versatile product. To take advantage of
its features and to avoid danger for man and material please read the operating instructions carefully before
operating the unit. We recommend to keep the user’s manual for later reference.
Changes to the user’s manual are subject to further development of the device and won’t be announced. Please
download the latest version of this manual on: www.brusa.biz.
2 For Safe Use of this Unit
For your safety
•
Read the manual carefully
•
Please note that careless handling of high DC
voltages can be very dangerous and lethal. So
please take time to read the manual and connect
the unit properly and call a skilled professional in
any case.
•
Note that lethal voltages exist around this unit. We
cannot accept any liability concerning this danger.
19.01.08
page 4 of 41
Manual DMC524
This unit produces waste heat. Touching the
hot unit can lead to injuries and burnings.
Please do not install easy flammable material
close to the unit.
For your safety
Have the unit installed and made operational by
a skilled professional.
Do not open the unit without contacting the
manufacturer before.
Do not connect the high voltage connector
before being sure the device is separated from
the high voltage DC-link (e.g.: in a vehicle by
contactors).
Never disconnect the high voltage connectors
before being sure that there is no high voltage
on the DC-link anymore.
Use an insulation failure detector in order to
monitor the galvanic insulation between any
electrical contact and chassis.
Do not open the unit without contacting the
manufacturer beforehand.
Never pull the battery plug out of the unit
without breaking the HV connection beforehand
19.01.08
page 5 of 41
Manual DMC524
To prevent from damage of the device
Ensure that for the high voltage circuit fuses or
contactors are used in order to prevent the unit
from damage in case of failure conditions
Do not make any galvanic, electrical or low
ohmic connection between any electrical
contact, going out or coming from the DMC, to
earth or chassis. This could destroy the DMC.
Ensure sufficient cooling of the device. A low
temperature of the cooling water has a
considerable positive effect on the lifetime.
Avoid operation of the device next to a heat
source or in direct sunlight.
Even though the high IP-protection, we
recommend to not expose the unit to rain or
splash water.
We cannot accept any liability for consequential damages which arose from the use of this device.
19.01.08
page 6 of 41
Manual DMC524
3 General Description
The DMC524 is a universal hardware inverter to drive a wide range of three-phase motors like induction motors,
synchronous motors and hybrid synchronous motors.
The power stage of the DMC524 is based on the high performance and high efficiency SoftSwing® Topology
invented by BRUSA Elektronik AG. This ensures very low switching losses and allows a real compact and
lightweight design. In addition, EMC compliance can easily be achieved (no weight and volume of external
filtering elements). The DMC524 is controlled by CAN. Status feedback in physical dimensions is provided too.
3.1
Features
•
compact and lightweight: up to 15kW/kg
•
Proprietary SoftSwing topology:
o
high efficiency and low EMI
o
fast and smooth regulation due to high PWM frequency
o
no degradation of motor isolation
o
high speed applications
•
Control algorithms for AC induction and PM synchronous motors
•
Torque, speed and power control
•
CAN BUS and analog control interface
•
Control supply from high voltage or 12V/24V auxiliary board supply
•
Input and output common mode filters included
•
Integrated cable box for easy installation
3.2
Applications
•
Automotive drives for hybrid and fuel cell vehicles
•
Hybrid bus traction or generator inverter
•
Drives for Streetcars and Buses with overhead contact system
•
Turbine applications (Turbo-generator, Compressor)
•
High speed machining tools
19.01.08
page 7 of 41
Manual DMC524
4 Specifications
Tambient=25°C, Tcoolant=72°C, unless otherwise noted
Type
DMC
524
Input DC Voltage (including HV supply voltage)
Typical Input DC undervoltage shutdown
V
Minimum Input DC voltage for operation
V
Minimum Input DC voltage for full current capability
VDCmin
V
Maximum Input DCvoltage for operation
VDCmax
V
Typical Input DC overvoltage shutdown
V
Maximum Input DC surviving voltage
V
Three Phase AC Output
Continuous RMS current
IACcont
repetitive max. RMS current 30sec 100%, 90sec 50%
Peak RMS current derating vs. Tcoolant>72°C.
225
A
300
A
-6
A/°C
PACcont
80
kW
Max. Power (VDC=75%VDCmax, IAC=IACmax, cosφ=0,9)1
PACmax
106
kW
PWM Frequency (symmetrical modulation)
fPWM
24
kHz
Cont. Power (VDC=75%VDCmax, IAC=IACcont, cosφ=0,9)
1
Efficiency (VDC=75%VDCmax, PAC=PACcont, cosφ=0,9)1
0.97
Mechanical and Environment
Height
h
88
mm
Width
w
240
mm
Length (without connections and cable clamps)
l
360
mm
Length (with connections and cable clamps)
l
386
mm
m
9.2
kg
65
hPa
2.4
kW
Weight (with cooling water)
Coolant pressure drop @ 6l/min, Tcoolant = 25°C
2
Power dissipation to coolant (IAC = IACcont)
Ptot
Operational ambient temperature range
-40...+85 °C
protection grade
IP65
Connections
DC Input: 2 cable shoes M8; max cable cross section
70
mm2
AC output: 3 cable shoes M8; max cable cross section
70
mm2
23 pole AMP control connector, wire cross section
0.5
mm2
14
mm
Universal 14 pole Motor Sensor Interface connector
recommended coolant hose inside diameter
Note 1: 100% AC Sine Modulation, Phase-to-Phase AC Voltage amlitude = VDC
Note 2: coolant = water / glycol, 50/50
19.01.08
page 8 of 41
Manual DMC524
5 Scope of delivery
Qty
description
1
inverter with software
1
manual of the inverter
1
CD with application software
5
crimp contacts for the power cables
5
washers for the crimp contacts
5
mounting screws for the crimp contacts
5
screwed cable glands for the power cables
1
special tool for the screwed cable glands
1
AMP connector with 25 pins
5
closing plugs for the cable glands
2
closing plugs for the water connections
19.01.08
page 9 of 41
Manual DMC524
A complete set to run the inverter:
Inverter DMC524
•
mounting screws for the crimp contacts
•
washers for the crimp contacts
•
screwed cable glands for the power cables
•
special tool for the screwed cable glands
•
crimp contacts for the power cables
•
closing plugs for the cable glands
•
closing plugs for the water connections
23-pole control connector with crimp contacts:
19.01.08
•
AMPSEAL socket:
•
AMPSEAL contacts: 770854-1
•
Wire size: 0.5mm2
page 10 of 41
770680-1
Manual DMC524
6 Overview
With opened cover, the DMC524 contains following parts:
DC
Battery minus
Battery plus
Phase R
current Voltage
measurement
Phase S
IGBT Driver
measurement
Phase T
Phase
current
measurement
19.01.08
page 11 of 41
Controller
Manual DMC524
6.1
19.01.08
Functional Overview
page 12 of 41
Manual DMC524
7 Connectors
Negative HV
Positive HV
Phase R
+
Air Pressure balance
Phase S
Phase T
_
Motor interface
Cooling water connector ∅15mm
CAN Bus and
Cooling water connector
∅15mm
Control interface
Battery connector cable
shoes
mounting
Battery connector +
backwords!
Phase R
Phase S
Phase T
19.01.08
page 13 of 41
Manual DMC524
7.1
Motor Interface (RPS048)
Plug out:
1
10
2
9
11
8
14
3
12
13
7
4
6
7.1.1
5
Pin assignment:
Pin
Def.
Function
Color
Pin
Def.
Function
Color
1
POS3
6-BIT Absolute Position
brown
8
POS0
6-BIT Absolute Position
gray
2
POS4
6-BIT Absolute Position
red
9
POS1
6-BIT Absolute Position
white
3
POS5
6-BIT Absolute Position
pink
10
POS2
6-BIT Absolute Position
black
4
GND
Ground Position Sensor
yellow
11
GND
Ground NTC / PTC
brown green
5
NTC
Motor NTC temperature sensor
green
12
MOT B
Motor sync signal B (incremental)
red blue
6
PTC
Motor high temperature switch
blue
13
MOT A
Motor sync signal A (incremental)
pink gray
7
5V DC
Motor interface supply 5VDC
violet
14
UPD
Position Update Signal
yellow brown
The 5VDC (Pin 7) are only present, if HV (high voltage, battery terminals>130VDC) is present at the DMC, that
means, the speed sensor or position sensor is only powered, when high voltage is supplied.
19.01.08
page 14 of 41
Manual DMC524
7.2
CAN Bus and Control Interface
7.2.1
Control connector (23-pole):
No.
Abbr.
Function
1
GND
Ground (Auxiliary voltage minus, clamp 31, not
connected to the case!)
8
1
9
16
19.01.08
15
23
2
AUX
+12V (+8V..+32VDC, auxiliary voltage plus,
clamp 30)
3
EN
Power Enable (Power ON), active high
4
DO0
Digital Output 1 (programmable)
5
DO1
Digital Output 2 (programmable)
6
DO2
Digital Output 3 (programmable)
7
DO3
Digital Output 4 (programmable)
8
PG1
Analog Protected Ground (for pins 20 – 23)
9
CNL
CAN low
10
CNH
CAN high
11
TXD
RS232 Transmit (9-pole D-Sub: Pin 2)
12
RXD
RS232 Receive (9-pole D-Sub: Pin 3)
13
PRO
Enable firmware download
14
PG2
CAN Protected Ground
15
PG3
RS232 Protected Ground (9-pole D-Sub: Pin 5)
16
DI0
Digital Input 0
17
DI1
Digital Input 1
18
DI2
Digital Input 2
19
IL1
Interlock Pin 1
20
IL2
Interlock Pin 2
21
AI1
Analog Input 1 (programmable)
22
AI2
Analog Input 2 (programmable)
23
AI3
Analog Input 3 (programmable)
page 15 of 41
Manual DMC524
7.2.2
Description of the Control
Connectorpins
7.2.2.1
GND (Ground), Pin 1
Direct connection to control unit ground .
Capacitive coupling to case only.
Internal Circuit
•
battery, battery management system, fuel cell) the
vehicle’s ground must be connected to this terminal.
Gehäuse/housing
7.2.2.2
If DMC524 control signals are connected to other
vehicle components (e.g. propulsion system, on-board
5µF
1MΩ
GND (1)
AUX (Auxiliary Supply), Pin 2
The CAN communication, RS232 communication,
firmware programmability of the microprocessor
Internal Circuit
15V
Current measurement
Driver / power stage
Supply
from HV
HV
Internal
Supply
5V/uP
and the possibility to measure the voltages and
temperatures is established by the internal 5V
supply. This supply is only fed by the AUX (+12V)
EN (3)
750mA
220uH
input. The DMC can’t work only by supplying by HV
6.8uF
(high voltage terminals)
30V
960nF
AUX (2) 100uH
Input current I_AUX at 12V-auxiliary supply:
•
EN = „L“: 29mA
EN = „H“: 42mA
If HV is also applied and high enough (>120V) and
no error is detected, the device is fully ready to
operate (current measurement active, driver and
power stage active).
19.01.08
page 16 of 41
Manual DMC524
7.2.2.3
EN (Enable, Power ON), Pin 3
By applying a voltage to AUX and by setting EN =
„high“ (+5V...32V) the device will be ready to
Interne Beschaltung
Internal Circuit
5V
6.9kΩ
operate. Reasonably this is realized by using a
switch in order to connect the enable-pin to the
3,3V
auxiliary supply.
EN (3)
1,0V
220pF
10kΩ
5V-Supply
Enable
If additionally high voltage is applied to the power
Schmitt
Trigger
interface, the device is fully ready to operate and
can be turned on and operated by sending
appropriate CAN-messages.
22kΩ
47nF
20.5kΩ
Otherwise a limited operation is possible as further
explained in the description of pin AUX.
In order to download a new firmware, EN does not
have to be „high”.
7.2.2.4
DO0 – DO3 (Digital Outputs),
With these four programmable digital outputs, low
Pins 3 - 7
frequency applications can be realized:
Drive LEDs for status functions (e.g.: under- or
Internal Circuit
overvoltage, exceeding of current limit, temperature
AUX
100kΩ
DO0 - DO3 (4 - 7)
derating,...).
Drive other external components (PWM for display
0.02Ω
All four digital outputs show the following features:
I0sink
10nF
instruments, relays, small fans,...).
•
Short circuit detection (Imax = 700mA).
•
Over-temperature shutdown.
•
Open load detection (by current source).
•
Independent detection of each of these failures and
providing of fault signal (e.g.: feedback to the
processor).
In case of such a failure at one of the outputs the
other outputs remain still fully functional as long as
such a failure does not lead to over-temperature
shut down of the other outputs.
All outputs can be driven with a frequency up to
1kHz.
19.01.08
page 17 of 41
Manual DMC524
7.2.2.5
PG1 – PG3 (Analog Ground),
In order to simplify external wiring, three additional
Pins 8, 14, 15
ground pins are available. Each pin is connected to
the supply’s ground GND by a PTC-fuse.
Internal Circuit
Following pin assignment is suggested:
1µF
300mA
PG1 – PG3 (8, 14, 15)
Nr.
Abbr.
Function
8
PG1
Analog Protected Ground (for
pins 20 - 23) (protected
means with fuse)
14
PG2
Protected Ground (protected
means with fuse)
CAN-GND
15
PG3
Protected RS232 Ground (9pol D-Sub: Pin 5, protected
means with fuse)
7.2.2.6
CNH,
CNL
(CAN-Bus,
Interface), Pins 9, 10
CAN-
The CAN interface has following
characteristics:
Internal Circuit
CAN 2.0 B, 500 kBaud
51uH
120Ω
CNH (10)
33V
33V
47pF
47pF
CNL (9)
Galvanic insulation from ground and all other
control signals in order to avoid interferences
51uH
caused by ground offset voltages.
The 120Ω termination resistor can be mounted
Termination resistor
and CAN choke is
optional (default is a
resistor but no choke)
optionally.
•
The CAN interface allows to transmit and receive
messages according to the CAN-matrix defined by the
customer.
19.01.08
page 18 of 41
Manual DMC524
7.2.2.7
TXD,
RXD
(RS232-Interface),
Pins 11, 12
•
The RS232 interface provides a direct serial
connection between the DMC524 and a computer. You
can use the standard Windows Hyperterminal tool on
Internal Circuit
the computer e.g. at COM1 and configure it to
RS232Transeiver
TXD (11)
19’200bits/sec, 8 bits, no parity, 1 stop bit and no
protocol in the hyperterminal. This connection is not
200Ω
intended for general use. Please contact Brusa
470pF
Elektronik AG ([email protected]) for further
470pF
33V
33V
200Ω
470pF
470pF
RXD (12)
informations.
•
You can also download firmware via these pin’s for
the microprocessor, which is provided by BRUSA
Elektronik AG (by setting PRO = “high”). For further
information regarding the download, please contact
directly BRUSA Elektronik AG. The download of a new
firmware may also only be done with agreement of
BRUSA Elektronik AG.
•
Pin assignment of the 9-pole D-sub socket:
TXD (11)
7.2.2.8
PRO
(Enable
firmware
RXD (12)
2
3
PG3 (15)
5
9 pin D-Sub
connector to the
PC, female
This pin is exclusively activated (PRO = „high“) to
download a new firmware, whereas EN does not
download), Pin 13
have to be „high”.
Internal Circuit
PRO = „high” causes the following actions
5V
regardless of supplying the device from HV or
220pF
10kΩ
5VSupply
Enable
1,0V
•
If the device is in operation, it will be shut down.
Schmitt
Trigger
•
The device is then ready to be programmed via the
serial interface.
22kΩ
10kΩ
22kΩ
47nF
auxiliary supply:
3,3V
PRO (13)
•
The download of a new firmware may only be done
with agreement of BRUSA Elektronik AG. The new
firmware could be sent by email.
7.2.2.9
DI0 – DI2 (Digital Inputs), Pins 16
•
– 18
realized by firmware upgrade and the needs of the
With these three inputs, various functions can be
customer.
19.01.08
page 19 of 41
Manual DMC524
7.2.2.10
AI1 – AI3 (Analog Inputs), Pins 21
With each of these three analog inputs two different
– 23
functions can be realized:
•
Internal Circuit
Analog
Multiplexer
47nF
22kΩ
33V
470pF
potentiometer
•
AI1 – AI3 (21 - 23)
1mA – current source for an external 5kΩ
33kΩ Pull-up – resistor for external 33kΩ NTC-
temperature sensor.
Each of these three analog inputs can be
programmed individually according to the
customer’s requirements. If all three inputs are
configured as current source, the following
functions could be realized:
•
AI1: Voltage limit
•
AI2: Current limit
•
AI3: Reserve
If the inputs are configured for temperature
measurement (Tmin = 25°C) of external
components, the following configuration can used:
19.01.08
•
AI1: Battery temperature
•
AI2: Cooling water temperature
•
AI3: Reserve
page 20 of 41
Manual DMC524
8 Overview
8.1
Block Diagram
I_HV
+
S
R
360uF
T
Motor
U HV
_
Driver
PWM
U_batt
Overcurrent
Temperature
CAN
Control
Interface
19.01.08
uP
page 21 of 41
I_mot
Motor
Interface
Manual DMC524
9 General
9.1
Field of Application
In this section, there will be explained the general function modes of the DMC, e.g. the different regulator modes,
the error mode and as a consequence, the different reactions to it.
Following a diagram for better presentation:
Torque Mode
Torquetorque
Mode
(“CAN
(“CAN
torque
enable” is set,
enable” active
is set,
warning
is
warning active is
Disable “CAN torque
enable” Bit
Error occurs
Hardware
Enable (Pin 3)
Start /
Power up
(HV and
Enable “CAN
Clear Error Bit
torque enable”
/ HW-Reset
Bit
Error occurs
Stand by
(power stage
Clear Error Bit / HW-Reset
Error Mode
(Power stage
off)
disabled
Enable “CAN
torque limit
Error occurs
enable” Bit
Clear Error Bit
/ HW-Reset
Disable “CAN
torque limit
enable” Bit
Speed Mode (“CAN
torque limit enable”
is set, warning
active is possible)
19.01.08
page 22 of 41
Manual DMC524
9.2
Stand by Mode, Normal Operation, Supply
See description at AUX (Auxiliary Supply), Pin 2 and at EN (Enable), Pin3 (page 16), which refer exactly to that
point in detail.
9.3
Regulator Modes
If no Torque Mode or Speed Mode is selected, the DMC is in stand by mode. The power stage is disabled.
9.3.1
Torque Mode
The main regulator is the torque regulator. You can choose the torque command value by CAN in the maximum
possible range, the DMC tries to reach this torque, if no limitations are active (warning).
It is possible, that the torque can be limited by a to high temperature of the motor or the inverter, by a to low
(motoring) or high (regeneration) battery voltage (HV), by a to high HV current, by a to high motor current, by a to
high speed. This controller will not work in this mode, if an error is active (error message on CAN).
•
Pay attention, if the motor has no load and you want command a high torque. The motor will
accelerate very fast until it reaches the maximum allowed speed (e.g. 30’000rpm or 100’000rpm).
9.3.2
Speed Mode (formerly torque limit mode)
The main regulator is the speed regulator. The negative or positive torque can simultaneously be limited/reduced,
so that the risk of an undesired condition is minimized. The DMC tries to follow to the desired speed with this
limited torque.
It is even possible, that the desired operating point can’t be reached due to a limitation of other regulators
(warning) or even completely disabled (error). The reason for reduction could be a to high temperature of the
motor or inverter, to high motor or battery current, a to low (motoring) or to high (regeneration) HV voltage.
The inverter will not work in this mode, if an error is active (error message on CAN) => error mode.
9.4
Error and Warning Modes
9.4.1
Error definition
Errors will result in full performance loss, which will cause the system to shut down without recovering
performance. The error will be latched and can only be cleared by the CAN-command bit ”clear error” or by
hardware reset. For further details please refer to the valid CAN-Matrix.
9.4.1.1 Short Circuit / Error
If a short circuit for more than 16 times during 2 seconds is detected from the drivers at the power stage, the
power stage will be switched off permanently and the error_bitmap will be set (Gate unit, “short circuit condition”
at message 0x25A, Byte 0, Bit7)
If there are less than 16 short circuits during 2 seconds, the power stage will be switched off only for 50ms.
19.01.08
page 23 of 41
Manual DMC524
9.4.2
Warning Definition
Warnings may cause reduction of performance by internal DMC situations (inverter temperature) or loss of
performance caused by external interface (e.g. undervoltage, loss of communication etc.) .Warnings will not be
latched and full performance can be restored, when warning condition is corrected. Error and warning status are
updated in periodic CAN-messages.
9.5
Safety Line
Output from DMC:
If the “Main contactor request Pin” Bit at the CAN message 0x210 (CMS_B_MC_REQ) is set, the safety line (Pin
5 at Control Interface) is pulled down (active low), otherwise it is free and can be pulled down also by other
devices connected to the safety line.
Input:
If LOW (active low) is detected on the safety line (Pin 5 at Control Interface), the DMC sets the Bit “Pin Main
contactor request” Bit at the CAN message 0x258 (CMS_B_MC_PIN).
In any case, if the safety line is low, the DMC switches off the power stage. This condition can also happen, if
another device connected to the safety line has detected a fault and have pulled down this safety line.
19.01.08
page 24 of 41
Manual DMC524
9.6
DMC524 Firmware Update
The firmware of the DMC524 can be updated in order to use additional features that have been implemented
after the initial production date of the inverter. For this task, a firmware flash loader program is used which is
described here and is available from the web-site:
http://www.renesas.com/fmwk.jsp?cnt=/download_search_results.jsp&fp=/support/downloads/download_results
&layerId=1050
Caution: Before updating the firmware, make sure that no conflicts occur with your current setup. If you are not
sure about it, please contact BRUSA Elektronik AG or your local dealer. The Motor Parameter Table could be
newer and not compatible with the old one. Especially the custom specific motor types could be not usable
anymore.
9.6.1
Requirements
•
PC running Windows 95 / 98 / NT / 2000 / XP
•
Serial interface RS232
9.6.2
Setup of DMC524 and PC
•
Connect pin 13 (PRO) of the DMC524's 23-pin control connector to pin 2 (AUX).
•
Power up the DMC524 through AUX 12VDC.
•
Connect the RS 232 cable to the serial interface COM1 of the PC and to the appropriate pins of the
DMC524's control connector (see 7.2.2.7, TXD, RXD (RS232-Interface), Pins 11, 12).
•
19.01.08
Make sure that no other application uses or tries to use the COM1 serial interface.
page 25 of 41
Manual DMC524
9.6.3
Installation of the Flash Loader Program
In order to download the new firmware to the DMC524 the DMC5 the „Flash Development Toolkit FDT305“ have
to be installed as follows (installation steps which are not listed below nothing was modified and you have to click
the Next-Button):
19.01.08
page 26 of 41
Manual DMC524
Attention: Before clicking „OK“
a Reset have to be executed.
19.01.08
page 27 of 41
Manual DMC524
Tools/Options:
19.01.08
page 28 of 41
Manual DMC524
Switch on the “Prog-On” switch
programming the DMC524:
19.01.08
page 29 of 41
Manual DMC524
10 CAN Bus Protocol
10.1 Data Format and Range Definitions
Data order, as sent in a message: Bit 15...7...0 = MSB...LSB, Byte 0 ... Byte 7, high byte in a word first, high
word in a Long first (Motorola convention).
Used data types in this document are bits, bitmaps (bit length: 8 or 16) and analog signals (signed word). Bits are
first assembled to bitmaps, before there location in the message will be placed.
Every analog value has a valid range, in which the receiving controller shall not have any data format problems.
The receiving controller checks the data, if it is in the valid range.
If data is out of range, the corresponding error bit will be set and appropriate error action will be taken. Analog
status values of the lower controller will have a defined no valid value which shall be used for sensor breakdown
or other events to indicate to the upper controller that the value is not valid and that a default value should be
used.
10.2 Error and Warning Definitions & Handling
10.2.1 Error Definition:
Errors will result in full performance loss, which will cause the system to shut down without recovering
performance by itself. The error is latched and can just be cleared by the a command bit or a hardware reset.
10.2.2 Error List
Error Name
Hex
Byte No. / Bit Description:
Code
No.
in
CAN
Message
ERROR_INIT
0x8000
byte0 - bit7
set, if offset current at hall sensors at
ignition 15 start up is bigger than +10A
ERROR_DC_OVERCURRENT
0x4000
byte0 - bit6
set, if I bat > 370A (only active after
init routine)
ERROR_DC_OVERVOLTAGE
0x2000
byte0 - bit5
set, if U bat > 445V
(420V at CAN Matrix Version 1.5 and
earlier)
ERROR_DC_UNDERVOLTAGE
0x1000
byte0 - bit4
set, if U bat < 130V
ERROR_SEVERE_OVERSPEED
0x0800
byte0 - bit3
set, if n_act>92000rpm or n_act<92000rpm
values coming from motor parameter
19.01.08
page 30 of 41
Manual DMC524
table
(set also, if speed sensor cable is not
connected, because speed is set to
123'456U/min in that case)
ERROR_SEVERE_OVERTEMP_MOTOR
0x0400
byte0 - bit2
set,
if
temperature
overtemperature
specific
sensor
at
PTC
motor
measures to hot temperature (e.g. coil
at 180°C to the inverter, no software
adjustment possible)
ERROR_SEVERE_OVERTEMP_INVERTER
0x0200
byte0 - bit1
set, if temperature at power stage >
110°C
ERROR_CAN_MSG_MAIN_COMMAND
0x0100
byte0 - bit0
set, if CAN message receive time >
40ms
ERROR_SHORT_CIRCUIT_INVERTER
0x0080
byte1 - bit7
Set, if during 2 sec. more than 16 short
circuits were counted from power part.
If there are less than 16 short circuits
during 2 seconds, the power stage will
be switched off only for 50ms.
ERROR_MSG1_LOST
byte1 – bit4
bei Fehlen der CAN-Verbindung wird
ein Error ausgelöst
ERROR_MSG2_LOST
byte1 – bit5
bei Fehlen der CAN-Verbindung wird
ein Error ausgelöst
ERROR_COMMAND_OUT_OF_RANGE_MSG1 0x0040
byte1 – bit0
Set, if some CAN Message in “DMC
Torque Control” leaves the valid range
given in the CAN-Matrix
ERROR_COMMAND_OUT_OF_RANGE_MSG2 0x0020
byte1 – bit1
Set, if some CAN Message in “DMC DC
Limits” leaves the valid range given in
the CAN-Matrix
ERROR_UBATT_REDUNDANCY
0x0040
byte1 - bit6
Set, if a difference bigger than 15 volts
is measured between the two HV
voltage sensors (redundancy) during
17.06ms
19.01.08
page 31 of 41
Manual DMC524
10.2.3 Warning Definition
Warnings may cause loss of performance caused by external interface (e.g. undervoltage, loss of communication
etc.) or internal DMC situations (inverter temperature).
Warnings will not be latched and full performance can be restored, when warning condition is corrected.
10.2.4 Warning Description
Error Name
Hex
Byte No. / Description:
Code
Bit No. in
CAN
Message
WARNING_LIMIT_BY_DC_CURRENT
0x8000
byte2 - bit7
Set, if torque is limited by one
of two HV DC Current limits
“DC
(e.g.
Motoring”
Current
and
“DC
Limit
Current
Limit Regenerating”)
WARNING_LIMIT_BY_DC_VOLTAGE
0x4000
byte2 - bit6
Set, if torque is limited by one
of two 2 HV DC Voltage Limits
(e.g.
“Motoring
DC
Voltage
Limit” and “Regenerating DC
Voltage Limit”)
WARNING_LIMIT_BY_SPEED
0x2000
byte2 - bit5
Set, if torque is limited by
speed (“Speed Request”)
WARNING_LIMIT_BY_MOTOR_TEMP
0x1000
byte2 - bit4
Set, if torque is limited by
Motor Temperature, determined
by
Fehler!
konnte
werden.,
Verweisquelle
nicht
gefunden
Fehler!
Verweisquelle konnte nicht
gefunden werden. (”Tm” and
“kT”)
WARNING_LIMIT_BY_INVERTER_TEMP
0x0800
byte2 - bit3
Set, if torque is limited by
Inverter Temperature, please
see also 12.2, Electronic Data
or 12.3.1, Output current
19.01.08
page 32 of 41
Manual DMC524
WARNING_COMMAND_OUT_OF_RANGE
0x0200
byte2 - bit1
Set, if some CAN Message
leaves the valid range given in
the CAN-Matrix
WARNING_LIMIT_BY_AC_CURRENT
0x0080
byte3 - bit7
Set, if torque is limited by AC
current, determined by Fehler!
Verweisquelle konnte nicht
gefunden werden., Fehler!
Verweisquelle konnte nicht
gefunden werden. (”mc” and
“gc”)
10.2.5 Torque Control List
Error Name
Hex
Byte No. / Description:
Code
Bit No. in
CAN
Message
MAIN_CONTACTOR_REQUEST
0x8000
byte1 - bit7
0 = Closing allowed, 1 = Open contactor
request
GENERAL_ERROR_LATCH
0x0200
byte1 - bit1
0 = No Error, 1 = Error/failure latched
GENERAL_WARNING
0x0100
byte1 - bit0
0 = No Warning, 1 = Warning active at the
moment
TORQUE_LIMIT_DC_CURRENT
0x0080
byte0 - bit7
1 = Torque is limited by DC current at the
moment
TORQUE_LIMIT_DC_VOLTAGE
0x0040
byte0 - bit6
1 = Torque is limited by DC voltage at the
moment
TORQUE_LIMIT_SPEED
0x0020
byte0 - bit5
1 = Torque is limited by speed at the
moment
TORQUE_LIMIT_TEMPERATURE
0x0010
byte0 - bit4
1 = Torque is limited by some temperature
at the moment
TORQUE_LIMIT_AC_CURRENT
0x0008
byte0 - bit3
1 = Torque is limited by AC current at the
moment
19.01.08
page 33 of 41
Manual DMC524
10.3 Can Bus Commands
10.3.1 Version: DMC5_CAN_Spec_3.0.xls:
19.01.08
page 34 of 41
Manual DMC524
19.01.08
page 35 of 41
Manual DMC524
Precharge the high voltage before closing the
11 Operation of the device
connections by contactors.
Connect the pin EN to AUX (activate ignition
key, close switch).
The CAN – user interface (CVI) can be
provided optionally by BRUSA, if the device
will not be integrated in an anyway existing
CAN-communication network. Such an
example is shown on the picture on the left
side, whereas the device has to be started as
follows:
•
Start the CAN – user interface and press the
“Start”-button in order to allow communication with
the device. With the button “Run” like described in
the picture the power stage is activated.
•
Communication with the device is ensured, if
the displays “Tx” and “Rx” are blinking.
In order to allow the main regulator to fulfill its
function ensure that no limiting regulator is
active.
The device can be switched off in any
operational condition by pressing again the
button “Run” and deactivating the pin EN.
The sudden disconnection of the high voltage
(open the contactors) is permissible as well.
19.01.08
page 36 of 41
Manual DMC524
12 Technical Data
12.1 Mechanic Data
Dimensions with connector ( l x w x h ):
360mm x 240mm x 88mm
Weight ( without cooling water ):
9.2 kg
Operating temperature range
-20 – +85 °C
Max. temperature cooling water input:
72 °C
Pressure Loss of cooling medium:
65mbar, Water-Glykol 50/50, T= 25°C, 6l/min
Max. pressure cooling water ( at 20°C):
1,0 bar
19.01.08
page 37 of 41
Manual DMC524
19.01.08
page 38 of 41
Manual DMC524
19.01.08
page 39 of 41
Manual DMC524
12.2 Electronic Data
HV voltage range: (HVDC)
120 – 480VDC
LV supply range
8,0 – 30,0VDC
Max. current HV ( max. power ):
300A
Standby current HV (without torque )
100mA @ 360V HVDC
Max. induced Motor voltage phase to phase @ 400V HV
224VAC
Max. output AC phase current:
300ARMS
Continuous AC phase current @ 360 V, Tcoolant = 72°C
225ARMS
Max. output power @ 360V
106kVA
Continuous appearent output power @ 360V, Tcoolant = 72 °C
80kVA
Motor frequency:
0 – 2'000Hz
PWM switching frequency:
23.4375kHz
Temperature limits: (default value)*
Maximum Inverter Temperature
150°C
Reduction of output current with rising temperature of Inverter:
-6A/°C
See also diagram: 12.3.1, Output current
19.01.08
page 40 of 41
Manual DMC524
12.3 Diagrams
12.3.1 Output current
13 Warranty
We assure a warranty for a period of 24 month
from the date of purchase for defects of
material and by workmanship.
Improper use or handling of the product causes
the warranty to be void.
Specifications are subject to change without
notice.
Note that this device processes lethal voltages.
We cannot accept any liability concerning this
danger.
We cannot accept any liability for consequential
damages which arose from the use of this
device.
19.01.08
page 41 of 41