1
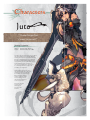
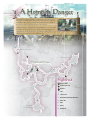
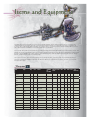
Love, War, and Destiny Intertwine
The shadow of civil war looms over the kingdom of Lanzheim. Juto, a boy with
no recollection of his past, may be the key to ending the cycle of bloodshed.
This essential guide leads you on Juto’s journey to learn his destiny and
discover where his heart belongs!
Comprehensive Walkthrough—Every Quest
We guide you through the entire game from start to finish, including all the optional quests!
Know each quest’s EXP, SID, and item rewards before you accept it. Merchant lists
tell you what’s for sale and what it costs, treasure chest locations guide you
to items and riches, and much more!
Detailed Maps
Our maps reveal quest locations,
merchants, Pillars for saving your game
and healing, treasure chests, and many
other crucial areas!
Expert Combat Training
M A G N A C A R TA™ 2
We help you maximize your Skills
and Weapon Enhancements, cure
status effects and avoid some
entirely, and use the best
attack in any situation.
Context-sensitive AI
guidance helps you
select your leaders
and keep your party
on task. Expert boss
strategy gets you
through every fight!
Complete Equipment, Item, and Enemy Coverage
We provide detailed stats and specs for all the weapons, items,
consumables, and more! Learn where you encounter each
monster type, its Soul Extraction Kamonds, and much more!
That’s Not All!
Detailed character stats and bios, complete
Achievements list, and more!
www.namcobandaigames.com
$19.99 USA / $22.99 CAN
ISBN-13: 978-074401149-4
ISBN-10: 074401149-3
“MagnaCarta” is a trademark of NAMCO BANDAI Games Inc. & SOFTMAX CO.,LTD. ©SOFTMAX CO.,LTD. ©2004-2009
NAMCO BANDAI Games Inc. Unreal is a registered trademark of Epic Games, Inc. All Rights Reserved. Unreal ® Engine,
Copyright 1998 - 2009, Epic Games, Inc. All rights reserved.
MC2cover.indd 1
DETAILED MAPS! EVERY QUEST!
www.bradygames.com
COVERS XBOX 360®
Jennifer and Kenny Sims
9/25/09 11:27:29 AM
Prologue
2
Characters
4
Learning the Basics
18
Walkthrough
1
2
3
4
5
6
7
8
9
10
11
12
13
14
15
16
17
18
19
00 TOC.indd 1
A Home in Danger
Making New Allies
Traveling to Abazet Port
The Battle for Oldfox Canyon
A Necessary Deception
Back to Headquarters
A Confusing Reunion
Into the Wasteland
Coming Home
UnfinishedBusiness
A Slight Detour
Revelations
A City in Ruins
A Daring Rescue
An Internal Struggle
Preparations
Hunting Party
Tying Up Loose Ends
Journey’s End
24
34
44
48
56
68
78
88
94
100
108
118
126
134
142
150
158
166
176
Skills
184
Enhancements
212
Items and Equipment
214
Bestiary
240
Achievements
255
10/1/09 11:21:13 AM
Characters
Juto
“I have things that
I want to protect.”
Starting Equipment
Weapon:
Support:
WoodenSword:Attack+5
BronzeKnuckleguard+1DEF
Though he has lost his memory, at first glance
this young man seems to be little different
from any of his peers. He wonders about his
past as he spends his days on his adopted
homeland of Highwind Island relaxing and
slowly learning to use his Wooden Sword
under Melissa’s patient tutelage. The
only clue to his past lies in the fact that
he can’t bring himself to wield a real
swordnot even in practice.
What happened to him to cause
this aversion? Was he an innocent
caught in the fires of war? Was
he a soldier who can no longer
bring himself to wield the
tools of conflict? Perhaps
most troubling, what is
this monstrous power he
seems to possess?
Each step along his
journey seems
to bring more
questions than
answers.
02 Characters.indd 4
9/29/09 11:15:00 AM
Level
HP
ATK
DEF
Field Action: Kick
SPI
RES
AGI
STA
STA
Recovery
EXP to Next
Level
Skill
Points
4
+56
-
-
-
-
+1
-
-
580
-
5
+46
-
-
-
-
-
-
-
775
-
6
+42
-
+1
+1
-
+1
+1
+1
974
-
7
+38
+1
-
-
-
-
-
-
1195
-
8
+42
+1
+1
-
+1
+1
-
-
1378
-
9
+42
+1
+1
-
-
-
+1
-
1569
-
10
+50
+1
-
-
-
+1
-
-
1752
-
11
+41
-
+1
+1
-
-
-
+1
1911
8
12
+43
+1
+1
-
-
+1
+1
-
2164
14
13
+42
-
+1
-
+1
-
-
-
2327
11
14
+41
+1
+1
-
-
+1
-
-
2479
10
15
+42
+1
+1
-
-
-
+1
-
2684
8
16
+57
-
+1
+1
-
+1
-
+1
2925
10
17
+60
+1
+1
-
-
-
-
-
3188
11
18
+59
+1
+1
-
+1
+1
+1
-
3474
7
19
+56
-
+1
-
-
-
-
-
3786
12
20
+54
+1
+1
-
-
+1
-
-
4164
10
21
+89
+1
+1
+1
-
-
+1
+1
4580
11
22
+89
+1
+1
-
-
+1
-
-
5038
9
23
+83
+1
+1
-
+1
-
-
-
5541
12
24
+88
+1
+1
-
-
+1
+1
-
6095
10
25
+39
+1
+1
-
-
-
-
-
6704
8
26
+82
+1
+1
+1
-
+1
-
+1
7374
-
27
+82
+1
+1
-
-
-
+1
-
8111
12
28
+82
+1
+1
-
-
+1
-
-
8922
6
29
+82
+1
+1
-
+1
-
-
-
9814
10
30
+85
+1
+1
-
-
+1
+1
-
10795
10
31
+59
+1
+1
+1
+1
-
-
+1
11874
8
32
+59
+2
+1
-
-
+1
-
-
13061
10
33
+59
+1
+1
-
+1
-
+1
-
14367
9
34
+59
+1
+1
-
-
+1
-
-
15803
12
35
+89
+2
+1
-
+1
-
-
-
17383
10
36
+105
+1
+1
+1
-
+1
+1
+1
18252
8
37
+104
+2
+1
-
+1
-
-
-
19164
10
38
+105
+1
+1
-
+1
+1
-
-
20122
9
39
+105
+2
+1
-
-
-
+1
-
21128
10
40
+119
+1
+1
-
+1
+1
-
-
22184
13
41
+63
+2
+1
+1
+1
-
-
+1
23293
10
42
+63
+2
+1
-
-
+1
+1
-
24457
7
43
+63
+1
+2
-
+1
-
-
-
25679
12
44
+63
+2
+1
-
+1
+1
-
-
26962
10
45
+66
+2
+1
-
-
-
+1
-
28310
11
46
+104
+2
+1
+1
+1
+1
-
+1
29725
9
47
+104
+2
+1
-
+1
-
-
-
31211
10
48
+104
+2
+2
-
+1
+1
+1
-
31211
12
49
+104
+2
+1
-
-
-
-
-
34409
10
50
+105
+2
+1
-
+1
+1
-
-
36129
11
51
+162
+2
+1
+1
+1
-
-
+1
37574
9
52
+162
+2
+1
-
+1
+1
+1
-
39076
10
53
+162
+2
+2
-
+1
-
-
-
40639
13
54
+162
+2
+1
-
+1
+1
-
-
42264
10
55
+163
+2
+1
-
-
-
+1
-
43954
8
56
+176
+2
+1
+1
+1
+1
-
+1
45712
10
57
+175
+3
+1
-
+1
-
-
-
47540
10
58
+176
+2
+2
-
+1
+1
+1
-
49441
8
59
+176
+2
+1
-
+1
-
-
-
51418
10
60
+178
+3
+1
-
+1
+1
-
-
57588
10
Juto’s Field Action is Kick. It is
used to destroy certain things,
like Lappers Shells, which can
reveal hidden items. It also
comes in handy during certain
battles. Never underestimate
the usefulness of a good
swift kick!
Characters
Stat Increases Per Level
Weapon Styles
One-Handed Sword
This style offers a good
balance between offense and
defense and allows you to
use Counter. This Signature
Technique is very powerful,
especially against other melee
fighters. Because it uses no
Stamina, you can perform it
any time it becomes active.
Not only does it dish out
the damage, Counter also
causes your foes to inflict less
damage with their weapons,
a stunning advantage when
facing tougher foes!
Two-Handed Sword
This is a mostly offensive
weapon style with the
Signature Technique, Impact
Swing. It deals a devastating
blow and knocks down
your enemies, interrupting
their attacks and buying you
precious time while they
regain their feet.
5
02 Characters.indd 5
9/29/09 11:15:07 AM
Learning the Basics
This chapter provides the information you need to make your way through the engaging world of MagnaCarta 2. You’ll find
information on the menus, maps, movement, and combat to prepare you for the journeys ahead.
Read the User Manual
This chapter is intended as a supplement to the user manual that comes with your copy of MagnaCarta 2, not a replacement
for it. We avoid rehashing content that’s already in the user manual, except when it’s necessary for explaining other concepts.
The discussions in this chapter assume that you have read and understand the user manual that comes with the game.
The Main Menu
The Main menu is your primary resource for managing your
characters. From here, you can manage your party, deal with
your equipment, learn new Techniques, and manage your quests
and information.
From this screen, you can also see your characters’ stats. While
all seven stats play an important role, their importance varies
with each character.
Formation
Though you start with only Juto, you eventually have six
characters in your party. Each one brings unique abilities and
skills to the table, and you grow to depend on each of them to
get you through different situations. You can have only three
active members at a time, and the Formation menu lets you
select which lucky three are active as often as you wish.
Active party members are on the left. When you want to switch
one out, just select the one you wish to make inactive by
pressing a, then navigate to the inactive members on the right
to swap them out. As you navigate over them, you see a helpful
snapshot of their stats and equipment on the bottom of the
screen. You can also move your active party members around via
the Formation menu. This is great if you prefer to keep certain
characters in certain positions; for example, you may wish to
keep your main melee person on top to make healing easier
during battle.
03 Gameplay.indd 18
ATK:
This is your Attack stat. It determines how much physical
damage you can deliver. It helps everyone, but it’s very
important for characters using melee skills.
DEF: Defense mitigates the physical damage you endure. While
increased Defense is always beneficial, it is most useful to
characters who engage in close melee combat.
Into the Fray!
SPI:
As long as they haven’t died, you can switch any of
your inactive members for active ones during battle
as well. If you find that one character takes too much
damage or is otherwise unsuited for a fight, switch him
or her out with a comrade and continue the battle.
Your Spirit determines the damage you inflict with
Attribute Kan. The higher the Spirit, the more damage you
dish out with your offensive skills.
RES:
Resistance mitigates the damage you take from offensive
spells. It also helps decrease the chance of getting afflicted
by conditions.
9/29/09 11:05:35 AM
attacks. It also raises your chance to dodge incoming attacks.
STA:
A larger Stamina pool lets you perform more attacks and skills
before going into Overdrive, thus increasing your damage.
STA Recovery: This affects how quickly you recover your
Stamina. It is important because a higher STA Recovery
lets your Stamina regenerate at a faster rate.
Items
The Items menu lists all the non-equipped items you have in
your inventory, along with a description below. This is useful for
quickly seeing items you recently acquired, as it lists them under
the All tab in the order you picked them up. When an item is
character-specific, you can see which character can use the item
on the right.
To view just one particular type of item, you can navigate through
the different categories listed at the top. This is particularly
helpful when it comes to Tools—you can easily see how many
consumables you have at your disposal. You may not use the
other tabs quite as much, as the Equipment menu makes it easy
to manage your gear.
Equipment
All heroes rely on their equipment to get the job done, and
your party is no exception! From the Equipment menu, you
can navigate between characters via the k and t to manage
their equipment.
Each character can equip one Weapon, one Support Item, and
two Accessories. You can navigate between these slots via the
z or d. For example, select Weapon on a character. As the
skill trees indicate, each character has a choice of two Weapon
Styles. All the available equipment for that character in the
selected slot shows up on the Equipment list on the upper right.
Scroll through these to view their stats just below the list. This
lets you review all the equipment in your inventory and switch
out your equipment as needed.
Learning the Basics
AGI: Agility raises the chance of getting a critical hit with your
Weapons and Support Items are character-specific and thus
can be worn only by a particular character. On the other hand,
Accessories can be worn by any of your characters. Regardless
of how you spend your Skill Points, you want all characters
to have a good weapon for each of the two types available in
their inventory. Many situations call for you to use a particular
weapon type, whether to complete a quest or to meet the needs
of a battle.
Support Items give you pluses to your Defense and Resistance
stats. You don’t have to swap out these items for a particular
situation. Rather, your goal is to keep the best piece of
equipment in that slot.
Maybe You Can’t Buy Happiness…
…but you can certainly buy better gear! While you
happen upon some powerful items in your travels, don’t
be afraid to use what the shops have to offer. Many
times, the items available for purchase are the best
ones available to you at a given time.
Skills
From the Skills menu, you can manage each character’s two
skill trees. As you level up, you earn Skill Points (SP) and can
spend them to learn new skills. This ability makes each character
unique. You can select the skills that best suit your play style
as you move deeper into the tree. For an in-depth look at each
character’s skill tree, see the Skills section of this guide.
While it’s true that your Weapons are of primary importance,
don’t discount Accessories as mere baubles! These
interchangeable items come in so many varieties that they
often make the difference between an easy battle and one you
may not survive. Accessories can raise your stats significantly
and modify other variables, like how much experience or
SID you earn. Perhaps their most important function is the
protection from status conditions that some of them offer. Many
Accessories give you immunity to various types of conditions.
For instance, the Ring of Detoxification grants you immunity
to Poison. If you equip it when you face a boss whose main
damage source involves inflicting Poison, then you’ve done
half the work of winning the battle just by slipping on a
piece of jewelry.
19
03 Gameplay.indd 19
9/29/09 11:05:43 AM
1. A Home in Danger
Highwind Island is a beautiful, peaceful place. Its cliff-top village and sandy shores as yet are
untouched by the Lanzheim Civil War. Having lost the memories of his previous life, Juto now
calls this pleasant village home and spends his days relaxing. He does his best to avoid Melissa’s
efforts to teach him about their world and to train him to use his wooden sword.
With the discovery of an ancient Guardian on the island, this idyllic existence comes to an end. The
Southern Forces have come to study and retrieve the Guardian, inadvertently bringing their war to
Highwind’s doorstep. Wanting this prize for themselves, Schuenzeit’s Northern Forces soon appear to claim the Guardian as their own. The ensuing
conflict threatens Juto’s adopted home and all those that he holds dear.
6
P
Windsong Caverns
5
1
Azurebell Forest
Highwind Village
Q
O
2
1
3
P
6
3
P
Q 2
O
5
4
7
Highwind
Treasure Chest
Q
Optional Quest Start
O
P
Merchant
4
Highwind
Island Shore
04 walk01.indd 24
P
Pillar
1
Chief’s House
2
Makeshift Hospital/Simple Warehouse
3
Bilter’s Box
4
Bilter
5
Haman
6
Mama Worm
9/29/09 11:02:24 AM
Because Melissa caught you slacking off, she makes you her
errand boy! The first place she sends you is to the Observatory
to see if the Northern Forces ships are coming. Follow the arrow
on your map to reach the path leading up to the Observatory.
From there, Melissa sends you on another errand.
Using Your Map
In Movement mode, you can
always see your mini-map in the
upper right-hand corner of your
screen. This shows you your
location, marked by a green arrow,
in your immediate area. It also
shows the direction, marked by a
red arrow, that you need to go to
reach the trigger point for your next
main objective.
1. A Home in Danger
Running Errands
Sometimes it can be difficult to see exactly where you
need to go by using only the mini-map. To bring up the
area map, press w. This brings up a map of the entire
region, even places you haven’t visited yet. From here,
you can see your objective marked by a golden flag.
Make your way to the objective to trigger the next event.
This time Melissa needs you
to meet her at the lift near
the village’s south end. Again,
follow the arrow on your map
to reach the meeting place.
Before returning to the main
part of the village from the
Observatory, head up the
ramp to find a Treasure Chest
1
.
Treasure Chests can be found throughout the world. They
contain useful items like SID, equipment, and consumable
items. This one contains one Healing Leaf, which can be used to
restore HPs.
On your way to meet Melissa, stop by the Simple Warehouse.
Buildings that you can enter are marked in green on the map. To
enter, approach the door and press a. Inside you find another
Treasure Chest 2 containing 150 SID.
25
04 walk01.indd 25
9/29/09 11:02:36 AM
Unlike when you reached the Observatory, your quest’s end
does not automatically trigger when you approach Melissa. As
you can see, Melissa now has a red exclamation point over her
head when you approach. This indicates that you must speak
with her to continue this required quest. Approach her and press
a to talk to her.
It seems that Clawpers, small crab-like monsters, are harassing
the workers building barricades on the shore. She wants you
to make things easier for the workers by eliminating three
Clawpers. If you need help with learning combat, Melissa offers
to teach you once you reach the shore. Though the combat
system is very intuitive and easy to use, it’s a good idea to let
Melissa show you the ropes before your first battle.
To reach the Highwind Island Shore, step out onto the lift
behind Melissa and press a to lower it to the shore below.
Make your way down the path and head to the right when
it splits. Here you meet a Village Girl who needs your
help. She asks you to break open the nearby Lappers
Shell to obtain a pearl for her. Approach the Lappers
Shell and press a to Kick it apart and grab the pearl.
Lapper Shells can occasionally contain useful items,
like Healing Seeds, so be sure to give them a kick
when you happen upon them. Be cautious though;
they sometimes also contain Lappers, which can put
up quite a fight!
In return for your help, the girl teaches you about
Pillars. You can find Pillars in various locations
throughout the world. Use them to save your
game and to heal your party. When you come to
a Pillar, even if you don’t want to save your game,
be sure to approach it and press a to heal any
wounds you may have. Take a moment to save
your game here before continuing down the path
to the shore.
Field Actions
Field Actions are character-specific actions that can
be performed only in Movement mode. Kick is Juto’s
Field Action. When Juto can Kick an object, the a in
the lower right-hand corner turns green. Kick can be
performed only when Juto is directly next to an object,
so be sure to get close to your target when you try to
Kick. Each character has his or her own unique Field
Action. Check out the Characters section of this guide
to see each one.
26
04 walk01.indd 26
9/29/09 11:02:45 AM
1. A Home in Danger
Kill the Clawpers
EXP: 350
SID: 100
If you took up Melissa’s offer to demonstrate combat to
you, she meets you at the shore. She gives you all the basic
information you need to make yourself useful in a fight.
Follow her directions and practice on the Clawper here.
Once you finish her lesson, or if you told her you don’t
need the refresher, proceed down to the shore and take out
the Clawpers there. Notice that monsters show up on your
mini-map as red dots. Keep an eye on this so that you’re
never surprised by running into a group of nasty creatures!
When you finish clearing out the Clawpers, report to
Bilter near the Barricade.
No Such Thing as Too Much SID!
The Princess
When turning in your quest to Bilter, he tells you that Princess
Rzephillda is coming to the island to personally supervise the
Southern Forces. Head north,
back up the path and into the
village. Make your way east,
past the Merchant, to find
another Treasure Chest 3 .
Open it up to collect 100 SID.
Highwind Island Merchant
Item
Cost
Healing Seed
130 SID
Belt of Life
500 SID
Belt of Power
600 SID
Make your way to the north of the Simple Warehouse. There,
you volunteer to show the Princess and Argo to Windsong
Caverns. Head southwest around the Simple Warehouse and
Makeshift Hospital to reach the lift leading down to the caverns.
Before you go down, enter the hut to the right of the lift to find
another Treasure Chest 4 , which contains two Healing Seeds.
Take the lift down to reach Windsong Caverns. Even though it
doesn’t look like the Princess and Argo are following you, they
are present when you exit the lift.
Be on the lookout for extra SID coins. They are often
left behind after a monster is defeated by someone else,
like the Island Guards or a party member. Be sure to
walk over them to add them to your coin purse.
27
04 walk01.indd 27
9/29/09 11:02:54 AM
Items and Equipment
All soldiers depend on their equipment to get them through difficult battles, and the Counter-Sentinel Unit is no exception! This
chapter provides a listing of every item you encounter and its relevant information, such as the buy and sell price and what it can
do for you. Each character can equip one Weapon, one Support, and two Accessories at a time. Use the following tables to see at a
glance what equipment is available to your characters and where you can find it.
Items found in Treasure Chests are marked with a number followed by a dash and another number in the Treasure Chest column. This
indicates the section of the Walkthrough in which it is found, and which Treasure Chest(s) holds it. For example, 05-3 would mean that
the item is found in Walkthrough section number 5, A Necessary Deception; within this Walkthrough section, the item is in Treasure
Chest 3, as labeled on this guide’s accompanying map.
You receive some items only as a result of making your way through the game, as quest rewards or loot from defeating bosses.
However, most items are available for purchase. The Merchant table at the end of this section shows you where you can find the
items that are for sale.
Weapons
Item
Style
Buy
Sell
Found
Available Treasure ATK DEF
for
Chest
Purchase
SPI
RES STA
STA
Recovery
Ancient People’s
Hammer
Hammer
3900
975
-
Y
-
+45
-
-
+8
-
-
Axe of Lightning
Axe
-
875
Defeating Rutan
-
-
+42
-
-
-
-
-
Axe of Sudden
Death
Axe
4500
1125
-
Y
-
+60
-
-
-
-
-
Axe of the Hero
Axe
34000
8500
-
Y
-
+190
-
-
-
-
-
Axe of Unlucky
Soldier
Axe
6400
1600
-
Y
-
+95
-
-
-
-
-
Bakuryu Ball
Fireball
-
-
Quest: The Reeden
Seal Stones
-
-
-
-
+210
-
-
-
Berserker
One-Handed
Sword
4800
1200
-
Y
-
+62
+14
-
-
-
-
Blast Axe
Axe
-
1375
Defeating Zebasa
-
-
+78
-
-
-
-
-
Bloody Hammer
Hammer
-
6000
Defeating Claire in
Navyblue Marsh
-
-
+150
-
-
+25
-
-
Bow of Embers
Bow
19000
4750
-
Y
-
-
-
+115
-
-
-
Bow of God’s
Hand
Bow
28000
7000
-
Y
-
-
-
+170
-
-
-
Bow of Sinking
Bow
5200
1300
-
Y
-
-
-
+76
-
-
-
Bow of the Stars
Bow
4700
1175
-
Y
-
-
-
+58
-
-
-
Brave Fist
Knuckle
25000
6250
-
Y
-
+175
-
-
-
-
-
07 Items and Equipment.indd 214
9/30/09 5:26:58 PM
Bestiary
Knowing your enemies is invaluable when you face them in battle. This war-ravaged land is filled with foes from various humanoid races, beasts, and
monsters. This chapter profiles each and every creature you encounter in your travels. We’ve included all the information you need to prevail against
them in a life-or-death struggle on the battlefield!
Zephie’s Soul Extraction Technique can yield valuable Kamonds from many of the foes you
face. We’ve also listed the type of Kamonds that you can get from each foe. The level of the
monster determines the level of the Kamond, as the following chart shows:
Monster Level
Kamond Level
7-25
Level 2
26-40
Level 3
41-50
Level 4
51-60
Level 5
Barnacles
Barnacles
Mad Barnacles
These creatures prefer dark, dank environments. They like to
travel in packs, so be careful you don’t get overwhelmed.
Like their smaller cousins, these Mad Barnacles like to
scuttle around in groups, attacking anything that gets close.
Walkthrough Section
Location
Level(s)
Soul Extraction
Walkthrough Section
Location
Levels
Soul Extraction
01 A Home in Danger
Windsong Cavern
4, 6
N/A
16 Preparations
Undersea Tunnel
54, 56, 58
Stamina Recovery
06 Back to Headquarters
Undersea Tunnel
20, 21
Stamina Recovery
17 Hunting Party
Undersea Tunnel
58
Stamina Recovery
Beasts
Blaze
Blaze Beast
These beasts, commonly found in Oldfox Canyon, can inflict
Stun when they attack you.
08 Bestiary.indd 240
Close relatives of the Blazes, these beasts can also inflict
Stun on you, interrupting your ability to fight.
Walkthrough Section
Location
Levels
Soul Extraction
Walkthrough Section
Location
Levels
Soul Extraction
11 A Slight Detour
Oldfox Canyon
34
Attack, Warrior Kamond
06 Back to Headquarters
Abazet Field
21
Attack
17 Hunting Party
Oldfox Canyon
58
Attack, Warrior Kamond,
Hero Kamond, Steel
Kamond, Herculean
Kamond
08 Into the Wasteland
Wasteland of
Silence
29
Attack
10 Unfinished Business
Dunan Hill
36
Attack, Kamond of Courage
10 Unfinished Business
Wasteland of
Silence
33
Attack, Kamond of Courage
11 A Slight Detour
Dunan Field
35, 36
Attack, Kamond of Courage
17 Hunting Party
Wasteland of
Silence
58
Attack, Kamond of Agility
9/30/09 4:46:56 PM
Official Strategy Guide
BradyGAMES Staff
Credits
By Jennifer and Kenny Sims
Publisher
David Waybright
Title Manager
Tim Fitzpatrick
Editor-In-Chief
H. Leigh Davis
Screenshot Editor
Michael Owen
Licensing Director
Mike Degler
Book Designer
Colin King
Marketing Director
Debby Neubauer
Production Designer
Wil Cruz
© 2009 DK/BradyGAMES, a division of Penguin Group (USA)
Inc. BradyGAMES® is a registered trademark of Penguin
Group (USA) Inc. All rights reserved, including the right of
reproduction in whole or in part in any form.
DK/BradyGames, a division of Penguin Group (USA) Inc.
800 East 96th Street, 3rd Floor
Indianapolis, IN 46240
“Magnacarta” is a trademark of NAMCO BANDAI Games
Inc. & SOFTMAX CO.,LTD. ©SOFTMAX CO.,LTD. ©20042009 NAMCO BANDAI Games Inc. Unreal is a registered
trademark of Epic Games, Inc. All Rights Reserved. Unreal
® Engine, Copyright 1998 - 2009, Epic Games, Inc. All rights
reserved.
International Translations
Brian Saliba
The ratings icon is a registered trademark of the
Entertainment Software Association. All other trademarks
and trade names are properties of their respective owners.
Please be advised that the ESRB ratings icons, “EC”, “E”,
“E10+”, “T”, “M”, “AO”, and “RP” are trademarks owned
by the Entertainment Software Association, and may only
be used with their permission and authority. For information
regarding whether a product has been rated by the ESRB,
please visit www.esrb.org. For permission to use the ratings
icons, please contact the ESA at [email protected].
ISBN-10: 0-7440-1149-3
ISBN-13: 978-0-7440-1149-4
Printing Code: The rightmost double-digit number is the year
of the book’s printing; the rightmost single-digit number is
the number of the book’s printing. For example, 09-1 shows
that the first printing of the book occurred in 2009.
12 11 10 09
Printed in the USA.
10 BM.indd 256
4 3 2 1
Acknowledgments
BradyGAMES sincerely thanks everyone at Namco Bandai
Games for their gracious support during this project. Very
special thanks to Zack Karlsson, Charlie Chough, Dennis Lee,
Masahiro Knittel, and Merwin Del Rosario for their expert
assistance from start to finish—thank you!
9/29/09 12:48:37 PM