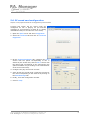
1
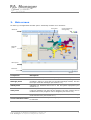
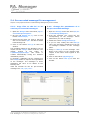
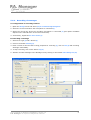
P.A. Manager.
PA System management software.
USER’S MANUAL.
OPTIMAX INSTALLATIONS.
Document version 1.0
May 2009
Contents
1.
Prior concepts............................................................................................................ 5
2.
Main screen ............................................................................................................... 6
3.
4.
2.1.
The menu bar ....................................................................................................8
2.2.
The message panel ........................................................................................... 12
2.3.
The alarm panel ............................................................................................... 13
2.4.
The area panel ................................................................................................. 16
2.5.
The status bar.................................................................................................. 16
2.6.
Information Panel ............................................................................................. 17
2.7.
Meaning
2.7.1.
2.7.2.
2.7.3.
2.7.4.
of the icons and colours of the application buttons .................................... 19
Meaning of the buttons and icons on the Message Panel............................. 19
Meaning of the buttons and icons on the Area Panel. ................................. 20
Colours indicating zone status. ............................................................... 21
Other Buttons ...................................................................................... 21
Initial operations ..................................................................................................... 22
3.1.
Initialisation of the Software............................................................................... 22
3.2.
Change of language .......................................................................................... 22
3.3.
User management ............................................................................................ 22
3.3.1. Change user ........................................................................................ 23
3.3.2. Create a new user ................................................................................ 23
3.3.3. Modify or edit the name and the password of a user .................................. 23
3.3.4. Delete a user ....................................................................................... 23
3.3.5. Create a new User Profile ...................................................................... 23
3.3.6. Modify or edit a User Profile ................................................................... 23
3.3.7. Delete a User Profile ............................................................................. 24
3.4.
Screen Design operations .................................................................................. 24
3.4.1. Change to Screen Design mode .............................................................. 24
3.4.2. Exit Screen Design mode....................................................................... 24
3.4.3. Change the position of the panels ........................................................... 24
3.4.4. Create an area..................................................................................... 25
3.4.5. Delete an area ..................................................................................... 25
3.4.6. Change the name of an area .................................................................. 25
3.4.7. Add a background image to an area ........................................................ 25
3.4.8. Delete a background image from an area................................................. 25
3.4.9. Add zones to an area ............................................................................ 26
3.4.10. Delete zones from an area..................................................................... 26
3.4.11. Add groups to an area .......................................................................... 26
3.4.12. Delete groups from an area ................................................................... 26
3.4.13. Move elements in an area...................................................................... 26
Basic Operator operations ....................................................................................... 27
4.1.
Select a zone or group....................................................................................... 27
4.2.
Change area .................................................................................................... 27
User’s Manual for Optimax installations. Version 1.0
P.A. Manager. PA system management software
3
5.
4.3.
Send a PC pre-recorded message........................................................................ 27
4.4.
Send a sequence of PC pre-recorded messages ..................................................... 28
4.5.
Quick cancellation of the selection of groups and/or zones ...................................... 28
4.6.
Activate a local pre-recorded message in a zone (digital amplifier) from the PC.......... 28
4.7.
Modify the volume of a zone............................................................................... 29
4.8.
Modify the volume of a group ............................................................................. 29
4.9.
Change the music program of a zone................................................................... 30
Advanced Operations ............................................................................................... 31
5.1.
Operations with groups...................................................................................... 31
5.1.1. Create a group..................................................................................... 31
5.1.2. Synchronise groups .............................................................................. 31
5.1.3. Modify or edit a group........................................................................... 31
5.1.4. Delete a group ..................................................................................... 31
5.2.
Scheduling operations ....................................................................................... 32
5.2.1. Create a message schedule ................................................................... 33
5.2.2. Modify a message schedule.................................................................... 33
5.2.3. Enable / Disable a message schedule ...................................................... 33
5.2.4. Delete a message schedule.................................................................... 33
5.2.5. Create a volume schedule...................................................................... 34
5.2.6. Modify a volume schedule...................................................................... 34
5.2.7. Enable / Disable a volume schedule ........................................................ 34
5.2.8. Delete a volume schedule...................................................................... 34
5.3.
Message sequences........................................................................................... 35
5.3.1. Create a sequence of PC pre-recorded messages ...................................... 35
5.3.2. Edit a message sequence ...................................................................... 35
5.3.3. Delete a message sequence ................................................................... 35
5.4.
Pre-recorded message file management............................................................... 36
5.4.1. Copy files to the PC to be used as pre-recorded messages.......................... 36
5.4.2. Change the parameters of a PC pre-recorded message .............................. 36
5.4.3. Monitoring of pre-recorded messages ...................................................... 37
5.4.4. Recording of messages ......................................................................... 38
5.4.5. Copy files to the PC to be used as a Gong ................................................ 39
5.5.
Log backup configuration ................................................................................... 39
5.6.
PC sound card configuration ............................................................................... 40
5.7.
Maintenance reset configuration.......................................................................... 41
5.8.
Configuration of Optimax unit status checks ......................................................... 41
5.9.
Generation of a surveillance report ...................................................................... 42
5.10. Access to the installation screen ......................................................................... 43
5.11. Event and Operation Viewers.............................................................................. 43
5.11.1. Event Log ........................................................................................... 43
5.11.2. Message Log........................................................................................ 44
5.11.3. Multicast ............................................................................................. 44
5.11.4. Audio IP.............................................................................................. 45
6.
Software versions .................................................................................................... 45
User’s Manual for Optimax installations. Version 1.0
P.A. Manager. PA system management software
4
1. Prior concepts
We consider it appropriate to define in advance certain terms that appear throughout this user’s
manual.
Term
Description
Zone
Minimum unit to which a message, schedule or music program is sent.
Represented on the screen by a zone selection button.
Group
Set of zones. They must first be created by the user. A group can be
formed by several groups. Represented on the screen by a group
selection button.
Area
Set of zones and/or groups represented on the screen inside the same
panel. Various areas can be created in the same installation, thereby
facilitating access to the zone and/or group selection buttons.
PC pre-recorded
message
Audio file stored on the hard disk of the computer. In order for the
message to be available, it must be saved in the messages folder
created during installation (SMP250v2 / pafiles / messages) and added
to the Message List (see section 5.4.1.). The equipment supports WAV,
MP3 formats...
Message scheduling
Configuration by means of which a pre-recorded message can
automatically be sent to a pre-established group in accordance with a
schedule.
Volume scheduling
Configuration by means of which the volumes and tone equalisations of
a particular zone can automatically be modified in accordance with a
schedule.
User profile
Profile associated with a user which allows or limits access to certain
functions of the program. Each user must be associated with a specific
profile. It is possible to create, modify or delete user profiles.
Mode
Each sound source of the P.A. Manager system must be assigned a
priority level with respect to the other sound sources. These priority
levels, known as Mode, must be assigned during configuration of the
system.
Each PC pre-recorded message must also be assigned a Mode (see
section 5.4.2.)
User’s Manual for Optimax installations. Version 1.0
P.A. Manager. PA system management software
5
2. Main screen
On start-up, the application window opens. It basically consists of six elements:
Area panel
Menu bar
Cancel selection of
zones/groups
Message
panel
Alarm panel
Status bar
Figure 1
Component
Description
Menu bar
Contains all the drop-down menu options (see section 2.1.).
Message panel
Contains the information and the buttons corresponding to the
messages: start live voice and pre-recorded message buttons, and the
list of pre-recorded messages (see section 2.2.).
Alarm panel
Indicates the incidents that occur in the PA system equipment (see
section 2.3.).
Area panel
On this panel one or several groups and zones can be selected to
receive a message, the area can be changed, the zone volume can be
modified and music programs can be assigned (see section 2.4.).
Status bar
Information bar. Displays menu information, user name, screen design
mode and the time (see section 2.5.).
Cancel selection button
Cancels the selection of any zone or group in the installation that might
be selected.
User’s Manual for Optimax installations. Version 1.0
P.A. Manager. PA system management software
6
It is possible to modify the position of the panels to adapt the screen to the needs of the operator.
To do so, it is necessary to change to Screen Design mode (see section 3.4.).
The message, alarm and information panels can either be docked or floating panels.
When a panel is docked, it is positioned on the edge of the application window. It can also be
minimised to save space on the screen. When a panel is undocked, it is separated from the other
components of the work area, it remains floating and it can easily be moved around any part of the
screen.
To...
Proceed as follows...
Undock a window
Drag the top part of the window, moving it away from the edge of the
application window.
Dock a window
Drag the window over any of the anchoring marks (figure 2).
Minimise a window
When you have docked a window, click on the icon in the top righthand corner of this window ( ).
Through all these operations, the work area can be personalised, and it is easily adapted to the
needs of each installation.
When the application is closed, the screen configuration is saved, so that when the program is
restarted, the last screen configuration is maintained.
Figure 2
Figure 3
Minimised window
Docked window
Floating window
User’s Manual for Optimax installations. Version 1.0
P.A. Manager. PA system management software
7
2.1. The menu bar
File Menu
Select...
To...
Exit
Exit the application.
Edition Menu
Select...
To...
Screen Design
Add, rename or delete areas.
Add zones to an area or delete them.
Add groups to an area or delete them.
Add the background image to an area or delete it.
Modify the position of
appearance of the screen.
the
panels,
changing
the
New Area
Create a new area. It is necessary to enter an area
name.
Delete Area
Delete an existing area.
Rename Area
Change the name of an existing area.
New Zone
Add one or several zones to an area.
Delete Zone
Delete one or several zones from an area.
New Group
Add one or several groups to an area.
Delete Group
Delete one or several groups from an area.
Add Background image
Insert a background image in an area. Files with a bmp,
gif and jpg extension are supported.
Delete Background image
Delete the background image from an area.
User’s Manual for Optimax installations. Version 1.0
P.A. Manager. PA system management software
8
View Menu
Select...
To...
Event Log
View the log of operations performed.
Message Log
View the log of operations performed.
Multicast
View the frames and the Heart Beats (signs of life) of the
units in the installation with an Ethernet connection.
SNMP Manager
Function not available.
Information Panel
Zone Status
Open the information panel, where you can view and
edit data about:
•
LCC and GCC processes of the installation.
•
Open Audio IP channels.
View the status of the zones on screen through the
background colour of the zone selection buttons (see
section 2.7.3. Colours indicating zone status).
Group Menu
Select...
To...
New Group
Create new groups.
Group Information
View, modify or delete previously created groups.
Synchronise the new group configurations with the
equipment in the installation.
Scheduling Menu
Select...
To...
New Scheduling of Messages
Create schedules of pre-recorded
sequences, destined for a group.
Message Scheduling Information
View, modify or delete pre-recorded
schedules destined for a group.
New Scheduling of Volumes
Create a volume schedule in one or several zones.
Volume Scheduling Information
View, modify or delete volume schedules.
User’s Manual for Optimax installations. Version 1.0
P.A. Manager. PA system management software
messages
or
message
9
Message Menu
Select...
To...
Message
Sequence
Message Sequence
/
New
Create sequences of pre-recorded messages.
Message Sequence /
Sequence Information
Message
View, modify or delete sequences of pre-recorded
messages.
(PC)
Pre-recorded
Management
Message
Add messages to or delete them from the list of prerecorded messages available on the PC.
Configure the controls for monitoring and recording the
PC sound cards.
Record messages or monitor the existing messages on
the server PC.
(DVA-100ETH)
Pre-recorded
Message Management
Add messages to or delete them from the list of prerecorded messages available on the DVA-100ETH.
Through this option a Mode can be assigned to each
DVA-100ETH message.
Users Menu
Select...
To...
Change User
Change user. It is necessary to enter the user’s name
and password.
New User
Create a new user. It is necessary to enter a name and
password for the new user, and to associate a user
profile with this user.
User Information
Modify or delete pre-existing users.
New Profile
Create a new user profile.
Profile Information
Modify or delete user profiles.
User’s Manual for Optimax installations. Version 1.0
P.A. Manager. PA system management software
10
Options Menu
Select...
To...
Language
Change the user interface language.
Real Equipment
Use the system in a real environment, with the PA
system equipment.
Simulated Equipment
Use the system in a simulation environment, without
the need for the PA system equipment to be
connected. The simulation environment offers limited
functions.
Configurations
Configure the backups of the RS485 operations and
communication log files, configure the PC sound cards,
configure the maintenance reset.
Installations
Exit the operator environment
installation configuration screen.
and
open
the
Help Menu
Select...
To...
Create Reports
Launch the generator of surveillance reports, reports
that provide a graphic display of the status and
behaviour of the loudspeaker lines and critical path in
installations with SU-114, SU-214/0 or OPTIMAX
power stages.
About…
Provides information about the version and revision
number of the application.
User’s Manual for Optimax installations. Version 1.0
P.A. Manager. PA system management software
11
2.2. The message panel
This is used, once the zones and / or groups
have been selected on the area panel, to
configure the parameters of the message and
to send it.
Figure 4
(2)
(1)
(3)
Priority/Gong tab
Priority:
Figure 5
Control not
available in
Optimax
installations.
The priority
of each PC
pre-recorded message is predetermined by
the configuration of Modes and Sound Sources and
by the assignment of a Mode to each message
through the Messages / (PC) Pre‐recorded Message
Management menu (See section 5.4.2).
(3)
Gong: This option activates or deactivates the
gong for each message that is sent.
(4)
(5)
(6)
(1)
Folder window
Each folder represents a unit in the PA system
that has the potential to contain pre-recorded
messages.
The
folders
are
created
automatically during configuration of the
software.
To select a folder, click on it.
The folder selected shows the messages that
it contains in the message window (2).
(2)
Message window
Shows a list with the pre-recorded messages
available in the folder selected (1), in
alphabetical order.
The type of gong used depends on the
configuration of Modes and Sound Sources when
the installation is configured.
(4) Sequence of PC Pre-recorded
Messages Drop-down Menu
A sequence of PC pre-recorded messages can
be selected from this menu.
The sequences of PC pre-recorded messages
must be created beforehand by means of the
Menu Messages > Message Sequence > New Message
Sequence, selecting messages from the PC
Messages folder.
In order to view the sequences contained in
the drop-down menu, first it is necessary to
select the PC Messages folder from the folder
window (1).
(5)
Message activation button
Button which activates prerecorded messages on the hard
disk of the computer (PC
Messages folder).
To select a message, click on it.
(6)
The messages may be in different formats
(wav, wma, mp3...).
Text providing information about the message
status (Preparing equipment, Gong, Playing Pre‐
recorded Announcement).
User’s Manual for Optimax installations. Version 1.0
P.A. Manager. PA system management software
Status
12
2.3. The alarm panel
Figura 8
This panel shows the incidents and alarms that occur in the PA system. These appear in
chronological order. Each incident contains information about:
1.
2.
3.
4.
Date and time of the incident.
Equipment model generating the incident.
RS-485 address of the equipment unit or name of the ETH unit.
Type of alarm.
Alarm/Incident
Description
Corrective action
IP Disconnection
Occurs when a unit loses the Ethernet connection.
Check the IP configurations of the
unit in question.
Check that the ETH LINK LED on
the unit is lit, and if it is not, check
the Ethernet connections between
the unit and the switch.
IP communication
recovered
Occurs when a unit recovers the Ethernet connection or at
program start‐up when the units with an Ethernet
connection communicate with the server PC.
Emergency Link
fails
Check the emergency input
Appears if the emergency input connection fails on Optimax
connection of the Optimax power
amplifiers with emergency input surveillance activated.
stage.
Emergency Link
recovered
Appears if the emergency input connection is recovered on
Optimax amplifiers with emergency input surveillance
activated.
Emergency
Contact Alarm ON
Failure of the connection of the contact activating the
emergency input emergency message. Only on Optimax
amplifiers with surveillance of emergency input contacts
activated.
Emergency
Contact Alarm OFF
Recovery of the connection of the contact activating the
emergency input emergency message. Only on Optimax
amplifiers with surveillance of emergency input contacts
activated.
Evacuation
Contact Alarm ON
Appears in the event of the failure of the connection of the
contact activating the emergency input evacuation message.
Only on Optimax amplifiers with surveillance of emergency
input contacts activated.
Evacuation
Contact Alarm OFF
Recovery of the connection of the contact activating the
emergency input evacuation message. Only on Optimax
amplifiers with surveillance of emergency input contacts
activated.
Pre‐Evacuation
Appears in the event of the failure of the connection of the Check
User’s Manual for Optimax installations. Version 1.0
P.A. Manager. PA system management software
Check the emergency input
connection of the Optimax power
stage and the device responsible
for activating the message.
Check the emergency input
connection of the Optimax power
stage and the device responsible
for activating the message.
the
emergency
input
13
Alarm/Incident
Contact Alarm ON
Description
Corrective action
contact activating the emergency input pre‐evacuation connection of the Optimax power
message. Only on Optimax amplifiers with surveillance of stage and the device responsible
emergency input contacts activated.
for activating the message.
Pre‐Evacuation
Contact Alarm OFF
Recovery of the connection of the contact activating the
emergency input pre‐evacuation message. Only on Optimax
amplifiers with surveillance of emergency input contacts
activated.
Protection Alarm
Protection of the amplifier is activated.
Temperature
Alarm
The temperature of the amplifier is higher than the
Check the power stage.
temperature set by configuration.
Temperature
sensors error –
Difference of more
than 20°
There is a difference in temperature of more than 20°
Restart the unit. If the problem
between the values read by the internal temperature
persists, check the power stage.
sensors of the amplifier.
Temperature
sensors error –
Front
The internal temperature sensor at the front of the OPTIMAX Restart the unit. If the problem
amplifier does not communicate correctly.
persists, check the power stage.
Temperature
sensors error –
Rear
The internal temperature sensor at the rear of the OPTIMAX Restart the unit. If the problem
amplifier does not communicate correctly.
persists, check the power stage.
MP3 File
Checksum Alarm
ON (name_file)
Record the file in the MP3
Possible corruption of the data corresponding to the MP3
memory of the power stage once
file in the OPTIMAX power stage memory.
again.
MP3 File
Checksum Alarm
OFF
Recovery from the checksum error of the MP3 file in the
OPTIMAX power stage memory.
ANM Sensor “n”
FAIL
Check that the RS485 address of
the probe coincides with the
Failure of RS485 communication between the OPTIMAX address specified by the alarm
received by the PC.
power stage and the NS‐485 noise sensor.
Check the connections between
amplifier and noise sensor.
Recovery of
Polling Sensor
address “n”
Recovery of RS485 communication between the OPTIMAX
power stage and the NS‐485 noise sensor.
Principal Power
Supply Alarm
Failure of the 230 VAC power supply in OPTIMAX power Check the connection of the
stages with dual power supply (230 VAC and 24 VDC power stage to the 230 VAC mains
battery).
supply.
Auxiliary Power
Supply Alarm
Failure of the 24 VDC power supply in OPTIMAX power
Check the 24 VDC connection of
stages with dual power supply (230 VAC and 24 VDC
the power stage.
battery).
High Impedance
Error
Check the connections and the
Appears if a high impedance error occurs in Optimax impedance of the loudspeaker
amplifiers whose line surveillance is activated.
line. There may be a short circuit
in the line.
Low Impedance
Error
Check the connections and the
Appears if a low impedance error occurs in Optimax
impedance of the loudspeaker
amplifiers whose line surveillance is activated.
line. Possible open line status.
User’s Manual for Optimax installations. Version 1.0
P.A. Manager. PA system management software
Check the power stage.
14
Alarm/Incident
Description
Line Status
Recovery
Recovery from a high or low impedance error in an Optimax
amplifier whose line surveillance is activated.
Link A fails
Unit without Ethernet connection in port A
Check the Ethernet A connection
on the unit.
Link B fails
Unit without Ethernet connection in port B
Check the Ethernet B connection
on the unit.
Recovery of Link
A/B
Recovery of the connection between the Ethernet A or B
input of the unit and the switch or hub.
DSP Fail
Error in the DSP of the unit
Restart the unit. If the problem
persists, check the power stage.
SPI ”n” Fail
Internal hardware error in the unit
Restart the unit. If the problem
persists, check the power stage.
High Impedance
Capsule Error
Detection of short circuit in the capsule of a DC‐600ETH
Check desk.
desk.
Low Impedance
Capsule Error
Detection of open line in the capsule of a DC‐600ETH desk.
Capsule Status
Recovery
Recovery of open line or short circuit in the capsule of a DC‐
600ETH desk.
Lines / Amplifiers:
(Alarm generated
by a DALA01/0,
SU‐114 or SU‐
214/0).
A text stream appears formed by 13 elements (if the alarm is
generated by a DALA‐01) or 14 elements (if the alarm is
generated by an SU‐114 or SU‐214/0).
Each element represents the status of an amplifier / line. In
this way, the elements of the stream, read from left to right,
indicate the result of the surveillance performed by the unit
in its surveillance channels.
Values:
•
OK: Loudspeaker line/amplifier line in good condition.
•
LZ: Line low impedance error.
•
HZ:
•
AM: Amplifier error.
•
‐‐: The card is not inserted in the unit or it is not
configured.
Line high impedance error.
No response to
Polling
Error in the RS485 communication of a unit.
Polling recovery
Appears on program start‐up if the RS485 communication
of the unit is correct, or when the RS485 communication of
a unit is recovered.
User’s Manual for Optimax installations. Version 1.0
P.A. Manager. PA system management software
Corrective action
Check desk.
LZ: Check the connections and the
impedance of the loudspeaker
line. There may be a short circuit
in the line.
HZ: Check the connections and the
impedance of the loudspeaker
line. Possible open line status.
AM: Check that the amplifier is
working correctly and delivering
24 VDC to the surveillance system.
Check that the RS485 address of
the unit (RS485 ADDRESS DIP
switch) coincides with the address
specified by the alarm received by
the PC.
Check the RS485 connections on
the unit.
15
When the system generates an alarm of any kind, the image shown in
figure 9 appears to the right of the panel.
Figure 10
By double clicking on this image, a
window opens providing information
about the current alarms generated
by the system.
Figure 9
The colour of the text indicates the
type of alarm:
•
Alarms with red text: The unit
does not respond to RS485
communication.
•
Alarms with orange text: The unit
does
not
respond
to
communication
through
the
Ethernet network.
•
Alarms with blue text: Remaining
alarms.
Communication
is
functioning, but the unit detects or generates a problem in the installation.
2.4. The area panel
The user must create areas in which to position the zone and group selection buttons.
Each area can have a different
background image.
Figure 11
To create, modify or delete an
area or the elements that form
an area, the Screen Design
option must be activated (See
section
3.4.
Screen
Design
Operations).
Once the areas have been
configured, use this panel to:
•
Select the zones or groups
where you wish to send a
message.
•
Modify the volume for each
zone or group.
•
Modify the music program of
each zone.
To change area, click on the tab
with the name of the area that
you wish to display.
2.5. The status bar
Information bar, situated in the lower part of the application.
Displays menu information, current user name, unit that is being polled, PC RS485 communication
indicator and system time.
Figure12
User’s Manual for Optimax installations. Version 1.0
P.A. Manager. PA system management software
16
2.6. Information Panel
To view this panel, open the View menu and select Information Panel.
The panel has three tabs: Local Congestion Control, Global Congestion Control and DVA Status.
Local Congestion Control and Global Congestion Control
Every Optimax installation requires two processes with the capacity to manage the priorities between audio
channels of the different equipment units with an Ethernet connection. These two processes are known as
Congestion Control.
• Local Congestion Control (LCC): Manages the priorities between audio channels when the sender and the
receiver belong to the same PA Area.
• Global Congestion Control (GCC): Manages the priorities between audio channels when the sender and
the receiver belong to different PA Areas.
When the installation is configured, it is decided which Optimax units have this active process, taking
account of the following:
• Each PA Area requires, as a minimum, one active Local Congestion Control. A minimum of two LCCs per
PA Area is advisable, in case one of the units stops working.
• In installations with more than one PA Area, at least one Global Congestion Control is necessary. In this
case, a minimum of two GCCs are recommended.
•
Local Congestion Control
This tab shows the data that refer to LCC.
(1) Co-ordinator. Indicates the unit of the PA Area
that acts as local co-ordinator, that is to say, the unit
whose LCC process co-ordinates the audio channels at
PA Area level.
(1)
(2)
(2) Station. In installations with more than one PA
Area, this control can be used to change PA Area to
view the information about the LCC processes of each
PA Area.
(3)
(3) Local Channels. This list shows the active local
audio channels, ordering them according to the
priority of the channel (the priorities are defined in the
configuration of Modes and Sound Sources when the
installation is created).
(4) Update Button. Refreshes the active channel
information.
(5) Delete Channel Button. This is used to delete
channels from the list of local channels.
User’s Manual for Optimax installations. Version 1.0
P.A. Manager. PA system management software
(4)
(5)
17
•
Global Congestion Control
This tab shows the data that refer to GCC.
(1) Co-ordinator. Indicates the unit in the
installation that acts as global co-ordinator, that is to
say, the unit whose GCC process establishes the
priorities of audio channels in different PA Areas.
(1)
(2) Global Channels. This list shows the active
global audio channels, ordering them according to the
priority of the channel (the priorities are defined in the
configuration of Modes and Sound Sources when the
installation is created).
(2)
(3) Update Button. Refreshes the active channel
information.
(4) Delete Channel Button. This is used to delete
channels from the list of global channels.
(3)
(3)
•
(4)
(4)
DVA Status
Shows the audio channels of the DVA-100ETH pre-recorded messages, ordering these channels
according to the priority of the message.
User’s Manual for Optimax installations. Version 1.0
P.A. Manager. PA system management software
18
2.7. Meaning of the icons and colours of the application buttons
2.7.1.
Meaning of the buttons and icons on the Message Panel.
Pre‐recorded message activation button. Press to activate the message.
Indicates that the units are preparing to broadcast the message.
Pre‐recorded message button activated. Press to stop the message (in
synchronous mode).
Appears, when a message is sent, if there is no problem related with the set
of zones selected.
Indicates that the operation performed has generated some kind of incident.
Appears, when a message is sent, if there is a problem with any of the zones
selected. The message will not reach all the zones selected.
User’s Manual for Optimax installations. Version 1.0
P.A. Manager. PA system management software
19
2.7.2.
Meaning of the buttons and icons on the Area Panel.
GROUP buttons and icons
ZONE buttons and icons
Selection button representing a
ZONE that has not been selected.
Selection button representing a
GROUP that has not been
selected.
ZONE selection button. Indicates
zone selected.
GROUP selection button.
Indicates group selected.
Loss of IP communication with
the zone.
Alarm exclusive to Groups.
Indicates that there is no IP
connection with the server PC
that controls one of the zones
that form the group.
Indicates
an
RS485
communication error with the
unit that controls the zone (UMX‐
01/0).
Accompanying a zone button,
this
indicates
an
RS485
communication error with the
unit that controls the surveillance
of the zone (DALA or SU).
Zone disconnected
installer.
by
the
Yellow zone alarm indicator.
Indicates a loudspeaker line error
in the zone.
User’s Manual for Optimax installations. Version 1.0
P.A. Manager. PA system management software
Accompanying a group selection
button, this indicates an RS485
communication error with the
unit that controls one of the
zones that form the group (DALA‐
01, SU, UMX‐01/0).
Alarm exclusive to Groups.
Indicates that one of the zones
that form the group is
disconnected.
Accompanying a group selection
button, this indicates that there
is a loudspeaker line error in one
of the zones that form the group.
20
2.7.3.
Colours indicating zone status.
The status of the zones corresponding to OPTIMAX power stages can be viewed on screen, since it
is shown by the background colour of the zone selection buttons.
For this purpose, the Zone Status option on the View menu must be activated.
Zone playing a locally activated emergency message.
Zone playing a locally activated priority message.
Zone playing a program locally.
Zone playing a music program that arrives via ETHERNET.
Zone playing a priority announcement that reaches it via ETHERNET.
Zone playing a pre‐recorded message stored in the FLASH memory of the amplifier.
Zone playing a pre‐recorded message stored in the MP3 memory of the amplifier.
2.7.4.
Other Buttons
Cancels the selection of all zones and groups. Indicates groups or zones
selected.
Indicates that no group or zone has been selected.
User’s Manual for Optimax installations. Version 1.0
P.A. Manager. PA system management software
21
3. Initial operations
3.1. Initialisation
Software
of
the
Double click on the PA Manager icon on the
desktop.
3.2. Change of language
Open the
Language.
required.
Options menu and select
Next, select the language
associated with each user. This profile
determines the degree of access of each user
to the various options of the software or
functions.
By default the program has two users:
default, associated with the Default profile,
and
factory,
associated
with
an
Administrator profile.
User
Password
Profile
default
default
Default
factory
factory
Administrator
The user name and password are case‐sensitive
3.3. User management
The system has been designed
different users may work in it.
so
that
New profiles can be created, modified or
deleted. For more information, see sections
3.3.5, 3.3.6 and 3.3.7.
Each user has a name and an access code.
Furthermore, a user profile must be
Figure 17: Functions of the Administrator
User profile
User’s Manual for Optimax installations. Version 1.0
P.A. Manager. PA system management software
Figure 18: Functions of the Default
User profile
22
3.3.1.
Change user
3. Click on the button Edit.
1. Select Users on the menu bar and then
Change User.
4. Modify the name, the password (this will
have to be repeated) or the user profile.
2. Enter the name of the new user in the User
field.
5. Click on the button Accept.
3. Enter the password of the new user in the
Password field.
4. Click on Accept.
3.3.4.
Delete a user
The user name will appear on the status bar.
Requires a user profile with the Delete User function
enabled
1. Select Users on the menu bar and then User
Information.
2. Select the user name that you wish to
delete from the list of users.
N.B.:
If you tick the Initial User checkbox, every time the
application is started, the program will be launched
with this user.
3.3.2.
3. Click on the button Delete.
4. Click on the button Accept.
5. Close the Profile Info window by clicking on
Close.
Create a new user
Requires a user profile with the Create User function
enabled
1. Select Users on the menu bar and then New
User.
2. Enter the name of the new user in the User
Name field.
3. Enter a Password in the Password field.
4. Repeat the code in the Repeat Code field.
5. Select a User profile.
6. Click on the button Accept.
3.3.5.
Create a new User Profile
Requires a user profile with the Create Profile function
enabled
1. Select Users on the menu bar and then New
Profile.
2. Enter a name for the new profile in the
Profile Name field.
3. Activate the functions required for the new
profile.
7. Select the button Yes to add other new
users or the button No to close the creation
of users.
4. Click on the button Accept.
3.3.3. Modify or edit the name and
the password of a user
3.3.6.
Requires a user profile with the Modify User function
enabled
1. Select Users on the menu bar and then User
Information.
2. Select a name from the list of users.
User’s Manual for Optimax installations. Version 1.0
P.A. Manager. PA system management software
5. Select the button Yes to add other new
profiles or the button No to close the
creation of profiles.
Modify or edit a User Profile
Requires a user profile with the Edit Profile function
enabled
1. Select Users on the menu bar and then
Profile Information.
2. Select a name from the list of profiles.
3. Click on the button Edit.
23
4. Modify the name or the functions of the
user profile.
3.3.7.
Delete a User Profile
5. Click on the button Accept.
Requires a user profile with the Delete Profile function
enabled
6. Close the Profile Info window by clicking on
Close.
1. Select Users on the menu bar and then
Profile Information.
2. Select a name from the list of profiles.
3. Click on the button Delete.
4. Click on the button Accept.
5. Close the Profile Info window by clicking on
Close.
3.4. Screen Design operations
Requires a user profile with the Screen Design function enabled
By means of the screen design operations, the graphic elements of the screen can be configured.
In this way, the user can create areas, add background images to areas, add or delete zone and
group selection buttons, change the position of the zone or group buttons, or change the position
of the message, information and alarm panels.
ATTENTION:
From Screen Design mode it is NOT possible to send messages or receive zone or group status
alarms.
3.4.1.
mode
Change
to
Screen
Design
Requires a user profile with the Screen Design function
enabled
Select Edition on the menu bar and then Screen
Design.
Once Screen Design mode has been activated,
the menu option appears marked as selected,
and the words SCREEN DESIGN appear on the
status bar.
3.4.2.
Exit Screen Design mode
Requires a user profile with the Screen Design function
enabled
Select Edition on the menu bar and then Screen
Design.
The words SCREEN DESIGN will disappear
from the status bar.
3.4.3. Change the position of the
panels
Requires a user profile with the Screen Design function
enabled and the user must be in Screen Design mode.
In Screen Design mode it is possible to
configure the message and alarm panels so
that they behave like docked or floating
panels (read section 2. Main Screen).
User’s Manual for Optimax installations. Version 1.0
P.A. Manager. PA system management software
24
To move the panel, click on the title bar and
drag the window to the desired position.
To dock a floating panel, drag
the window over any of the
panel anchoring marks (figure
19).
Figure 19
3.4.6.
Change the name of an area
Requires a user profile with the Screen Design function
enabled and the user must be in Screen Design mode.
1. Using the area selection tabs, select the
area that you wish to rename, so that this
is the area visible on the screen.
2. Select Edition on the menu bar and then
Rename Area.
3. Enter the new name.
If the panels are designated as floating
panels, when Screen Design mode is exited,
the panels will continue as floating panels, and
they can be dragged and positioned in any
part of the screen.
If, on the other hand, they are designated as
dockable panels, when Screen Design mode is
exited, the panels will continue as dockable
panels, and they can be minimised.
4. Click on the button Accept.
3.4.7. Add a background image to
an area
Requires a user profile with the Screen Design function
enabled and the user must be in Screen Design mode.
3.4.4.
Create an area
1. Using the area selection tabs, display the
area to which you wish to add the
background image.
Requires a user profile with the Screen Design function
enabled and the user must be in Screen Design mode.
2. Select Edition on the menu bar and then Add
Background image.
1. Select Edition on the menu bar and then
New Area.
3. Select the name and the location of the
file, then click on the button Open. Image
files in bmp, jpg or gif format are
supported.
2. Enter an Area Name.
3. Click on the button Accept.
3.4.5.
Delete an area
3.4.8. Delete a background image
from an area
Requires a user profile with the Screen Design function
enabled and the user must be in Screen Design mode.
Requires a user profile with the Screen Design function
enabled and the user must be in Screen Design mode.
1. Using the area selection tabs, select the
area that you wish to delete, so that this is
the area visible on the screen.
1. Using the area selection tabs, display the
area from which you wish to remove the
background image.
2. Select Edition on the menu bar and then
Delete Area.
2. Select Edition on the menu bar and then
Delete Background image.
3. Click on the button Accept.
User’s Manual for Optimax installations. Version 1.0
P.A. Manager. PA system management software
25
3.4.9.
Add zones to an area
Requires a user profile with the Screen Design function
enabled and the user must be in Screen Design mode.
1. Using the area selection tabs, display the
area to which you wish to add one or
several zones.
2. Select Edition on the menu bar and then
New Zone.
3. Select the zones that you wish to add to
the area (to select several zones, press and
hold down Ctrl).
4. Click on the button Accept.
3. Select the groups that you wish to add to
the area (to select several groups, press
and hold down Ctrl).
4. Click on the button Accept.
3.4.12. Delete groups from an area
Requires a user profile with the Screen Design function
enabled and the user must be in Screen Design mode.
1. Using the area selection tabs, display the
area containing the group that you wish to
delete.
2. Select Edition on the menu bar and then
Delete Group.
3.4.10. Delete zones from an area
Requires a user profile with the Screen Design function
enabled and the user must be in Screen Design mode.
1. Using the area selection tabs, display the
area containing the zone or zones that you
wish to delete.
2. Select Edition on the menu bar and then
Delete Zone.
3. Select the zones that you wish to delete (to
select several zones, press and hold down
Ctrl).
4. Click on the button Accept.
3.4.11. Add groups to an area
Requires a user profile with the Screen Design function
enabled and the user must be in Screen Design mode.
3. Select the groups that you wish to delete
(to select several groups, press and hold
down Ctrl).
4. Click on the button Accept.
3.4.13. Move elements in an area
Requires a user profile with the Screen Design function
enabled and the user must be in Screen Design mode.
It is possible to move and situate the zone
and group selection buttons in the desired
position within an area. In this way, if a
background image is used, such as the plan of
the floor of a building for example, the various
zone selection buttons can be situated in the
position corresponding to the particular zone
on the plan.
1.
Using the area selection tabs, display the
area containing the elements that you wish
to move.
2.
Move the pointer over the area panel. Note
that the pointer changes shape.
1. Using the area selection tabs, display the
area to which you wish to add one or
several groups.
3.
Click on an element and while holding
down the mouse button, move it across the
area until the desired position is reached.
2. Select Edition on the menu bar and then
New Group.
4.
Release the mouse button to anchor the
element.
In order that groups may be added to an
area, they must first have been created by
means of the Group menu (See section 5.1.
Operations with groups).
User’s Manual for Optimax installations. Version 1.0
P.A. Manager. PA system management software
26
4. Basic Operator operations
4.1. Select a zone or group
On the area panel, click on the zone or group
selection button. The buttons selected turn
green.
Zone selection…
4.3. Send
message
a
PC
pre-recorded
1. On the area panel, select the zones and/or
groups to which you wish to send the prerecorded message by clicking on the zone
or group selection buttons. The buttons
selected turn green.
2. On the message panel, select the file that
you require from the PC Messages folder.
Group selection…
To cancel the selection, click on the button
selected.
4.2. Change area
To change area, click on the tab with the
name of the area that you wish to display.
Figure 20
3. If required,
gong.
activate
the
4. Press
the
pre-recorded
message
button.
The
equipment takes a few
moments to prepare itself.
5. While
the
message
is
played, STOP appears. If you
wish to stop the message
before it ends, press the
STOP button.
6. Once the message has been
sent, the button returns to
standby status.
User’s Manual for Optimax installations. Version 1.0
P.A. Manager. PA system management software
27
4.4. Send a sequence of
pre-recorded messages
PC
1. On the area
panel, select
the zones
and/or groups
to which you
wish to send
the sequence
of PC prerecorded
messages.
2. If required,
activate the
gong.
1. Right click with the mouse on the
background of the area or on the
background image of the area and select
the option Deselect all zones.
2. Click on the button that
cancels
selection
of
zones/groups. This button can
be found in the top right-hand
corner of the application.
4.6. Activate
a
local
prerecorded message in a zone
(digital amplifier) from the PC
Figure 21
3. On the
message
panel, select
a sequence
from the list
of sequences
of PC pre-recorded messages (figure 21).
1. Right click with the mouse on the zone and
select Play Local Message.
2. Configure
the
parameters
of
the
message:
4. Press
the
pre-recorded
message activation button.
The equipment takes a few
moments to prepare itself.
Preparing equipment…
5. While
the
message
is
played, STOP appears. If you
wish to stop the message
being played, press the
STOP button.
6. Once the sequence has
been sent,
the button
returns to standby status.
4.5. Quick cancellation of the
selection of groups and/or
zones
Message Type: The digital amplifier has two
internal memories in which files can be
stored for subsequent use as local prerecorded messages: the MP3 circuit Flash
Memory and the Coldfire Flash Memory.
The Message Number and the Message Priority
must also be configured.
3. Click on the button PLAY to play the
message. To stop the message, click on the
button STOP.
When you click on any of the buttons selected
(which are green), they return to standby
status (blue). To speed up the process by
deselecting all the zones and groups at once,
there are two possibilities:
User’s Manual for Optimax installations. Version 1.0
P.A. Manager. PA system management software
28
4.7. Modify the volume of a
zone
4.8. Modify the volume of a
group
Requires a user profile with the Edit Volume function
enabled
Requires a user profile with the Edit Volume function
enabled
1. Right click with the mouse on the zone
selection button to select the particular
zone.
Attention: When the volume of a group
is modified, the volume of all the zones
that form the group is modified.
2. Select the option Adjust Volume.
1. Right click with the mouse on the group
selection button to select the particular
group.
2. Select the option Adjust Volume.
3. Move the volume controls to the desired
position.
3. Move the volume controls to the desired
position.
4. Click on OK.
4. Click on OK.
User’s Manual for Optimax installations. Version 1.0
P.A. Manager. PA system management software
29
4.9. Change the music program
of a zone
Requires a user profile with the Edit Volume function
enabled
1. Right click with the mouse on the zone
selection button to select the particular
zone.
When the source of the music program that it
is wished to assign to one or several zones is
an UMX-ETH card, it is necessary to assign an
analog source to this digital source.
To do so, in the music program assignment
table, click on the name of the digital source
and select the analog source.
2. Select the option Adjust Music Programs.
3. A table appears in which each of the rows
represents a music program and each of
the columns represents a zone. The
number of rows and columns depends on
the number of zones and music sources in
each installation.
This music program can then be assigned to
the zones required.
To quickly assign the same music program to
all the zones in a PA Area, right click with the
mouse on the name of the music program
required and select Apply to all zones.
To remove a particular music program from all
the zones in a PA Area, right click with the
mouse on the name of this music program
and select Remove from all zones.
Click on the program/zone intersections to
assign the music program to this particular
zone.
= music program assigned
= without music program
4. Click on OK.
User’s Manual for Optimax installations. Version 1.0
P.A. Manager. PA system management software
30
5. Advanced Operations
5.1. Operations with groups
A group is a set of zones represented on the screen by a selection button.
Each group can be formed by zones and groups.
The groups must first be created by the user. This section shows how groups can be created,
modified and deleted.
5.1.1.
Create a group
Requires a user profile with the Create Group function
enabled
2. Click on the button Synchronise.
3. Click on the button Accept.
4. Click on the button Close.
1. Select Group on the menu bar and then New
Group.
2. From the lists Zones Available and Groups
Available, select the elements that are to
form the group (for multiple selection hold
the Ctrl key down) and click on the button
Add.
3. Enter the name that will identify the group.
This name will appear together with the
group selection button.
4. Enter a Number.
Each group requires a Number. The
equipment identifies the group by means of
this number.
This number cannot be the same for more
than one group. If a number is chosen that
is already being used by another group, a
warning message appears. By default, the
program
fills
the
number
field
automatically.
5. Click on the button Accept.
6. Select Yes if you wish to add more groups
or No to save the group and exit.
7. Follow the instructions in the next section
5.1.2. Synchronise Groups.
5.1.2.
Synchronise groups
Requires a user profile with the Edit Group function
enabled
When groups are created, edited or deleted, it
is necessary to update the configuration of the
equipment in the installation.
1. Select Group on the menu bar and then
Group Information.
User’s Manual for Optimax installations. Version 1.0
P.A. Manager. PA system management software
5.1.3.
Modify or edit a group
Requires a user profile with the Edit Group function
enabled
1. Select Group on the menu bar and then
Group Information.
2. Select the group that you wish to modify
from the Group Info list.
3. Click on the button Edit.
4. Modify the parameters as required: Add
zones or groups, modify the Name or the
Number of the group.
5. Click on the button Accept.
6. Click on Accept once again.
7. Click on the button Close.
Remember that you must proceed
Synchronise Groups (section 5.1.2.).
5.1.4.
to
Delete a group
Requires a user profile with the Delete Group function
enabled
1. Select Group on the menu bar and then
Group Information.
2. Select the group that you wish to modify
from the Group Info list.
3. Click on the button Delete.
4. Click on the button Accept.
5. Click on the button Close.
Remember that you must proceed
Synchronise Groups (section 5.1.2.).
to
31
5.2. Scheduling operations
There are 2 types of scheduling:
•
Message scheduling
Through this option, a PC pre-recorded message
or a sequence of PC messages can automatically
be sent to a group in accordance with a schedule.
If groups of just one zone are created, it is
possible to send message scheduling instructions
to that particular zone.
•
Volume scheduling
Through this option, the volumes and tone
equalisations of one or several zones can be
automatically modified in accordance with a
schedule.
User’s Manual for Optimax installations. Version 1.0
P.A. Manager. PA system management software
32
5.2.1.
Create a message schedule
Requires a user profile with the Create Schedule function
enabled
1. Select Scheduling on the menu bar and then
New Scheduling of Messages.
2. Enter a schedule name and then configure
the parameters of the schedule (Selection of
Date, Selection of Time and Selection of
Announcements).
3. Click on the button Accept.
4. Select Yes to add more groups or No to save
the schedule and exit.
5.2.2.
Modify a message schedule
Requires a user profile with the Edit Schedule function
enabled
1. Select Scheduling on the menu bar and then
Message Scheduling Information.
4. Use the control Enabled to activate or
deactivate the schedule.
5. Click on the button Accept.
6. Click on the button Close.
5.2.4.
Delete a message schedule
Requires a user profile with the Delete Schedule function
enabled.
1. Select Scheduling on the menu bar and then
Message Scheduling Information.
2. Select the name of the schedule that you
wish to modify from the Message Scheduling
Info list.
3. Click on the button Delete.
4. Click on the button Accept.
5. Click on the button Accept.
6. Click on the button Close.
2. Select the name of the schedule that you
wish to modify from the Message Scheduling
Info list.
3. Click on the button Edit.
4. Modify the parameters as required.
5. Click on the button Accept.
6. Click on the button Close.
5.2.3. Enable / Disable a message
schedule
Requires a user profile with the Edit Schedule function
enabled.
The scheduling of messages can be activated
or deactivated as the user requires. To do
this:
1. Select Scheduling on the menu bar and then
Message Scheduling Information.
2. A list with the schedules available appears.
Active schedules appear in green, while
schedules that have been disabled appear
in red. Select the name of the schedule
that you wish to enable or disable from the
Message Scheduling Info list.
3. Click on the button Edit.
User’s Manual for Optimax installations. Version 1.0
P.A. Manager. PA system management software
33
5.2.5.
Create a volume schedule
Requires a user profile with the Create Schedule function
enabled.
1. Select Scheduling on the menu bar and then
New Scheduling of Volumes.
2. Enter a schedule Name and then configure
the Selection of the Date and Selection of the Time
parameters.
3. Click on the button Add.
4. Select the zone for which the volume
schedule is required.
5. Configure the volume, bass and treble of
the program and priority channels by
moving the sliding control to the required
position.
6. Click on the button Accept.
7. Repeat steps 3, 4 and 5 for each zone that
you wish to add to the schedule.
5.2.7. Enable / Disable a volume
schedule
Requires a user profile with the Edit Schedule function
enabled.
Schedules can be activated or deactivated as
the user requires. To do this:
1. Select Scheduling on the menu bar and then
Volume Scheduling Information.
2. A list with the schedules available appears.
Active schedules appear in green, while
schedules that have been disabled appear
in red. Select the name of the schedule
that you wish to enable or disable from the
Volume Scheduling Info list.
3. Click on the button Edit.
4. Use the control Enabled to activate or
deactivate the schedule.
5. Click on the button Accept.
8. Select OK.
6. Click on the button Close.
9. Select Yes to create another volume
schedule or No to save the schedule and
exit.
5.2.8.
Delete a volume schedule
Requires a user profile with the Delete Schedule function
enabled.
5.2.6.
Modify a volume schedule
Requires a user profile with the Edit Schedule function
enabled.
1. Select Scheduling on the menu bar and then
Volume Scheduling Information.
2. Select the name of the schedule that you
wish to modify from the Volume Scheduling
Info list.
3. Click on the button Edit.
4. Modify the parameters as required (Name,
Date and Time).
Using the Add, Delete and Edit buttons, you
can modify the volume scheduled for each
zone.
1. Select Scheduling on the menu bar and then
Volume Scheduling Information.
2. Select the name of the schedule that you
wish to modify from the Volume Scheduling
Info list.
3. Click on the button Delete.
4. Click on the button Accept.
5. Click on the button Accept.
6. Click on the button Close.
5. Click on the button Accept.
6. Click on the button Close.
User’s Manual for Optimax installations. Version 1.0
P.A. Manager. PA system management software
34
5.3. Message sequences
5.3.1. Create a sequence of PC prerecorded messages
Requires a user profile with the Create Message Sequence
function enabled
5.3.3.
Delete a message sequence
Requires a user profile with the Create Message Sequence
function enabled
1. Open the Messages menu, select Message
Sequence and then New Message Sequence.
1. Open the Messages menu, select Message
Sequence
and
then
Message
Sequence
Information.
2. Enter a name for the Message sequence in
the Name window.
2. Select the sequence that you wish to delete
from the Message Sequence Info list.
3. From the PC Messages folder, select the first
message that is to form part of the
sequence.
3. Click on the button Delete.
4. Click on the button Add.
4. Confirm deletion by clicking on OK.
5. Click on the button Close.
5. Repeat steps 3 and 4 until the sequence is
created.
6. Click on the button Accept.
Select Yes to create another message
sequence or No to save the sequence and exit.
5.3.2.
Edit a message sequence
Requires a user profile with the Create Message Sequence
function enabled
1. Open the Messages menu, select Message
Sequence
and
then
Message
Sequence
Information.
2. Select the sequence that you wish to
modify from the Message Sequence Info list.
3. Click on the button Edit.
4. You can modify the messages that make up
the sequence by means of the Add – Remove
buttons, change the order of the messages
(Up – Down buttons) or change the name of
the sequence.
5. When you have finished, click on OK.
6. Select OK once again.
7. Click on the button Close.
User’s Manual for Optimax installations. Version 1.0
P.A. Manager. PA system management software
35
5.4. Pre-recorded message file management
Requires a user profile with the Pre‐recorded Message Management function enabled
5.4.1. Copy files to the PC to be
used as pre-recorded messages
5.4.2. Change the parameters of a
PC pre-recorded message
1. Open the Messages menu and select (PC) Pre‐
recorded Message Management.
1. Open the Messages menu and select (PC) Pre‐
recorded Message Management.
2. On the tab Message List (1), click on the
button Add New Files (2).
2. From the Message List, select the file
corresponding to the message whose
parameters you wish to change.
3. Select the files that you wish to add and
click on the button Open. The files are added
to the Message List.
4. Click on the button Close (3) to close the
window.
The messages added to the Message List are
copied into the messages folder of the PC. The
default
location
of
this
folder
is:
C:\SMP250v2\pafiles\messages. This folder is
created automatically during the software
installation process.
If necessary, subfolders can be created from
the messages folder to improve the organisation
of the messages. The messages in these
subfolders will have to be added to the
Message List.
3. Enable the control Change parameters (4).
4. If you so wish, modify the field Label (5).
This is the text that is displayed on the list
of messages available on the message
panel.
5. Assign a Mode (6) to the message. This
Mode is the priority of the message with
respect to the other audio signals in the
system.
6. Click on the button Apply Changes (7).
7. Click on the button Close (3) to close the
window.
Valid file formats for the PC pre-recorded
messages are .wav, .mp3, .wma…
(1)
(2)
(4)
(5)
(6)
(7)
(3)
User’s Manual for Optimax installations. Version 1.0
P.A. Manager. PA system management software
36
5.4.3.
Monitoring of pre-recorded messages
A. Configuration of monitoring controls
Prior to monitoring of messages, it is necessary to configure the monitoring controls.
1. Open the Messages menu and select (PC) Pre‐recorded Message Management.
2. Select the sound card where the monitor is connected (1).
3. Select the play source line (the options available depend on the brand and the model of the
sound card used) (2).
4. If necessary, adjust the Play Source Volume (3) and the Master Volume (4) of the sound card.
B. Monitoring a message
1. Click on the play button (5).
2. Select the message that you wish to monitor (6) and click on Open (7).
3. To stop the message before it ends, click on the button Stop (8).
(1)
(2)
(3)
(6)
(4)
(7)
(5)
(8)
User’s Manual for Optimax installations. Version 1.0
P.A. Manager. PA system management software
37
5.4.4.
Recording of messages
A. Configuration of recording controls
1. Open the Messages menu and select (PC) Pre‐recorded Message Management.
2. Select the record card where the microphone is connected (1).
3. Select the record line where the recording microphone is connected (2) (the options available
depend on the manufacturer of the sound card used).
4. If necessary, adjust the Rec Source Volume (3).
B. Recording a message
1. Select a file type (4) and a format (5).
2. Click on the button Recording (6).
3. Enter a name for the file that is being prepared for recording (7), click on Save (8) and recording
will begin immediately.
4. To stop recording, click on the button Stop (9).
5. Add the recorded message to the Message List by clicking on the button Add to Message List (10).
(1)
(2)
(3)
(4)
(8)
(7)
(5)
(10)
(9)
(6)
User’s Manual for Optimax installations. Version 1.0
P.A. Manager. PA system management software
38
5.4.5.
Copy files to the PC to be used as a Gong
To use an audio file as a personalised Gong, it must be copied to the gongs folder of the Server PC.
This folder is created automatically during the software installation process.
The default location of this folder is: C:\SMP250v2\pafiles\gongs
In order that these gong files may be used, it is necessary to assign the gong to a Mode when the
system is configured. In this way, the PC pre-recorded messages with this same mode assigned to
them can be activated preceded by the gong.
5.5. Log backup configuration
Requires a user profile with the Access to Configuration function enabled
All the system operations, events and alarms are
logged in some text files called logs.
These files are created automatically every day,
and they are saved in the log folder of the PC
(SMP250v2\pafiles\log).
Through the log backup, a weekly backup is
performed of the log files of the system
operations, alarms and communication.
The files copied are saved in the folder old
(SMP250v2\pafiles\log\old). When the backup is
made, the old files contained in the folder old are
deleted. This backup system makes logs of 2
weeks available (the current week in the folder log
and the previous week in the folder old) and avoids
unnecessary space being taken up on the PC’s
hard disk.
To configure log file backup, proceed as follows:
1. Open the Options menu and select Configurations.
2. Activate the option Delete Logs Periodically.
3. Configure the day and the time at which the logs are to be copied.
4. Click on Accept.
User’s Manual for Optimax installations. Version 1.0
P.A. Manager. PA system management software
39
5.6. PC sound card configuration
Requires a user profile with the Access to Configuration function enabled
Through this option the PC sound cards are
configured for use in playing PC pre-recorded
messages or as generators of audio IP (in analog
installations with pre-recorded live voice audio).
1. Open the Options menu and select Configurations.
2. Select the Sound Card tab and click on Sound Card
Configuration.
3. On the Pre‐Recorded Messages tab, configure the Line In
control with the option corresponding to line in
offered by the sound card, and the Mic In control with
the option that corresponds to the microphone (the
options available vary according to the manufacturer
of the sound card used).
4. Configure the play and record volumes.
5. If the PC has two sound cards, repeat the process for
the card corresponding to the Audio IP by clicking on
the Audio IP Messages tab.
6. Finally, close the configuration window.
7. Click on Accept.
User’s Manual for Optimax installations. Version 1.0
P.A. Manager. PA system management software
40
5.7. Maintenance reset configuration
Requires a user profile with the Access to Configuration function enabled
Through this option, the user can program a reset
of the computers in the system and a
reconfiguration
of
the
equipment
as
a
maintenance measure.
To do this:
1. Open the Options menu and select Configurations.
2. Select the Maintenance Reset tab.
3. Enable the reset by ticking the check box.
4. Select the days and the time at which you wish
to perform the reset.
5. Click on Accept.
5.8. Configuration of Optimax unit status checks
Requires a user profile with the Access to Configuration function enabled
In Optimax installations, each equipment unit
sends heart beat signals to the PC every so often,
thereby indicating its status.
Through this option, a process is activated
whereby the PC checks the Optimax units,
attempting to recover the units from which it no
longer receives a heart beat.
To activate the check:
1. Open the Options menu and select Configurations.
2. Select the Optimus Status tab.
3. Tick the check box Enable OPTIMAX equipment
control.
4. Establish an interval of time between checks.
User’s Manual for Optimax installations. Version 1.0
P.A. Manager. PA system management software
41
5.9. Generation of a surveillance report
In installations with SU-114, SU-214/0 or Optimax power stages, it is possible to generate reports
about the behaviour of the loudspeaker lines, the critical path or the emergency input.
In this way, and through a graphic representation, users can quickly learn of exactly when an error
occurred.
The software supports printout of the report or export to other formats (PDF, Word, Excel…).
1. Open the Help menu
and select Create
Reports.
2. Select the tab
corresponding to the
equipment model
about which you wish
to generate the report
(1) and the name of the
equipment unit (2).
(1)
(2)
(4)
(5)
(3)
3. Select the frequencies
that are to form part of
the report (3) (Non
Audible, Audible and
Critical Path).
4. Select a range of dates
or Every day (4).
5. Click on Generate Report
(5).
The result is a report on
the surveillance conducted
during the established
period of time. Each graph
has
the
following
indications:
MEASUREMENTS
WITH
AUDIBLE FREQUENCY:
Blue:
Values
obtained
loudspeaker line surveillance.
NON
by
MEASUREMENTS WITH AUDIBLE
FREQUENCY:
CRITICAL PATH / EMERGENCY
INPUT
Orange: Values obtained
loudspeaker line surveillance.
Light blue: Values obtained in the
surveillance of the critical path (SU
units), or in the surveillance of the
emergency input (UP‐ETH).
by
Red: Upper limit above which a
value is considered to be a low
impedance loudspeaker line or
short‐circuited line error.
Yellow: Upper limit above which a
value is considered to be a low
impedance loudspeaker line or
short‐circuited line error.
Pink: Upper limit above which a
value is considered to be an error.
Green: Lower limit below which a
value is considered to be a high
impedance line or open line error.
Lilac: Lower limit below which a
value is considered to be a high
impedance line or open line error.
Light green: Lower limit below
which a value is considered to be
an error.
User’s Manual for Optimax installations. Version 1.0
P.A. Manager. PA system management software
42
5.10. Access to the installation screen
Requires a user profile with the Access to Installation function enabled
Open the Options menu and select Installations. The installation screen appears.
Here, following the tree-like structure typical of Windows Explorer, you can add, delete and edit
equipment units.
5.11. Event and Operation Viewers
5.11.1. Event Log
This shows the configuration operations performed by the operator (creation of areas, addition of
zones, groups…) and the operations performed automatically by the system (checking of
equipment…).
To view this log, open the View menu and select Event Log.
The information that
appears in the event log
is automatically logged
in a text file. This file,
named
LogEvents_(day_month_year
).txt, can be found in the
log folder of the PC
(SMP250v2\pafiles\log).
More information can be
found in section 5.5. Log
backup configuration.
User’s Manual for Optimax installations. Version 1.0
P.A. Manager. PA system management software
43
5.11.2. Message Log
This
shows
the
message
activation
operations
performed by the operator.
To view this log, open the View
menu and select Message Log.
The information that appears in
the
message
log
is
automatically logged in a text
file.
This
file,
named
LogMessages_(day_month_year).txt,
can be found in the log folder of
the PC (SMP250v2\pafiles\log).
More information can be found
in
section 5.5. Log backup
configuration.
5.11.3. Multicast
This shows Multicast communication between the equipment in the installation.
To open the viewer, select the View menu and click on Multicast.
•
Frames: Information appears about the Multicast communication between equipment in the
PA system.
•
Heart
Beat:
This
shows
the
heart beats of the
equipment with an
Ethernet connection
directed towards the
Multicast
group.
This signal provides
information
about
the status of the
equipment.
•
Heart
Beat
(equipment unit): Each
equipment
model
has
its
own
information
tab.
By clicking on these
tabs you can view
the IP addresses of
each
equipment
unit, as well as the
internal
firmware
versions of the units.
User’s Manual for Optimax installations. Version 1.0
P.A. Manager. PA system management software
44
5.11.4. Audio IP
This shows the communication log between the P.A. Manager application and any integration
clients.
To open the viewer, select the View menu and click on Audio IP.
6. Software versions
The functions described in this user’s manual are valid for Optimax installations and the following
software version (or a later version):
Software Version
Revision Number
2.5
3391.19997
User’s Manual for Optimax installations. Version 1.0
P.A. Manager. PA system management software
45
OPTIMUS S.A.
C/ Barcelona, 101
E-17003 Girona (Spain)
Tel. (+34) 972 203 300
Fax (+34) 972 218 413
Email: [email protected]
www.optimus.es