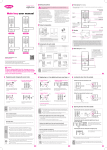
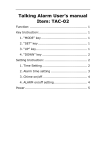
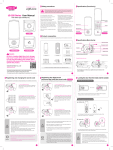
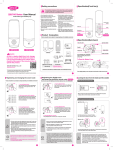
1
The brand for a safer life
Safety precautions
Warning
user manual
Front ass’y
Back ass’y
The precautionary measures are for the safety of the user, for the prevention of property
damage, and for the avoidance of any inconveniences due to an accident. These must be read
and followed properly.
• Do not disassemble or alter the lock.
• Do not install where the distance over
5mm between the door and door frame.
• Please do not expose the secret code and
change the secret code in regularly.
• Batteries should not be exposed directly to
heat sources or flames, or submerged in water,
because they may leak or explode, resulting in
severe damage. Please do not use damaged
batteries.
• Do not press using sharp tools or press
numeric button excessively.
• Make sure the door is completely locked when
going out.
• Place the batteries carefully and correctly according
to their polarity (+/-). If the batteries are inserted
in a wrong way, differently from the indicated
direction or polarity, leakage or rupture could occur.
Pay attention to it.
• Please do not mix old with new batteries or use
different types.
Always use new alkaline batteries.
• Do not clean the product with flammable materials
such as alcohol, benzene or thinners. Such materials
may damage the surface or cause a fire.
• Replace the current batteries with new ones within
1 week after the battery replacement notification
melody sounded off for the first time.
Battery cover
Keypad cover
Emergency power
supply terminal
Remote controller
pack (Option)
Manual/Auto
switch
Volume switch
Components
Touch plate
Double lock
button
Emergency key insertion hole
Digital touch key
Manual knob
Mortise
Front Handle
Strike
Rubber pad for
the back ass’y
Back ass’y
Front ass’y
Register button
Back handle
Handle shaft
Handle shaft stop ring
* Must be used for the installation
Anti-panic handle
The handle is a one-touch type product developed by the company.
When it is installed successfully, the user just needs to swing it down
to open the door safely and conveniently when moving from the inside
area to the outside area.
Touch plate
JM-640S and JM-640 (3W)
Battery 4pcs
Installation template
User manual
※ In addition to 2pcs of smart tag key
that are provided basically, 13.56Mhz ISO
14443A type RF tags, NFC cards and credit
cards can be also registered as card keys.
Product warranty
Components of each model
Door opening type
Model
Emergency key
2way / secret code and digital touch key can be used
2way / secret code and smart tag (card) can be used
3way / secret code and smart tag (card) and a key can be used
UNICOR HIGHTECH CO., LTD
www.unicor.co.kr
Remote controller
is a separate item
3way / secret code, digital touch key, and key can be used
Mortise
Dead Bolt
- This manual may change without notice in case of product improvement.
- Product specifications are subject to change without prior notice.
- This manual may not be edited or changed without the manufacturer’s prior permission
Latch Bolt
Caution
As this is a keyless digital door lock, damage may occur
to parts of the dead lock system if it is not used according
to the manual. Users should be fully aware of the manual
and how to operate this product.
Caution
• The lifetime of the batteries is based on the result of the tests by the company and is not an absolute measurement.
It will vary depending on the temperature and humidity of the installed locations as well as depending on the
frequency of usage and the quality of batteries.
• The functions, design, and composition of the product may change without prior notification for the purpose of
improving its quality.
Registering and changing the secret code
Caution
Opening the door from the inside
The door must be open while registering the secret code.
When it is needed to register additional digital touch keys and smart tags (cards) (totally 50pcs of digital
touch key can be registered), it is required to repeat the above process 2 before the keypad lamp is turned off.
Attention
1. O
pen the battery cover of the back ass’y, and short
press the [Register] button one time.
※U
pon shipment, the right-hand door mode is set to default, meaning that there is no need for going
through the setting process when installing it for a right-hand door. If the door is a left-hand type, it is
required to change the direction of the Latch Bolt of the mortise. Otherwise, the door will not be closed.
2. Push the keypad cover of the front ass’y up, and check
that the keypad lamp is turned on.
Caution
If neither the digital touch key nor the smart tag (card) is contacted or if the [Open] button is not pressed,
in case of the remote controller, for 14 seconds after the [Register] button is pressed, the registration
process will be cancelled. When a new digital touch key, smart tag (card) or a new remote controller is
registered (The above 1–4 steps), the previous one will be automatically deleted.
Caution
If the user does not open the door within 7 seconds after pulling the
handle down, the door will be automatically locked.
▶ Pulling the back handle down
Deleting the digital touch key, smart tag (card),
and remote controller
3. Enter the secret code of 3-20 digits.
4. Press the [Register] button. Then, the registration will
be completed while a sound is generated for checking
the registration.
After 3 seconds
Pull the handle of the back ass’y down slightly. Then, the anti-panic function
will be activated, disabling the locked state and opening the door.
1. Open the battery cover of the back
ass’y, and short press the [Register]
button one time.
▶ Opening the door by using the manual knob.
ual knob
Man
2. Push the front keypad cover up.
Open/Close
Caution
If no secret code is entered within 14 seconds after the [Register] button is pressed, the
registration process will be cancelled. When a new secret code is registered (The above 1-4
steps), the previous one will be automatically deleted. If the registration mode is cancelled,
the previous secret code will be maintained.
Turn the manual knob in the left or right direction. Then, the door will be opened.
3. Press number 0 for 5 seconds. All the
digital touch keys, card keys and remote
controllers will be deleted while a sound
will be generated for checking.
For 5 seconds
Registering the digital touch key
Caution
When it is needed to register digital touch keys, smart tags (cards) and remote controllers,
or registering them again, it is required to register them all together at once.
1. Open the battery cover of the back ass’y, and short
press the [Register] button one time.
Close/Open
Locking the door from the inside
▶ When the auto lock function is set.
2. Bring the digital touch keys into contact at the touch plate
in order (When each digital touch key is comes in contact at the
touch plate, the registration will be completed while a sound is
generated for checking the registration)
※ Bring the smart tag (card) into contact at the touch plate.
After 3 seconds
Opening the door from the outside
▶ Opening the door by using the
secret code
1. Push the keypad cover up and enter the secret code.
2. When the user brings the keypad cover down, there
will be a sound for checking. Then, the user needs to
bring the handle down to open the door.
▶ Opening the door by using the digital touch key,
smart tag (card) or the remote controller
When the auto lock function is set, the door will be automatically locked 3 seconds
after the door is closed.
▶ When the auto lock function is set.
3. Press the [Register] button of the keypad after
registering all digital touch keys or smart tags (cards).
2. When there is a sound for checking, the user just needs to bring the handle
down to open the door.
ual knob
Man
4. Registering the remote controller (option): Short press the
[Register] button of the back ass’y one time, and the press the
[Open] button for registration.
Open/Close
1. Bring the registered digital touch key or smart tag key into contact
at the touch plate, or press the [Open] button in case of the remote controller.
Close/Open
▶ Opening the door by
using the emergency key
Each time the user turns the manual knob to the left or right position, the door will
be opened and closed accordingly.
Insert the emergency key into the emergency
key hole and turn it to open the door.
Releasin the double lock function from
the outside
Locking the door from the outside
Setting the auto/manual lock function
For locking the door automatically (or manually)
▶ When the auto lock function is set.
▶ Releasing
▶ Setting the auto lock function
1. While the door is locked, push the keypad up and enter the registered secret code.
Remove the battery cover, and shift the [Manu/Auto] switch to the auto mode
(Upon shipment, the mode is set to default).
After 3 seconds.
Manual
Auto
Close the door, and then the door will be automatically locked 3 seconds later.
2. Press the [#] button and press the secret code and press the [*] button again.
▶ Setting the manual lock function
▶ When the manual lock function is set.
Remove the battery cover, and shift the [Manu/Auto] switch to the manual mode.
Push the keypad cover up and down. Then, the door
will be locked
Manual
Auto
Setting and releasing the forced lock function
from the outside
This function makes it possible for an emergency sound to be generated for the purpose of
enhancing security when the door lock is handled from the inside when the user has to be absent
from the premise for a period of time.
Forced lock function
Internal double lock function
1.Push the keypad cover up from the
outside, and press the number
[0] button for 5 seconds.
This makes it impossible to open the door by using the secret code, digital touch key, smart tag
(card) or the remote controller from the outside.
※ Even when the double lock function is set, it is still possible to open the door by using the emergency
key that is prepared for an emergency situation.
▶ Setting
Audio control function
▶ Setting
While the door is locked, press the double lock button of the back ass’y for 3
seconds. Then, a sound for checking will be generated, completing the setting.
▶ Releasing
This makes it possible for the user to adjust audio in
stages. Remove the battery cover, and the shift the
volume switch to 0, 1, or 2.
※ [0] for mute, [1] for low-pitched sound and
[2] for high-pitched sound
This function will be automatically disabled when the user opens the
door and enters the premise normally by using the secret code, digital
touch key or the smart tag (card).
Imaginary code system to prevent exposure
secret code (Imaginary code function)
For 3 seconds
Touch the keypad, and press the [#] button one time. Then,
press the [*] button and enter the secret code. Then, press the
[*] button again.
※ This is a temporary function, meaning that the operating
sound will be generated again when the door lock is used
again later.
Even when another person is watching nearby, this function makes it possible for the user to
enter an imaginary code before entering the real secret code.
Open/Close
Opening the door by
using the handle.
High-temperature
detection
▶ How to use the
function
ual knob
Man
When the secret code is 1234,
the user just needs to enter the
real secret code 1234 at the end,
after 78945 is entered.
Close/Open
Opening the door by
using the manual knob.
Information
After entering
78945
When a heat of temperature that is so high (About 60°C
±5°C) that a fire is suspected, is detected, a powerful warning
sound will be generated, and, at the same time, the locked
state will be automatically disabled.
If the back ass’y is exposed to direct sunlight a long period of time, it could cause the temperature sensor to be activated and a warning sound to be generated accordingly. The door’s locked
state will be disabled even when the door is in the double-locked state from the inside.
▶ Releasing the high-temperature warning
The unsetting will take place when the power is reset
after removing batteries.
※The unsetting cannot take place if the temperature
of the product is high.
The total number of digits combining the imaginary code and the real secret code should
be 3-20 digits.
8
Resetting the system
The warning is disabled.
9
Batteries are removed.
Standard of the product
Classification
This makes it possible to reset the system if the circuit unstable temporarily, such as condensation
and temporary shut-down.
While the door is closed, if an abnormal opening of the
door (For example: Someone breaks into the premise by
opening up the gap in the door) is detected, a warning
sound of 80dB will be generated.
▶ How to release
the warning
sound
Caution
Entering 1234
7
Trespass / Breakage alarm
This removes the sound temporarily (one time) when it
is needed to use the door lock quietly regardless of the
currently set operating sound.
▶ Mute function
▶ Setting
Touch the keypad cover, and press the [#] button for 10 seconds or longer. Then,
the power will be turned on again.
The warning is disabled.
Specification
Front ass’y
(Front body)
74W X 295H X25D mm
Back ass’y
(Main body)
74W X 295H X30D mm
Digital touch key
2pcs (2way tag model) / Possible to register up to 50pcs.
Smart tag (card)
2pcs (2way tag model) / Possible to register up to 50pcs.
Emergency key
2pcs
Battery
74W X 295H X25D mm
Rated voltage: DC 6V
Working temperature: -20℃
to 60℃
Sensor working temperature (High
temperature): 60℃
Will run for about 10 months when
used 10 times a day (6–8 months in
case of card models)
1.5V AA LR6 alkaline battery x 4
Door Handing
Enter the secret code normally or bring the digital touch key or smart tag (card) into contact
normally. Then, the warning sound will be disabled.
Remarks
LH / RH / LHR / RHR
*The lifetime of the batteries is based on the result of the tests by the company and is not an absolute measurement. It will vary
depending on the temperature and humidity of the installed locations as well as depending on the frequency of usage and the
quality of batteries.
For 10 seconds or longer.
* The functions, design, and composition of the product may change without prior notification for the purpose of improving its quality.
Battery replacement notification
The batteries are removed
The secret code is entered
The digital touch key or smart tag
(card) is brought into contact
The product
is used in
normal
conditions
What is the battery replacement notification function?
When the batteries need to be replaced, a melody will sound off when operating the product. The
melody is for letting the user know about the need for replacing batteries
Play-prevention warning and
stopping of operation
If the melody sounds off when operating the system, it is required to immediately open the battery cover of the back ass’y, and replace all the batteries (4pcs) with new genuine 1.5V LR6 AA
alkaline batteries that can be purchased at the mart.
When an unregistered secret code is entered 3 consecutive times or an unregistered digital touch key or
smart tag (card) comes in contact 3 consecutive times, a warning sound will be generated and the system
operation will be stopped for 30 seconds.
Caution
Entered 3 consecutive times?
2) Bring the battery into contact at the 9V battery input terminal at the
bottom of the front ass’y, and the press the [*] button while maintaining
the contact. If the power is supplied normally, a sound “Bibi~” will be
generated and the keypad will be turned on.
3) Enter the secret code and then press the [*] button, or bring the registered
digital touch key or smart tag (card) into contact. Then, the door will be
opened.
Information
10
Free-of-charge repair
Same failure occurs 4 times or more
Free-of-charge repair Paid repair
The repair parts are not available at the main office
Product replacement
Replacement after depreciation
based on a fixed rate.
Paid repair
Not the case of failure
Mistakes and mishandling by the user
●When needed to break the
product due to the loss of
secret code.
●When the door is sagging, or
installation is defective, requiring
the product to be reinstalled.
●Request for checking the product
for possible problems while
there is no specific symptom of
a failure.
●P roblems in operation occur after
the user installs the product
directly.
●A visit for repair is needed as
there are mistakes and mishan
dling by the user such as mistakes
in replacing batteries and unskill
ful use of the product.
●Defective operation due to poorly
inserted batteries and use of
defective batteries.
●Failure and breaking due to the
use of the product for other
purposes.
●Failure and breaking caused by
the user on purpose or from an
external impact.
Other reasons
●Failure and damage due to natu
ral disasters such as fires, floods, and damage from sea water.
●Penetration by water, condensa
tion and injection of chemicals, requiring the internal circuits to be replaced, and causing failures.
Warranty
1) Purchase a 9V battery in a rectangular shape from nearby stationary stores
or convenience stores.
Caution
Failure occurs within 1 year from date of purchase
◎ The warranty period for all of the company’s products is 1 year from the date of purchase indicated
on the warranty certificate.
◎ The details of all kinds of services by the company is based on the damage compensation criteria of
the consumer protection act by the government
◎ Even during the warranty coverage, users need to pay (the cost for trip, technical support and parts)
for some services if they are in the category of chargeable services.
◎ The warranty is applicable only in the local area.
◎ Users must submit the warranty certificate that contains the installation information when needed
to request a service.
◎ If the warranty certificate is not available, users need to submit a receipt, a credit card receipt or
a cash receipt instead (Except for a simple receipt)
◎ If it is impossible to show the purchase date, the warranty period will be applied by taking into
consideration the product’s manufactured date + expiration period (6 months)
How to use
If the warning sound continues or the deadbolt does not work normally, it is required to
adjust the position of the door lock, requiring the user to contact a shop that can handle the
installation or an expert in the door locks
Product replacement
*Details of mistakes and mishandling by the user
∙Must use general batteries, not rechargeable ones.
∙Take precautions in placing the batteries in the compartment in order to prevent leakage or rupture that
could occur when they are placed wrongly.
∙Must replace the old batteries all with new ones, not partially. Do not use new ones with
discharged ones together.
∙It is designed to operate with the rated voltage 6V. If low voltage (4.2±0.3V) is detected,
a melody will sound off.
∙After the replacement, if the door lock stops working in a short period of time or the batteries are
discharged, the batteries could be defective. It is required to contact the shop where the user purchased
batteries and get new ones as replacement ones.
When the batteries of the door lock are completely discharged, making it impossible to open the
door from the outside by using the secret code, digital touch key, or the card key, this function will
help supply the emergency power by using a 9V battery from the outside.
“Bibibibi”
After the warranty period
Failure occurs within 1 month from date of purchase
Mistakes and
mishandling Mistakes and mishandling by the user
by the user Defective installation, and other reasons
What is the emergency power supply?
While the door is opened or closed, if the dead bolt does not come out or is not retrieved normally
because of the jam of the deadbolt, and a warning sound “Bibibibi” will be generated.
Within the warranty period
Not the case of failure
Emergency power supply
Warning the jam of the deadbolt
Content of compensation
Types of consumer damage
UNICOR HIGHTECH CO., LTD
∙It is OK to bring a 9V battery as an emergency power into contact regardless of the + and – polarities.
∙When it comes to a key type model, it is possible to enter by using an emergency key even in this
situation. That is why it is recommended to carry the emergency key usually or keep it in a safe place
(in a car).
∙The emergency power can be supplied when keeping the 9V battery into contact at the input terminal
(not rechargeable)
∙Replace all the discharged batteries right after supplying the emergency power.
62 EunCheong Street, Namdong-Gu, Incheon, Korea (zip : 405-817)
http://www.unicor.co.kr
11
12