1
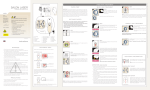
Instruction Manual
REV 2
Thank you for choosing our Traditional Sauna!
Index
=====================================
Important safety guides………… ………………………………………………….. … .2
Introduction, benefits, highlight………………………………………………………… 3
Installation requirements……………………………………………………………… …3
Installation procedure……………………………………………………………………4-9
Operation………………………………………………………………………………….10
Safety warnings………………………………………………………………………… 10
Trouble Shooting……………………………………………………………….………….11
Maintenance……………………………………………………………………………… 11
Transportation& Store…………………………………………………………………….11
Packing List………………………………………………………………………………
1
11
IMPORTANT SAFETY GUIDES
READ AND FOLLOW ALL INSTRUCTIONS
A) Reference to the warning marking provided with the sauna, indicating the importance of attaching the marking,
using the nails provided in the intended location, at eye level.
B) A receptacle shall not be installed inside the sauna room.
C) The door of the heated room do not include any locking or latching system, malfunction of which could cause
entrapment inside the heated room.
D) Keep the intended ventilation open when use the dry-bath bathing room.
E) CAUTION: Hyperthermia occurs when the internal temperature of the body reaches a level several degrees above the
normal body temperature of 98.6°F(37℃). The symptoms of hyperthermia include an increase in the internal
temperature of the body, dizziness, lethargy, drowsiness, and fainting. The effects of hyperthermia include:
a) Failure to perceive heat;
b) Failure to recognize the need to exit the room;
c) Unawareness of impending hazard;
d) Fetal damage in pregnant women;
e) Physical inability to exit the room; and
f) Unconsciousness.
WARNING – The use of alcohol, drugs, or medication is capable of greatly increasing the risk of fatal hyperthermia.
F) CAUTION: IF THE MANUALLY RESETTABLE TEMPERATURE-LIMITING CONTROL TRIPS FREQUENTLY,
A QUALIFIED SERVICEMAN SHOULD BE CONTACTED.
G) CAUTION: IT IS UNLAWFUL TO INSTALL THIS UNIT WITHOUT FIRST OBTAINING A PERMIT FROM THE
LOCAL ELECTRICAL INSPECTION AUTHORITY.
H) WARNING: REDUCE THE RISK OF ELECTROCUTION AND BURNS, DO NOT OPERATE UNLESS GUARD IS
IN PLACE.
I) CAUTION: EXCESSIVE EXPOSURE CAN BE HARMFUL TO HEALTH. PERSONS WITH POOR HEALTH
SHOULD CONSULT THEIR PHYSICIANS BEFORE USING SAUNA.
J) CAUTION: REDUCE THE RICK OF FIRE, DO NOT PLACE COMBUSTIBLE MATERIAL ON HEATER AT ANY
TIME.
K) WARNING: REDUCE THE RISK OF OVERHEATING:
a)EXIT IMMEDIATELY IF UNCOMFORTABLE, DIZZY, OR SLEEPY, STAYING TOO LONG IN A HEATED AREA
IS CAPABLE OF CAUSING OVERHEATING.
b)SUPERVISE CHILDREN AT ALL TIMES.
c) CHECK WITH A DOCTOR BEFORE USE IF PREGNANT, IN POOR HEALTH, OR UNDER MEDICAL CARE.
d) BREATHING HEATED AIR IN CONJUNCTION WITH CONSUMPTION OF ALCOHOL, DRUGS, OR
MEDICATION IS CAPABLE OF CAUSING UNCONSCIOUSNESS.
L) WARNING: REDUCE THE RISK OF ELECTROCUTION, DISCONNECT THE SUPPLY CONNECT BEFORE
SERVICING.
SAVE THESE INSTRUCTIONS
2
1. Introduction
We welcome you to the most affordable traditional sauna in the nation!
We also congratulate you on your new path
to better health! Thousands of users enjoy the benefits of traditional saunas every day.
Traditional saunas help you burn
calories, reduce toxins, relieve pain and even clear complexions. Now you can enjoy the great benefits of traditional heat
within the privacy of your own home.
We strive to deliver superior home health products at an affordable price.
Our list of clients grows daily and we
believe that your success is our success. Our staff has over 15 years of combined professional experience and is ready to
provide you with excellent customer service.
2. Health & Beauty Benefits
Relieve pain: The heat energy of our traditional sauna accelerate the blood circulation and supply more oxygen to
the body.
Increased blood circulation diminishes inflammation, relieves pain, and speeds up recovery. Traditional saunas
have also been used to treat bursitis, rheumatism, arthritis, and hemorrhoids.
Increased blood circulation not only
alleviates internal ailments, but also skin conditions such as psoriasis, eczema and scars. Good circulation is essential for
smooth and firm skin.
Burn calories & fat: The steam of the traditional sauna eliminate extra salt and subcutaneous fat. Burn up to 600
calories in one half hour session versus a half hour of jogging which burns 300 calories, and a half hour of cycling burns
225 calories.
Relax your body and mind: It supplies you for a special environment with 30℃-90℃. It passes through your body,
speed the metabolism, accelerate the blood circulation, bring the fresh oxygen and nutriment into the organization, the
rubbish expel from body along with the sweat, renew the energy quickly, then relieve tiredness.
3.
Highlights
a.
High quality craftsmanship
b. Automatic thermostat for constant temperature
c.
Timer
d. Digital sensor and automatic thermometer
e.
Heat stove
Installation
1. Installation requirements
a.
Do not plug any other appliances into the outlet with your traditional sauna.
b. Install the sauna on a completely level floor.
c.
Do not store flammable objects or chemical substances near the sauna .
3
Installation procedure
Sauna Room:
1. Structure of Infrared Sauna. See FIG-1.
FIG-1
1. Bottom board
2. sitting baffle
6. external top board
7. vent
10. wooden lamp shade
sauna structure
3. bench
8. left back board
11. left front board
4. right side board
5. right back board
9.warm barothermohygrogram
12. front board
1, One unit packed into two or three cartons. See FIG-2
FIG-2
2/3 cartons
FIG-2.1
C/No.
Check the C/NO. on both cartons if they are the same. If not, please notify the store/website you purchased your Infrared Sauna,
for example: C/NO: 002
1OF 3,
C/NO: 002
2 OF 3 and C/NO: 002
4
3 OF 3
are for one unit. See FIG-2.1
3.Make sure all parts are present before installing the unit. See packing list below.:
A. user manual
E. sitting baffle
I. left back board
B.front board
F. bottom board
J. right back board
C. left front board
G. sitting board
D. right front board
H. backrest
K. top board
4.Place the bottom board in the desired location of your sauna. See FIG-3.
FIG-3
Placing bottom floor
FIG-4
Assembling left and right back board
5. Align corresponding battens of the left and right back board, make sure the protruding batten aim to the flute
。
See FIG-4
FIG-5 Lock the screw tight
FIG-6
Assembling left front board
6. Align the left and right back board, you can see the corresponding flute, use the screw to lock tight.
See FIG- 5.
7. Align the corresponding battens of left front board and left back board, make sure they are fit with each other, and use the
screw to lock them tight. See FIG- 6.
8. Align the corresponding battens of left front board and right front board, make sure they are fit with each other, and use the
screw to lock them tight. See FIG- 7,8.
FIG-7 Assembling the front board
FIG-8 lock the screw on the right of the front board
5
9. Place the floor board on the desired location on the sauna. note: make sure the front and back of the floor board.
See FIG- 9.
10. Hold the long sitting board along the left back board ,then place it vertically into the slots, and lock them tight with screws.
Note: make sure the two legs are upright, otherwise the sitting board is instable.See FIG- 10.
FIG-9 place the floor board
FIG-10 Assemble the above long sitting board
11. Hold the short sitting board along the left back board, then place it vertically into the slots, and lock them tight with screws.
Note: make sure the two legs are upright, otherwise the sitting board is instable.See FIG- 11.
FIG-11 Assembling the down short sitting board
FIG-12 Assemble the left long sitting baffle
12. Hold the left back board and right back board along the slot, then place the long sitting baffle vertically into the slots, and
lock them tight with screws. Note: make sure the long sitting baffle uprights to long sitting board.
See FIG- 12.
13.Hold the left back board and right back board along the slot, then place it vertically into the slots, and lock them tight with
screws. Note: make sure the long sitting baffle uprights to short sitting board.See FIG- 13. Use the same way to lack the
left little baffle, to make it upright the left long sitting sitting baffle and lock them tight.
See FIG- 14.
FIG-13 Assembling right short baffle
FIG-14 Assembling left short baffle
6
14.Deploy the top board flat.See FIG-15.raise the top board high enough to see if it fits with the surrounding boards, and then
put down. See FIG-16
FIG-15deploy the top board
FIG-16 Assembling the top board
15. When put down the top board, make the power supply lines aim at the“U” type slot on the top board. See FIG-17.All
these wires should be connected with the outer wires of top board, and make sure they are connected tight.See FIG-18.
FIG-17put through the wire
FIG-18 outer line on top board
16.First, fix the lamp holder with screws, and connect the power supply lines.See FIG-19.Then lock the lamp and glass cover
tight. See FIG-20.
17. After that, put the wooden lampshade under the glass cover (be moderate),then lock it with screw.See FIG-21.
18. Take out the warm barothermohygrogram, and put it on the level of panel. Note: do not put the warm barothermohygrogram
under the heat stove. See FIG-22.
FIG-19 fix the pedestal
FIG-20 install the glass cover
7
FIG-21 install the wooden cover
FIG-22 install the warm barothermohygrogram
19.Take out the sauna heat stove, and examine the equipment.See FIG-23. Then disassemble one side batten of the wooden
support frame. See FIG-24.
20.After that, upend the sauna stove into the wooden frame, and disassemble the right aluminum board, then connect the power
supply line of the sauna stove.(Note: red wire is connected with L, green wire is connected with N, the double is ground
line which is connected to the join with mark ) and lock them tight with screws.See FIG-25.
FIG-23 examine the stove
FIG-24 disassemble the wooden frame
FIG-25 connect the power supply line of stove
FIG-26 location of the stove
21. After assembling the wires, install the right aluminum board and wooden batten, and place the stove on the right location.
See FIG-26
22.Finish the installation.
23. Put some stones on the sauna stove, about 10-15kgs.
Attention: The temperature inside stove is very high, we must use high quality sauna stones. Because the bad quality stone can
’t
afford high temperature, easily be cracked; And it will damage the heating tube when become hot and irrigated by water.
8
9
Operation
1. Precautions
a.
Check all the circuitry and the plug meet all requirements.
b. Set the temperature and time to a comfortable level.
c.
Drink a cup of water before the sauna session.
d. After 2 hours of continuous use, shut the sauna down for one hour.
e.
To avoid burns, do not touch the heating element.
3. Operation:please refer to the separate manual of HARVIA STOVE
a.
Plug the sauna into a outlet which is stated in nameplate. Do not share the outlet with any other appliances.
Plug the
unit into the outlet. Sauna should be unplugged when not in use.
b. Turn the temperature button refering to the stove manual.
c.
Turn the ‘time’ button to set the using time refering to the stove manual.
d. After your sauna session, turn off, and unplug the power cable.
Warnings
1. Safety precautions
a.
To avoid fire, do not dry clothes or leave any towels in the sauna.
b. To prevent burns or electric shocks, do not touch or use metal tools on the net cover of the sauna heater elements.
c.
While in the sauna, do not touch the light bulb. If the bulb needs to be changed, switch it off and wait until the sauna is
shut off and the bulb is cool
d. Do not use the traditional sauna if you have any of the following conditions:
1. Open wounds
2. Eye diseases
3. Sever sunburns
4. Elderly & weak people, especially those suffering from a disease, pregnant women and infants are prohibited.
Children over the age of 6 years may use the sauna under the supervision of adults.
5. If suffering from a disease directly related to temperature, seek the advice of a doctor before using.
6. Do not place pets in the sauna.
7. Do not use the sauna if you are under the effects of alcohol.
Trouble Shooting:
problem
1
indicator light for power
possible reason
countermeasure
The connector is not connected properly Check the connector or replace a new
supply not working
one
No power supply input
10
check the circuitry
2
Indicator light for function
Indicator light is broken
replace the outer controller
The heating indicator light is broken
replace the outer controller
The heater is broken
Replace with a new one
is not working
3
Sauna stove is not heating
up
Of the same specifications
The wire junction or the heater’s wire is
Check and make them tight
loosen
5
Odor from the sauna
The circuit‘s problems
1) there is eye winker around, remove it
2)parts on the circuit is broken
6
Light bulb is not working
Light bulb is burned out
Replace the light bulb
Lamp holder is broken
Replace the lamp holder
Cleaning
Clean the sauna room with a wet cotton towel, dry with a clean dry towel.
Do no use benzene, alcohol, or strong cleaning chemicals on sauna.
NOTE: Any chemical that can damage wood material
will damage the sauna and the protection layer that is on the wood.
*** Do not leave the sauna on for more than 2 hours at a time. ***
Transportation and storage
1. Avoid exposure to rain, snow or strong collisions during transport.
2. Do not store in damp environments.
Packing list
1pc floor panel
2pcs sitting panels (one big and one small)
1pc front panel
1pc light bulb and holder
1pc left front panel
1 instruction manual
1pc right front panel
1pc lamp cover
1pc left back panel
1pc barothermohygrogram
1pc right back panel
1pc top cover
2pcs backrest (1pc for NYS-1112)
2pcs sitting baffle(one big and one small)
1 bag of screw and bolt
1pc screwdriver
1set of bucket and spoon
2pcs top panels
1pc sauna stove
11