1
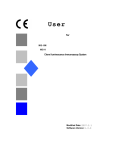
Instruction Manual
Solaris Sauna
REV 2
Index
=====================================
Page
Important safety guides……………………………………………………………. .
2
Introduction …………………………………………………………...……………… 3
Benefits …………..………………………………………………………………….
3
Installation requirements…………………………………………………………...
4
Installation procedure …………………………………………………………..…..
4-9
Operation………………………………………………………………………………. 10
Warnings………………………………………………………………………………. 11
Trouble Shooting………………………………………………………………………11-12
Clean and Maintenance……………………………………………………………… 13
Transportation…………………………………………………………………………. 13
Packing List…………………………………………………………………………….. 13
1
NOTE: Actual model may differ slightly from pictures shown in manual.
IMPORTANT SAFETY INSTRUCTIONS
READ AND FOLLOW ALL INSTRUCTIONS
A) Please reference the warning marking provided with the infrared room, indicating the importance of
attaching the marking. There are relevant explanations for the warning notice as well as instructions
on where to place the warning:
a)
The hyperthermia warning marking should be located on the outside of the door at eye level.
b) The fire warning marking should be located on the interior wall above the heater at eye level.
B) An electrical receptacle shall not be installed inside the heated room.
C) The door of the heated room does not include a locking or latching system as use of such devices
could cause entrapment inside the heated room.
D) Keep the ventilation panel open when using the infrared room.
E) CAUTION: Hyperthermia occurs when the internal body temperature reaches a level above the normal
body temperature of 98.6°F (37℃). Symptoms of hyperthermia include an increase in the internal
body temperature, dizziness, lethargy, drowsiness, and fainting. Effects of hyperthermia include:
a) Failure to perceive heat;
b) Failure to recognize the need to exit the room;
c) Unawareness of impending hazard;
d) Fetal damage in pregnant women;
e) Physical inability to exit the room; and
f)
Unconsciousness.
F) WARNING – The use of alcohol, drugs, or medication will greatly increase the risk of fatal
hyperthermia.
G) WARNING: REDUCE THE RISK OF ELECTROCUTION AND BURNS. DO NOT OPERATE UNLESS THE
HEATER PANEL GUARDS ARE IN PLACE.
H) CAUTION: EXCESSIVE EXPOSURE CAN BE HARMFUL TO YOUR HEALTH. PERSONS WITH POOR
HEALTH SHOULD CONSULT THEIR PHYSICIAN BEFORE USING AN INFRARED ROOM.
I)
CAUTION: REDUCE THE RICK OF FIRE, DO NOT PLACE COMBUSTIBLE MATERIAL ON OR IN FRONT
OF THE HEATERS AT ANY TIME.
2
J) WARNING: REDUCE THE RISK OF OVERHEATING:
a) EXIT THE INFRARED ROOM IMMEDIATELY IF YOU ARE UNCOMFORTABLE, DIZZY,
OR SLEEPY. STAYING TOO LONG IN A HEATED AREA IS CAPABLE OF CAUSING
OVERHEATING.
b) SUPERVISE CHILDREN AT ALL TIMES.
c) CHECK WITH A DOCTOR BEFORE USE IF PREGNANT, IN POOR HEALTH, OR UNDER
MEDICAL CARE.
d) BREATHING HEATED AIR IN CONJUNCTION WITH CONSUMPTION OF ALCOHOL,
DRUGS, OR MEDICATION IS CAPABLE OF CAUSING UNCONSCIOUSNESS.
K) WARNING: REDUCE RISK OF ELECTROCUTION. DISCONNECT
POWER SUPPLY BEFORE
SERVICING.
L) SAVE THESE INSTRUCTIONS
Introduction
Thank you for the purchase of your Solaris Infrared Sauna. We congratulate you on your new
path to better health! Thousands of users enjoy the benefits of infrared saunas every day.
Infrared
saunas help you burn calories, reduce toxins, relieve pain and even clear complexions. Now you can
enjoy the great benefits of far-infrared heat within the privacy of your own home.
Solaris Highlights
a. High quality craftsmanship
b. Automatic thermostat for constant temperature
c.
Timer and buzzer: buzzer sounds 5 minutes before the end of session
d. Digital sensor and thermometer
e. Infrared heating panels
SENSOR Di s pl ay
T EMP
T
Installation
3
tA - c t - f
tB- c t - f
tC- c t - f
t D- c t - f
tE- c t - f
tF - c t - f
tG- c t - f
t H- c t - f
L OAD
L OAD
L OAD
L OAD
L OAD
L OAD
L OAD
L OAD
L I GHT
T I ME DOMN
POWER
N
T I ME
M C U
5VDC
T EMP DOMN
12VDC
POWER
T I ME UP
RELAY
T EMP UP
L
+12VDC
L I GHT
OVERCURRENT
PROTECTI ON
Installation requirements
a. Do not plug any other appliances into the outlet with your our infrared sauna.
Use only a dedicated
circuit that is GFCI protected.
b. Install the sauna on a completely level floor.
c.
Do not spray the exterior with water or place the sauna on a damp surface.
d. Do not store flammable objects or chemical substances near the sauna.
Installation procedure
Sauna Room:
1. Structure of Infrared Sauna. See FIG-1 (Note: CD player has been replaced with MP3 jack.)
2. The Solo and Duet infrared saunas are packed into two cartons. See FIG-2 for example: C/NO:
002
1OF 2 and C/NO: 002
2 OF 2 are for one unit.
4
FIG-2
Two cartons
FIG-2.1
The Trio infrared sauna is packed in 3 cartons, for example: C/NO: 002
C/NO: 002
3 OF 3
1OF 3,
C/No.
C/NO: 002
2 OF 3 and
are for one unit;
3. Make sure all parts are present before installing the unit. See packing list below.
4.
A. User manual
B. Bottom section
C. Back wall
D. Left side
E. Right side
F. Seat support
G. Seat
H. Back rest
I. Front wall
J. Roof
K. External top
L. CD Player
N. Screwdriver
O.
Towel shelf
Place the bottom section (section 4, Sauna room diagram, p.3) in the desired location and make sure
which side is the front and which side is the back. See FIG-3.
FIG-3
Placing bottom section
FIG-4 Assembling back wall
5.
Align the back wall with bottom section’s corresponding battens; make sure they are in line. See FIG-4
6.
Align the left side with bottom section’s corresponding battens; make sure left board fits flush into back
wall. See FIG-5
5
FIG-5 Assemble left side
FIG-6 Latching
7. The latch has a guide tab that must be placed in the guide slot for alignment. Pick up the back wall (hold it
upright to the bottom section) and place the tab in the slot, do not latch at this time. When the back wall
and the front wall/side wall are set together on the floor section, close and latch it. See Figure 6
FIG-7
Assemble right side
FIG-8
Assemble seat supports
8. Align the right side with bottom section corresponding battens; make sure right side fits flush into back
wall and latch together. See FIG-6 and FIG-7
9.
Slide the seat support down vertically into the slot within left and right panel. Next, connect the bench’s
heater element wire to corresponding wire from the back wall, and then locate seat and slide into place.
See Figure 8, 9 Note: Make sure the wires are connected tightly; otherwise the heater will not work.
FIG-9 Connecting wire
FIG-10 Assemble seat
10. Put the seat horizontally on corresponding battens of the backboard. See FIG-10
6
FIG-11 Assemble front wall
11. Align the front wall (section 3) with bottom section’s corresponding battens, and then latch it with the left
and right sides respectively. Note: Take caution of the glass door to avoid damage. See FIG-11.
12. Pull the wires of front wall and back wall into the room to avoid pressing the wires during installation. See
FIG-12.
Open the door, raise the roof high enough to see if it fits with the surrounding sides, then put down.
FIG-12Setting the roof
FIG-13 Lead the heater wires through the holes in the roof
13. During the course of putting down the roof, make sure all the wires (mentioned above) and connecting
plugs are slipped through the corresponding holes of the roof. All these wires will be connected to the
controller on the roof. See FIG-13
14. See FIG-14. Connect all the wires and connectors to the corresponding outlets on the controller on the
roof. Please be sure all the plugs are connected tightly.
FIG-14 Connectors on roof
FIG-15 Push down the wires into the room
15. After that, push down the power plugs of the speakers, temperature sensor, control panel and CD player
7
through the hole near the fan on the top board. See FIG 15
16. All the wires from the roof should be linked with corresponding connectors of the control panel and the
temperature sensor and the radio antenna. Otherwise, the sauna will not function if any connections are
missed. See FIG 17-20.
17. Make sure all steps are finished correctly, plug in the power and try using the s auna at first to make
sure it will work properly. Then put the external top board (section 10) over the roof, and take out the
power plug through the corresponding hole in the external top board. See FIG-22
FIG-22 Slip the power plug through top board
FIG-23 Attach the top board with screws
18. Affix the top board with screws See FIG-23
Installation Completed.
8
Operation
1. Precautions
a. Check all the circuitry and the plug meet all requirements.
b. Set the temperature and time to a comfortable level, normally, 60 minutes at 50-65℃(122ºF-140℉)
Note: If ambient temperature is lower than 18.3℃(65℉), please set the temperature at about 122 ºF; and
if ambient temperature is higher than 18.3℃(65℉), please set the temperature at about 65℃(140 ºF).
c.
Drink a cup of water before the sauna session.
d. After 2 hours of continuous use, shut the sauna down for one hour.
e. To avoid burns, do not touch the heating element.
2. Operation
a. See electrical label on the unit, and plug the sauna into a proper wall outlet. Do not share the outlet
with any other appliances.
sauna.
Plug the unit into the outlet and use the ON/OFF switch to activate the
Sauna should be unplugged when not in use.
b. Press the ‘temperature’ button to increase or decrease the temperature. If the ‘heat’ light is on, the
temperature setting will increase one degree every time the ‘+’ button is pushed. If pressed for three
seconds, the setting will increase quickly. Decrease the temperature in the same manner by pressing
the ‘-‘ button.
c.
After the sauna reaches the desired temperature, the ‘heat’ light turns off.
Press the ‘light’ button to turn the light on and off.
d. If the sauna is too stuffy, open the vent in the ceiling or open the front door.
e. After your sauna session, turn off, and unplug the power cable.
f.
To set the time press the ‘function’ button until the ‘time” button blinks. Press the ‘+’and ‘-‘ buttons to
set the timer from 5 to 60 minutes. If pressed for three seconds, the timer will increase quickly.
When the display reads ‘05’, the timer will buzzes then the machine will shut off automatically after 5
minutes. To extend the sauna session, reset the timer again.
g. The Fahrenheit and Centigrade display can be switched: press the temperature button "+" and "-" at the
9
meantime, then press the button of "light" to switch
h. CD Player (CD is the optional part)
Please read the instruction of our car stereo with CD player
Warnings
1. Safety precautions
a. To avoid fire, do not dry clothes or leave any towels in the sauna.
b. To prevent burns or electric shocks, do not touch or use metal tools on the net cover of the far
infrared film elements.
c.
While in the sauna, do not touch the light bulb. If the bulb needs to be changed, switch it off and wait
until the sauna is shut off and the bulb is cool
d. Do not spray water on the far-infrared tube.
This activity may result in electric shock or damage to
the heater elements.
e. Do not use the infrared sauna if you have any of the following conditions:
1. Open wounds
2. Eye diseases
3. Sever sunburns
4. Elderly & weak people, especially those suffering from a disease, pregnant women and
infants are prohibited. Children over the age of 6 years may use the sauna under the
supervision of adults.
5. If suffering from a disease directly related to temperature, seek the advice of a doctor before
using.
6. Do not place pets in the sauna.
7. Do not use the sauna if you are under the effects of alcohol.
Trouble Shooting:
1
problem
possible reason
countermeasure
indicator light for power
The connector is not connected
Check the connector or replace a
supply not working
properly
new one
No power supply input
chick the circuitry ( especially
weather there is power supply
input)
2
Indicator light is broken
replace the circuitry panel
Indicator light for
The heating indicator light is
Replace the relevant control panel
function is not working
broken
The circuit board or components
Replace the circuit board
are broken
the temperature sensor is broken
check the connect is loosen and
replace it
3
Infrared Heater not
The heater is broken
heating up
Replace with a new one
Of the same specifications
The wire junction or the heater’s
wire is loosen
10
Check and make them tight
the temperature sensor is broken
check junction of
the
temperature sensor is loosen and
replace it
the circuit board of the relay is not
replace the circuit board
work
4
Odor from the sauna
The circuit‘s problems
1) there is eyewinker around,
remove it
2)some heater’s temperature over
high,cut off the power
supply,replace it
3) parts on the circurity is broken
5
Light bulb is not working
Light bulb is burned out
Replace the light bulb
Light bulb wiring is loosen
Replace the lamp holder
Problems with electrical control
Repair or replace it
panel
6
7
8
9
Sauna is not power up
Power cord is unplug
Plug back power cord to outlet
Outlet has no power
Check outlet or circuit breaker
Power supply or circuit panel is
Replace the power supply or
broken
related circuitry board
The temperature
The connector of temperature
Tighten the connector of
display show "EP"
sensor is loose or sensor
temperature sensor or change to a
damaged
new temperature sensor.
The temperature
The temperature inside the sauna
Turn off the unit, and contact the
display show "H"
room is too high
manufacture.
Speaker does not work
The speaker is broken
Replace with a new one of the
same specifications
The speaker wire is loosen
Reconnect the speaker wire
The power indicator light for CD is
Turn on the switch to start work
off
10
CD-Player doesn’t work
Power connector is loose or
Check connector or replace it
damage
DC power supply is no power to
Check DC power supply wiring or
the CD-player
replace the power supply
CD-player is defective
Replace the CD-player
CD-player protection fuses is burnt
Replace the fuses
out
USER MAINTENANCE INSTRUCTIONS
Cleaning
Clean the faceplate with a wet towel, or clean with a small amount of hand-soap mixed with warm water if
necessary.
Clean the sauna room with a wet cotton towel, dry with a clean dry towel.
11
Do no use benzene,
alcohol, or strong cleaning chemicals on sauna.
NOTE: Any chemical that can damage wood
material will damage the sauna and the protection layer that is on the wood.
*** Do not leave the sauna or CD player on for more than 2 hours at a time. ***
Transportation and storage
1. Avoid exposure to rain, snow or strong collisions during transport.
2. Do not store in damp environments.
12