1
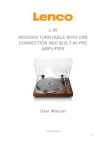
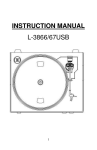
KLARSTEIN USB TURNTABLE - User's manual
Unpack the main unit and find the mains power plug and plug into an available socket.
Amplifier connection
Connect audio plugs to Alert input on your mixer or amplifier:
- Red plug into R/H channel input.
- White plug into L/H channel input.
Playing a record
-
Place the record of your choice on the turntable. If it is a 45 rpm, do not forget to place
the adapter on the record spindle.
Choose the desired playing speed using the Speed switch.
Release the arm lock.
Gently push the tone arm with your hand.
Place the cartridge vertically over the first track of the record. The turntable will start
turning automatically.
Slowly put down the cartridge until it touches the record. The record player will start playing.
When records has finished, the platter will stop automatically if the Autostop switch has been
switched to [ON].
NOTE:
- Lift the tone arm and put it on the rest.
- Place the protective cap on the stylus and close the arm lock.
- Turn off by unplugging the plug from the socket.
MAINTENANCE
Replacing the stylus
Please refer to the figures 1-8
Installing a new cartridge
Please refer to figures 5 and 6
NOTES
For maximum enjoyment and a longer lifetime of your records, We advise you to clean your
records using a rag impregnated with an anti-static product.
For the same reason your stylus should be replaced periodically (approximately every 250 hours).
Dust the stylus from time to time using a very soft brush dipped in alcohol (brushing from back to
front ).
When transporting your record player do not forget to:
- Replace the protective cap on the stylus.
- Put the rest clip into the pick-up arm.
4
Recording/editing LP Records to PC using Audacity
For the complete manual please check the following website:
http://audacity.sourceforge.net/help/documentation?lang=en
Before recording and editing the music, please first install the supplied software.
To Install Software (PC)
1. Insert the CD that came with your USB turntable.
2. Read the installation menu and click “Install Audacity pro software ” button on install
screen to install [Audacity] software. Once installed, run the Audacity program which
should be on your desktop.
3. With the software installed, you can record vinyl records onto your PC and convert to MP3
4. Plug your record player into an AC outlet and connect the USB port of the record player
with the USB port of your computer.
5. Turn on the power switch of your record player and open the [Audacity] program that you
have installed.
6. Hit the record button in the toolbar and then play the LP record
Software Configuration
1. Click on [Microphone] in the drop down menu and select “Stereo Mix”
2. Select the “Edit” menu and then “ Preferences”
Select the USB audio device under the “ Recording ” selection as shown.
Select “ Software Playthrough” to hear the audio while recording.
NOTE
Depending on your computer model and operating system, the USB record player may show up
with a different name in your windows system.
Maybe some computers do not show this title, it doesn’t matter, just try one suits for you.
Note: Actually the turntable is a plug’n play device and most computer system support
for hot-plugging, so user can use some other recording device such as Microsoft
mapping Input or the sound card of your computer.
After completed the above settings, you are ready for recording.
Toolbars
Selection tool-for selecting the range of audio you want to edit or listen to.
Envelope tool-for changing the volume over time.
Draw tool-for modifying individual samples.
Zoom tool-for zooming in and out.
Timeshift tool-for sliding tracks left or right.
Multi tool-lets you access all of these tools at once depending on the
location of the mouse and the keys you are holding down.
Audio Control Buttons
Skip to Start-moves the cursor to time 0. If you press Play at this point, your project
will play from the beginning.
Play-starts playing audio at the cursor position. If some audio is selected,
only the selection is played.
Loop-if you hold down the Shift key, the Play button changes to a Loop
button, which lets you keep playing the selection over and over again.
Record-starts recording audio at the project sample rate (the sample rate
in the lower-left corner of the window). The new track will begin at the
current cursor position, so click the “Skip to Start” button first if you want
the track to begin at time 0.
Pause-temporarily stops playback or recording until you press pause
again.
Stop-stops recording or playing. You must do this before applying effects,
saving or exporting.
Skip to End-moves the cursor to the end of the last track.
Edit Toolbar
All button on this toolbar perform actions – and with a couple of exceptions, they’re all just
shortcuts of existing menu items to save you time. Holding the mouse over a tool will show
a “tooltip” in case you forget which one is which.
Cut
Copy
Paste
Trim away the audio outside the selection
Mute the selected audio
Undo
Redo (repeat last command)
Zoom In
Zoom Out
Fit selection in window – zooms until the selection just fits inside the
window.
Fit project in window – zooms until all of the audio just fits inside the
window.
Track Pop-Down Menu
The Track Pop-Down Menu appears when you click in a track’s title. This lets
you access a few special commands that apply to individual tracks.
Name… - lets you change the name of the track.
Move Track Up – exchange places with the track above this one.
Move Track Down – exchange places with the track below this one.
Waveform(dB) – similar to Waveform,but on a logarithmic scale, measured in
decibels (dB).
Spectrum – display the track as a spectrogram, showing the amount of
energy in different frequency bands.
Pitch (EAC) – highlights the contour of the fundamental frequency (musical
pitch) of the audio, using the Enhanced Autocorrelation (EAC) algorithm.
Mono – makes this track a mono track, meaning it is played out of just one
speaker, or played out of the left and right speakers equally.
Left Channel – makes this track come out of only the left speaker.
Right Channel – makes this track come out of only the right speaker.
Make Stereo Track – if there is another track below this one, joins them to
make a single stereo track, with the top track representing the left speaker,
and the bottom track representing the right speaker.When tracks are joined
into a stereo pair, all edits automatically apply to both the left and right
channel.
Split Stereo Track – if the selected track is a stereo track (a pair of left and
right tracks joined together as a single track), this operation splits them into
two separate tracks that you can modify and edit independently.
Set Sample Format – this determines the quality of the audio data and the
amount of space it takes up. 16-bit is the quality used by audio CD’s and is
the minimum quality that Audacity uses internally converted when you open
them). 24-bit is used in higher-end audio hardware. 32-bit float unless you
have a slow computer or are running out of disk space.
Set Rate – sets the number of samples per second of the track, 44100Hz is
used by audio CDs. Tracks can have different sample rates in Audacity; they
are automatically resampled to the project sample rate (in the lower-left corner
of the window).
File Menu
New – creates a new empty window
Open …- opens an audio file or an Audacity project in a new window (unless
the current window is empty ). To add audio files to an existing project window,
use one of the Import commands in the Project menu.
Close – closes the current window, asking you if you want to save changes.
On Windows and Unix, closing the last window will quit Audacity, unless you
modify this behavior in the Interface Preferences.
Save Project – saves everything in the window into an Audacity-specific
format so that you can save and quickly continue your work later. An Audacity
project consists of a project file, ending in “.aup”, and a project data folder,
ending in “_data”. For example, if you name your project “Composition”, then
Audacity will create a file called “Composition.aup”,and a folder called
Composition_data. Audacity project files are not meant to be shared with
other programs – use one of the Export commands (below) when you are
finished editing a file.
Save Project As… - same as Save Project (above), but lets you save a
project as a new name.
Recent Files – brings up a list of files you have recently opened in audacity to
be re-opened quickly.
Export As WAV… - exports all of the audio in your project as a WAV file, an
industry-standard format for uncompressed audio. You can change the
standard file format used for exporting from Audacity by opening the File
Format Preferences. Note that exporting will automatically mix and resample if
you have more than one track, or varying sample rates. See also File Formats.
Export Selection As WAV… - same as above, but only exports the current
selection.
Export as [MP3]… - exports all of the audio as an MP3 file. MP3 files are
compressed and therefore take up much less disk space, but they lose some
audio quality. Another compressed alternative is Ogg Vorbis (below). You can
set the quality of MP3 compression in the File Format Preferences. See also
MP3 Exporting.
Export Selection As MP3… - same as above, but only exports the current
selection.
Export as [Ogg Vorbis]… - exports all of the audio as an Ogg Vorbis file.
Ogg Vorbis files are compressed and therefore take up much less disk space,
but they lose some audio quality. Ogg Vorbis files tend to take up a little less
disk space than MP3 for similar compression quality, and Ogg Vorbis is free
from patents and licensing restrictions, but Ogg Vorbis files are not as
widespread. You can set the quality of Ogg compression in the File Format
Preferences.
Export Selection As [Ogg Vorbis]… - same as above, but only exports the
current selection.
Export Labels… - if you have a Label Track in your project, this lets you
export the labels as a text file. You can import labels in the same text format
using the “Import Label…” command in the Project Menu.
Export Multiple – lets you split your project into multiple files all in one step.
You can either split them vertically (one new file per track), or horizontally
(using labels in a Label Track) to indicate the breaks between exported files.
Page Setup – configure how Audacity will print out the track waveforms using
the Print option, and what printer to use.
Print – Print out the main window view from audacity showing the tracks and
waveforms.
Exit (Quit) – closes all windows and exits Audacity, prompting you to save
any unsaved changes first.
Edit Menu
Undo – This will undo the last editing operation you performed to your project.
Audacity supports full unlimited undo – meaning you can undo every editing
operation back to when you opened the window.
Redo – This will redo any editing operations that were just undone. After you
perform a new editing operation, you can no longer redo the operations that
were undone.
Cut – Removes the selected audio data and places it on the clipboard. Only
one “thing” can be on the clipboard at a time, but it may contain multiple
tracks.
Copy – Copies the selected audio data to the clipboard without removing it
from the project.
Paste – Inserts whatever is on the clipboard at the position of the selection or
cursor in the project, replacing whatever audio data is currently selected, if
any.
Trim – Removes everything to the left and right of the selection.
Delete – Removes the audio data that is currently selected without copying it
to the clipboard.
Silence – Erases the audio data currently selected, replacing it with silence
instead of removing it.
Split – Moves the selected region into its
own track or tracks, replacing the affected portion of the original track with
silence. See the figure below:
Duplicate – Makes a copy of all or part of a track or set of tracks into new
tracks. See the figure below:
Select…> ALL-Selects all of the audio in all of the tracks in the project.
Select…>Start to Cursor-Selects from the beginning of the selected tracks to
the cursor position.
Select…>Cursor to End – Selects from the cursor position to the end of the
selected tracks.
Find Zero Crossings – Modifies the selection slightly so that both the left and
right edge of the selection appear on a positive-slope zero crossing. This
makes it easier to cut and paste audio without hearing clicking sounds.
Selection Save – Remembers the current selection (or cursor position),
allowing you to restore it later.
Selection Restore – Restores the cursor position to the last position saved
by “ Selection Save”.
Move Cursor…> to Track Start- Moves the cursor to the start of the current
track.
Move Cursor…>to Track End-Move the cursor to the end of the currently
selected track.
Move Cursor…> to Selection Start-Moves the cursor to the end of the current
selection.
Move Cursor…> to Selection End-Moves the cursor to the end of the current
selection.
Snap-To…>Snap On- Enable Snap-To mode. When Snap-To mode is
enabled, the selection will be constrained to the nearest interval on the time
scale, by default the nearest second. So if you click and drag from 4.2
seconds to 9.8 seconds, it will result in a selection from 4 seconds to 10
seconds, exactly. You can change the units that are snapped to using the “Set
Selection Format” option in the View Menu.
Snap-To…> Snap Off – Turns Snap-To mode off letting you select arbitrary
ranges of time.
Preferences… - opens the Preferences dialog.
View Menu
Zoom In – Zooms in on the horizontal axis of the audio, displaying more
detail about less time. You can also use the zoom tool to zoom in on a
particular part of the window.
Zoom Normal – Zooms to the default view, which displays about one inch per
second.
Zoom Out – Zooms out, displaying less detail about more time.
Fit in Window – Zooms out until the entire project just fits in the window.
Fit Vertically – Resizes all of the tracks vertically so they all fit inside of the
window (if possible).
Zoom to Selection – Zooms in or out so that the selection fills the window.
Set Selection Format – lets you choose the formatting that is displayed at
the bottom of the window indicating the current selection time. Options include
film, video, and audio CD frames, seconds+samples, or pure time. If you turn
on Snap-To mode in the Edit Menu, the selection will snap to the frames or
other quantization you have selected in this menu.
History… - Bring up the history window. It shows all the actions you have
performed during the current session, including importing. The right-hand
column shows the amount of hard disk space your operations used. You can
jump back and forth between editing steps quite easily by simply clicking on
the entries in the window, the same as selecting Undo or Redo many times in
a row. You can also discard Undo history window can be kept open while you
work.
Float Control Toolbar – moves the Control Toolbar out of the window and
into its own floating window, so you can position it wherever you want.
TheMenu item changes to Dock Control Toolbar, which you can use to put
the toolbar back into the main window.
Float Edit Toolbar – moves the Edit Toolbar out of the window and into its
own floating window, so you can position it wherever you want. The menu
item changes to Dock Edit Toolbar, which you can use to put the toolbar
back into the main window.
Float Edit Toolbar – moves the Edit Toolbar out of the window and into its
own floating window, so you can position it wherever you want. The menu
item changes to Dock Edit Toolbar, which you can use to put the
toolbar back into the main window.
Float Meter Toolbar – does the same thing for audacity’s VU meters which
you use to set recording levels and adjust playback.
Float Mixer Toolbar – moves the Mixer Toolbar out of the window and into its
own floating window as above.
Project Menu
Import Audio… - This command is used to import audio from a standard
audio format into your project. Use this command if you already have a couple
of tracks and you want to add another track to the same project, maybe to mix
them together. You cannot use this option to import Audacity Projects. The
only way to combine two Audacity Projects is to open them in separate
windows, then copy and paste the tracks.
Import Labels… - This command takes a text file which contains time codes
and labels, and turns them into a Label Track.
Import MIDI… - This menu command
imports MIDI files and puts them into a
MIDI Track. Audacity can display MIDI files, but cannot play, edit, or save
them yet.
Import Raw Data… - This menu command allows you to open a file in
virtually any uncompressed format. When you select the file, Audacity will
analyze it and try to guess its format. It will guess correctly about 90% of the
time, so you can try just pressing “OK” and listening to the result. If it is not
correct, however, you can use the options in the dialog to try some other
possible encodings.At the beginning of your imported track(s), you may notice
a little bit of noise. This is probably the file’s header, which Audacity was not
able to parse. Just zoom in and select the noise with the Selection Tool, and
then choose Delete from the Edit Menu.
Edit ID3 Tags… - Opens a dialog allowing you to edit the ID3 tags associated
with a project, for MP3 exporting.
Quick Mix – This command mixes all of the selected tracks together. If you
are mixing stereo tracks, or mixing tracks that are marked as Left or Right
channel, the result will be a stereo track (two channels), otherwise the result
will be mono. Your tracks are implicitly mixed whenever you hit the Play
button and whenever you export. This command offers a way to do it
permanently and save the results to disk, saving on playback resources. Note
that if you try to mix two very loud tracks together, you may get clipping (it will
sound like pops, clicks , and noise ). To avoid this, drag the gain slider on the
tracks down to reduce their volume before mixing.
New Audio Track – This creates a new empty Audio Track. This command is
rarely needed, since importing, recording, and mixing automatically create
new tracks as needed. But you can use this to cut or copy data from an
existing track and paste it into a blank track. If that track was at a non-default
rate then you may need to use Set Rate from the Track Pop-Down menu to
set the correct sample rate.
New Stereo Track – same as above, but creates a stereo track. You can also
create a stereo track by joining two tracks using the track pop-down menu.
New Label Track – This creates a new Label Track, which can be very useful
for textual annotation.
New Time Track – This creates a new Time Track, which is used to vary the
speed of playback over time.
Remove Tracks – This command removes the selected track or tracks from
the project. Even if only part of a track is selected, the entire track is removed.
You can also delete a track by clicking the X in its upper-left corner. To cut out
only part of the audio in a track, use Delete or Silence.
Align Tracks… - All the Align functions work on whole tracks or groups of
tracks, not on selections, even if they span across multiple tracks. They all
operate by time-shifting tracks (moving them left or right), making it easier to
synchronize tracks or get rid of silence at the beginning. The cursor or
selection stays in the same place unless you use “Align and move cursor…”
below.
Align and move cursor… - same as the functions above, except that the
cursor or selection is moved along with the tracks. That allows you to shift the
tracks without losing your relative place.
Add Label at Selection – This menu item lets you create a new label at the
current selection. You can title the label by typing with the keyboard and then
hitting “Enter” when you’re done.
Add Label at Playback Position – This menu item lets you create a new
label at the current location where you are playing or recording. Do this if you
want to mark a certain passage while you’re listening to it. You can title the
label by typing with the keyboard and then hitting “Enter” or “Return” when
you’re done. Only available whilst audacity is playing.
Generate Menu
If you choose an item from the Generate menu when there are no tracks in a
project, a new track is created. Otherwise, the current track is used.
If a track is selected and the cursor is placed in a single place in the track
audio is inserted at the cursor position. The default duration is 30 seconds.
The audio created with replace the any
selection, otherwise it is inserted into the
track, shifting up later parts of the track.
Silence – inserts silence
Tone… - you can create a Sine wave,
Square wave, or Sawtooth wave.
White Noise – inserts random audio samples, which sounds like pure static.
Any items which appear after these three built-ins are [VST],[LADSPA], or
[NYQUIST] plug-ins. It is possible for a poorly written plug-in to crash
[Audacity], so always save your work before using a plug-in. Note that any
effect that doesn’t take any audio as input will automatically be placed in the
Generate menu.
Effect Menu
The items in this menu only work when you have audio selected. Audacity
does not have any real-time effects; you must select the audio, apply the
effect, and then listen to the results. Most effects have a Preview button,
Clicking on this button plays up to three seconds of audio, allowing you to
hear what it will sound like after the effect is applied. This is useful for finetuning the effect parameters.
Repeat Last Effect – selecting this command is a shortcut to applying the
most recent effect with the same settings. This is a convenient way to quickly
apply the same effect to many different parts of a file.
Amplify – changes the volume of the selected audio. If you click the “ Allow
clipping” checkbox, it will let you amplify so much that the audio ends up
beyond the range of the waveform, and is clipped (distorted). The default
value when you open the effect is to amplify so that the loudest part of the
selection is as loud as possible without distortion.
Bass Boost – enhances the bass frequencies in the audio.
Change Pitch – changes the pitch/frequency of the selected audio without
changing the tempo. When you open the dialog, the starting frequency is set
to Audacity’s best guess as to the frequency of the selection. This works well
for recordings of singing or musical instruments without background noise.
You can specify the pitch change in one of four different ways: musical note,
semitones, frequency, or percent change.
Change Speed – changes the speed of the audio by resampling. Making the
speed higher will also increase the pitch, and vice versa. This will change the
length of the selection.
Change Tempo – changes the tempo (speed) of the audio without changing
the pitch. This will change the length of the selection.
Compressor – compresses the dynamic range of the selection so that the
loud parts are soft parts the same. You can optionally normalise the recording
afterwards, resulting in the entire piece having higher perceived volume.
Echo – very simple effect that repeats the selection with a decay, sounding
like a series of echo’s. This effect does not change the length of the selection,
so you may want to add silence to the end of the track before applying it
(using the Generate Menu).
Equalization – Boost or reduce arbitrary frequencies. You can select one of a
number of different curves designed to equalize the sound of some popular
record manufacturers, or draw your own curve.
Fade In – fades the selection in linearly.
Fade Out – fades the selection out linearly.
FFT Filter – similar to Equalization, lets you enhance or reduce arbitrary
frequencies. The curve here uses a linear scale for frequency.
Invert – Flips the waveform vertically, the same as a phase inversion in the
analogue domain.
Noise Removal – This effect lets you clean up noise from a recording. First,
select a small piece of audio that is silent except for the noise, select “ Noise
Removal”, and click on the “Get Noise Profile” button. Then select all of the
audio you want filtered select “ Noise Removal” again, and click the “ Remove
Noise” button. You can experiment with the slider to try to remove more or
less noise. It is normal for Noise Removal to result in some distortion. It works
best when the audio signal is much louder than the noise.
Normalize – allows you to correct for DC offset (a vertical displacement of the
track) and/or amplify such that the maximum amplitude is a fixed amount -3Db.
It’s useful to normalize all of your tracks before mixing. If you have a lot of
tracks, you may then need to use the track gain sliders to turn some
down.
Nyquist Prompt – for advanced users only. Allows you to express arbitrary
transormations using a powerful functional programming language. See the
Nyquist section of the Audacity website for more information.
Phaser – the name “Phaser” comes from “Phase Shifter”, because it works by
combining phase-shifted signals with the original signal. The movement of the
phase-shifted signals is controlled using a low Frequency Oscillator (LFO).
Repeat – repeats the selection a certain number of times. This operation is
quite fast and space-efficient, so it is practical to use
it to create nearly-infinite loops.
Reverse – This effect reverses the selected audio temporally; after the effect
the end of the audio will be heard first and the beginning last.
Wahwah – uses a moving bandpass filter to create its sound. A low frequency
oscillator (LFO) is used to control the movement of the filter throughout the
frequency spectrum. Adjusts the phase of the left and right channels when
given a stereo selection, so that the effect seems to travel across the
speakers.
Plugins 1 to 15…etc. These submenus contain any VST, Ladspa, or Nyquist
plug-ins loaded by audacity. It is possible for a poorly written plug-in to crash
Audacity, so always save your work before using a plug-in effect.
Analyze Menu
Plot Spectrum – To use this feature, first select a audio region from a single
track, then select “Plot Spectrum”. It opens up a window that displays the
“Power Spectrum “ of the audio region, calculated using the
“Fast Fourier Transform”. The graph represents the energy of each frequency.
As you move the cursor over the display, it shows you the nearest peak
frequency. This window can also display other common functions that are
calculated using the 'Fast Fourier Transform', including three versions of the
'Autocorrelation' function. The 'Enhanced Autocorrelation' function is very
good at identifying the pitch of a note.
The ' Analyze menu' is used for effects and plug-in effects that do not modify
the audio data, but simply open a dialog with
descriptive information. [Audacity] also
supports 'Analyze' commands that create annotations in a ' Label Track'.
Help Menu
About Audacity – To displays the version number and credits. If you have
compiled [Audacity] yourself, check here to verify which optional modules
have successfully compiled.