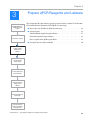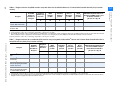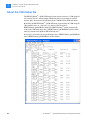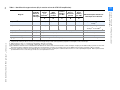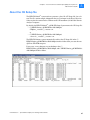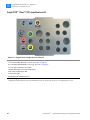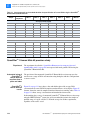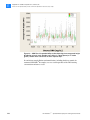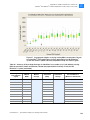
1
Getting Started Guide HID EVOlution™ – qPCR/STR Setup System Getting Started Guide Getting Started Guide HID EVOlution ™ – qPCR/STR Setup System Getting Started Guide For Research Use Only. Not for use in diagnostic procedures. Information in this document is subject to change without notice. APPLIED BIOSYSTEMS DISCLAIMS ALL WARRANTIES WITH RESPECT TO THIS DOCUMENT, EXPRESSED OR IMPLIED, INCLUDING BUT NOT LIMITED TO THOSE OF MERCHANTABILITY OR FITNESS FOR A PARTICULAR PURPOSE. TO THE FULLEST EXTENT ALLOWED BY LAW, IN NO EVENT SHALL APPLIED BIOSYSTEMS BE LIABLE, WHETHER IN CONTRACT, TORT, WARRANTY, OR UNDER ANY STATUTE OR ON ANY OTHER BASIS FOR SPECIAL, INCIDENTAL, INDIRECT, PUNITIVE, MULTIPLE OR CONSEQUENTIAL DAMAGES IN CONNECTION WITH OR ARISING FROM THIS DOCUMENT, INCLUDING BUT NOT LIMITED TO THE USE THEREOF, WHETHER OR NOT FORESEEABLE AND WHETHER OR NOT APPLIED BIOSYSTEMS IS ADVISED OF THE POSSIBILITY OF SUCH DAMAGES. NOTICE TO PURCHASER OF QUANTIFILER® KITS: LIMITED LICENSE Use of this product, including the Quantifiler Duo DNA Quantification Kit, is covered by US patent claims and patent claims outside the US. The purchase of this product includes a limited, non-transferable immunity from suit under the foregoing patent claims for using only this amount of product solely in forensic and paternity testing, including reporting results of purchaser’s activities for a fee or other commercial consideration, and also for the purchaser's own internal research. No right under any other patent claims (such as apparatus or system claims for real-time PCR) is conveyed expressly, by implication, or by estoppel. Further information on purchasing licenses may be obtained from the Director of Licensing, Applied Biosystems, 850 Lincoln Centre Drive, Foster City, California 94404, USA. TRADEMARKS: Trademarks of Life Technologies Corporation and its affiliated companies: AB (Design)®, ABI PRISM®, AmpFlSTR®, COfiler®, FAM™, GeneAmp®, GeneMapper®, GeneScan™, Hi-Di™, Identifiler®, LIZ®, MicroAmp®, MiniFiler™, PrepFiler™, Profiler Plus®, Quantifiler®, ROX™, SEfiler™, SEfiler Plus™, SGM Plus®, Veriti®, VIC®, and Yfiler®. AmpliTaq Gold and TaqMan are registered trademarks of Roche Molecular Systems, Inc. Freedom EVO and Freedom EVOware are registered trademarks and HID EVOlution is a trademark of Tecan Group Ltd. All other trademarks are the sole property of their respective owners. © 2009, 2010 Life Technologies Corporation. All rights reserved. Part Number 4426903 Rev. B 09/2010 Contents About This Guide . . . . . . . . . . . . . . . . . . . . . . . . . . . . . . . . . . . . . . . . vii Purpose . . . . . . . . . . . . . . . . . . . . . . . . . . . . . . . . . . . . . . . . . . . . . . . . . . . . . . . . . . . . . . . . vii Assumptions . . . . . . . . . . . . . . . . . . . . . . . . . . . . . . . . . . . . . . . . . . . . . . . . . . . . . . . . . . . . viii Safety information . . . . . . . . . . . . . . . . . . . . . . . . . . . . . . . . . . . . . . . . . . . . . . . . . . . . . . . . . ix How to obtain support . . . . . . . . . . . . . . . . . . . . . . . . . . . . . . . . . . . . . . . . . . . . . . . . . . . . . x Chapter 1 The HID EVOlution™ - qPCR/STR Setup System . . . . . . . . . . . . . . . . 1 HID EVOlution™ - qPCR/STR Setup System workflow . . . . . . . . . . . . . . . . . . . . . . . . . . . . . 2 Supported system configuration . . . . . . . . . . . . . . . . . . . . . . . . . . . . . . . . . . . . . . . . . . . . . . 4 Supported kits . . . . . . . . . . . . . . . . . . . . . . . . . . . . . . . . . . . . . . . . . . . . . . . . . . . . . . . . . . . . 5 Required instruments, software, and materials . . . . . . . . . . . . . . . . . . . . . . . . . . . . . . . . . . . 6 For more information . . . . . . . . . . . . . . . . . . . . . . . . . . . . . . . . . . . . . . . . . . . . . . . . . . . . . . . 7 Chapter 2 Pre-Run Procedures . . . . . . . . . . . . . . . . . . . . . . . . . . . . . . . . . . . . . . 9 One-time tasks . . . . . . . . . . . . . . . . . . . . . . . . . . . . . . . . . . . . . . . . . . . . . . . . . . . . . . . . . . 10 Before each run: Run maintenance scripts . . . . . . . . . . . . . . . . . . . . . . . . . . . . . . . . . . . . . 12 Before each run: Set up extracted DNA samples . . . . . . . . . . . . . . . . . . . . . . . . . . . . . . . . 13 Before each run: (Optional) Set up sample information . . . . . . . . . . . . . . . . . . . . . . . . . . . 17 Guidelines: Preventing contamination . . . . . . . . . . . . . . . . . . . . . . . . . . . . . . . . . . . . . . . . . 20 For more information . . . . . . . . . . . . . . . . . . . . . . . . . . . . . . . . . . . . . . . . . . . . . . . . . . . . . . 21 Chapter 3 Prepare qPCR Reagents and Labware . . . . . . . . . . . . . . . . . . . . . . . 23 Review pre-run checklist for qPCR reaction setup . . . . . . . . . . . . . . . . . . . . . . . . . . . . . . . 24 Set up reagents . . . . . . . . . . . . . . . . . . . . . . . . . . . . . . . . . . . . . . . . . . . . . . . . . . . . . . . . . . 25 Set up the labware on the worktable . . . . . . . . . . . . . . . . . . . . . . . . . . . . . . . . . . . . . . . . . 30 Chapter 4 Run Automated qPCR Setup . . . . . . . . . . . . . . . . . . . . . . . . . . . . . . . 33 Run a qPCR setup script . . . . . . . . . . . . . . . . . . . . . . . . . . . . . . . . . . . . . . . . . . . . . . . . . . . 34 Perform post-run tasks . . . . . . . . . . . . . . . . . . . . . . . . . . . . . . . . . . . . . . . . . . . . . . . . . . . . 35 About the qPCR reaction plate layout . . . . . . . . . . . . . . . . . . . . . . . . . . . . . . . . . . . . . . . . 36 For more information . . . . . . . . . . . . . . . . . . . . . . . . . . . . . . . . . . . . . . . . . . . . . . . . . . . . . . 37 HID EVOlution™ - qPCR/STR Setup System Getting Started Guide iii Contents Chapter 5 Perform qPCR and Review Results . . . . . . . . . . . . . . . . . . . . . . . . . 39 About the 7500 Setup file . . . . . . . . . . . . . . . . . . . . . . . . . . . . . . . . . . . . . . . . . . . . . . . . . . 40 Transfer and import the 7500 Setup file . . . . . . . . . . . . . . . . . . . . . . . . . . . . . . . . . . . . . . . 41 Perform qPCR . . . . . . . . . . . . . . . . . . . . . . . . . . . . . . . . . . . . . . . . . . . . . . . . . . . . . . . . . . . 42 Analyze and export the qPCR results . . . . . . . . . . . . . . . . . . . . . . . . . . . . . . . . . . . . . . . . . 42 For more information . . . . . . . . . . . . . . . . . . . . . . . . . . . . . . . . . . . . . . . . . . . . . . . . . . . . . . 43 Chapter 6 Prepare STR PCR Reagents and Labware . . . . . . . . . . . . . . . . . . . . 45 Review pre-run checklist for STR PCR reaction setup . . . . . . . . . . . . . . . . . . . . . . . . . . . . 46 Determine reagent volumes . . . . . . . . . . . . . . . . . . . . . . . . . . . . . . . . . . . . . . . . . . . . . . . . . 47 Set up reagents . . . . . . . . . . . . . . . . . . . . . . . . . . . . . . . . . . . . . . . . . . . . . . . . . . . . . . . . . . 52 Set up the labware on the worktable . . . . . . . . . . . . . . . . . . . . . . . . . . . . . . . . . . . . . . . . . . 54 Chapter 7 Run Automated STR PCR Setup . . . . . . . . . . . . . . . . . . . . . . . . . . . 57 Run STR PCR setup . . . . . . . . . . . . . . . . . . . . . . . . . . . . . . . . . . . . . . . . . . . . . . . . . . . . . . 58 Perform post-run tasks . . . . . . . . . . . . . . . . . . . . . . . . . . . . . . . . . . . . . . . . . . . . . . . . . . . . 61 About the STR PCR plate layout . . . . . . . . . . . . . . . . . . . . . . . . . . . . . . . . . . . . . . . . . . . . 62 For more information . . . . . . . . . . . . . . . . . . . . . . . . . . . . . . . . . . . . . . . . . . . . . . . . . . . . . . 63 Chapter 8 Perform STR PCR and Set Up Capillary Electrophoresis . . . . . . . . . 65 Run STR PCR amplification . . . . . . . . . . . . . . . . . . . . . . . . . . . . . . . . . . . . . . . . . . . . . . . . . 66 About the CE Setup file . . . . . . . . . . . . . . . . . . . . . . . . . . . . . . . . . . . . . . . . . . . . . . . . . . . . 67 Transfer and import the CE Setup file . . . . . . . . . . . . . . . . . . . . . . . . . . . . . . . . . . . . . . . . . 68 Prepare the CE Plate . . . . . . . . . . . . . . . . . . . . . . . . . . . . . . . . . . . . . . . . . . . . . . . . . . . . . . 68 For more information . . . . . . . . . . . . . . . . . . . . . . . . . . . . . . . . . . . . . . . . . . . . . . . . . . . . . . 69 Appendix A Troubleshooting . . . . . . . . . . . . . . . . . . . . . . . . . . . . . . . . . . . . . . . . 71 Appendix B Reagent Block Configurations . . . . . . . . . . . . . . . . . . . . . . . . . . . . . 75 Quantifiler® DNA Quantification Kits . . . . . . . . . . . . . . . . . . . . . . . . . . . . . . . . . . . . . . . . . . 76 Quantifiler® Human Kit with pre-prepared standards . . . . . . . . . . . . . . . . . . . . . . . . . . 76 Quantifiler® Human Kit with system-prepared standards . . . . . . . . . . . . . . . . . . . . . . . 77 Quantifiler® Y Human Male Kit with pre-prepared standards . . . . . . . . . . . . . . . . . . . . 78 Quantifiler® Y Human Male Kit with system-prepared standards . . . . . . . . . . . . . . . . . 79 Quantifiler® Human and Y Human Male Kits with pre-prepared standards . . . . . . . . . 80 Quantifiler® Human and Y Human Male Kits with system-prepared standards . . . . . . 81 AmpFlSTR® PCR Amplification Kits . . . . . . . . . . . . . . . . . . . . . . . . . . . . . . . . . . . . . . . . . . 82 AmpFlSTR® COfiler® PCR Amplification Kit . . . . . . . . . . . . . . . . . . . . . . . . . . . . . . . . . 82 AmpFlSTR® Identifiler® PCR Amplification Kit . . . . . . . . . . . . . . . . . . . . . . . . . . . . . . . 83 AmpFlSTR® MiniFiler™ PCR Amplification Kit . . . . . . . . . . . . . . . . . . . . . . . . . . . . . . . 84 iv HID EVOlution™ - qPCR/STR Setup System Getting Started Guide Contents AmpFlSTR® Profiler Plus® PCR Amplification Kit . . . . . . . . . . . . . . . . . . . . . . . . . . . . . 85 AmpFlSTR® SEfiler Plus™ PCR Amplification Kit . . . . . . . . . . . . . . . . . . . . . . . . . . . . . 86 AmpFlSTR® SGM Plus® PCR Amplification Kit . . . . . . . . . . . . . . . . . . . . . . . . . . . . . . 87 AmpFlSTR® Yfiler® PCR Amplification Kit . . . . . . . . . . . . . . . . . . . . . . . . . . . . . . . . . . 88 Appendix C HID EVOlution™ - qPCR/STR Setup System Detailed Workflow Description . . . . . . . . . . . . . . . . . . . . . . . . . . . . . . . . . . . . . . . . . . . . . 89 Appendix D Dilution Protocols . . . . . . . . . . . . . . . . . . . . . . . . . . . . . . . . . . . . . . . . 93 DNA input amount must be normalized before STR PCR amplification . . . . . . . . . . . . . . . 94 Terms used in the Freedom EVOware® software . . . . . . . . . . . . . . . . . . . . . . . . . . . . . . . . 94 Guidelines for successful normalization . . . . . . . . . . . . . . . . . . . . . . . . . . . . . . . . . . . . . . . 94 About DNA normalization on the HID EVOlution™ system . . . . . . . . . . . . . . . . . . . . . . . . . 96 Dilution protocols with examples . . . . . . . . . . . . . . . . . . . . . . . . . . . . . . . . . . . . . . . . . . . . 98 Appendix E Validation Experiments and Results . . . . . . . . . . . . . . . . . . . . . . . . 103 Overview . . . . . . . . . . . . . . . . . . . . . . . . . . . . . . . . . . . . . . . . . . . . . . . . . . . . . . . . . . . . . . 104 Materials and methods . . . . . . . . . . . . . . . . . . . . . . . . . . . . . . . . . . . . . . . . . . . . . . . . . . . 105 Precision and reproducibility studies: DNA standard dilution series preparation and reaction setup . . . . . . . . . . . . . . . . . . . . . . . . . . . . . . . . . . . . . . . . . . . . . 107 Precision and reproducibility studies: qPCR reaction setup scripts . . . . . . . . . . . . . . . . . 108 Quantifiler® Human reaction setup precision and reproducibility study . . . . . . . . . . . 108 Quantifiler® Y Human Male kit precision study . . . . . . . . . . . . . . . . . . . . . . . . . . . . . . 110 Combined Quantifiler® Human and Quantifiler® Y Human Male reaction setup precision study . . . . . . . . . . . . . . . . . . . . . . . . . . . . . . . . . . . . . . . . . . . . . . . . . . . . . . 111 Precision and reproducibility studies: STR PCR amplification reaction setup scripts . . . 114 Identifiler® and SGM Plus® STR PCR amplification reaction setup precision and reproducibility studies . . . . . . . . . . . . . . . . . . . . . . . . . . . . . . . . . . . . . . . . . . . . . . . . 114 Other AmpFlSTR® kits: Supplemental precision and reproducibility studies . . . . . . . 117 Identifiler® and SGM Plus® STR PCR amplification reaction setup accuracy study . . . . 122 Complete system check and precision study . . . . . . . . . . . . . . . . . . . . . . . . . . . . . . . . . . 126 Concordance and position ID confirmation study . . . . . . . . . . . . . . . . . . . . . . . . . . . . . . 131 Contamination study . . . . . . . . . . . . . . . . . . . . . . . . . . . . . . . . . . . . . . . . . . . . . . . . . . . . . 132 Conclusion . . . . . . . . . . . . . . . . . . . . . . . . . . . . . . . . . . . . . . . . . . . . . . . . . . . . . . . . . . . . 133 References . . . . . . . . . . . . . . . . . . . . . . . . . . . . . . . . . . . . . . . . . . . . . . . . . . . . . . . . . . . . 134 Appendix F Automation Guidelines . . . . . . . . . . . . . . . . . . . . . . . . . . . . . . . . . . . 135 qPCR reaction setup automation guidelines . . . . . . . . . . . . . . . . . . . . . . . . . . . . . . . . . . . 135 STR PCR reaction setup automation guidelines . . . . . . . . . . . . . . . . . . . . . . . . . . . . . . . . 137 HID EVOlution™ - qPCR/STR Setup System Getting Started Guide v Contents Appendix G Safety . . . . . . . . . . . . . . . . . . . . . . . . . . . . . . . . . . . . . . . . . . . . . . . 141 Chemical safety . . . . . . . . . . . . . . . . . . . . . . . . . . . . . . . . . . . . . . . . . . . . . . . . . . . . . . . . . 142 General chemical safety . . . . . . . . . . . . . . . . . . . . . . . . . . . . . . . . . . . . . . . . . . . . . . . 142 MSDSs . . . . . . . . . . . . . . . . . . . . . . . . . . . . . . . . . . . . . . . . . . . . . . . . . . . . . . . . . . . . 143 Chemical waste safety . . . . . . . . . . . . . . . . . . . . . . . . . . . . . . . . . . . . . . . . . . . . . . . . 144 Biological hazard safety . . . . . . . . . . . . . . . . . . . . . . . . . . . . . . . . . . . . . . . . . . . . . . . 145 Safety alerts . . . . . . . . . . . . . . . . . . . . . . . . . . . . . . . . . . . . . . . . . . . . . . . . . . . . . . . . . . . . 146 Documentation . . . . . . . . . . . . . . . . . . . . . . . . . . . . . . . . . . . . . . . . 147 Related documentation . . . . . . . . . . . . . . . . . . . . . . . . . . . . . . . . . . . . . . . . . . . . . . . . . . . 148 Obtaining information from the Help system . . . . . . . . . . . . . . . . . . . . . . . . . . . . . . . . . . . 150 Send us your comments . . . . . . . . . . . . . . . . . . . . . . . . . . . . . . . . . . . . . . . . . . . . . . . . . . 150 Index . . . . . . . . . . . . . . . . . . . . . . . . . . . . . . . . . . . . . . . . . . . . . . . . 151 vi HID EVOlution™ - qPCR/STR Setup System Getting Started Guide About This Guide Purpose This guide provides procedures for human identification (HID) customers who want to use the HID EVOlution™ - qPCR/STR Setup System to automate: • Reaction plate setup for quantitative real-time PCR (qPCR) • DNA normalization and PCR amplification reaction plate setup for Short Tandem Repeat (STR) analysis Always refer to this guide for pre-run and post-run handling of samples, kit reagents, and pipetted PCR plates. Refer to Tecan documentation for details on the HID EVOlution™ - qPCR/STR Setup System safety, set up, operating, and maintenance instructions. Figure 1 Overview of the automated HID workflow using the HID EVOlution™ qPCR/STR Setup System. The steps covered in this Getting Started Guide are shown in blue. The steps performed on the HID EVOlution™ system are highlighted in orange. HID EVOlution™ - qPCR/STR Setup System Getting Started Guide vii About This Guide Assumptions Assumptions This guide assumes that: • You know how to handle forensic samples and prepare them for quantitation and STR analysis. • The HID EVOlution™ - qPCR/STR Setup System (a Tecan Freedom EVO® 150 or 200 with the appropriate hardware, software, and scripts) has been installed, configured, tested, and calibrated by Tecan personnel. • You are trained on the proper operation, maintenance, and troubleshooting of the HID EVOlution™ - qPCR/STR Setup System. • You have access to the Tecan HID EVOlution™ - qPCR/STR Setup System Application Manual, the Tecan Freedom EVO® Operating Manual, and other applicable Tecan documentation. • You have referred to the manufacturer’s instrument documentation for important safety information related to the use of the Tecan Freedom EVO® instrument. viii HID EVOlution™ - qPCR/STR Setup System Getting Started Guide About This Guide Safety information Safety information Note: For general safety information, see this Preface and Appendix G, “Safety” on page 141. When a hazard symbol and hazard type appear by a chemical name or instrument hazard, see the “Safety” Appendix for the complete alert on the chemical or instrument. Safety alert words Four safety alert words appear in Applied Biosystems user documentation at points in the document where you need to be aware of relevant hazards. Each alert word—IMPORTANT, CAUTION, WARNING, DANGER—implies a particular level of observation or action, as defined below: IMPORTANT! – Indicates information that is necessary for proper instrument operation, accurate chemistry kit use, or safe use of a chemical. WARNING! – Indicates a potentially hazardous situation that, if not avoided, may result in minor or moderate injury. It may also be used to alert against unsafe practices. WARNING! – Indicates a potentially hazardous situation that, if not avoided, could result in death or serious injury. WARNING! – Indicates an imminently hazardous situation that, if not avoided, will result in death or serious injury. This signal word is to be limited to the most extreme situations. Except for IMPORTANTs, each safety alert word in an Applied Biosystems document appears with an open triangle figure that contains a hazard symbol. These hazard symbols are identical to the hazard symbols that are affixed to Applied Biosystems instruments). MSDSs The MSDSs for any chemicals supplied by Applied Biosystems or Ambion are available to you free 24 hours a day. For instructions on obtaining MSDSs, see “Obtaining MSDSs” on page 143. IMPORTANT! For the MSDSs of chemicals not distributed by Applied Biosystems or Ambion contact the chemical manufacturer. HID EVOlution™ - qPCR/STR Setup System Getting Started Guide ix About This Guide How to obtain support How to obtain support For HID support: • In North America – send an email to [email protected], or call 888-821-4443 option 1. • Outside North America – contact your local support office. For the latest services and support information for all locations, go to: www.appliedbiosystems.com At the Applied Biosystems web site, you can: • Access worldwide telephone and fax numbers to contact Applied Biosystems Technical Support and Sales facilities. • Search through frequently asked questions (FAQs). • Submit a question directly to Technical Support. • Order Applied Biosystems user documents, MSDSs, certificates of analysis, and other related documents. • Download PDF documents. • Obtain information about customer training. • Download software updates and patches. x HID EVOlution™ - qPCR/STR Setup System Getting Started Guide Chapter 1 1 #HAPTER The HID EVOlution™ qPCR/STR Setup System The HID EVOlution™ - qPCR/STR Setup System This chapter covers: ■ HID EVOlution™ - qPCR/STR Setup System workflow . . . . . . . . . . . . . . . . . . . 2 ■ Supported system configuration . . . . . . . . . . . . . . . . . . . . . . . . . . . . . . . . . . . . . . 4 ■ Supported kits . . . . . . . . . . . . . . . . . . . . . . . . . . . . . . . . . . . . . . . . . . . . . . . . . . . . 5 #HAPTER Pre-Run Procedures ■ Required instruments, software, and materials . . . . . . . . . . . . . . . . . . . . . . . . . . . 6 ■ For more information . . . . . . . . . . . . . . . . . . . . . . . . . . . . . . . . . . . . . . . . . . . . . . 7 #HAPTER Prepare qPCR Reagents and Labware #HAPTER Run Automated qPCR Setup #HAPTER Perform qPCR and Review Results #HAPTER Prepare STR PCR Reagents and Labware #HAPTER Run Automated STR PCR Setup #HAPTER Perform STR PCR and Set Up Capillary Electrophoresis HID EVOlution™ - qPCR/STR Setup System Getting Started Guide 1 1 Chapter 1 The HID EVOlution™ - qPCR/STR Setup System HID EVOlution™ - qPCR/STR Setup System workflow HID EVOlution™ - qPCR/STR Setup System workflow The HID EVOlution™ - qPCR/STR Setup System automates qPCR and STR PCR reaction setup. Table 1 below describes the steps performed by the user in a human identification (HID) workflow, with the steps that involve the HID EVOlution™ qPCR/STR Setup System highlighted in blue. A detailed description of the steps is provided in Appendix C on page 89. Figure 1 on page 3 shows the integration of the HID EVOlution™ - qPCR/STR Setup System with the other instruments, software, and data files in the HID workflow. Table 1 Overview of the automated HID workflow. HID Workflow Covered in Chapter... Extraction procedures are not included in this guide. For automated extraction procedures, see the PrepFiler™ Automated Forensic DNA Extraction Kit Getting Started Guide. 2, “Pre-Run Procedures” on page 9 3, “Prepare qPCR Reagents and Labware” on page 23 4, “Run Automated qPCR Setup” on page 33 5, “Perform qPCR and Review Results” on page 39 5, “Perform qPCR and Review Results” on page 39 2, “Pre-Run Procedures” on page 9 6, “Prepare STR PCR Reagents and Labware” on page 45 7, “Run Automated STR PCR Setup” on page 57 8, “Perform STR PCR and Set Up Capillary Electrophoresis” on page 65 8, “Perform STR PCR and Set Up Capillary Electrophoresis” on page 65 CE and data analysis procedures are not included in this guide. See the AmpFlSTR Kit User’s Guides. 2 HID EVOlution™ - qPCR/STR Setup System Getting Started Guide Chapter 1 The HID EVOlution™ - qPCR/STR Setup System HID EVOlution™ - qPCR/STR Setup System workflow 1 Figure 1 Files used to import sample information to the next HID workflow step. The qPCR/STR Sample file is automatically generated by the HID EVOlution™ – Extraction System, or can be manually created from a template. Use the qPCR/STR Sample file to import the required sample name and information for both qPCR and STR PCR reaction setup (see page 17 for more options). Import the automaticallygenerated 7500 Setup file as a SDS plate record. Import the automaticallygenerated CE Setup file as a CE plate record. HID EVOlution™ - qPCR/STR Setup System Getting Started Guide 3 1 Chapter 1 The HID EVOlution™ - qPCR/STR Setup System Supported system configuration Supported system configuration The HID EVOlution™ - qPCR/STR Setup System consists of: • A dedicated TECAN Freedom EVO® 150 or 200 robotic workstation. • The necessary hardware, including a 4-channel liquid handling accessory (LiHa). • Application software: Freedom EVOware® version 2.1 SP1, SOE version 1.2 SP1, and HID EVOlution qPCR/STR driver 1.1.0.0.25 SP4 or Freedom EVOware® version v1.4 SP1, special SOE for HID, and HID EVOlution qPCR/STR driver 1.1.0.0.25 SP4. Note: If you are not using the most current driver (1.1.0.0.25 SP4), contact your local Tecan service organization about upgrading. See the Tecan HID EVOlution™ – qPCR/STR Setup System Application Manual, Section 10, “Customer Support,” for contact information. • Software scripts developed and validated to automate the set up of reaction plates for quantitative real-time PCR and STR PCR amplification for use in HID applications. Note: The Freedom EVO 150 and 200 instruments can be configured identically and both instruments are supported for use with the HID EVOlution™ - qPCR/STR Setup System. Validation studies were performed on the Freedom EVO 150 and Freedom EVOware® v1.4. Freedom EVOware® v2.1 was validated on the HID EVOlution™ – Combination System with additional verification studies performed on the HID EVOlution™ - qPCR/STR Setup System. 4 HID EVOlution™ - qPCR/STR Setup System Getting Started Guide Chapter 1 The HID EVOlution™ - qPCR/STR Setup System Supported kits 1 Supported kits The following Applied Biosystems DNA quantitation and amplification kits have been validated and are supported for use with the HID EVOlution - qPCR/STR Setup System. Supported Kit Quantifiler® Human DNA Quantification Kit ® Applied Biosystems Part Number 4343895 Quantifiler Y Human Male DNA Quantification Kit 4343906 AmpFlSTR® COfiler® 4304256 AmpFlSTR® Identifiler® ® ™ PCR Amplification Kit PCR Amplification Kit 4322288 AmpFlSTR MiniFiler PCR Amplification Kit 4373872 AmpFlSTR® AmpFlSTR® Profiler Plus® PCR Amplification Kit 4303326 SEfiler Plus™ PCR Amplification Kit 4382699 ® ® AmpFlSTR SGM Plus PCR Amplification Kit 4307133 AmpFlSTR® 4359513 Yfiler® PCR Amplification Kit Refer to the appropriate Quantifiler® kit and AmpFlSTR® kit user guides for kit contents and storage conditions. HID EVOlution™ - qPCR/STR Setup System Getting Started Guide 5 1 Chapter 1 The HID EVOlution™ - qPCR/STR Setup System Required instruments, software, and materials Required instruments, software, and materials The additional instruments, software, and materials needed for use but not supplied with the HID EVOlution™ - qPCR/STR Setup System are described in Tables 2 and 3: Table 2 Required instruments and software Instrument or Software Source Applied Biosystems 7500 Real-Time PCR System and Sequence Detection Software v1.2.3 Applied Biosystems (Contact your local sales representative for computer configurations) 9600/9700 Gold-plated Silver 96-Well GeneAmp® PCR System or 9600/9700 Silver 96-Well GeneAmp® PCR System or Veriti® 96-well thermal cycler (with silver 96-well sample block or gold-plated silver 96-well sample block) Applied Biosystems (PN 4314878) Applied Biosystems 3130/3130xl Genetic Analyzer and Genetic Analyzer Data Collection Software version 3.0 Applied Biosystems (Contact your local sales representative for computer configurations) Applied Biosystems (PN N8050001) Applied Biosystems (PN 4375786) Table 3 Required materials Source ‡ Material Benchtop centrifuge with 96-well plate adapters Disposable pipette tips (DiTis): 50-µL LiHa conductive disposable tips with filter § Tecan (PN 30032114) www.tecan.com Disposable pipette tips (DiTis): 200-µL LiHa conductive disposable tips with filter § Tecan (PN 30000629) www.tecan.com 100 mL disposable troughs for reagents Tecan (PN 10613048) www.tecan.com Barcodes (optional) See the Tecan HID EVOlution™ – qPCR/STR Setup System Application Manual and the Tecan Freedom EVO® Operating Manual, Section 3.5.6 “Positive Identification (PosID)” for requirements MicroAmp® clear adhesive film (to seal PCR product plates for storage) Applied Biosystems (PN 4306311) MicroAmp® adhesive film applicator Applied Biosystems (PN 4333183) MicroAmp® optical adhesive film (to seal qPCR reaction plates during qPCR) Applied Biosystems (PN 4360954) Four 96-well reaction plate adapters (supplied with the system; listed as “adapter plate PCR HID EVOlution” in the HID EVOlution™ – qPCR/STR Setup System Application Manual.) Tecan (PN 30032860) Note: If you are processing extracted DNA from plates, you will require 2 adapters for qPCR setup and 4 adapters for STR PCR setup. If you are processing extracted DNA from tubes, you need 1 adapter for qPCR setup and 3 for STR PCR setup. Six tube racks (optionally supplied with the system; also listed as “16-position tube carrier with vertical cap storage” in the HID EVOlution™ – qPCR/STR Setup System Application Manual.) 6 Tecan (PN 10613035) HID EVOlution™ - qPCR/STR Setup System Getting Started Guide Chapter 1 The HID EVOlution™ - qPCR/STR Setup System For more information 1 Table 3 Required materials (continued) Source ‡ Material Graduated 5-mL self-standing transport tubes (master mix vials) with conical bottom VWR 89005-596 T10E0.1 buffer (10 mM Tris-HCl [pH 8.0] and 0.1 mM Na2EDTA) User supplied or Teknova (T0233) Degassed deionized water MLS # MicroAmp® optical 96-well reaction plate (with or without barcode) Applied Biosystems (PN 4306737 or N8010560) RNase-free microfuge tubes (1.5 mL), certified DNase- and RNase-free Applied Biosystems (PN AM12400) or equivalent ‡ Recommended sources. Equivalent materials from other suppliers can be used after appropriate validation studies by the user laboratory. § Disposable tips that have not been certified by Tecan may not yield the same liquid handling performance. # For the MSDS of any chemical not distributed by Applied Biosystems, contact the chemical manufacturer. Before handling any chemicals, refer to the MSDS provided by the manufacturer, and observe all relevant precautions. For more information For information on: • DNA standard dilution series preparation and quantitation procedures, see the appropriate Quantifiler® Kits User’s Guide. • DNA normalization and amplification procedures, see the appropriate AmpFlSTR® Kit User Guide as noted in “Applied Biosystems documentation” on page 148. • Manual DNA extraction procedures, see the PrepFiler™ Forensic DNA Extraction Kit User Guide. • Automated DNA extraction procedures, see the PrepFiler™ Automated Forensic DNA Extraction Kit Getting Started Guide. • Validation experiments performed by Applied Biosystems and the results, see Appendix E, “Validation Experiments and Results” on page 103. • The HID EVOlution™ - qPCR/STR Setup System, see the “Tecan documentation” on page 149. HID EVOlution™ - qPCR/STR Setup System Getting Started Guide 7 1 8 Chapter 1 The HID EVOlution™ - qPCR/STR Setup System For more information HID EVOlution™ - qPCR/STR Setup System Getting Started Guide Chapter 2 2 #HAPTER The HID EVOlution™ qPCR/STR Setup System Pre-Run Procedures This chapter provides prerequisite procedures for qPCR and STR PCR reaction setup. ■ One-time tasks . . . . . . . . . . . . . . . . . . . . . . . . . . . . . . . . . . . . . . . . . . . . . . . . . . 10 Create detectors for the 7500 Real-Time PCR System. . . . . . . . . . . . . . . . . . . . 10 Create an instrument protocol and results group for the CE instrument . . . . . . 11 #HAPTER Pre-Run Procedures ■ Before each run: Run maintenance scripts . . . . . . . . . . . . . . . . . . . . . . . . . . . . . 12 ■ Before each run: Set up extracted DNA samples . . . . . . . . . . . . . . . . . . . . . . . . 13 Set up extracted DNA samples in a 96-well plate. . . . . . . . . . . . . . . . . . . . . . . . 14 Set up extracted DNA samples in tubes . . . . . . . . . . . . . . . . . . . . . . . . . . . . . . . 15 ■ Before each run: (Optional) Set up sample information. . . . . . . . . . . . . . . . . . . 17 #HAPTER Prepare qPCR Reagents and Labware About sample information . . . . . . . . . . . . . . . . . . . . . . . . . . . . . . . . . . . . . . . . . 17 Options for entering sample information . . . . . . . . . . . . . . . . . . . . . . . . . . . . . . 17 Create a qPCR/STR Sample file. . . . . . . . . . . . . . . . . . . . . . . . . . . . . . . . . . . . . 18 ■ Guidelines: Preventing contamination . . . . . . . . . . . . . . . . . . . . . . . . . . . . . . . . 20 #HAPTER Run Automated qPCR Setup ■ For more information . . . . . . . . . . . . . . . . . . . . . . . . . . . . . . . . . . . . . . . . . . . . . 21 #HAPTER Perform qPCR and Review Results #HAPTER Prepare STR PCR Reagents and Labware #HAPTER Run Automated STR PCR Setup #HAPTER Perform STR PCR and Set Up Capillary Electrophoresis HID EVOlution™ - qPCR/STR Setup System Getting Started Guide 9 2 Chapter 2 Pre-Run Procedures One-time tasks One-time tasks Complete the following tasks on each Real-Time PCR and CE instrument before starting the automated procedures. This will allow you to import the: • SDS Setup file (generated by the HID EVOlution™ - qPCR/STR Setup System) into the SDS software v1.2.3. • 7500 Results file(s) into the HID EVOlution™ - qPCR/STR Setup System software. • CE Setup file (generated by the HID EVOlution™ - qPCR/STR Setup System) into the 3130/3130xl instrument Data Collection Software v3.0. Create detectors for the 7500 RealTime PCR System If you have not already done so, create detectors in the SDS Software v1.2.3 for running the Quantifiler® assays. Refer to the Applied Biosystems Quantifiler® Kits User’s Manual for instructions on creating the detectors. IMPORTANT! The detectors must have the exact names and capitalization shown below. Note: These detectors allow you to import the HID EVOlution system-generated 7500 Setup file (ReactionPlate1.txt or <barcode>.txt) to the SDS Software. See “About the 7500 Setup file” on page 40 for details. 1. Create the following detectors for the Quantifiler® Human kit: • Name = Quantifiler Human – Reporter Dye = FAM – Quencher Dye = None (make sure None is selected) • Name = IPC (IPC assay) – Reporter Dye = VIC – Quencher Dye = None (make sure None is selected) 2. Create the following detectors for the Quantifiler® Y Human Male kit: • Name = Quantifiler Y – Reporter Dye = FAM – Quencher Dye = None (make sure None is selected) • Name = IPC (IPC assay) – Reporter Dye = VIC – Quencher Dye = None (make sure None is selected) 10 HID EVOlution™ - qPCR/STR Setup System Getting Started Guide Chapter 2 Pre-Run Procedures One-time tasks Create an instrument protocol and results group for the CE instrument 2 If you have not already done so, create an instrument protocol and a results group in the Data Collection Software v3.0 to match the names used in CE Setup file generated by the HID EVOlution™ - qPCR/STR Setup System: 1. After STR PCR reaction setup, use Microsoft® Excel® to open the CE Setup file generated by the HID EVOlution™ - qPCR/STR Setup System. Note: The CE Setup file name and location is C:\HIDEVOlution_qPCRSTRfiles\ AB3130Input\STRplate_<rundate>_<runtime>.txt or C:\HIDEVOlution_qPCRSTRfiles\AB3130Input\ <barcode>_<rundate>_<runtime>.txt. 2. In the CE Setup file, note the exact name (including capitalization) of the instrument protocol and the results group. Note: By default, the instrument protocol and the results group are both named “HIDEvolution”; however, individual systems can have different configurations. 3. Confirm that, in the Data Collection software, you have created an instrument protocol and a results group with the same names that you noted in step 2. If not, follow steps 4 and 5 to create them. 4. If necessary, set up the results group in the Data Collection software Results Group Editor: a. Select the General tab, then enter the results group name exactly as it appears in the CE Setup file (usually HIDEvolution). b. Select the Analysis tab, then select GeneMapper_Generic in the Analysis Type field. c. Configure the Destination and Naming tabs according to your laboratory needs. HID EVOlution™ - qPCR/STR Setup System Getting Started Guide 11 2 Chapter 2 Pre-Run Procedures Before each run: Run maintenance scripts 5. If necessary, set up the instrument protocol in the Data Collection software: a. Select Protocol Manager from the left navigation pane. b. Click New at the center left of the Instrument Protocol section, then enter the following: • Name: Enter the instrument protocol name exactly as it appears in the CE Setup file (usually HIDEvolution). • Type: Regular • Run Module: Select the run module according to the kit and your laboratory needs. • Dye Set: Select the dye set according to the kit. c. Click OK. Refer to the Applied Biosystems 3130/3130xl Getting Started Guide for details on creating the instrument protocol and results group. Before each run: Run maintenance scripts Run the appropriate maintenance scripts after setting up carriers and racks on the worktable, but before placing samples, reagents, or plasticware on the worktable. See the Tecan HID EVOlution™ – qPCR/STR Setup System Application Manual, Section 7.5, “Maintenance Scripts,” and Section 5.2, “Running Maintenance” for details. Before starting the run, if... ...then run It is the first run of the day DailyStartUp_qPCRSTR It is not the first run of the day Flush_qPCRSTR When you run DailyStartUp_qPCRSTR or Flush_qPCRSTR, you see: Flush_qPCRSTR one or more times until: • Air bubbles in the lines and/or • Intermittent flow from a DiTi cone • There are no visible air bubbles and • Flow from the DiTi cones is constant There are one or more DiTis on the liquid handling arm (LiHa) Drop_DiTis_qPCRSTR You refilled DiTis Set_200tip_Position_qPCRSTR and Set_50tip_Position_qPCRSTR IMPORTANT! For proper liquid handling, run the Flush_qPCRSTR script before every run one or more times until there are no visible air bubbles. Note: Maintenance scripts are not included with Freedom EVOware® v1.4. 12 HID EVOlution™ - qPCR/STR Setup System Getting Started Guide Chapter 2 Pre-Run Procedures Before each run: Set up extracted DNA samples 2 Before each run: Set up extracted DNA samples You can set up extracted DNA samples in either: • A 96-well plate – Follow the instructions in “Set up extracted DNA samples in a 96-well plate” on page 14 • 1.5-mL tubes – Follow the instructions in “Set up extracted DNA samples in tubes” on page 15 Note: You cannot use both a plate and tubes for extracted DNA samples in the same run. Tables 4 and 5 describe the maximum number of extracted DNA samples that can be processed in a qPCR or STR PCR reaction setup run. Table 4 Maximum number of samples in a qPCR reaction setup run Quantifiler® DNA Quantification Kit Quantifiler® Human Kit Number of extracted samples and controls Number of reactions in resulting qPCR reaction plate up to 80 up to 80 Other wells in resulting qPCR reaction plate 16 wells are used for the DNA standard dilution series (2 replicates of the 8 concentrations in the series) Quantifiler® Y Human Male Kit up to 80 up to 80 16 wells are used for the DNA standard dilution series (2 replicates of the 8 concentrations in the series) Combined set up using both Quantifiler® Human and Y Human Male Kits up to 32 up to 32 Quantifiler® Human kit reactions 32 wells are used for the DNA standard dilution series up to 32 Quantifiler® Y Human Male kit reactions (4 replicates of the 8 concentrations in the series) Table 5 Maximum number of samples in a STR PCR reaction setup run Number of extracted samples and controls Number of reactions in resulting STR PCR reaction plate COfiler®, Identifiler®, MiniFiler™, Profiler Plus®, SEfiler Plus™, or SGM Plus® Kits up to 88 up to 88 Yfiler® Kit up to 87 AmpFlSTR® PCR Amplification Kit Other wells in resulting STR PCR reaction plate 1 well for amplification positive control 1 well for amplification negative control 6 empty wells ‡ up to 87 2 wells for amplification positive control 1 well for amplification negative control 6 empty wells‡ ‡ Because the STR PCR reaction plate layout is designed for easy transfer of amplified PCR product to a CE plate, six of the wells in the STR PCR reaction plate remain empty as a placeholder for the allelic ladder sample replicates in the CE plate. See “About the STR PCR plate layout” on page 62. HID EVOlution™ - qPCR/STR Setup System Getting Started Guide 13 2 Chapter 2 Pre-Run Procedures Before each run: Set up extracted DNA samples Set up extracted DNA samples in a 96-well plate 1. Confirm that a MicroAmp® Optical 96-Well Reaction Plate (the extracted DNA sample plate) is labeled for identification. If you use barcodes to track samples, move the barcode provided with the plate into the correct position as shown in the Tecan HID EVOlution™ qPCR/STR Setup System Application Manual. 2. Place the first extracted DNA sample in any well position on the plate (for example, you can begin with well number 14). 3. After the first extracted DNA sample, continue placing samples next to one another in vertical columns as shown in the “Correct” examples below. Do not leave empty wells between samples. If there is a failed extracted sample in the plate, use blank reagents (water or TE buffer) in that well. See examples of correct extracted DNA sample plate setup below. IMPORTANT! Make sure to assign a sample ID to all samples, including failed samples. Correct (samples in wells 1 through 48) Correct (samples in wells 14 through 61) 14 Incorrect Incorrect HID EVOlution™ - qPCR/STR Setup System Getting Started Guide Chapter 2 Pre-Run Procedures Before each run: Set up extracted DNA samples Set up extracted DNA samples in tubes 2 1. Confirm the number and labeling of tubes: • For qPCR setup, confirm that you have no more than 80 labeled 1.5-mL microcentrifuge tubes containing extracted DNA samples or control samples (or no more than 32 tubes for a combined plate). • For STR PCR setup, confirm that you have no more than 88 labeled 1.5-mL microcentrifuge tubes (87 for the Yfiler® kit) containing extracted DNA samples. If you use barcodes to track samples, confirm that barcodes are correctly placed on the tubes (see barcode information in the Tecan HID EVOlution™ qPCR/STR Setup System Application Manual). 2. Confirm that the tube racks are correctly positioned: • For qPCR setup, confirm that the tube racks S1 through S5 are at grid positions 27-31. • For STR PCR setup, confirm that the tube racks S1 through S6 are at grid positions 27-32. 3. Correctly position the sample tubes in the tube racks: a. Place the first sample tube in the tube racks (for example, you can begin with rack S1, position 8). b. After the first sample tube, continue placing sample tubes from back to front in vertical columns as shown in the examples below. Do not leave empty positions between sample tubes. IMPORTANT! DNA sample tubes must be contiguously loaded. Do not leave empty tube positions between sample tubes. Examples of correct qPCR setup: HID EVOlution™ - qPCR/STR Setup System Getting Started Guide 15 2 Chapter 2 Pre-Run Procedures Before each run: Set up extracted DNA samples Examples of correct STR PCR setup: 4. Check that the barcodes are in a readable position. 5. Open each tube, securing the tube caps in a fixed upright position as shown below. IMPORTANT! Open tube caps carefully to prevent contamination and splatter. 16 HID EVOlution™ - qPCR/STR Setup System Getting Started Guide Chapter 2 Pre-Run Procedures Before each run: (Optional) Set up sample information 2 Before each run: (Optional) Set up sample information You have several options for entering sample information to the HID EVOlution™ qPCR/STR Setup System software. If you chose the sample file option, set up the sample file before the run according to the instructions in “Create a qPCR/STR Sample file” on page 18. About sample information During a qPCR or STR PCR reaction setup run, the software prompts you to enter or import the sample name and information for each extracted DNA sample. The sample information is used by the HID EVOlution™ - qPCR/STR Setup System to: • Set up the reaction plate. • Generate a Samples Report at the end of the run. The report records each extracted DNA sample starting position in a plate or in tubes and each sample final position in the reaction plate. • Generate a text file containing the sample information: – qPCR reaction setup run – Generates a 7500 Setup file that you can import into the SDS software plate document to define the parameters of the 7500 Real-Time PCR System run. – STR PCR reaction setup run – Generates a CE Setup file that you can import into the Data Collection Software to define the parameters of the 3130/3130xl Genetic Analyzer run. Options for entering sample information You have several options for entering sample information. You can: • Automatically capture sample information by having the system scan barcodes on the plates and/or tubes – Select barcodes compatible with the PosID-3, then make sure the barcodes are correctly placed when you set up the worktable. See the Tecan HID EVOlution™ – qPCR/STR Setup System Application Manual, Section 4.6 “Barcodes” for details. For: – Barcodes on 96-well plates – After the plate barcode is scanned, you must manually enter or import the sample name and information for each well in the plate. See the Tecan HID EVOlution™ – qPCR/STR Setup System Application Manual, Section 5.3 “Running a Script” for details. – Barcodes on tubes – The sample name (barcode) and sample position for each tube are automatically updated in the software when the barcodes are scanned. After the tube barcodes are scanned, you have the option to manually edit the sample information. See the Tecan HID EVOlution™ – qPCR/STR Setup System Application Manual, Section 5.3 “Running a Script” for details. • Import the qPCR/STR Sample file (output) from HID EVOlution™ – Extraction System – If you used the HID EVOlution™ – Extraction System to perform DNA extraction, use the Extraction System output (qPCR/STR Sample file: HID_<rundate> <runtime>.csv) from that run. Sample ID and sample position in the sample file must agree with the samples on the worktable. HID EVOlution™ - qPCR/STR Setup System Getting Started Guide 17 2 Chapter 2 Pre-Run Procedures Before each run: (Optional) Set up sample information • Create a qPCR/STR Sample file from a template – You can create a qPCR/STR Sample file before running the script and then import the file into the HID EVOlution™ system. Two sample input file templates are provided on the CD with the HID EVOlution software: one for DNA samples in a 96-well plate, and one for DNA samples in 1.5-mL tubes. See “Create a qPCR/STR Sample file” on page 18 and the Tecan HID EVOlution™ – qPCR/STR Setup System Application Manual, Section 3.4.2 “File Format for Plate Wells/Tubes” for details. • Manually enter sample information into the HID EVOlution™ software – Run the appropriate EVOware software script, then enter the information when you are prompted. Use the Edit button in the Sample Information dialog box and manually add sample information. See the Tecan HID EVOlution™ – qPCR/STR Setup System Application Manual, Section 5.3 “Running a Script” for details. Note: If you manually enter sample information for qPCR setup, you will need to re-enter the information for STR PCR setup. To reduce setup time, consider creating a qPCR/STR Sample file for use in qPCR and STR PCR setup as described below. Note: If you are using barcodes, barcode scanning takes place before you import and/or manually enter information.You can manually enter sample information after barcode scanning and before or after importing a sample file. Generally, the information scanned/imported/entered last overwrites previous sample information. Because initial software configuration can vary depending on customer requirements, you may see different behavior with your system. Create a qPCR/STR Sample file 1. Open the qPCR/STR Sample file template provided with the software CD: a. Select StartAll ProgramsAccessoriesNotepad to open Microsoft Notepad. IMPORTANT! Use a text editor such as Microsoft Notepad to edit the sample input file. Do not use Microsoft Excel, which may introduce invalid formatting. b. Select FileOpen, then browse to the template files originally provided in the “Sample Files” folder on the HID EVOlution™ - qPCR/STR Setup System software CD. c. Select SampleFile_96.csv (if using tubes) or SampleFile_Plate_96.csv (if using a plate), then click Open. 2. Select FileSave As, browse to the directory C:\HIDEVOlution_qPCRSTRfiles (or another location of your choosing), change the file name to <UserDefined>.csv, then click Save. 18 HID EVOlution™ - qPCR/STR Setup System Getting Started Guide Chapter 2 Pre-Run Procedures Before each run: (Optional) Set up sample information 2 3. When editing a template, follow the formatting rules that are described in Tecan HID EVOlution™ – qPCR/STR Setup System Application Manual, Section 3.4.2 “File Format for Plate Wells/Tubes” and the following guidelines: • Do not include empty plate well or tube rack positions between samples. • Avoid spaces or other special characters such as commas (,), asterisks (*), or slashes (/). • For the sample name field, follow your laboratory naming conventions to assign a unique name to each sample. Make sure that the sample name meets the formatting rules. 4. Save the file with a .csv extension, then close the file. IMPORTANT! The file extension must be .csv for the file to be imported to the HID EVOlution™ software. HID EVOlution™ - qPCR/STR Setup System Getting Started Guide 19 2 Chapter 2 Pre-Run Procedures Guidelines: Preventing contamination Guidelines: Preventing contamination PCR assays require special laboratory practices to avoid false positive amplifications. The high sensitivity of these assays may result in the amplification of a single DNA molecule. To minimize false positives due to the presence of amplified material in your work area, follow these recommended laboratory practices: • When possible, maintain separate work areas, dedicated equipment and supplies for: – Sample preparation – PCR setup – PCR amplification – Analysis of PCR products • Wear a clean lab coat (not previously worn while handling amplified PCR products or during sample preparation) and clean gloves when preparing samples for PCR amplification. • Change gloves whenever you suspect they are contaminated and before leaving the work area. • Use positive-displacement pipettes with aerosol-resistant pipette tips. • Never bring amplified PCR products into the PCR setup area. • Open and close all sample tubes and reaction plates carefully. • Try not to splash or spray PCR samples. • When pipetting from a kit component tube, hold the cap of the tube in your gloved hand, or be sure to set it down on a clean, decontaminated surface. • Keep reactions and components sealed when possible. • Before opening sealed reagents or reaction tubes or plates, centrifuge the tube or plate briefly (approximately two seconds in a microcentrifuge) to collect any residual tube contents from the sides and cap. • Clean lab benches and equipment periodically with freshly diluted 10% bleach solution. Note: For the Freedom EVO™ workstation, follow with copious amounts of water. 20 HID EVOlution™ - qPCR/STR Setup System Getting Started Guide Chapter 2 Pre-Run Procedures For more information 2 For more information For information on: • Tecan’s numbering system for plate wells and tube racks, see the Tecan HID EVOlution™ – qPCR/STR Setup System Application Manual, Section 3.4.5, “Definition of Positions in Multi-Well Racks and Plates.” • Preparing a sample input file, refer to the Tecan HID EVOlution™ – qPCR/STR Setup System Application Manual, Section 3.4.2 “File Format for Plate Wells/Tubes” and Section 3.4.5, “Definition of Positions in Multi-Well Racks and Plates.” • Manually entering sample information, refer to the Tecan HID EVOlution™ – qPCR/STR Setup System Application Manual, Section 5.3 “Running a Script.” • Barcode specifications for use on the Freedom EVO instrument, refer to the Tecan Freedom EVO® Operating Manual, Section 3.5.6, “Positive Identification (PosID)” and the Tecan HID EVOlution™ – qPCR/STR Setup System Application Manual, Section 4.6 “Barcodes.” HID EVOlution™ - qPCR/STR Setup System Getting Started Guide 21 2 22 Chapter 2 Pre-Run Procedures For more information HID EVOlution™ - qPCR/STR Setup System Getting Started Guide Chapter 3 3 #HAPTER The HID EVOlution™ qPCR/STR Setup System Prepare qPCR Reagents and Labware This chapter provides procedures to prepare reagents, labware, and the Tecan Freedom EVO workstation for quantitative PCR (qPCR) reaction setup. ■ Review pre-run checklist for qPCR reaction setup. . . . . . . . . . . . . . . . . . . . . . . 24 ■ Set up reagents . . . . . . . . . . . . . . . . . . . . . . . . . . . . . . . . . . . . . . . . . . . . . . . . . . 25 About minimum required reagent volumes . . . . . . . . . . . . . . . . . . . . . . . . . . . . 25 #HAPTER Pre-Run Procedures Determine required reagent volumes . . . . . . . . . . . . . . . . . . . . . . . . . . . . . . . . . 26 Place reagents in the qPCR reagent block . . . . . . . . . . . . . . . . . . . . . . . . . . . . . 29 ■ Set up the labware on the worktable . . . . . . . . . . . . . . . . . . . . . . . . . . . . . . . . . . 30 #HAPTER Prepare qPCR Reagents and Labware #HAPTER Run Automated qPCR Setup #HAPTER Perform qPCR and Review Results #HAPTER Prepare STR PCR Reagents and Labware #HAPTER Run Automated STR PCR Setup #HAPTER Perform STR PCR and Set Up Capillary Electrophoresis HID EVOlution™ - qPCR/STR Setup System Getting Started Guide 23 3 Chapter 3 Prepare qPCR Reagents and Labware Review pre-run checklist for qPCR reaction setup Review pre-run checklist for qPCR reaction setup Cool the qPCR reagent block to 4 °C before use to help keep reagents cool on the worktable. It is recommended, when not in use, that you store reagent blocks in a refrigerator at 4 °C. (Optional) Create a qPCR/STR Sample file that you can use to import sample information during the qPCR and STR PCR setup runs, as described in “Create a qPCR/STR Sample file” on page 18. If you want the HID EVOlution™ - qPCR/STR Setup System to prepare DNA standards, prepare the T10E0.1 buffer (10 mM Tris-HCl [pH 8.0] and 0.1 mM Na2EDTA) according to the directions in the Quantifiler® Kits User’s Manual. IMPORTANT! Glycogen was not used during the Applied Biosystems validation study. If you intend to use glycogen, perform your own validation studies to evaluate the liquid handling performance. Assemble the materials you will use. See “Required instruments, software, and materials” on page 6 for a complete list of materials and sources. • Extracted DNA samples as described in “Set up extracted DNA samples in a 96-well plate” on page 14 or “Set up extracted DNA samples in tubes” on page 15 • Reagents: – Quantifiler® Human DNA Quantification Kit and/or Quantifiler® Y Human Male DNA Quantification Kit – T10E0.1 buffer (10 mM Tris-HCl [pH 8.0] and 0.1 mM Na2EDTA) – Degassed deionized water (system liquid), 3000 mL per run • Plasticware: – A MicroAmp® Optical 96-Well Reaction Plate (used as the qPCR reaction plate) – If you want the HID EVOlution™ - qPCR/STR Setup System to prepare DNA standards, eight labeled 1.5-mL tubes (PN AM12400 or equivalent) for DNA standards (16 tubes for combined setups) – One 5-mL VWR tube for the Quantifiler® kit master mix (2 tubes for combined setups) – One-half tray of 200-µL DiTis (for 96 reactions) – One and one-half trays of 50-µL DiTis (for 96 reactions) • HID EVOlution™ - qPCR/STR Setup System-specific carriers: – Two 96-well metal microplate/plate adapters – Up to five 16-position tube carriers with vertical cap storage (if extracted DNA samples are in tubes) • (Optional) Barcodes for DNA sample plate or tubes and qPCR reaction plate Make a list of the lot numbers and expiration dates of the Quantifiler® kit components that will be used in the run for entry into the HID EVOlution™ - qPCR/STR Setup System software. Set up the carriers and racks according to the Tecan HID EVOlution™ – qPCR/STR Setup System Application Manual, Section 4.3.3, “Set Up Carriers and Racks.” Start up the system and perform routine maintenance, including running the appropriate maintenance scripts, according to the Tecan HID EVOlution™ – qPCR/STR Setup System Application Manual, Section 4.3.2, “Prepare the Instrument,” section 5.1 “Starting the System,” and “Before each run: Run maintenance scripts” on page 12 in this guide. Determine the amount of reagents and place the reagents and DNA standard dilution series (if previously prepared) in the reagent block as described in “Set up reagents” on page 25. Place the reagents, labware, and samples on the worktable as described in “Set up the labware on the worktable” on page 30. 24 HID EVOlution™ - qPCR/STR Setup System Getting Started Guide Chapter 3 Prepare qPCR Reagents and Labware Set up reagents 3 Set up reagents About minimum required reagent volumes The tables on page 26 through page 28 list the minimum required reagent volumes for each kit. The volumes in the tables include: • The volume of reagent that will be added to each reaction in the qPCR reaction plate. • Excess volume required per sample and per run necessary to compensate for evaporation and pipetting losses during the run. • Excess volume (dead volume) required per tube (50 µL) or trough (5 mL) on the worktable necessary to ensure that the pipette tips remain submerged during aspiration so that liquid, not air, enters the tips. • For the Quantifiler® Primer Mix and PCR Reaction Mix, the volume required per tube to ensure that the instrument detects adequate volume to prepare the selected number of reactions. For these reagents, the instrument aspirates 190 µL at a time. In order for the instrument to detect reagent in a tube, the tube must contain a minimum of 240 µL (this is 190 µL plus a 50-µL dead volume). When the reagent volume falls below 240 µL, the instrument is likely to determine that the liquid level is too low for successful aspiration. If the instrument determines that the liquid level is too low, the instrument then looks for a sufficient volume in the next available tube of the same reagent (if available) or pauses the run and displays the error message “Not enough liquid.” HID EVOlution™ - qPCR/STR Setup System Getting Started Guide 25 3 Chapter 3 Prepare qPCR Reagents and Labware Set up reagents Use the following procedure to determine the amount of Quantifiler® kit reagents and T10E0.1 buffer that you need to prepare for the run. Determine required reagent volumes Note: Applied Biosystems recommends that you combine reagents from different tubes from the same lot if necessary to meet the minimum volume requirements. If you want to: • Use a DNA standard dilution series that was prepared in the last two weeks – Start with step 1 below. • Let the HID EVOlution™ system prepare the DNA standard dilution series for you – Start with step 2 on page 27. 1. (Optional) If you want to use a pre-prepared DNA standard dilution series, determine if the series meets the following requirements: • The series must have been prepared in the last two weeks • The series must have been prepared according to the procedures specified in the appropriate Quantifiler® Kits User’s Manual • You must have the required volumes of the pre-prepared DNA standard dilutions shown in the table: Required Volumes for Pre-Prepared DNA Standard Dilution Series Type of qPCR reaction plate Required Volume Plate prepared with EITHER Quantifiler® Human or Quantifiler® Y Human Male Quantification Kit 60 µL of each of the eight concentrations of diluted standard. Note: This includes the required overfill volume. Note: Two replicates of the eight concentrations in the DNA standard dilution series are transferred to the qPCR reaction plate for a total of 16 DNA standard dilution series samples. Plate prepared with BOTH Quantifiler® Human and Quantifiler® Y Human Male Quantification Kit You need two pre-prepared DNA standard dilution series, one for each kit. For each of the two DNA standard dilution series, you need 60 µL of each of the eight concentrations of diluted standard. Note: This includes the required overfill volume. Note: Two replicates of the eight concentrations in the DNA standard dilution series are transferred to the qPCR reaction plate for each of the two DNA standard dilution series for a total of 32 DNA standard dilution series samples. If the pre-prepared DNA standard dilution series does not meet the requirements, then let the HID EVOlution™ system prepare the DNA standard dilution series for you using the standard and TE buffer volumes shown in step 2 on page 27. 26 HID EVOlution™ - qPCR/STR Setup System Getting Started Guide Chapter 3 Prepare qPCR Reagents and Labware Set up reagents 3 2. If the HID EVOlution™ system is preparing the DNA standard dilution series, use the table below to determine the required volume of undiluted Quantifiler® Human DNA Standard and T10E0.1 buffer. Required Volumes for HID EVOlution™ system-Prepared DNA Standard Dilution Series Available volume in full tube of reagent Minimum volume ‡ required on worktable 120 µL 100 µL To prepare a reaction plate using EITHER the Quantifiler® Human or Quantifiler® Y Human Male Quantification Kit NA 6 mL in trough To prepare a reaction plate with BOTH the Quantifiler® Human and Quantifiler® Y Human Male Quantification Kits NA 7 mL in trough Reagent Undiluted Quantifiler® Human DNA Standard T10E0.1 buffer in trough ‡ Includes 50 µL dead volume per tube and 5 mL per trough necessary to ensure that the pipette tips remain submerged during aspiration so that liquid, not air, enters the tips. 3. Calculate the required volume of Quantifiler® kit reagents using the Table 6 or Table 7 on page 28. IMPORTANT! To obtain the required volume of primer mix, you can place up to 3 tubes of primer mix in the reagent block for one run. If you divide the minimum required volume of primer mix across 2 or 3 tubes, each tube must contain a multiple of 190 µL plus an additional 50 µL per tube to ensure that the instrument detects adequate volume to prepare the selected number of reactions. See “About minimum required reagent volumes” on page 25. HID EVOlution™ - qPCR/STR Setup System Getting Started Guide 27 Quantifiler® PCR Reaction Mix Diluted Standard Samples per Run Required Excess Reactions per Run Required Dead Volume ‡ per Tube A B C D E 1.4 mL 11.55 µL up to 80 16 3 50 µL 1194 § µL in one tube # 5 mL 13.75 µL up to 80 16 3 50 µL 1412 ‡‡ µL in one tube Minimum Required Volume for 80 extracted DNA samples and 16 diluted standards = [A × (B + C + D)] + E ‡ A 50-µL dead volume per tube is necessary to ensure that the pipette tips remain submerged during aspiration so that liquid, not air, enters the tips. § [11.55 µL/reaction × (80 + 16 + 3 reactions)] + 50 µL/tube = 1193.45 µL in one tube # If you divide the minimum volume of Primer Mix across multiple tubes, each tube must contain a multiple of 190 µL plus an additional 50 µL per tube to ensure that the instrument detects adequate volume to prepare the selected number of reactions. For example, place at least 1000 µL in the first tube and 240 µL in the second tube. ‡‡ [13.75 µL/reaction × (80 + 16 + 3 reactions)] + 50 µL/tube = 1411.25 µL in one tube Table 7 Reagent volumes for a combined qPCR reaction setup using both the Quantifiler® Human and Y Human Male Quantification Kits in one qPCR reaction plate (25-µL reaction volume). HID EVOlution™ - qPCR/STR Setup System Getting Started Guide Reagent Available Volume in Full Tube of Reagent Required Volume per Reaction Extracted DNA Samples per Run Diluted Standard Samples per Run Required Excess Reactions per Run Required Dead Volume ‡ per Tube A B C D E Minimum Required Volume for 32 extracted DNA samples and 32 diluted standards = [A × (B + C + D)] + E Quantifiler® Human Primer Mix 1.4 mL 11.55 µL up to 32 16 3 50 µL 639 µL in one tube § Quantifiler® Y Human Male Primer Mix 1.4 mL 11.55 µL up to 32 16 3 50 µL 639 µL in one tube Quantifiler® PCR Reaction Mix (for preparing Quantifiler Human reactions) 5 mL 13.75 µL up to 32 16 3 50 µL 752 µL in one tube Quantifiler® PCR Reaction Mix (for preparing Quantifiler Y Human Male reactions) 5 mL 13.75 µL up to 32 16 3 50 µL 752 µL in one tube ‡ A 50-µL dead volume per tube is necessary to ensure that the pipette tips remain submerged during aspiration so that liquid, not air, enters the tips. § If you divide the volume of Primer Mix across multiple tubes, each tube must contain a multiple of 190 µL plus an additional 50 µL per tube to ensure that the instrument detects adequate volume to prepare the selected number of reactions. Set up reagents Quantifiler® Human or Y Human Male Primer Mix Extracted DNA Samples per Run Chapter 3 Prepare qPCR Reagents and Labware Reagent Required Volume per Reaction Available Volume in Full Tube of Reagent 3 28 Table 6 Reagent volumes for qPCR reaction setup with either the Quantifiler® Human or Y Human Male Quantification Kit (25-µL reaction volume). Chapter 3 Prepare qPCR Reagents and Labware Set up reagents Place reagents in the qPCR reagent block 3 Use the following procedure to place the Quantifiler® kit reagents into the correct positions in the chilled qPCR reagent block. 1. Thaw reagents, mix and centrifuge according to the Quantifiler® Kits User’s Manual. 2. If you are using a previously-prepared DNA standard dilution series, vortex and briefly centrifuge the DNA standard dilutions at low speed before use. 3. Select the appropriate reagent block setup from the following table, then use the appropriate figure to place the reagents and labeled empty tubes in the reagent block. IMPORTANT! If you are using a pre-prepared DNA standard dilution series, make sure to place each concentration in the correct location in the reagent block. If you are using... The Quantifiler® Human kit The Quantifiler® Y Human Male kit Both the Quantifiler® Human and Y Human Male kits And the DNA standards... Set up the reagent block according to... Are pre-prepared Figure 8 on page 76 Will be prepared by the HID EVOlution™ system Figure 9 on page 77 Are pre-prepared Figure 10 on page 78 Will be prepared by the HID EVOlution™ system Figure 11 on page 79 Are pre-prepared Figure 12 on page 80 Will be prepared by the HID EVOlution™ system Figure 13 on page 81 HID EVOlution™ - qPCR/STR Setup System Getting Started Guide 29 3 Chapter 3 Prepare qPCR Reagents and Labware Set up the labware on the worktable Set up the labware on the worktable After loading the reagent block, use the following procedure to place the reagent block, PCR reaction plate, trough, disposable pipette tips (DiTis), and samples on the worktable. Use Figure 2 on page 32 as a guide. CAUTION! For important safety information related to the use of the Tecan Freedom EVO instrument, refer to the manufacturer's instrument documentation. 1. Set up the DiTis as described in the Tecan HID EVOlutionTM - qPCR/STR Setup System Application Manual, Section 4.3.5, “Set Up Plasticware and Samples on the Workstation.” IMPORTANT! If the DiTi trays are not correctly set up in the two carriers, for example if the 50-µL DiTis are placed in the 200-µL DiTis position, the LiHa may crash or pipetting errors may result. If there are no DiTis where the software expects them, the run will pause until you replenish the DiTis. During this pause, the samples may become unstable. To prevent this from occurring, use full DiTi trays, and run the script: Set_DiTi_Position_200 or Set_DiTi_Position_50 to set all DiTis to position 1. 2. Confirm that you have correctly loaded the reagent block (see “Place reagents in the qPCR reagent block” on page 29), remove the caps from the prepared reagents, then place the loaded reagent block on grid 15, site position 1. 3. If the HID EVOlution™ system is preparing the DNA standards, place 6 mL (Human or Y Human Male) or 7 mL (Human and Y Human Male) of T10E0.1 buffer into a 100-mL trough (see Figure 2, item 7), then place the trough on grid 14, site position 2. 30 HID EVOlution™ - qPCR/STR Setup System Getting Started Guide Chapter 3 Prepare qPCR Reagents and Labware Set up the labware on the worktable 3 4. Place an empty MicroAmp® Optical 96-Well Reaction Plate (for the qPCR reactions) into the metal plate adapter with well A1 in the top left corner on grid 21, site position 1 (see Figure 2, item 9). Reaction plate well 1 (A1) Reaction plate notch IMPORTANT! To ensure that samples are transferred to the correct wells, confirm that: • The reaction plate is placed in the metal plate adapter • The reaction plate wells are aligned with the holes in the metal plate adapter • Well A1 is positioned in the upper left corner 5. Ensure that the extracted DNA is in either a 96-well plate or in 1.5-mL tubes before setting up the samples on the worktable for qPCR setup. For instructions, see “Set up extracted DNA samples in a 96-well plate” on page 14 or “Set up extracted DNA samples in tubes” on page 15. 6. If the extracted DNA is in a plate, place the extracted DNA sample plate into the metal plate adapter on the worktable in grid 21, site position 3, with well A1 in the top left corner. Reaction plate well 1 (A1) Reaction plate notch IMPORTANT! Confirm that: • The reaction plate is placed in the metal plate adapter • The reaction plate wells are aligned with the holes in the metal plate adapter • Well A1 is positioned in the upper left corner HID EVOlution™ - qPCR/STR Setup System Getting Started Guide 31 3 Chapter 3 Prepare qPCR Reagents and Labware Set up the labware on the worktable 11 1 4 Site number 2 2 5 Site number 3 3 6 8 Site number 1 9 7 10 S1 S2 S3 S4 S5 Grid numbers 1 2 3 4 5 6 7 8 9 10 11 12 13 14 15 16 17 18 19 20 21 22 23 24 25 26 27 28 29 30 31 32 Figure 2 Tecan Freedom EVO® workstation (worktable) layout for a qPCR setup run. Locations for DNA samples in both a plate and tubes are shown. Note: Locations for DNA samples in both plate and tubes are shown, but only one type of plasticware for extracted DNA can be placed on the workstation for a given run. 1–2. 200-µL disposable pipette tips (DiTis) 3–6. 50-µL DiTis 7. Trough for T10E0.1 buffer 8. Chilled qPCR Reagent Block 9. MicroAmp® Optical 96-Well Reaction Plate (qPCR reaction plate) with 96-well metal plate adapter 10. MicroAmp® Optical 96-Well Reaction Plate (if extracted DNA samples are in a plate) with 96-well metal plate adapter 11. Tube racks S1 through S5 for DNA sample tubes (if extracted DNA samples are in tubes) 32 HID EVOlution™ - qPCR/STR Setup System Getting Started Guide Chapter 4 4 #HAPTER The HID EVOlution™ qPCR/STR Setup System Run Automated qPCR Setup This chapter provides procedures for performing a qPCR reaction setup run. ■ Run a qPCR setup script . . . . . . . . . . . . . . . . . . . . . . . . . . . . . . . . . . . . . . . . . . . 34 About script files . . . . . . . . . . . . . . . . . . . . . . . . . . . . . . . . . . . . . . . . . . . . . . . . 34 Run a script . . . . . . . . . . . . . . . . . . . . . . . . . . . . . . . . . . . . . . . . . . . . . . . . . . . . . 34 #HAPTER Pre-Run Procedures ■ Perform post-run tasks . . . . . . . . . . . . . . . . . . . . . . . . . . . . . . . . . . . . . . . . . . . . 35 Take care of the qPCR reaction plate . . . . . . . . . . . . . . . . . . . . . . . . . . . . . . . . . 35 Clean up the instrument . . . . . . . . . . . . . . . . . . . . . . . . . . . . . . . . . . . . . . . . . . . 35 ■ About the qPCR reaction plate layout. . . . . . . . . . . . . . . . . . . . . . . . . . . . . . . . . 36 ■ For more information . . . . . . . . . . . . . . . . . . . . . . . . . . . . . . . . . . . . . . . . . . . . . 37 #HAPTER Prepare qPCR Reagents and Labware #HAPTER Run Automated qPCR Setup #HAPTER Perform qPCR and Review Results #HAPTER Prepare STR PCR Reagents and Labware #HAPTER Run Automated STR PCR Setup #HAPTER Perform STR PCR and Set Up Capillary Electrophoresis HID EVOlution™ - qPCR/STR Setup System Getting Started Guide 33 4 Chapter 4 Run Automated qPCR Setup Run a qPCR setup script Run a qPCR setup script About script files Run a script To begin automated qPCR or STR PCR reaction setup on the HID EVOlution™ qPCR/STR Setup System, you must run a script. Scripts contain the workflow instructions defined for a specific instrument type (the Freedom EVO® 150 and 200 instrument), worktable configuration, and Freedom EVOware® software version to automate a specific procedure. For example, there are six scripts available to set up qPCR reaction plates using the HID EVOlution™ system (see table below) and 14 scripts available to set up a STR PCR reaction plate (see “Run STR PCR setup” on page 58). After performing all tasks, including maintenance, in the “Review pre-run checklist for qPCR reaction setup” on page 24, use the following procedure to begin automated qPCR reaction setup: 1. Select the appropriate EVOware software script for the Quantifiler® kit(s) and plasticware that you are using: Freedom EVOware® software script selection for qPCR reaction setup If you are using the kit(s)... Quantifiler® Human Kit Quantifiler® Y Human Male Kit Quantifiler® Human AND Y Human Male Kits and the sample DNA is in... ...use the script Maximum number of extracted DNA samples per run a 96-well plate QuantifilerHuman_plate.esc 80 1.5-mL microcentrifuge tubes QuantifilerHuman_tubes.esc 80 a 96-well plate QuantifilerY_plate.esc 80 1.5-mL microcentrifuge tubes QuantifilerY_tubes.esc 80 a 96-well plate QuantifilerHumanY_plate.esc 1.5-mL microcentrifuge tubes QuantifilerHumanY_tubes.esc 32 total ‡ ‡ Two reactions are prepared for each of the 32 extracted DNA samples: one reaction is prepared using the Quantifiler® Human kit reagents, and one reaction is prepared using the Quantifiler® Y Human Male kit reagents. 2. Follow the directions in the Tecan HID EVOlution™ – qPCR/STR Setup System Application Manual, Section 5.3.1, “Running a Quantifiler Script.” IMPORTANT! If you want the HID EVOlution™ - qPCR/STR Setup System to prepare the DNA standard dilution series, make sure to select the Prepare Standards checkbox in the Reagent Information window of the script. 34 HID EVOlution™ - qPCR/STR Setup System Getting Started Guide Chapter 4 Run Automated qPCR Setup Perform post-run tasks 4 Perform post-run tasks Take care of the qPCR reaction plate 1. Remove the prepared qPCR reaction plate containing the qPCR reactions from the worktable. 2. Seal the qPCR reaction plate with MicroAmp® Optical Adhesive Film (PN 4311971). 3. Place the qPCR reaction plate in a table-top centrifuge with plate holders, then centrifuge the plate at 3000 rpm for approximately 20 seconds to remove any air bubbles. Clean up the instrument 1. Remove the TE buffer trough, and dispose of any remaining TE buffer. If it is the last run of the day, dispose of the TE buffer trough. IMPORTANT! Do not reuse the reagents in the troughs. See “Waste disposal” on page 144. 2. Follow the instructions in the Tecan HID EVOlutionTM - qPCR/STR Setup System Application Manual, Section 5.3.1, “After Run” on page 87. HID EVOlution™ - qPCR/STR Setup System Getting Started Guide 35 4 Chapter 4 Run Automated qPCR Setup About the qPCR reaction plate layout About the qPCR reaction plate layout Regardless of the extracted DNA sample setup, the qPCR reaction plate is always set up in the same way: the sample from the first position in the extracted DNA sample plate or first extracted DNA sample tube is always placed in well A3 of the qPCR reaction plate. The DNA standard dilution series reactions are placed in columns 1 and 2. See Figure 3. In combined qPCR reaction plates, the first Quantifiler® Human sample reaction is placed in well A3 and the first Quantifiler® Y Human Male sample reaction is placed in well A9. The DNA standard dilution series reactions are placed in columns 1, 2, 7, and 8. See Figure 4 on page 37. At the end of a qPCR reaction setup run, the HID EVOlution™ - qPCR/STR Setup System generates a report that lists the position of each DNA sample in the extracted DNA sample plate or tubes and in the qPCR reaction plate. Figure 3 Plate layout for Quantifiler® Human or Quantifiler® Y Human Male kits. Eight DNA standards, in duplicate, are placed in columns 1 and 2. 36 HID EVOlution™ - qPCR/STR Setup System Getting Started Guide Chapter 4 Run Automated qPCR Setup For more information 4 Figure 4 Plate layout for a combined setup using both Quantifiler® Human and Quantifiler® Y Human Male kits. Eight DNA standards, in duplicate, are placed in columns 1 and 2 (Human kit) and in columns 7 and 8 (Y Human Male kit). For more information For information on: • Running quantification scripts, see the Tecan HID EVOlution™ – qPCR/STR Setup System Application Manual, Section 5.3.1, “Running a Quantifiler Script.” • How to import sample files, see the Tecan HID EVOlution™ - qPCR/STR Setup System Application Manual, Section 5.3.1, “Running a Quantifiler Script.” • Script error messages, see the Tecan HID EVOlution™ – qPCR/STR Setup System Application Manual, Section 8.4 “Application Software.” • The EVOware® software, see the Tecan EVOware® Standard/EVOware® Plus 2.1 Software Manual and Tecan EVOware® Standard/EVOware® Plus 2.1 Software Getting Started Guide. • The qPCR Samples Report, see the Tecan HID EVOlution™ – qPCR/STR Setup System Application Manual, Section 5.3.1, “Running a Quantifiler Script,” and Section 6, “Results.” HID EVOlution™ - qPCR/STR Setup System Getting Started Guide 37 4 38 Chapter 4 Run Automated qPCR Setup For more information HID EVOlution™ - qPCR/STR Setup System Getting Started Guide Chapter 5 5 #HAPTER The HID EVOlution™ qPCR/STR Setup System Perform qPCR and Review Results This chapter explains where to get relevant information to perform qPCR and review the results. ■ About the 7500 Setup file. . . . . . . . . . . . . . . . . . . . . . . . . . . . . . . . . . . . . . . . . . 40 ■ Transfer and import the 7500 Setup file . . . . . . . . . . . . . . . . . . . . . . . . . . . . . . . 41 ■ Perform qPCR. . . . . . . . . . . . . . . . . . . . . . . . . . . . . . . . . . . . . . . . . . . . . . . . . . . 42 #HAPTER Pre-Run Procedures ■ Analyze and export the qPCR results . . . . . . . . . . . . . . . . . . . . . . . . . . . . . . . . . 42 ■ For more information . . . . . . . . . . . . . . . . . . . . . . . . . . . . . . . . . . . . . . . . . . . . . 43 #HAPTER Prepare qPCR Reagents and Labware #HAPTER Run Automated qPCR Setup #HAPTER Perform qPCR and Review Results #HAPTER Prepare STR PCR Reagents and Labware #HAPTER Run Automated STR PCR Setup #HAPTER Perform STR PCR and Set Up Capillary Electrophoresis HID EVOlution™ - qPCR/STR Setup System Getting Started Guide 39 5 Chapter 5 Perform qPCR and Review Results About the 7500 Setup file About the 7500 Setup file The HID EVOlution™ - qPCR/STR Setup System software generates a 7500 Setup file for each run. The file contains sample information that you can import to an SDS software plate document for the qPCR run on the 7500 Real-Time PCR instrument. By default, the HID EVOlution™ - qPCR/STR Setup System names the 7500 Setup file “ReactionPlate1.txt” or “<barcode>.txt” and saves the file to the C:\ HIDEVOlution_qPCRSTRfiles folder. The HID EVOlution™ system automatically archives the 7500 Setup file in the C:\HIDEVOlution_qPCRSTRfiles\Archive folder when you start the next qPCR or STR PCR setup run. If necessary, create shortcuts on your desktop to the C:\HIDEVOlution_qPCRSTRfiles and C:\HIDEVOlution_qPCRSTRfiles\Archive folders. 40 HID EVOlution™ - qPCR/STR Setup System Getting Started Guide Chapter 5 Perform qPCR and Review Results Transfer and import the 7500 Setup file 5 Transfer and import the 7500 Setup file IMPORTANT! To successfully import the 7500 Setup file to the SDS software, the detector names created in the SDS software must match those in the 7500 Setup file. See “Create detectors for the 7500 Real-Time PCR System” on page 10. 1. Transfer the 7500 Setup file (generated by the HID EVOlution™ system at the end of the qPCR reaction setup run) to the SDS software computer: a. On the HID EVOlution system, navigate to the C:\ HIDEVOlution_qPCRSTRfiles folder, then locate the file (ReactionPlate1.txt or <barcode>.txt). b. (Optional) Rename the file. c. Copy and transfer the ReactionPlate1.txt (or <barcode>.txt) file to a location where it can be accessed by the SDS software computer. 2. Start the 7500 Real-Time PCR System and SDS Software: a. Start the computer. b. Power on the 7500 instrument. c. Start the SDS Software. Note: For more information on starting the 7500 Real-Time PCR System and software, refer to the Applied Biosystems 7300/7500/7500 Fast Real-Time PCR System Installation and Maintenance Guide. 3. Import the 7500 Setup file into the Applied Biosystems 7500 SDS Software plate document for use during the quantitation run as follows: a. In the SDS software, select FileNew to create a new Standard Curve (Absolute Quantitation) plate document, then in the new document wizard select Finish. b. With a blank plate document open, select FileImport Sample Set Up. c. Browse to locate the 7500 Setup file, select the file (ReactionPlate1.txt or <barcode>.txt), then click Open. d. Modify the instrument protocol: Delete the Stage 1 hold step (50 °C for 2 minutes) and change the Sample Volume to 25. HID EVOlution™ - qPCR/STR Setup System Getting Started Guide 41 5 Chapter 5 Perform qPCR and Review Results Perform qPCR 4. Save the plate document: a. Select FileSave As. b. In the Save as dialog box: • Enter a file name in the File name field. Do not add an extension to the file name. • Select SDS Document (*.sds) from the Save as type drop-down list. • Click Save. Perform qPCR Perform qPCR as described in the Applied Biosystems Quantifiler® Kits User’s Manual. Analyze and export the qPCR results When the qPCR run is complete, use the following procedures to: • Analyze and review the qPCR results • Export the 7500 Results file 1. Analyze and review the 7500 results: a. In the SDS software, click Analyze. b. Omit any blank samples. c. Review the standard curve to ensure that results are within the recommended range (see the Quantifiler® Kits User’s Manual). If necessary, omit standard outliers, then click Analyze to recalculate the standard curve. d. Review the quantitation data, including the IPC CT, and consider the condition of the original sample to determine if any samples require additional processing before STR PCR reaction setup. 2. When you are done analyzing the results in the SDS software, export the 7500 Results file and copy to the HID EVOlution™ system computer: a. In the SDS software, select FileExportResults. b. Navigate to the desired location on your hard drive. c. Type a name for the exported file. d. Select the export type (.csv). 42 HID EVOlution™ - qPCR/STR Setup System Getting Started Guide Chapter 5 Perform qPCR and Review Results For more information 5 e. Save the file. f. Copy the file to the computer where the EVOware™ Software is installed, or to a server that can be accessed from both systems. Note: During STR PCR reaction setup, you import the sample information in the 7500 Results file to the HID EVOlution™ - qPCR/STR Setup System. The EVOware uses the information in the 7500 Results file to set up sample information and to help normalize the DNA input amount for STR PCR reaction setup on the HID EVOlution™ - qPCR/STR Setup System. For more information For information on: • The standard curve, refer to the ABI PRISM® 7000 Sequence Detection System User Guide, Quantifiler® Kits User’s Manual, and the Applied Biosystems 7300/7500/7500 Fast Real-Time PCR System Absolute Quantification Getting Started Guide. • Quantitation, see the Applied Biosystems Quantifiler® Kits User’s Manual. • The 7500 Results file, see the Applied Biosystems 7300/7500/7500 Fast RealTime PCR System Absolute Quantitation Using Standard Curve Getting Started Guide. • Setting up a plate document and plate document template, see the Applied Biosystems Quantifiler® Kits User’s Manual. HID EVOlution™ - qPCR/STR Setup System Getting Started Guide 43 5 44 Chapter 5 Perform qPCR and Review Results For more information HID EVOlution™ - qPCR/STR Setup System Getting Started Guide Chapter 6 6 #HAPTER The HID EVOlution™ qPCR/STR Setup System Prepare STR PCR Reagents and Labware This chapter provides procedures to prepare reagents and labware for STR PCR amplification reaction setup. ■ Review pre-run checklist for STR PCR reaction setup . . . . . . . . . . . . . . . . . . . 46 ■ Determine reagent volumes . . . . . . . . . . . . . . . . . . . . . . . . . . . . . . . . . . . . . . . . 47 About minimum required reagent volumes . . . . . . . . . . . . . . . . . . . . . . . . . . . . 47 #HAPTER Pre-Run Procedures Reagent volume tables . . . . . . . . . . . . . . . . . . . . . . . . . . . . . . . . . . . . . . . . . . . . 47 ■ Set up reagents . . . . . . . . . . . . . . . . . . . . . . . . . . . . . . . . . . . . . . . . . . . . . . . . . . 52 ■ Set up the labware on the worktable . . . . . . . . . . . . . . . . . . . . . . . . . . . . . . . . . . 54 #HAPTER Prepare qPCR Reagents and Labware #HAPTER Run Automated qPCR Setup #HAPTER Perform qPCR and Review Results #HAPTER Prepare STR PCR Reagents and Labware #HAPTER Run Automated STR PCR Setup #HAPTER Perform STR PCR and Set Up Capillary Electrophoresis HID EVOlution™ - qPCR/STR Setup System Getting Started Guide 45 6 Chapter 6 Prepare STR PCR Reagents and Labware Review pre-run checklist for STR PCR reaction setup Review pre-run checklist for STR PCR reaction setup Cool the STR PCR reagent block to 4 °C before use to help keep reagents cool on the worktable. It is recommended, when not in use, that you store reagent blocks in a refrigerator at 4 °C. (Optional) Locate the qPCR/STR Sample file (the .csv sample file that you created and used in qPCR reaction setup), or (Optional) Create a qPCR/STR Sample file that you can use to import sample information during the run, as described in “Create a qPCR/STR Sample file” on page 18. Confirm that the 7500 Results file(s) that you want to use are in .csv format and in a location where the file(s) can be imported to the HID EVOlution™ - qPCR/STR Setup System software. See “Analyze and export the qPCR results” on page 42. Assemble the materials you will use. See “Required instruments, software, and materials” on page 6 for a complete list of materials and sources. • Extracted DNA samples. Use the plate or tubes containing extracted DNA samples that you prepared and processed in the associated qPCR reaction setup run. See “Set up extracted DNA samples in a 96-well plate” on page 14 or “Set up extracted DNA samples in tubes” on page 15. • Reagents: – Applied Biosystems AmpFlSTR® kit – T10E0.1 buffer (10 mM Tris-HCl [pH 8.0] and 0.1 mM Na2EDTA). Refer to your specific AmpFlSTR® Kit User Guide for directions on buffer preparation. – Degassed deionized water (system liquid), 3000 mL per run • Plasticware: – A MicroAmp® Optical 96-Well Reaction Plate (to be used as the STR PCR reaction plate) – Two additional MicroAmp® Optical 96-Well Reaction Plates (to be used as pre-dilution plates) – One tray of 200-µL DiTis (for 96 reactions) – Three trays of 50-µL DiTis (for 96 reactions) • HID EVOlution™ - qPCR/STR Setup System carriers: – Four 96-well metal microplate/plate adapters – Up to six 16-position tube carriers with vertical cap storage (if extracted DNA samples are in tubes) • (Optional) Barcodes for DNA sample plate or tubes and STR PCR plate Make a list of the lot numbers and expiration dates of the AmpFlSTR® kit components that will be used in the run for entry into the HID EVOlution™ - qPCR/STR Setup System software. Set up the carriers and racks according to the Tecan HID EVOlution™ – qPCR/STR Setup System Application Manual, Section 4.3.3, “Set Up Carriers and Racks.” Start up the system and perform routine maintenance, including running the appropriate maintenance scripts, according to the Tecan HID EVOlution™ – qPCR/STR Setup System Application Manual, Section 4.3.2, “Prepare the Instrument,” section 5.1 “Starting the System,” and “Before each run: Run maintenance scripts” on page 12 in this guide. Determine the required volume of reagents for the run as described in “Determine reagent volumes” on page 47. Place the reagents in the reagent block as described in “Set up reagents” on page 52. Place the reagents, labware, and samples on the worktable as described in “Set up the labware on the worktable” on page 54. 46 HID EVOlution™ - qPCR/STR Setup System Getting Started Guide Chapter 6 Prepare STR PCR Reagents and Labware Determine reagent volumes 6 Determine reagent volumes About minimum required reagent volumes Tables 8 through 11 on pages 48 through 51 list the minimum required reagent volumes for each kit. The volumes in the tables include: Reagent volume tables Use the appropriate table below to determine the required volumes of reagents. For the: • The volume of reagent that will be added to each reaction in the STR PCR reaction plate. • Excess volume required per sample and per run necessary to compensate for evaporation and pipetting losses during the run. • Excess volume (dead volume) required per tube (50 µL) or trough (5 mL) on the worktable necessary to ensure that the pipette tips remain submerged during aspiration so that liquid, not air, enters the tips. • For the AmpFlSTR® Primer Set and PCR Reaction Mix or Master Mix, the volume required per tube to ensure that the instrument detects adequate volume to prepare the selected number of reactions. For these reagents, the instrument aspirates 190 µL at a time. In order for the instrument to detect reagent in a tube, the tube must contain a minimum of 240 µL (this is 190 µL plus a 50-µL dead volume). When the reagent volume falls below 240 µL, the instrument is likely to determine that the liquid level is too low for successful aspiration. If the instrument determines that the liquid level is too low, the instrument then looks for a sufficient volume in the next available tube of the same reagent (if available) or pauses the run and displays the error message “Not enough liquid.” • For the T10E0.1 buffer in the trough, the volume necessary to ensure adequate buffer for any dilution ratio required for sample normalization. • • • • Identifiler® kit, use Table 8 on page 48 Yfiler® kit, use Table 9 on page 49 MiniFiler™ and SEfiler Plus™ kits, use Table 10 on page 50 COfiler®, Profiler Plus®, and SGM Plus® kits, use Table 11 on page 51 Then prepare the reagents according to “Set up reagents” on page 52. HID EVOlution™ - qPCR/STR Setup System Getting Started Guide 47 1.1 mL Extracted DNA Samples per Run Control Samples per Run Required Excess Reactions per Run Required Dead Volume § per Tube A B C D E 6.05 µL up to 88 2 4 50 µL Minimum Required Volume for 88 Samples and 2 Controls [A × (B + C + D)] + E = 619 µL # AmpFlSTR® PCR Reaction Mix 1.1 mL 11.55 µL up to 88 2 4 50 µL [A × (B + C + D)] + E = 1136 µL ‡‡ in one tube §§ AmpliTaq Gold® DNA Polymerase 50 µL 100 µL combined in one tube ## for 1 to 88 samples plus 2 controls 100 µL combined in one tube## AmpFlSTR® Control DNA 9947A 300 µL 60 µL for 1 to 88 samples plus 2 controls 60 µL T10E0.1 buffer in reagent block NA 60 µL for 1 to 88 samples plus 2 controls 60 µL T10E0.1 buffer in trough NA 25 mL in trough for 1 to 88 samples plus 2 controls 25 mL in trough HID EVOlution™ - qPCR/STR Setup System Getting Started Guide ‡ Includes excess volume to compensate for evaporation and pipetting losses during the run. § A 50-µL dead volume per tube is necessary to ensure that the pipette tips remain submerged during aspiration so that liquid, not air, enters the tips. # [6.05 µL/reaction × (88 + 2 + 4 reactions)] + 50 µL/tube = 618.7 µL in one tube ‡‡ [11.55 µL/reaction × (88 + 2 + 4 reactions)] + 50 µL/tube = 1135.7 µL in one tube §§ If you divide the minimum volume of PCR Reaction Mix between two tubes, make sure that each tube contains a multiple of 190 µL plus an additional 50 µL per tube to ensure that the instrument detects adequate volume to prepare the selected number of reactions. For example, place at least 1000 µL in the first tube and 240 µL in the second tube. ## You must combine the volumes in two full 50-µL tubes in one tube. The tube containing the combined volume must be one of the original AmpliTaq Gold® DNA Polymerase tubes provided with the kit. Use of another type of tube can cause liquid detection errors. Determine reagent volumes AmpFlSTR® Primer Set Required Volume per Reaction ‡ Chapter 6 Prepare STR PCR Reagents and Labware Reagent Available Volume in Full Tube of Reagent 6 48 Table 8 Identifiler® kit reagent volumes (25-µL reaction volume for STR PCR amplification). Reagent AmpFlSTR® Yfiler® Primer Set Available Volume in Full Tube of Reagent 0.55 mL Required Volume per Reaction ‡ Extracted DNA Samples per Run Control Samples per Run Required Excess Reactions per Run Required Dead Volume § per Tube A B C D E 5.5 µL up to 87 3 3 50 µL Minimum Required Volume for 88 Samples and 2 Controls [A × (B + C + D)] + E = 562 µL # AmpFlSTR® Yfiler® PCR Reaction Mix 1.1 mL AmpliTaq Gold® DNA Polymerase 50 µL 100 µL combined in one tube ## for 1 to 87 samples plus 3 controls AmpFlSTR® Control DNA 9947A 25 µL 60 µL for 1 to 87 samples plus 3 controls 60 µL AmpFlSTR Control DNA 007 300 µL 60 µL for 1 to 87 samples plus 3 controls 60 µL T10E0.1 buffer in reagent block NA 60 µL for 1 to 87 samples plus 3 controls 60 µL T10E0.1 buffer in trough NA 25 mL in trough for 1 to 87 samples plus 3 controls ® 10.12 µL up to 87 3 3 50 µL [A × (B + C + D)] + E = 992 µL ‡‡ in one tube §§ 100 µL combined in one tube## 25 mL in trough ‡ Includes excess volume to compensate for evaporation and pipetting losses during the run. § A 50-µL dead volume per tube is necessary to ensure that the pipette tips remain submerged during aspiration so that liquid, not air, enters the tips. # [5.5 µL/reaction × (87 + 3 + 3 reactions)] + 50 µL/tube = 561.5 µL in one tube ‡‡ [10.12 µL/reaction × (87 + 3 + 3 reactions)] + 50 µL/tube = 991.16 µL in one tube §§ If you divide the minimum volume of PCR Reaction Mix between two tubes, make sure that each tube contains a multiple of 190 µL plus an additional 50 µL per tube to ensure that the instrument detects adequate volume to prepare the selected number of reactions. For example, place at least 810 µL in the first tube and 240 µL in the second tube. ## You must combine the volumes in two full 50-µL tubes in one tube. The tube containing the combined volume must be one of the original AmpliTaq Gold® DNA Polymerase tubes provided with the kit. Use of another type of tube can cause liquid detection errors. Determine reagent volumes Chapter 6 Prepare STR PCR Reagents and Labware HID EVOlution™ - qPCR/STR Setup System Getting Started Guide Table 9 Yfiler® kit reagent volumes (25-µL reaction volume for STR PCR amplification). 6 49 500 µL Extracted DNA Samples per Run Control Samples per Run Required Excess Reactions per Run Required Dead Volume § per Tube A B C D E 5.5 µL up to 88 2 4 50 µL Minimum Required Volume for 88 Samples and 2 Controls # [A × (B + C + D)] + E = 567 µL ‡‡ in one tube AmpFlSTR® Master Mix 500 µL 11 µL up to 88 2 4 50 µL [A × (B + C + D)] + E = 1084 µL §§ in one tube ## AmpFlSTR® Control DNA 007 300 µL 60 µL for 1 to 88 samples plus 2 controls 60 µL T10E0.1 buffer in reagent block NA 60 µL for 1 to 88 samples plus 2 controls 60 µL T10E0.1 buffer in trough NA 25 mL in trough for 1 to 88 samples plus 2 controls 25 mL in trough HID EVOlution™ - qPCR/STR Setup System Getting Started Guide ‡ Includes excess volume to compensate for evaporation and pipetting losses during the run. § A 50-µL dead volume per tube is necessary to ensure that the pipette tips remain submerged during aspiration so that liquid, not air, enters the tips. # If necessary, combine reagents from different tubes from the same lot to meet the minimum volume requirements. When ordering kits, you can request multiple kits from the same lot. ‡‡ [5.5 µL/reaction × (88 + 2 + 4 reactions)] + 50 µL/tube = 567 µL in one tube §§ [10.12 µL/reaction × (88 + 2 + 4 reactions)] + 50 µL/tube = 1084 µL in one tube ## If you divide the minimum volume of PCR Master Mix between two tubes, make sure that each tube contains a multiple of 190 µL plus an additional 50 µL per tube to ensure that the instrument detects adequate volume to prepare the selected number of reactions. For example, place at least 620 µL in the first tube and 515 µL in the second tube. Determine reagent volumes AmpFlSTR® Primer Set Required Volume per Reaction ‡ Chapter 6 Prepare STR PCR Reagents and Labware Reagent Available Volume in Full Tube of Reagent 6 50 Table 10 MiniFiler™ and SEfiler Plus™ kits reagent volumes (25-µL reaction volume for STR PCR amplification). Reagent AmpFlSTR® Primer Set Available Volume in Full Tube of Reagent 1.1 mL Required Volume per Reaction ‡ Extracted DNA Samples per Run Control Samples per Run Required Excess Reactions per Run Required Dead Volume § per Tube A B C D E 12.1 µL up to 88 2 0.4 50 µL Minimum Required Volume for 88 Samples and 2 Controls # [A × (B + C + D)] + E = 1144 µL ‡‡ AmpFlSTR® PCR Reaction Mix 1.1 mL 23.1 µL up to 88 2 0.4 50 µL [A × (B + C + D)] + E = 2139 µL §§ in one tube ## AmpliTaq Gold® DNA Polymerase 50 µL 100 µL combined in one tube ‡‡‡ for 1 to 88 samples plus 2 controls 100 µL combined in one tube‡‡‡ AmpFlSTR® Control DNA 9947A or 007 300 µL 70 µL for 1 to 88 samples plus 2 controls 70 µL T10E0.1 buffer in reagent block NA 70 µL for 1 to 88 samples plus 2 controls 70 µL T10E0.1 buffer in trough NA 30 mL in trough for 1 to 88 samples plus 2 controls 30 mL in trough ‡ Includes excess volume to compensate for evaporation and pipetting losses during the run. § A 50-µL dead volume per tube is necessary to ensure that the pipette tips remain submerged during aspiration so that liquid, not air, enters the tips. # If necessary, combine reagents from different tubes from the same lot to meet the minimum volume requirements. When ordering kits, you can request multiple kits from the same lot. ‡‡ [12.1 µL/reaction × (88 + 2 + 0.4 reactions)] + 50 µL/tube = 1143.84 µL in one tube §§ [23.1 µL/reaction × (88 + 2 + 0.4 reactions)] + 50 µL/tube = 2138.24 µL in one tube ## If you divide the minimum volume of PCR Reaction Mix between two tubes, make sure that each tube contains a multiple of 190 µL plus an additional 50 µL per tube to ensure that the instrument detects adequate volume to prepare the selected number of reactions. For example, place at least 1190 µL in the first tube and 1000 µL in the second tube. ‡‡‡You must combine the volumes in two full 50-µL tubes in one tube. The tube containing the combined volume must be one of the original AmpliTaq Gold® DNA Polymerase tubes provided with the kit. Use of another type of tube can cause liquid detection errors. Determine reagent volumes Chapter 6 Prepare STR PCR Reagents and Labware HID EVOlution™ - qPCR/STR Setup System Getting Started Guide Table 11 COfiler®/Profiler Plus®/SGM Plus® kits reagent volumes (50-µL reaction volume for STR PCR amplification). 6 51 6 Chapter 6 Prepare STR PCR Reagents and Labware Set up reagents Set up reagents After using the appropriate table (see “Determine reagent volumes” on page 47) to determine the amount of AmpFlSTR® kit reagents and T10E0.1 buffer that you need to prepare for the run, prepare the reagents and place the reagents in the chilled STR PCR reagent block as follows: 1. Thaw, mix, and centrifuge the reagents according to the procedures in the appropriate AmpFlSTR® PCR Amplification Kit User Guide. 2. For kits with tubes of AmpliTaq Gold® DNA Polymerase – To insure correct pipetting by the HID EVOlution™ system, spin down one full (50-µL) tube of the AmpliTaq Gold® DNA Polymerase, then pipette the entire volume into a second full tube of AmpliTaq Gold® DNA Polymerase from the same lot, for a final volume of 100 µL. IMPORTANT! The tube containing the combined volume must be one of the original AmpliTaq Gold® DNA Polymerase tubes provided with the kit. Use of another type of tube can cause liquid detection errors or cause the LiHa to crash. 3. If necessary, combine reagents from different tubes from the same lot to meet the minimum volume requirements. 4. Prepare the DNA control(s) as follows: a. If necessary to meet your laboratory target concentrations, dilute a portion of the control DNA with T10E0.1 buffer (10 mM Tris-HCl [pH 8.0] and 0.1 mM Na2EDTA) to meet the minimum required volume shown in the table: Note: For example, if you are using the MiniFiler™ kit and your control DNA target concentration is 0.05 ng/µL, combine 30 µL of control DNA (0.1 ng/µL) with 30 µL of low T10E0.1 buffer for a total volume of 60 µL. Note: The HID EVOlution™ - qPCR/STR Setup System does not dilute the control DNA, instead the system transfers a set volume (10 or 20 µL, depending on the kit) of control DNA to the reaction plate. AmpFlSTR® Kit Identifiler® and Yfiler® Kits MiniFiler™ ™ and SEfiler Plus Recommended Target Concentration for Control DNA (ng/µL) ‡ Minimum Required Volume of Diluted Control DNA (µL) § 0.1 ng/µL 60 0.05 ng/µL 60 0.1 ng/µL 70 Kits Profiler Plus® COfiler®, and SGM Plus® Kits ‡ This is the final recommended target concentration, based on Applied Biosystems developmental validation studies and instrumentation. § The minimum required volume is the volume required by the experiment (10 µL or 20 µL) plus a 50 µL dead volume. 52 HID EVOlution™ - qPCR/STR Setup System Getting Started Guide Chapter 6 Prepare STR PCR Reagents and Labware Set up reagents 6 b. Place the required volume of diluted control DNA in an empty original control DNA tube (with the narrow chamber and skirt) or another tube with the identical shape. IMPORTANT! For proper liquid detection the diluted control must be placed into a tube with an identical shape to the original control DNA tube. Using a 1.5 mL tube is not acceptable for proper liquid handling and no control will be transferred to the STR PCR reaction plate. 5. Select the appropriate reagent block setup from the following table, then use the appropriate figure to place the reagents and empty tubes in the correct positions in the chilled reagent block. Note: There is a 1.5-mL tube of T10E0.1 buffer placed in the Reagent block that is separate from the T10E0.1 buffer placed in a trough. See “Set up the labware on the worktable” on page 54 for instructions on placing the T10E0.1 buffer trough on the worktable. If you are using the following AmpFlSTR® PCR Amplification kit... COfiler® kit Set up the reagent block according to... Figure 14 on page 82 ® Identifiler kit Figure 15 on page 83 MiniFiler™ Figure 16 on page 84 Profiler kit Plus® kit Figure 17 on page 85 SEfiler Plus kit Figure 18 on page 86 Plus® Figure 19 on page 87 ™ SGM Yfiler® kit kit HID EVOlution™ - qPCR/STR Setup System Getting Started Guide Figure 20 on page 88 53 6 Chapter 6 Prepare STR PCR Reagents and Labware Set up the labware on the worktable Set up the labware on the worktable After loading the reagent block, use the following procedure to place the reagent block, STR PCR reaction plate, trough, disposable pipette tips (DiTis), and samples on the worktable. Use Figure 5 on page 56 as a guide. CAUTION! For important safety information related to the use of the Tecan Freedom EVO instrument, refer to the manufacturer's instrument documentation. 1. Set up the DiTis as described in the Tecan HID EVOlution™ – qPCR/STR Setup System Application Manual, Section 4.3.5., “Set Up Plasticware and Samples on the Workstation.” 2. Remove caps from the reagents, then place the loaded reagent block (Figure 5, item 8) on grid 15, site position 1 (See Tables 8 through 11 on pages 48 through 51 for correct volumes). 3. Place T10E0.1 buffer (for dilution of DNA samples) into a 100-mL trough (Figure 5, item 7), then place the trough on grid 14, site position 2 (See Tables 8 through 11 on pages 48 through 51 for correct volumes). 4. Place three empty MicroAmp® Optical 96-Well Reaction Plates into the metal plate adapter with well A1 in the top left corner (Figure 5, items 10-12) on: • Grid 15, site position 2 (pre-dilution plate) • Grid 21, site position 2 (pre-dilution plate) • Grid 21, site position 3 (STR PCR reaction plate) Reaction plate well 1 (A1) Reaction plate notch IMPORTANT! To ensure that samples are transferred to the correct wells, confirm for each plate that: • The plate is placed in the metal plate adapter • The plate wells are aligned with the holes in the metal plate adapter • Well A1 is positioned in the upper left corner 54 HID EVOlution™ - qPCR/STR Setup System Getting Started Guide Chapter 6 Prepare STR PCR Reagents and Labware Set up the labware on the worktable 6 5. Check the extracted DNA samples: a. Ensure that the extracted DNA is in either a 96-well plate or in 1.5-mL tubes before setting up the samples on the worktable for STR PCR reaction setup. For instructions, see “Set up extracted DNA samples in a 96-well plate” on page 14 or “Set up extracted DNA samples in tubes” on page 15. b. Confirm that there is an adequate volume of each extracted DNA sample. IMPORTANT! While the maximum sample volume required for any kit is 20 µL, it is recommended that you check the samples for sufficient volume prior to dilution. A 50 µL total volume is ideal for reliable liquid detection, but you can use lower volumes. If there is not enough sample for the required volume, the entire volume will be aspirated and diluted according to the dilution protocol, regardless of the deficient volume. This deficiency could result in low or no profiles in the downstream analysis. 6. If the extracted DNA is in a plate, place the extracted DNA sample plate into the metal plate adapter on the worktable in grid 21, site position 1, with well A1 in the top left corner. Reaction plate well 1 (A1) Reaction plate notch IMPORTANT! To ensure that samples are transferred to the correct wells, confirm that: • The extracted DNA plate is placed in the metal plate adapter • The extracted DNA plate wells are aligned with the holes in the metal plate adapter • Well A1 is positioned in the upper left corner HID EVOlution™ - qPCR/STR Setup System Getting Started Guide 55 6 Chapter 6 Prepare STR PCR Reagents and Labware Set up the labware on the worktable 13 1 4 Site number 1 Site number 2 2 5 Site number 3 3 6 8 9 10 11 77 12 S1 S2 S3 S4 S5 S6 Grid numbers 1 2 3 4 5 6 7 8 9 10 11 12 13 14 15 16 17 18 19 20 21 22 23 24 25 26 27 28 29 30 31 32 Figure 5 Tecan Freedom EVO® workstation (worktable) layout for a STR PCR setup run. Locations for DNA samples in a plate and tubes are shown. Note: Only one type of plasticware for extracted DNA can be placed on the workstation for a given run. 1–2. 200-µL disposable pipette tips (DiTis) 3–6. 50-µL DiTis 7. Trough for T10E0.1 buffer 8. AB STR PCR Reagent Block 9. MicroAmp® Optical 96-Well Reaction Plate (if samples are in a plate) with 96-well metal plate adapter 10-11. MicroAmp® Optical 96-Well Reaction Plates (for predilution of samples) with 96-well metal plate adapter 12. MicroAmp® Optical 96-Well Reaction Plate (STR PCR reaction plate) with 96-well metal plate adapter 13. Tube racks S1 through S6 for DNA sample tubes (if samples are in tubes) 56 HID EVOlution™ - qPCR/STR Setup System Getting Started Guide Chapter 7 7 #HAPTER The HID EVOlution™ qPCR/STR Setup System Run Automated STR PCR Setup This chapter provides procedures for performing a STR PCR reaction setup run. ■ Run STR PCR setup . . . . . . . . . . . . . . . . . . . . . . . . . . . . . . . . . . . . . . . . . . . . . . 58 ■ Perform post-run tasks . . . . . . . . . . . . . . . . . . . . . . . . . . . . . . . . . . . . . . . . . . . . 61 Take care of the STR PCR reaction plate . . . . . . . . . . . . . . . . . . . . . . . . . . . . . . 61 #HAPTER Pre-Run Procedures Clean up the instrument . . . . . . . . . . . . . . . . . . . . . . . . . . . . . . . . . . . . . . . . . . . 61 ■ About the STR PCR plate layout . . . . . . . . . . . . . . . . . . . . . . . . . . . . . . . . . . . . 62 ■ For more information . . . . . . . . . . . . . . . . . . . . . . . . . . . . . . . . . . . . . . . . . . . . . 63 #HAPTER Prepare qPCR Reagents and Labware #HAPTER Run Automated qPCR Setup #HAPTER Perform qPCR and Review Results #HAPTER Prepare STR PCR Reagents and Labware #HAPTER Run Automated STR PCR Setup #HAPTER Perform STR PCR and Set Up Capillary Electrophoresis HID EVOlution™ - qPCR/STR Setup System Getting Started Guide 57 7 Chapter 7 Run Automated STR PCR Setup Run STR PCR setup Run STR PCR setup After performing all tasks, including maintenance, in the “Review pre-run checklist for STR PCR reaction setup” on page 46, use the following procedure to begin a STR PCR reaction setup run: 1. Select the appropriate EVOware software script for the AmpFlSTR® kit and plasticware that you are using: Freedom EVOware® software script selection for STR PCR If the sample is prepared with... And the extracted DNA is in... Identifiler® kit reagents a 96-well plate 88 Identifiler_plate.esc 1.5-mL microcentrifuge tubes 88 Identifiler_tubes.esc a 96-well plate 87 Yfiler_plate.esc 1.5-mL microcentrifuge tubes 87 Yfiler_tubes.esc a 96-well plate 88 MiniFiler_plate.esc 1.5-mL microcentrifuge tubes 88 MiniFiler_tubes.esc a 96-well plate 88 COfiler_plate.esc 1.5-mL microcentrifuge tubes 88 COfiler_tubes.esc a 96-well plate 88 Profiler_plate.esc 1.5-mL microcentrifuge tubes 88 Profiler_tubes.esc a 96-well plate 88 SEfilerPlus_plate.esc 1.5-mL microcentrifuge tubes 88 SEfilerPlus_tubes.esc a 96-well plate 88 SGMPlus_plate.esc 1.5-mL microcentrifuge tubes 88 SGMPlus_tubes.esc Yfiler® kit reagents MiniFiler™ kit reagents COfiler® kit reagents Profiler Plus® kit reagents SEfiler Plus™ kit reagents ‡ SGM Plus® kit reagents Samples/run... Use this script ‡ This script is available in Freedom EVOware® version 2.1. To upgrade scripts, contact your local Tecan service organization. See the Tecan HID EVOlution™ – qPCR/STR Setup System Application Manual, Section 10, “Customer Support,” for contact information. 2. Follow the directions in the Tecan HID EVOlution™ – qPCR/STR Setup System Application Manual, Section 5.3.2, “Running a STR-PCR Setup Script” and the additional instructions in steps 3 through 5 below. 58 HID EVOlution™ - qPCR/STR Setup System Getting Started Guide Chapter 7 Run Automated STR PCR Setup Run STR PCR setup 7 3. Before entering or importing sample information, make sure that the sample IDs that you will import or manually enter match the sample IDs in the 7500 Results file(s). If you are using barcodes, make sure that the barcodes on the extracted DNA samples match the barcodes in the 7500 Results file(s). 4. After entering sample information (either manually, by using barcodes, or by importing a qPCR/STR Samples file): a. Confirm that the right side of the window displays a message with the number of samples you entered, for example: 60/60 planned samples present. b. If the message says that fewer samples will be processed than entered samples (for example, 15/60 planned samples present) this indicates that either: • Some samples were not given sample information. Click Edit to continue entering sample information. • Too many samples were indicated at the beginning of the wizard. Click and start the wizard again, this time entering the correct number of samples to process. 5. After selecting the appropriate 7500 Results file(s), view and edit the information in the Sample Normalization Adjustment window: a. Click View to open the Sample Normalization Adjustment window. Note: The window lists the number of samples automatically selected for processing, and identifies those samples that are outside the acceptable quantity range. Only those samples with data that successfully merged with the 7500 Results file, and which meet the conditions for normalization, are automatically selected for dilution and STR reaction setup. You can manually select or deselect samples for processing, and edit the acceptable quantity range and the target DNA input amount. The sample dilution calculations in the Sample Normalization Adjustment window are based on the STR PCR amplification reaction volume, the sample quantification data, and the input amount of DNA that you want to target (Req. Amt (ng)). The software selects the appropriate dilution protocol that brings the DNA input amount after dilution closest to the required DNA target amount. After dilution, 10 µL of diluted DNA (for 25-µL reactions) or 20 µL of diluted DNA (for 50-µL reactions) is added to each PCR reaction. b. Review the global settings for all samples in the sample list, and edit the settings if necessary: Note: If you change any value(s), the system automatically performs the necessary recalculations. • Process All – Select this checkbox to process all samples for STR PCR amplification setup. To return to the original settings, select Cancel, then select View to re-open the window. De-select the Process All checkbox to deselect all samples for processing. HID EVOlution™ - qPCR/STR Setup System Getting Started Guide 59 7 Chapter 7 Run Automated STR PCR Setup Run STR PCR setup • Global Req. Amount (ng) – Sets the target DNA amount to be added to each STR PCR reaction in the plate. Note: For samples below the target input amount, the sample will not be processed unless you select the process checkbox for the individual sample or select Process All. If you select this checkbox, then 10 µL of extracted DNA will be added for a 25-µL STR reaction, or 20 µL of extracted DNA will be added for a 50 µL STR reaction. • Qty. range (ng/µL) – Sets the acceptable concentration range for extracted DNA samples. Samples with concentrations above or below the range will not be included in the STR PCR reaction plate. c. Review the settings for individual samples in the sample list, and edit the settings if necessary: Note: If you change any value(s), the system automatically performs the necessary recalculations. • Process – Select or deselect an individual sample for processing. • Req. Amt (ng) – Sets the target DNA amount to be added to the STR PCR reaction for a specific extracted DNA sample. d. (Optional but recommended) When you are done reviewing and editing the information in the Sample Normalization Adjustment window, take a screenshot to capture the information, then name and save the screenshot. IMPORTANT! You can use this information later to determine the dilution ratio used for each sample, the amount of extracted DNA removed from the extracted DNA plate or tubes, and the target DNA input amount for each sample. e. Click OK to exit the Sample Normalization Adjustment window. Note: The software shows a summary of the total number of samples that will be processed. 60 HID EVOlution™ - qPCR/STR Setup System Getting Started Guide Chapter 7 Run Automated STR PCR Setup Perform post-run tasks 7 Perform post-run tasks Take care of the STR PCR reaction plate 1. Remove the prepared STR PCR reaction plate containing the STR PCR reactions from the worktable. 2. Seal the STR PCR reaction plate with MicroAmp® Clear Adhesive Film (PN 4306311). 3. Place the STR PCR reaction plate in a table-top centrifuge with plate holders, then centrifuge the plate at 3000 rpm for approximately 20 seconds to remove any air bubbles. Clean up the instrument 1. Remove the TE buffer trough, and dispose of any remaining TE buffer. If it is the last run of the day, dispose of the TE buffer trough. IMPORTANT! Do not reuse the reagents in the troughs. See “Waste disposal” on page 144. 2. Follow the instructions in the Tecan HID EVOlutionTM - qPCR/STR Setup System Application Manual, Section 5.3.1, “After Run” on page 108. HID EVOlution™ - qPCR/STR Setup System Getting Started Guide 61 7 Chapter 7 Run Automated STR PCR Setup About the STR PCR plate layout About the STR PCR plate layout Regardless of the extracted DNA sample setup, the STR PCR reaction plate is always set up in the same way: the sample from the first position in the extracted DNA sample plate or the first extracted DNA sample tube is always placed in well A1 of the STR PCR reaction plate. See Figure 6 below and Figure 7 on page 63 for STR PCR reaction plate layouts. At the end of the STR PCR setup run, the HID EVOlution™ system generates a report that lists the position of each DNA sample in the extracted DNA sample plate or tubes and in the STR PCR reaction plate. After STR PCR amplification, you transfer the PCR products from the STR PCR reaction plate to a CE plate for processing on the 3130/3130xl Genetic Analyzer. To make the plate-to-plate transfer easier, the STR PCR reaction plate layout mirrors that of the CE plate layout. For example, the HID EVOlution™ - qPCR/STR Setup System leaves six empty wells (designated as LDR) in the STR PCR plate as placeholders for the allelic ladder sample replicates in the CE plate. Figure 6 STR PCR plate layout for all AmpFlSTR® kits except for the Yfiler® kit. PTC = Amplification positive control (control DNA); NTC = Amplification negative control (TE buffer); LDR = empty wells indicating where allelic ladder sample replicates will be placed in the CE plate. The positive and negative control volumes are 10 µl for 25-µL reactions and 20 µL for 50-µL reactions. 62 HID EVOlution™ - qPCR/STR Setup System Getting Started Guide Chapter 7 Run Automated STR PCR Setup For more information 7 Figure 7 STR PCR plate layout for the AmpFlSTR® Yfiler® kit. D007 = Amplification positive control (control DNA 007); D9974A = Amplification positive control (control DNA 9947A); NTC = Amplification negative control (TE buffer); LDR = empty wells indicating where allelic ladder sample replicates will be placed in the CE plate. The positive and negative control volumes are 10 µl for 25-µL reactions and 20 µL for 50-µL reactions. For more information For information on: • Reports, see the Tecan HID EVOlution™ – qPCR/STR Setup System Application Manual, Section 6, “Results.” • Running scripts and on script error messages, see the Tecan HID EVOlution™ – qPCR/STR Setup System Application Manual, Section 5.3.2, “Running a STRPCR Setup Script,” and Section 8.4, “Application Software.” • Freedom EVOware® software, see the Tecan EVOware® Standard/EVOware® Plus 2.1 Software Manual and Tecan EVOware® Standard/EVOware® Plus 2.1 Software Getting Started Guide. HID EVOlution™ - qPCR/STR Setup System Getting Started Guide 63 7 64 Chapter 7 Run Automated STR PCR Setup For more information HID EVOlution™ - qPCR/STR Setup System Getting Started Guide Chapter 8 8 #HAPTER The HID EVOlution™ qPCR/STR Setup System Perform STR PCR and Set Up Capillary Electrophoresis This chapter explains where to get relevant information to perform STR PCR and how to set up for CE. ■ Run STR PCR amplification . . . . . . . . . . . . . . . . . . . . . . . . . . . . . . . . . . . . . . . 66 ■ About the CE Setup file . . . . . . . . . . . . . . . . . . . . . . . . . . . . . . . . . . . . . . . . . . . 67 ■ Transfer and import the CE Setup file . . . . . . . . . . . . . . . . . . . . . . . . . . . . . . . . 68 #HAPTER Pre-Run Procedures ■ Prepare the CE Plate . . . . . . . . . . . . . . . . . . . . . . . . . . . . . . . . . . . . . . . . . . . . . . 68 ■ For more information . . . . . . . . . . . . . . . . . . . . . . . . . . . . . . . . . . . . . . . . . . . . . 69 #HAPTER Prepare qPCR Reagents and Labware #HAPTER Run Automated qPCR Setup #HAPTER Perform qPCR and Review Results #HAPTER Prepare STR PCR Reagents and Labware #HAPTER Run Automated STR PCR Setup #HAPTER Perform STR PCR and Set Up Capillary Electrophoresis HID EVOlution™ - qPCR/STR Setup System Getting Started Guide 65 8 Chapter 8 Perform STR PCR and Set Up Capillary Electrophoresis Run STR PCR amplification Run STR PCR amplification Refer to the appropriate AmpFlSTR® kit documentation for amplification procedures. Document AmpFlSTR® COfiler® Part number PCR Amplification Kit User’s Manual 4306116 ® ® AmpFlSTR Identifiler PCR Amplification Kit User’s Manual 4323291 AmpFlSTR® MiniFiler™ 4374618 AmpFlSTR® Profiler PCR Amplification Kit User’s Manual Plus® PCR Amplification Kit User’s Manual 4303501 AmpFlSTR SEfiler Plus PCR Amplification Kit User’s Manual 4385739 AmpFlSTR® SGM 4309589 AmpFlSTR® Yfiler® ® ™ Plus® PCR Amplification Kit User’s Manual PCR Amplification Kit User’s Manual 4358101 When you are done with amplification (thermal cycling), prepare for CE. 66 HID EVOlution™ - qPCR/STR Setup System Getting Started Guide Chapter 8 Perform STR PCR and Set Up Capillary Electrophoresis About the CE Setup file 8 About the CE Setup file The HID EVOlution™ system software generates a plate file (CE Setup file) for each run. The file contains sample information that you can import to the Data Collection Software plate document for the STR run on the CE instrument (3130/3130xl Genetic Analyzer computer). By default, the HID EVOlution™ - qPCR/STR Setup System names the CE Setup file: • C:\HIDEVOlution_qPCRSTRfiles\AB3130Input\ STRplate_<rundate>_<runtime>.txt or • C:\HIDEVOlution_qPCRSTRfiles\AB3130Input\ <barcode>_<rundate>_<runtime>.txt The HID EVOlution™ system automatically archives the CE Setup file in the C:\ HIDEVOlution_qPCRSTRfiles\AB3130Input\Archive folder when you start the next qPCR or STR PCR setup run. If necessary, create shortcuts on your desktop to the C:\ HIDEVOlution_qPCRSTRfiles\AB3130Input and C:\HIDEVOlution_qPCRSTRfiles\ AB3130Input\Archive folders. HID EVOlution™ - qPCR/STR Setup System Getting Started Guide 67 8 Chapter 8 Perform STR PCR and Set Up Capillary Electrophoresis Transfer and import the CE Setup file Transfer and import the CE Setup file IMPORTANT! To successfully import the CE Setup file to the 3130/3130xl Genetic Analyzer Data Collection software v3.0, the instrument protocol and results group names created in the Data Collection software must match those in the CE Setup file. See “Create an instrument protocol and results group for the CE instrument” on page 11. 1. On the HID EVOlution system, navigate to the C:\ HIDEVOlution_qPCRSTRfiles\AB3130Input folder, then locate the CE Setup file with the name that you noted at the end of the run: • STRplate_<rundate>_<runtime>.txt or • <barcode>_<rundate>_<runtime>.txt 2. Copy and transfer the CE Setup file to a location where it can be accessed by the Data Collection Software computer. 3. In the Data Collection Software: a. Select Plate Manager, then click Import. b. Navigate to the CE Setup file that you copied from the HID EVOlution™ - qPCR/STR Setup System software to the CE instrument (3130/3130xl Genetic Analyzer computer). c. Select the file, click Open, then click OK. Prepare the CE Plate Refer to the applicable AmpFlSTR® Kit User Guide and the Applied Biosystems 3130/3130xl Genetic Analyzers User Bulletin: Using Data Collection Software v3.0 Protocols for Processing AmpFlSTR® PCR Amplification Kit PCR Products (PN 4363787). 68 HID EVOlution™ - qPCR/STR Setup System Getting Started Guide Chapter 8 Perform STR PCR and Set Up Capillary Electrophoresis For more information 8 For more information For information on: • Running STR PCR amplification, refer to the appropriate AmpFlSTR® Kit User’s Manual. • Running CE, see the Applied Biosystems 3130/3130xl Genetic Analyzers Getting Started Guide or the AmpFlSTR® Kit User’s Manual specific to your system. • For details on the HID EVOlution™ - qPCR/STR Setup System, see the Tecan HID EVOlution™ – qPCR/STR Setup System Application Manual. • Creating an analysis method, instrument protocol, and results group in the Data Collection software, refer to the Applied Biosystems 3130/3130xl Genetic Analyzers User Bulletin: Using Data Collection Software v3.0 - Protocols for Processing AmpFlSTR® PCR Amplification Kit PCR Products (PN 4363787). HID EVOlution™ - qPCR/STR Setup System Getting Started Guide 69 8 70 Chapter 8 Perform STR PCR and Set Up Capillary Electrophoresis For more information HID EVOlution™ - qPCR/STR Setup System Getting Started Guide Appendix A A Troubleshooting For troubleshooting problems with: • DNA yield, see the Quantifiler® Kits User’s Manual and Table 12 below. • Setting up and running the automation instrument, see the Tecan HID EVOlution™ - qPCR/STR Setup System Application Manual. Table 12 Troubleshooting qPCR/STR PCR results Observed problem The DNA yield is low or DNA is absent Possible reason • The biological sample contains no or a low amount of DNA. • Reagents are missing or improperly positioned on the worktable. • Incorrect automated pipetting occurred because of: – Incorrect or improperly placed DiTis, plates, tubes, or hardware. – Air bubbles or leaks in system. – Dirty or loose DiTi cones. • DiTis were not picked up properly. • Reagent, equipment or instrumentation failure. HID EVOlution™ - qPCR/STR Setup System Getting Started Guide Suggested solution Confirm the correct reagent and instrument setup, then re-run the samples: • Confirm reagent and instrument performance Manually set up control DNA samples using the same reagents and instrumentation to confirm that the reagents, protocol, equipment and instrumentation are functioning as expected. • Confirm all necessary reagents are present and correctly positioned on the workstation. Refer to the Tecan HID EVOlution™ - qPCR/STR Setup System Application Manual. • Confirm that you use the specified DiTis, plates, tubes, and metal racks and carriers in the correct positions. Refer to the Tecan HID EVOlution™ qPCR/STR Setup System Application Manual. • Clean and finger-tighten the DiTi cones, diluter valves and syringe fittings. Refer to the Tecan HID EVOlution™ - qPCR/STR Setup System Application Manual. • Confirm that you have sufficient system liquid, then flush the system and check for air bubbles and leaks. Refer to the Tecan HID EVOlution™ qPCR/STR Setup System Application Manual. • Review the LiHa coordinates (x, y, and z positions) of the DiTis. For details, contact Applied Biosystems or refer to the Tecan Freedom EVOware® Standard 2.1 Freedom EVOware® Plus 2.1 Extended Device Support Software Manual, Section 9.4.4, “Teaching the Labware Coordinates.” • Amplify the maximum volume for STR analysis. • Extract DNA from a different sample that is prepared from the same source. • Concentrate the sample, then repeat the test with the respective Quantifiler® kit before performing STR analysis. 71 A Appendix A Troubleshooting Table 12 Troubleshooting qPCR/STR PCR results (continued) Observed problem Possible reason Suggested solution The sample IPC CT is higher than the IPC CT of the no template quantitation control (NTC) or of the quantitation standards (for example, if the sample IPC CT is approximately two CT greater than the NTC IPC CT or the CT of the standards). or Weak amplification (high CT value and low ΔRn value) of the human and/or male-specific targets and no or weak amplification of the IPC. • The DNA concentration is above 25 ng/µL. • Potential presence of PCR inhibitors. • If the DNA concentration is over 25 ng/µL, dilute the DNA extract, then requantify the sample. • If the DNA concentrate is below 25 ng/µL, or if the diluted DNA eluate still produces high IPC CT compared to the NTC or quantitation standards, repurify the sample. CE signal is too high Sample concentration is greater than the reported quantification result. 72 IMPORTANT! Repurification may result in the loss of additional DNA. Consider proceeding to amplification with a kit such as the AmpFlSTR® MiniFiler™ PCR Amplification kit, which is designed to obtain STR profiles from compromised samples such as those which may be inhibited and/or degraded. • Before the next run: – To ensure correct pipetting, clean and finger tighten the DiTi cones, diluter valves, and syringe fittings. Refer to the Tecan HID EVOlution™ - qPCR/STR Setup System Application Manual. – Confirm that you have sufficient system liquid, then flush the system and check for air bubbles and leaks. Refer to the Tecan HID EVOlution™ - qPCR/STR Setup System Application Manual. • Requantify (see IMPORTANT above). • Before the next run: – To ensure correct pipetting, clean and finger tighten the DiTi cones, diluter valves, and syringe fittings. Refer to the Tecan HID EVOlution™ - qPCR/STR Setup System Application Manual. – Confirm that you have sufficient system liquid, then flush the system and check for air bubbles and leaks. Refer to the Tecan HID EVOlution™ - qPCR/STR Setup System Application Manual. HID EVOlution™ - qPCR/STR Setup System Getting Started Guide Appendix A Troubleshooting A Table 12 Troubleshooting qPCR/STR PCR results (continued) Observed problem CE signal is too low Possible reason Suggested solution • Potential presence of PCR inhibitors. • Incorrect target amount entered into the Sample Normalization Adjustment window. • Not enough DNA. • Presence of inhibitors. • Degraded formamide. • Dilution of DNA sample in H2O or wrong buffer (e.g., wrong EDTA concentration). • Confirm reagent and instrument performance Manually set up control DNA samples using the same reagents and instrumentation to confirm that the reagents, protocol, equipment and instrumentation are functioning as expected. • Use the maximum volume permitted for the DNA sample. • If possible, repurify DNA and requantify. Otherwise use the minimal volume possible. • Check the storage of formamide; do not thaw and refreeze multiple times. Try Hi-Di™ Formamide. • Verify that correct TE buffer was used (with 0.1-mM EDTA). • Before the next run: – To ensure correct pipetting, clean and finger tighten the DiTi cones, diluter valves, and syringe fittings. Refer to the Tecan HID EVOlution™ - qPCR/STR Setup System Application Manual. – Confirm that you have sufficient system liquid, then flush the system and check for air bubbles and leaks. Refer to the Tecan HID EVOlution™ - qPCR/STR Setup System Application Manual. HID EVOlution™ - qPCR/STR Setup System Getting Started Guide 73 A 74 Appendix A Troubleshooting HID EVOlution™ - qPCR/STR Setup System Getting Started Guide Appendix B B Reagent Block Configurations This appendix provides the reagent block configurations referred to in Chapter 3, “Prepare qPCR Reagents and Labware” on page 23 and Chapter 6, “Prepare STR PCR Reagents and Labware” on page 45 for the following kits: IMPORTANT! Prepare the reagents as directed in “Set up reagents” on page 25 and “Set up reagents” on page 52 before placing the reagents in the reagent block. ■ Quantifiler® DNA Quantification Kits . . . . . . . . . . . . . . . . . . . . . . . . . . . . . . . . 76 Quantifiler® Human Kit with pre-prepared standards . . . . . . . . . . . . . . . . . . . . 76 Quantifiler® Human Kit with system-prepared standards . . . . . . . . . . . . . . . . . 77 Quantifiler® Y Human Male Kit with pre-prepared standards . . . . . . . . . . . . . . 78 Quantifiler® Y Human Male Kit with system-prepared standards. . . . . . . . . . . 79 Quantifiler® Human and Y Human Male Kits with pre-prepared standards . . . 80 Quantifiler® Human and Y Human Male Kits with system-prepared standards 81 ■ AmpFlSTR® PCR Amplification Kits . . . . . . . . . . . . . . . . . . . . . . . . . . . . . . . . 82 AmpFlSTR® COfiler® PCR Amplification Kit . . . . . . . . . . . . . . . . . . . . . . . . . 82 AmpFlSTR® Identifiler® PCR Amplification Kit . . . . . . . . . . . . . . . . . . . . . . . 83 AmpFlSTR® MiniFiler™ PCR Amplification Kit . . . . . . . . . . . . . . . . . . . . . . . 84 AmpFlSTR® Profiler Plus® PCR Amplification Kit . . . . . . . . . . . . . . . . . . . . . 85 AmpFlSTR® SEfiler Plus™ PCR Amplification Kit . . . . . . . . . . . . . . . . . . . . . 86 AmpFlSTR® SGM Plus® PCR Amplification Kit . . . . . . . . . . . . . . . . . . . . . . . 87 AmpFlSTR® Yfiler® PCR Amplification Kit . . . . . . . . . . . . . . . . . . . . . . . . . . 88 HID EVOlution™ - qPCR/STR Setup System Getting Started Guide 75 B Appendix B Reagent Block Configurations Quantifiler® DNA Quantification Kits Quantifiler® DNA Quantification Kits Quantifiler® Human Kit with pre-prepared standards 50.0 5.556 0.617 0.069 16.667 1.852 0.206 0.023 1 3 5 7 2 4 6 8 9 10 11 12 13 Figure 8 Reagent block configuration for Quantifiler® Human kit with pre-prepared DNA standards. Legend: 1-8. 1.5-mL tubes of pre-prepared DNA standard dilution series (arrange concentrations as shown in the corresponding orange table). 9-11. Up to three 1.5-mL tube(s) of Quantifiler® Human Primer Mix. Place the first tube in position 9. If you use more than one tube, continue to position 10, then position 11. ‡ 12. Quantifiler® PCR Reaction mix. 13. Empty 5-mL VWR tube for the master mix. ‡ The required number of tubes with the Quantifiler® Human Primer Mix depends on the number of reactions and the fill level of the tubes. The instrument aspirates 190 µL at a time. In order for the instrument to detect reagent in a tube, the tube must contain a minimum of 240 µL (190 µL plus a 50-µL dead volume). If the volume of reagent in the first tube (position 9) falls below 240 µL, the instrument looks for a sufficient volume in the position 10 tube, then in the position 11 tube. If the tubes are not available or the instrument does not detect sufficient volume, the instrument pauses the run and displays the error message “Not enough liquid.” 76 HID EVOlution™ - qPCR/STR Setup System Getting Started Guide Appendix B Reagent Block Configurations Quantifiler® DNA Quantification Kits B Quantifiler® Human Kit with system-prepared standards 1 3 5 7 2 4 6 8 9 10 11 14 12 13 Figure 9 Reagent block configuration for Quantifiler® Human kit with DNA standards prepared by the HID EVOlution™ system. Legend: 1-8. 1.5-mL empty tubes for DNA standard dilution series. 9-11. Up to three 1.5-mL tube(s) of Quantifiler® Human Primer Mix. Place the first tube in position 9. If you use more than one tube, continue to position 10, then position 11. ‡ 12. Quantifiler® PCR Reaction mix. 13. Empty 5-mL VWR tube for the master mix. 14. Quantifiler® Human DNA Standard tube. ‡ The required number of tubes with the Quantifiler® Human Primer Mix depends on the number of reactions and the fill level of the tubes. The instrument aspirates 190 µL at a time. In order for the instrument to detect reagent in a tube, the tube must contain a minimum of 240 µL (190 µL plus a 50-µL dead volume). If the volume of reagent in the first tube (position 9) falls below 240 µL, the instrument looks for a sufficient volume in the position 10 tube, then in the position 11 tube. If the tubes are not available or the instrument does not detect sufficient volume, the instrument pauses the run and displays the error message “Not enough liquid.” HID EVOlution™ - qPCR/STR Setup System Getting Started Guide 77 B Appendix B Reagent Block Configurations Quantifiler® DNA Quantification Kits Quantifiler® Y Human Male Kit with pre-prepared standards 50.0 5.556 0.617 0.069 16.667 1.852 0.206 0.023 1 3 5 7 2 4 6 8 9 12 10 11 13 Figure 10 Reagent block configuration for Quantifiler® Y Human Male kit with pre-prepared DNA standards. Legend: 1-8. 1.5-mL tubes of pre-prepared DNA standards (arrange concentrations as shown in the corresponding orange table). 9-11. Up to three 1.5-mL tube(s) of Quantifiler® Y Human Male Primer Mix. Place the first tube in position 9. If you use more than one tube, continue to position 10, then position 11. ‡ 12. Quantifiler® PCR Reaction mix. 13. Empty 5-mL VWR tube for the master mix. ‡ The required number of tubes with the Quantifiler® Y Human Male Primer Mix depends on the number of reactions and the fill level of the tubes. The instrument aspirates 190 µL at a time. In order for the instrument to detect reagent in a tube, the tube must contain a minimum of 240 µL (190 µL plus a 50-µL dead volume). If the volume of reagent in the first tube (position 9) falls below 240 µL, the instrument looks for a sufficient volume in the position 10 tube, then in the position 11 tube. If the tubes are not available or the instrument does not detect sufficient volume, the instrument pauses the run and displays the error message “Not enough liquid.” 78 HID EVOlution™ - qPCR/STR Setup System Getting Started Guide Appendix B Reagent Block Configurations Quantifiler® DNA Quantification Kits B Quantifiler® Y Human Male Kit with system-prepared standards 1 3 5 7 2 4 6 8 9 10 11 14 12 13 Figure 11 Reagent block configuration for Quantifiler® Y Human Male kit with DNA standards prepared by the HID EVOlution™ system. Legend: 1-8. 1.5-mL empty tubes for DNA standards dilution series. 9-11. Up to three 1.5-mL tube(s) of Quantifiler® Y Human Male Primer Mix. Place the first tube in position 9. If you use more than one tube, continue to position 10, then position 11. ‡ 12. Quantifiler® PCR Reaction mix. 13. Empty 5-mL VWR tube for the master mix. 14. Quantifiler® Human DNA Standard tube. ‡ The required number of tubes with the Quantifiler® Y Human Male Primer Mix depends on the number of reactions and the fill level of the tubes. The instrument aspirates 190 µL at a time. In order for the instrument to detect reagent in a tube, the tube must contain a minimum of 240 µL (190 µL plus a 50-µL dead volume). If the volume of reagent in the first tube (position 9) falls below 240 µL, the instrument looks for a sufficient volume in the position 10 tube, then in the position 11 tube. If the tubes are not available or the instrument does not detect sufficient volume, the instrument pauses the run and displays the error message “Not enough liquid.” HID EVOlution™ - qPCR/STR Setup System Getting Started Guide 79 5.556 0.617 0.069 50.0 5.556 0.617 0.069 16.667 1.852 0.206 0.023 16.667 1.852 0.206 0.023 1 3 5 7 1 3 5 7 2 4 6 8 2 4 6 8 HID EVOlution™ - qPCR/STR Setup System Getting Started Guide 12 10 11 13 9 12 10 11 13 Reagent block configuration for Quantifiler® Human and Y Human Male kits with pre-prepared DNA standards. Legend: 1-8. 1.5-mL tubes of pre-prepared DNA standards (arrange concentrations as shown in the corresponding orange tables). 9-11. Up to three 1.5-mL tube(s) of Quantifiler® Primer Mix. Place the first tube in position 9. If you use more than one tube, continue to position 10, then position 11. ‡ 12. Quantifiler® PCR Reaction mix. 13. Empty 5-mL VWR tube for the master mix. ‡ The required number of tubes with the Quantifiler® Primer Mix depends on the number of reactions and the fill level of the tubes. The instrument aspirates 190 µL at a time. In order for the instrument to detect reagent in a tube, the tube must contain a minimum of 240 µL (190 µL plus a 50-µL dead volume). If the volume of reagent in the first tube (position 9) falls below 240 µL, the instrument looks for a sufficient volume in the position 10 tube, then in the position 11 tube. If the tubes are not available or the instrument does not detect sufficient volume, the instrument pauses the run and displays the error message “Not enough liquid.” Quantifiler® DNA Quantification Kits 50.0 9 Figure 12 Quantifiler® Y Human Male kit reagents Appendix B Reagent Block Configurations Quantifiler® Human kit reagents B 80 Quantifiler® Human and Y Human Male Kits with pre-prepared standards HID EVOlution™ - qPCR/STR Setup System Getting Started Guide Quantifiler® Human and Y Human Male Kits with system-prepared standards Quantifiler® Human kit reagents Quantifiler® Y Human Male kit reagents 1 3 5 7 1 3 5 7 2 4 6 8 2 4 6 8 9 10 11 9 14 12 11 14 13 12 13 Quantifiler® Human and Y Human Male kits with DNA standards prepared by the HID EVOlution™ system. Legend: 9-11. Up to three 1.5-mL tube(s) of Quantifiler® Primer Mix. Place the first tube in position 9. If you use more than one tube, continue to position 10, then position 11. ‡ 12. Quantifiler® PCR Reaction mix. 13. Empty 5-mL VWR tube for the master mix. 14. Quantifiler® Human DNA Standard tube. ‡ The required number of tubes with the Quantifiler® Primer Mix depends on the number of reactions and the fill level of the tubes. The instrument aspirates 190 µL at a time. In order for the instrument to detect reagent in a tube, the tube must contain a minimum of 240 µL (190 µL plus a 50-µL dead volume). If the volume of reagent in the first tube (position 9) falls below 240 µL, the instrument looks for a sufficient volume in the position 10 tube, then in the position 11 tube. If the tubes are not available or the instrument does not detect sufficient volume, the instrument pauses the run and displays the error message “Not enough liquid.” Quantifiler® DNA Quantification Kits 1-8. 1.5-mL empty tubes for DNA standards. Appendix B Reagent Block Configurations Figure 13 10 B 81 B Appendix B Reagent Block Configurations AmpFlSTR® PCR Amplification Kits AmpFlSTR® PCR Amplification Kits AmpFlSTR® COfiler® PCR Amplification Kit A B Figure 14 Reagent block configuration for COfiler® kit. Legend: 1. Control DNA 9947A diluted as necessary. See step 4 on page 52. 2. 1.5-mL tube containing T10E0.1 buffer. 3. Empty VWR tube for master mix preparation. 4a-4b. AmpFlSTR® PCR Reaction Mix. 5. COfiler® Primer Mix. 6. AmpliTaq Gold® DNA polymerase. ‡ ‡ You must combine the volumes in two full 50-µL tubes in one tube. The tube containing the combined volume must be one of the original AmpliTaq Gold® DNA Polymerase tubes provided with the kit. Use of another type of tube can cause liquid detection errors. 82 HID EVOlution™ - qPCR/STR Setup System Getting Started Guide Appendix B Reagent Block Configurations AmpFlSTR® PCR Amplification Kits B AmpFlSTR® Identifiler® PCR Amplification Kit A B Figure 15 Reagent block configuration for Identifiler® kit. Legend: 1. Control DNA 9947A diluted as necessary. See step 4 on page 52. 2. 1.5-mL tube containing T10E0.1 buffer. 3. Empty VWR tube for master mix preparation. 4a-4b. AmpFlSTR® PCR Reaction Mix. 5. Identifiler® Primer Mix. 6. AmpliTaq Gold® DNA polymerase. ‡ ‡ You must combine the volumes in two full 50-µL tubes in one tube. The tube containing the combined volume must be one of the original AmpliTaq Gold® DNA Polymerase tubes provided with the kit. Use of another type of tube can cause liquid detection errors. HID EVOlution™ - qPCR/STR Setup System Getting Started Guide 83 B Appendix B Reagent Block Configurations AmpFlSTR® PCR Amplification Kits AmpFlSTR® MiniFiler™ PCR Amplification Kit A B Figure 16 Reagent block configuration for MiniFiler™ kit. Legend: 1. Control DNA 007 diluted as necessary. See step 4 on page 52. 2. 1.5-mL tube containing T10E0.1 buffer. 3. Empty VWR tube for master mix preparation. 4a-4b. MiniFiler™ Master Mix. 5. MiniFiler™ Primer Mix. 84 HID EVOlution™ - qPCR/STR Setup System Getting Started Guide Appendix B Reagent Block Configurations AmpFlSTR® PCR Amplification Kits B AmpFlSTR® Profiler Plus® PCR Amplification Kit A B Figure 17 Reagent block configuration for Profiler Plus® kit. Legend: 1. Control DNA 9947A diluted as necessary. See step 4 on page 52. 2. 1.5-mL tube containing T10E0.1 buffer. 3. Empty VWR tube for master mix preparation. 4a-4b. AmpFlSTR® PCR Reaction Mix. 5. Profiler Plus® Primer Mix. 6. AmpliTaq Gold® DNA polymerase. ‡ ‡ You must combine the volumes in two full 50-µL tubes in one tube. The tube containing the combined volume must be one of the original AmpliTaq Gold® DNA Polymerase tubes provided with the kit. Use of another type of tube can cause liquid detection errors. HID EVOlution™ - qPCR/STR Setup System Getting Started Guide 85 B Appendix B Reagent Block Configurations AmpFlSTR® PCR Amplification Kits AmpFlSTR® SEfiler Plus™ PCR Amplification Kit A B Figure 18 Reagent block configuration for SEfiler Plus™ kit. Legend: 1. Control DNA 007 diluted as necessary. See step 4 on page 52. 2. 1.5-mL tube containing T10E0.1 buffer. 3. Empty VWR tube for master mix preparation. 4a-4b. SEfiler Plus™ Master Mix. 5. SEfiler Plus™ Primer Mix. 86 HID EVOlution™ - qPCR/STR Setup System Getting Started Guide Appendix B Reagent Block Configurations AmpFlSTR® PCR Amplification Kits B AmpFlSTR® SGM Plus® PCR Amplification Kit A B Figure 19 Reagent block configuration for SGM® Plus kit. Legend: 1. Control DNA 007 diluted as necessary. See step 4 on page 52. 2. 1.5-mL tube containing T10E0.1 buffer. 3. Empty VWR tube for master mix preparation. 4a-4b. AmpFlSTR® PCR Reaction Mix. 5. SGM® Plus Primer Mix. 6. AmpliTaq Gold® DNA polymerase. ‡ ‡ You must combine the volumes in two full 50-µL tubes in one tube. The tube containing the combined volume must be one of the original AmpliTaq Gold® DNA Polymerase tubes provided with the kit. Use of another type of tube can cause liquid detection errors. HID EVOlution™ - qPCR/STR Setup System Getting Started Guide 87 B Appendix B Reagent Block Configurations AmpFlSTR® PCR Amplification Kits AmpFlSTR® Yfiler® PCR Amplification Kit A B A B Figure 20 Reagent block configuration for Yfiler® kit. Legend: 1a. Control DNA 007 diluted as necessary. See step 4 on page 52. 1b. Control DNA 9947A diluted as necessary. See step 4 on page 52. 2. 1.5-mL tube containing T10E0.1 buffer. 3. Empty VWR tube for master mix preparation. 4a-4b. Yfiler® PCR Reaction Mix. 5. Yfiler® Primer Mix. 6. AmpliTaq Gold® DNA polymerase. ‡ ‡ You must combine the volumes in two full 50-µL tubes in one tube. The tube containing the combined volume must be one of the original AmpliTaq Gold® DNA Polymerase tubes provided with the kit. Use of another type of tube can cause liquid detection errors. 88 HID EVOlution™ - qPCR/STR Setup System Getting Started Guide Appendix C C HID EVOlution™ - qPCR/STR Setup System Detailed Workflow Description The steps performed by the user and by the HID EVOlution™ - qPCR/STR Setup System are described in the table and text below. Table 13 Overview of the automated HID workflow. HID Workflow Covered in Chapter... Extraction procedures are not included in this guide. For automated extraction procedures, see the PrepFiler™ Automated Forensic DNA Extraction Kit Getting Started Guide. 2, “Pre-Run Procedures” on page 9 3, “Prepare qPCR Reagents and Labware” on page 23 4, “Run Automated qPCR Setup” on page 33 5, “Perform qPCR and Review Results” on page 39 5, “Perform qPCR and Review Results” on page 39 2, “Pre-Run Procedures” on page 9 6, “Prepare STR PCR Reagents and Labware” on page 45 7, “Run Automated STR PCR Setup” on page 57 8, “Perform STR PCR and Set Up Capillary Electrophoresis” on page 65 8, “Perform STR PCR and Set Up Capillary Electrophoresis” on page 65 CE and data analysis procedures are not included in this guide. See the AmpFlSTR Kit User’s Guides. 1. Prepare Sample/Extract DNA from the forensic sample. DNA extraction with the PrepFiler™ Forensic DNA Extraction Kits can be performed manually, or automated on the HID EVOlution™ – Extraction System. Note: Extraction procedures are not included in this guide. For automated extraction procedures, see the PrepFiler™ Automated Forensic DNA Extraction Kit Getting Started Guide. HID EVOlution™ - qPCR/STR Setup System Getting Started Guide 89 C Appendix C HID EVOlution™ - qPCR/STR Setup System Detailed Workflow Description 2. Perform quantitative PCR to quantify the total amount of amplifiable DNA. a. Prepare for automated qPCR reaction setup: • Place extracted DNA samples in 96-well plates or 1.5-mL tubes. • (Optional) Create a qPCR/STR Sample file containing sample names and information for import to the HID EVOlution™ - qPCR/STR Setup System software. • Prepare Quantifiler® kit reagents for use on the HID EVOlution™ qPCR/STR Setup System. • Prepare the HID EVOlution™ - qPCR/STR Setup System. b. Run automated qPCR reaction setup on the HID EVOlution™ - qPCR/STR Setup System. The HID EVOlution™ system: • (Optional) Imports sample information from a qPCR/STR Sample file. Note: You can prepare a qPCR/STR Sample file before the run, or, if you used the HID EVOlution™ – Extraction System for DNA extraction, the HID EVOlution™ – Extraction System generates a PCR/STR Sample file (*.csv output file) that you can import for the qPCR or STR PCR reaction setup run. See “Options for entering sample information” on page 17. • Prepares the qPCR master mix. • (Optional) Prepares the DNA standard dilution series from the control DNA standard. • Transfers the master mix, DNA standard dilution series, and samples into a qPCR reaction plate and mixes the reaction components. • Generates a 7500 Setup file that can be imported into the 7500 RealTime PCR System SDS software v1.2.3 to set up the plate document for the qPCR run on the 7500 Real-time System. Note: The HID EVOlution™ - qPCR/STR Setup System can prepare up to 80 qPCR reactions and 16 DNA standard dilution series reactions per run. See “Before each run: Set up extracted DNA samples” on page 13. c. Run qPCR using the 7500 Real-Time PCR System with SDS Software v1.2.3. • Transfer the qPCR reaction plate to the 7500 instrument. • Import the 7500 Setup file to the SDS software. • Run qPCR. • Analyze and review the qPCR results. 90 HID EVOlution™ - qPCR/STR Setup System Getting Started Guide Appendix C HID EVOlution™ - qPCR/STR Setup System Detailed Workflow Description C 3. Perform STR amplification to amplify specific STR loci in a single PCR amplification sample: a. Prepare for automated STR PCR amplification reaction setup: • Place extracted DNA samples in 96-well plates or 1.5-mL tubes. • Prepare AmpFlSTR® kit reagents for use on the HID EVOlution™ qPCR/STR Setup System. • Prepare the HID EVOlution™ - qPCR/STR Setup System. b. Run automated STR PCR reaction setup on the HID EVOlution™ - qPCR/STR Setup System. The HID EVOlution™ system: • Reads the sample information from either the imported qPCR/STR Sample input file (*.csv) or the manually-entered sample list. • Reads the 7500 Results file(s) that you import from the 7500 Real-Time System SDS Software v1.2.3. • Confirms that the sample ID names from the Sample input file or sample list match the 7500 Results (output) file(s). • Determines the dilution ratio for each sample, if required, based on the measured DNA concentration, the required DNA input volume, or the user-defined target DNA input amount for the STR PCR reactions. • Dilutes the extracted DNA samples as needed to normalize the sample concentrations. • Prepares the master mix. • Transfers the master mix and normalized DNA samples into a STR PCR reaction plate and mixes the reaction components. • Generates a CE Setup file that can be imported into to the CE instrument (3130/3130xl Genetic Analyzer) Data Collection Software v3.0 to automatically populate the plate record. Note: The HID EVOlution™ - qPCR/STR Setup System can prepare up to 88 STR PCR reactions (87 when using the AmpFlSTR® Yfiler® PCR Amplification Kit) plus 2 or 3 controls per run. See “Before each run: Set up extracted DNA samples” on page 13. c. Transfer the STR PCR reaction plate to the 9600/9700 or Veriti® thermal cycler and perform PCR amplification. HID EVOlution™ - qPCR/STR Setup System Getting Started Guide 91 C Appendix C HID EVOlution™ - qPCR/STR Setup System Detailed Workflow Description 4. Perform capillary electrophoresis/genetic analysis to separate and detect amplified STR products. • Prepare the CE plate. • Import the CE Setup file to the Data Collection Software v3.0. • Run CE on a 3130/3130xl Genetic Analyzer. Note: Any AB HID validated CE platform can be used, but the electronic CE Setup file was formatted and validated for Data Collection Software v3.0 for the 3130/3130xl Genetic Analyzers. 5. Perform data analysis to analyze the CE results with GeneMapper® ID-X Software or GeneMapper® ID Software v3.2. 92 HID EVOlution™ - qPCR/STR Setup System Getting Started Guide Appendix D D Dilution Protocols This appendix covers: ■ DNA input amount must be normalized before STR PCR amplification . . . . . 94 ■ Terms used in the Freedom EVOware® software . . . . . . . . . . . . . . . . . . . . . . . . 94 ■ Guidelines for successful normalization. . . . . . . . . . . . . . . . . . . . . . . . . . . . . . . 94 Limits to the HID EVOlution™ system sample normalization . . . . . . . . . . . . . . 95 ■ About DNA normalization on the HID EVOlution™ system . . . . . . . . . . . . . . . 96 How the HID EVOlution™ system determines when to dilute an extracted DNA sample . . . . . . . . . . . . . . . . . . . . . . . . . . . . . . . . . . . . . . . . . . . . . . . . . . . . . . . . . 96 How the HID EVOlution™ system dilutes a sample . . . . . . . . . . . . . . . . . . . . . . 96 Order of processing and placement of D1 and D2 in the pre-dilution plates . . . 98 ■ Dilution protocols with examples . . . . . . . . . . . . . . . . . . . . . . . . . . . . . . . . . . . . 98 About the HID EVOlution™ - qPCR/STR Setup System dilution protocols . . . 98 How to determine the volume of extracted DNA sample used in each reaction 98 Dilution protocol examples. . . . . . . . . . . . . . . . . . . . . . . . . . . . . . . . . . . . . . . . . 99 Dilution protocol tables. . . . . . . . . . . . . . . . . . . . . . . . . . . . . . . . . . . . . . . . . . . . 99 HID EVOlution™ - qPCR/STR Setup System Getting Started Guide 93 D Appendix D Dilution Protocols DNA input amount must be normalized before STR PCR amplification DNA input amount must be normalized before STR PCR amplification If the concentration (ng/µL) of an extracted DNA sample is higher than the target DNA input (ng) for the AmpFlSTR® PCR Amplification kit, then the extracted DNA sample must be diluted to normalize the DNA input in the STR PCR reaction plate. The HID EVOlution™ system automates DNA input normalization using a one- or two-step dilution process. The workflow and examples of the dilution ratios used to achieve this are in the sections that follow. Terms used in the Freedom EVOware® software Required amount of DNA Quantity Configured volume The target amount of DNA (ng) you want in each reaction in the STR PCR reaction plate. The concentration of the extracted DNA (ng/µL) as shown in the SDS software. Also shown as “Qty” in the EVOware software Sample Normalization window. The volume of extracted DNA sample that is placed in the STR PCR reaction plate. The volume (10 or 20 µL) is pre-defined in the EVOware software based on the AmpFlSTR® kit that you use. This volume is not user-editable. Guidelines for successful normalization • Provide an adequate volume of extracted DNA – While the maximum sample volume required for any kit is 20 µL, it is recommended that you check the samples for sufficient volume prior to dilution. A 50 µL total volume is ideal for reliable liquid detection, but you can use lower volumes. IMPORTANT! If there is insufficient sample for the required volume, the entire volume will be aspirated and diluted according to the dilution protocol, regardless of the deficient volume. This deficiency could result in low or no profiles in the downstream analysis. • Set up the system – When you load plasticware for an STR PCR setup run, always load two pre-dilution plates on the worktable to ensure there are adequate wells for dilution. • Select samples for processing – During the STR PCR setup run, review and adjust (if necessary) the information in the Sample Normalization Adjustment window (see step 5 on page 59). When selecting samples for processing, be aware of the limits to the HID EVOlution™ system sample normalization (see page 95). 94 HID EVOlution™ - qPCR/STR Setup System Getting Started Guide Appendix D Dilution Protocols Guidelines for successful normalization Limits to the HID EVOlution™ system sample normalization D The HID EVOlution™ system software uses the target amount of DNA to select the required dilution protocol. It is not possible for the HID EVOlution™ system to dilute exceptionally high concentrations of DNA to the smallest target amount. Given a twostep dilution process and a maximum volume of 200 µL per dilution step, the maximum achievable dilution for a 1 ng target is 1:4000 for a 25-µL total reaction volume and 1:8000 for a 50-µL total reaction volume. In the Sample Normalization Adjustment window, if you select a sample that requires more than a 1:4000 dilution (or 1:8000 dilution for a 50-µL reaction volume), the sample will only be diluted by 1:4000 or 1:8000, respectively. After dilution, HID EVOlution™ system will place the maximum transferable volume (either 10 or 20 µL) into the STR PCR reaction plate. Consequently, the HID EVOlution™ system may add too much DNA sample to the STR PCR plate. This could result in an off-scale DNA data profile. Table 14 lists the maximum and minimum concentrations that can be diluted to the specified target amount for either a 10-µL or 20-µL transfer. Use Table 14 to determine the maximum concentration that can be diluted for the target DNA input amount (ng). For example, the HID EVOlution™ system cannot dilute a 1000 ng/µL sample to achieve a 0.1 ng target input amount within these limitations. The default limits in the HID EVOlution™ system software are set to the maximum and minimum concentrations of the standard curve for the Quantifiler® kits (0.023 to 50 ng/µL). Samples with concentrations outside these limits will not be processed, unless you manually edit the concentration range or select the individual sample(s) for processing. Table 14 Concentrations within the HID EVOlution™ system dilution range. 10 µL transfer into STR PCR plate 20 µL transfer into STR PCR plate Min (ng/µL) transfer Max (ng/µL) transfer Min (ng/µL) transfer Max (ng/µL) transfer 0.1 0.01 40 0.005 40 0.125 0.013 50 0.063 50 0.5 0.05 200 0.025 200 1.0 0.1 400 0.05 400 1.5 0.15 600 0.15 600 2.0 0.2 800 0.2 800 2.5 0.25 1000 0.125 1000 5.0 0.5 2000 0.25 2000 10.0 1.0 4000 0.5 4000 Target Amount (ng) HID EVOlution™ - qPCR/STR Setup System Getting Started Guide 95 D Appendix D Dilution Protocols About DNA normalization on the HID EVOlution™ system About DNA normalization on the HID EVOlution™ system How the HID EVOlution™ system determines when to dilute an extracted DNA sample 1. For each extracted DNA sample, the system uses the following values to determine if the sample needs to be diluted before it is pipetted to the STR PCR reaction plate. • CONC – Concentration (ng/µL) of the extracted DNA sample (shown as QTY in the 7500 Results file) • VOL – Volume (µL) of extracted DNA sample added to a STR PCR reaction (either 10 µL or 20 µL, depending on the kit) • AMOUNT – Target amount of DNA (ng) that you want in the STR PCR reaction. AMOUNT is the “Required Amount of DNA” defined by the user in the Sample Normalization Adjustment window. The usual range is 0.1 to 2.5 ng; the default is 1 ng. If CONC x VOL is... Then... ≤ AMOUNT No dilution is necessary; if you select this sample for processing, the HID EVOlution™ system transfers the maximum allowable volume of sample (either 10 or 20 µL) to the STR PCR plate. > AMOUNT The HID EVOlution™ system determines which dilution protocol to use to achieve an amount of DNA in the STR PCR reaction no more than 15% above or below the target amount that you specified. See “Dilution protocols with examples” on page 98. 2. Where necessary, the system calculates the required dilution ratio: DIL = CONC x VOL / AMOUNT, where DIL is the Dilution Ratio, for example a DIL of 1.548 represents a dilution ratio of 1:1.548. 3. Based on the required dilution ratio, the system selects one of the dilution protocols shown in Table 15 on page 100 (for kits with a 10-µL addition) or Table 16 on page 101 (for kits with a 20-µL addition). How the HID EVOlution™ system dilutes a sample The maximum dilution in a one-step dilution is 1:20 for kits with a 25-µL total reaction volume, and 1:40 for kits with a 50-µL total reaction volume. Any higher dilutions are performed as two-step dilutions. The HID EVOlution™ system will dilute a sample with a greater concentration than the target quantity/maximum transferable volume at least once. 1. The system performs the first dilution (D1). Note: The maximum dilution ratio for D1 is 1:20 for a 25-µL total reaction volume and 1:40 for 50-µL total reaction volumes. 2. If the first dilution (D1) is sufficient to reach the target amount of DNA, the HID EVOlution™ system transfers the maximum allowable volume of sample (either 10 or 20 µL) from D1 to the STR PCR reaction plate. 96 HID EVOlution™ - qPCR/STR Setup System Getting Started Guide Appendix D Dilution Protocols About DNA normalization on the HID EVOlution™ system D 3. If the first dilution (D1) is still too concentrated to reach the target amount of DNA, then the HID EVOlution™ system performs a second dilution (D2). Note: The maximum dilution ratio for D2 is 1:20 for a 25-µL total reaction volume and 1:40 for 50-µL total reaction volumes. 4. The HID EVOlution™ system transfers the maximum allowable volume of sample (either 10 or 20 µL) from D2 to the STR PCR plate. In a two-step dilution, the final dilution ratio equals the first dilution times the second dilutions. For example, two dilutions each of 1:20 will result in a 1:400 final dilution ratio. The workflows in Figure 21 are for demonstration purposes only. Workflow for normalization using a 10-µL addition TE Sample plate (DNA) If sample concentration is greater than target TE Dilution 1 (D1) If dilution ratio >1:20 Dilution 2 (D2) 10 μL If sample concentration is lower than target 10 μL STR PCR plate (PCR) 10 μL Workflow for normalization using a 20-µL addition TE Sample plate (DNA) If sample concentration is greater than target TE Dilution 1 (D1) If dilution ratio >1:40 Dilution 2 (D2) 20 μL If sample concentration is lower than target 20 μL STR PCR plate (PCR) 20 μL Figure 21 Normalization workflows (10 µL and 20 µL). Samples with DNA concentrations lower than the target will not be processed unless you manually select these samples for processing in the Sample Normalization Adjustment window. HID EVOlution™ - qPCR/STR Setup System Getting Started Guide 97 D Appendix D Dilution Protocols Dilution protocols with examples Order of processing and placement of D1 and D2 in the pre-dilution plates • The HID EVOlution™ - qPCR/STR Setup System processes all of the samples that require a one-step dilution first, then processes all of the samples that require a two-step dilution. • For two-step dilutions, the first (D1) and second (D2) dilutions occur in the same predilution plate in adjacent wells (for example: wells 41 and 49 or wells A6 and A7). • The two predilution plates loaded onto the worktable do not correspond to the number of dilutions a sample requires; rather, the two plates provide enough wells in the event that all samples require a two-step dilution. • The D2 dilutions do not necessarily occur in a second plate.They can occur in the first plate in wells that are adjacent to the D1 dilutions. • Additionally, when the samples that require a two-step dilution are being normalized, the HID EVOlution™ system processes them starting in a new column of the plate.This could leave some wells empty following the normalization of one-step diluted samples. Dilution protocols with examples About the HID EVOlution™ qPCR/STR Setup System dilution protocols In order to cover a dynamic range for dilutions from 1:1 to 1:4000 (or 1:8000 for the kits that use 20 µL of sample), different volumes are used in the dilution steps. The dilution protocols used by the HID EVOlution - qPCR/STR Setup System were developed based on the following considerations: Minimized DNA extract consumption, pipetting accuracy, and mechanical characteristics of the pipetting system. The dilution volumes are based on the physical properties of the system (increments of volumes in 83.3-nL steps) while minimizing sample consumption and maximizing pipetting accuracy. The maximal deviation from calculated-to-executed dilution is less than +/- 15% at the end of each dilution range. How to determine the volume of extracted DNA sample used in each reaction The amount of the original (extracted DNA) sample used in a 1- or 2-step dilution is not included in the STR Samples Report provided at the end of the run. To determine the amount: 1. Determine the dilution ratio used for the sample. The final dilution ratio for each sample is shown in the Sample Normalization Adjustment window. The STR Samples report also shows the dilution ratio(s). If you are using the information from the Samples report to determine the dilution ratio for a 2-step dilution, you will need to multiply the ratio for each of the steps together to determine the final dilution ratio. 2. Locate the dilution ratio in Table 15 on page 100 (for a 10-µL addition) or in Table 16 on page 101 (20-µL addition). The volume of extracted DNA sample used is shown in the same row in the next column. This is true for any target DNA input amount, but note that the first 2 columns of these tables apply only for 1-ng target DNA input amounts. 98 HID EVOlution™ - qPCR/STR Setup System Getting Started Guide Appendix D Dilution Protocols Dilution protocols with examples Dilution protocol examples D Example of no dilution/direct transfer – If you select a sample for processing that has a T Amt (target amount) less than the Global Req. Amount (as defined in the Sample Normalization Adjustment window), the HID EVOlution™ system transfers the maximum allowable volume of the sample (either 10 or 20 µL) to the STR PCR plate. For example, if the Global Req. Amount is 1 ng, and you select a 0.025 ng/µL sample prepared with the Identifiler® kit for processing, the HID EVOlution™ system transfers 10 µL of the sample (containing 0.25 ng of DNA) to the STR PCR plate. Example 1-step dilution – Using Table 15 on page 100, if you have a sample concentration of 1.2 ng/µL and you are targeting a total input amount of 1 ng, the sample will need to be diluted 12 times. The closest dilution protocol to this is 1:13.3, and so the sample will be diluted 1:13.3 times resulting in a final concentration of 0.902 ng/µL. To perform this dilution, the HID EVOlution™ system transfers 3 µL of sample from the original DNA sample plate and adds it to 37 µL of TE in the predilution plate (D1). The system will then thoroughly mix the TE and sample DNA before transferring 10 µL from D1 to the STR PCR plate (D1 to PCR). A single dilution step is sufficient for up to a 20-times dilution for a 10-µL addition (Table 15 on page 100) or up to a 40-times dilution for a 20-µL addition (Table 16 on page 101). Example 2-step dilution – A more concentrated sample needs stepwise dilutions to economize sample usage but still get a thoroughly mixed dilution. For example, if you have a sample containing 3.9 ng/µL, it will need to be diluted 36 times to be normalized for a 10-µL addition to the STR PCR plate. To perform this stepwise dilution, the HID EVOlution™ system starts by transferring 2 µL of the original DNA sample and mixes it with 38 µL of TE in the first dilution (D1). This first dilution is only a 1:20 dilution. To further dilute the sample, the HID EVOlution™ system aspirates and mixes 22 µL of the D1 dilution with 18 µL of TE in the second dilution (D2). The two dilution steps take place in adjacent wells of the same predilution plate. The second predilution plate is required when a large number of samples are processed and/or a large number of dilutions are required. Finally, the HID EVOlution™ system will aspirate and add 10 µL from D2 directly to the STR PCR Plate (D2 to PCR). Dilution protocol tables The maximum total dilution is 1:4000 for a 25-µL total reaction volume (or 1:8000 for a 50-µL total reaction volume). Below are two example dilution protocol tables that target 1 ng of DNA; Table 15 is for the 5-dye kits that require 10 µL of diluted DNA (25 µL total reaction volume) and Table 16 on page 101 is for the 4-dye kits that require 20 µL of diluted DNA (50 µL total reaction volume) in the STR PCR plate. Note: The 10- and 20-µL dilution tables are example dilution protocols for a 1-ng target DNA input amount. The dilution protocols used by the HID EVOlution™ system software will change based on the modifiable parameters such as the target DNA input amount (see step 5 on page 59). See either the Sample Normalization Adjustment window or the STR Samples report for the specific dilution used for an individual sample. HID EVOlution™ - qPCR/STR Setup System Getting Started Guide 99 D Appendix D Dilution Protocols Dilution protocols with examples Table 15 Dilution protocols for 10-µL transfer. Columns 1 and 2 apply only for a DNA target input amount of 1 ng. If your sample concentration is between... Then the dilution ratio is... First Dilution Mixture (D1) Second Dilution Mixture (D2) Volume of extracted DNA added to D1 (µL) Volume from D1 added to D2 (µL) Min (ng/µL) Max (ng/µL) 0.000 0.115 1:1 0.115 0.155 1:1.3 18.55 6.45 0 0 10 0.155 0.209 1:1.8 11 9 0 0 10 0.209 0.279 1:2.5 8.16 11.84 0 0 10 0.279 0.369 1:3.2 6.16 13.84 0 0 10 0.369 0.490 1:4.3 4.66 15.34 0 0 10 0.490 0.649 1:5.7 3.5 16.5 0 0 10 0.649 0.857 1:7.5 2.66 17.34 0 0 10 0.857 1.143 1:10 3 27 0 0 10 1.143 1.500 1:13.3 3 37 0 0 10 1.500 1.846 1:17.2 2.32 37.68 0 0 10 1.846 2.297 1:20 2 38 0 0 10 2.297 3.097 1:27 2 38 29.68 10.32 10 3.097 4.174 1:36 2 38 22.00 18.00 10 4.174 5.581 1:50 2 38 16.32 23.68 10 5.581 7.385 1:64 2 38 12.32 27.68 10 7.385 9.796 1:86 2 38 9.32 30.68 10 9.796 12.97 1:114 2 38 7.00 33.00 10 12.97 17.14 1:150 2 38 5.32 34.68 10 17.14 22.98 1:200 2 38 4.00 36.00 10 22.98 30.86 1:270 2 88 6.66 33.34 10 30.86 40.76 1:360 2 88 5.00 35.00 10 40.76 54.00 1:468 2 88 3.83 36.17 10 54.00 72.00 1:630 2 88 2.85 37.15 10 72.00 93.91 1:837 2 88 2.15 37.85 10 93.91 120.00 1:1080 2 88 2.50 57.50 10 120.00 154.29 1:1337 2 88 2.02 57.98 10 154.29 205.71 1:1800 2 88 2.00 78.00 10 205.71 266.67 1:2480 1.5 148.5 2.42 57.58 10 266.67 342.86 1:2990 1.5 148.5 2.01 57.99 10 342.86 400.00 1:4000 1.5 148.5 2.00 78 10 100 TE added to D1 (µL) TE added to D2 (µL) Volume D1 or D2 added to STR PCR reaction plate (µL) Sample is transferred directly from the extracted DNA plate or tube to the STR PCR plate 10 HID EVOlution™ - qPCR/STR Setup System Getting Started Guide Appendix D Dilution Protocols Dilution protocols with examples D Table 16 Dilution protocols for 20-µL transfer. Columns 1 and 2 apply only for a DNA target input amount of 1 ng. If your sample concentration is between: First Dilution Mixture (D1) Then the dilution ratio is: Volume of extracted DNA added to D1 (µL) TE added to D1 (µL) Second Dilution Mixture (D2) Volume from D1 added to D2 (µL) TE added to D2 (µL) Volume D1 or D2 added to STR PCR reaction plate (µL) Min (ng/µL) Max (ng/µL) 0.000 0.115 1:1 0.115 0.155 1:1.3 19.77 6.89 0 0 20 0.155 0.209 1:1.8 18.34 15 0 0 20 0.209 0.281 1:2.4 16.34 23.66 0 0 20 0.281 0.378 1:3.3 12.16 27.84 0 0 20 0.378 0.511 1:4.4 9 31 0 0 20 0.511 0.686 1:6 6.66 33.34 0 0 20 0.686 0.906 1:8 5 35 0 0 20 0.906 1.171 1:10.4 3.84 36.16 0 0 20 1.171 1.500 1:13.3 3 37 0 0 20 1.500 1.920 1:17.1 2.34 37.66 0 0 20 1.920 2.400 1:21.7 2.76 57.24 0 0 20 2.400 3.000 1:26.7 2.25 57.75 0 0 20 3.000 3.692 1:34.5 2.32 77.68 0 0 20 3.692 4.593 1:40 2 78 0 0 20 4.593 6.194 1:52 2 78 10.34 29.66 20 6.194 8.348 1:72.6 2 78 18.00 22.00 20 8.348 11.23 1:96 2 78 23.66 16.34 20 11.23 15.12 1:132 2 78 27.84 12.16 20 15.12 20.43 1:176 2 78 31.00 9.00 20 20.43 27.43 1:240 2 78 33.34 6.66 20 27.43 36.23 1:320 2 78 35.00 5.00 20 36.23 48.00 1:416 2 78 36.16 3.84 20 48.00 64.00 1:564 2 78 37.16 2.84 20 64.00 83.48 1:740 2 78 37.84 2.16 20 83.48 109.71 1:964 2 78 57.51 2.49 20 109.71 142.22 1:1280 2 158 37.50 2.50 20 142.22 182.86 1:1600 2 158 38.00 2.00 20 182.86 240.00 1:2136 2 158 57.75 2.25 20 240.00 295.38 1:2760 2 158 77.68 2.32 20 295.38 355.56 1:3200 2 158 78 2 20 355.56 457.14 1:4000 2 98 158 2 20 Sample is transferred directly from the extracted DNA plate or tube to the STR PCR plate HID EVOlution™ - qPCR/STR Setup System Getting Started Guide 20 101 D Appendix D Dilution Protocols Dilution protocols with examples Table 16 Dilution protocols for 20-µL transfer. Columns 1 and 2 apply only for a DNA target input amount of 1 ng. (continued) If your sample concentration is between: Volume of extracted DNA added to D1 (µL) TE added to D1 (µL) Volume from D1 added to D2 (µL) TE added to D2 (µL) Volume D1 or D2 added to STR PCR reaction plate (µL) 1:5360 1.5 148.5 117.76 2.24 20 738.46 1:6900 1.5 148.5 118.26 1.74 20 800.00 1:8000 1.5 148.5 118.5 1.50 20 Min (ng/µL) Max (ng/µL) 457.14 600.00 600.00 738.46 102 First Dilution Mixture (D1) Then the dilution ratio is: Second Dilution Mixture (D2) HID EVOlution™ - qPCR/STR Setup System Getting Started Guide Appendix E E Validation Experiments and Results This appendix covers: ■ Overview. . . . . . . . . . . . . . . . . . . . . . . . . . . . . . . . . . . . . . . . . . . . . . . . . . . . . . 104 ■ Materials and methods . . . . . . . . . . . . . . . . . . . . . . . . . . . . . . . . . . . . . . . . . . . 105 ■ Precision and reproducibility studies: DNA standard dilution series preparation and reaction setup . . . . . . . . . . . . . . . . . . . . . . . . . . . . . . . . . . . . . . . . . . . . . . . 107 ■ Precision and reproducibility studies: qPCR reaction setup scripts . . . . . . . . . 108 Quantifiler® Human reaction setup precision and reproducibility study . . . . . 108 Quantifiler® Y Human Male kit precision study . . . . . . . . . . . . . . . . . . . . . . . 110 Combined Quantifiler® Human and Quantifiler® Y Human Male reaction setup precision study . . . . . . . . . . . . . . . . . . . . . . . . . . . . . . . . . . . . . . . . . . . . . . . . . 111 ■ Precision and reproducibility studies: STR PCR amplification reaction setup scripts . . . . . . . . . . . . . . . . . . . . . . . . . . . . . . . . . . . . . . . . . . . . . . . . . . . . . . . . 114 Identifiler® and SGM Plus® STR PCR amplification reaction setup precision and reproducibility studies. . . . . . . . . . . . . . . . . . . . . . . . . . . . . . . . . . . . . . . . . . . . 114 Other AmpFlSTR® kits: Supplemental precision and reproducibility studies . 117 ■ Identifiler® and SGM Plus® STR PCR amplification reaction setup accuracy study . . . . . . . . . . . . . . . . . . . . . . . . . . . . . . . . . . . . . . . . . . . . . . . . . . . . . . . . . 122 ■ Complete system check and precision study . . . . . . . . . . . . . . . . . . . . . . . . . . 126 ■ Concordance and position ID confirmation study . . . . . . . . . . . . . . . . . . . . . . 131 ■ Contamination study . . . . . . . . . . . . . . . . . . . . . . . . . . . . . . . . . . . . . . . . . . . . . 132 ■ Conclusion . . . . . . . . . . . . . . . . . . . . . . . . . . . . . . . . . . . . . . . . . . . . . . . . . . . . 133 ■ References. . . . . . . . . . . . . . . . . . . . . . . . . . . . . . . . . . . . . . . . . . . . . . . . . . . . . 134 HID EVOlution™ - qPCR/STR Setup System Getting Started Guide 103 E Appendix E Validation Experiments and Results Overview Overview This appendix describes the experiments performed by the Applied Biosystems Human Identification (HID) team to validate automated qPCR/STR reaction setup on the Tecan HID EVOlution™ - qPCR/STR Setup System using Applied Biosystems chemistries, instruments, and software. The experimental design followed the validation guidelines published by the Scientific Working Group on DNA Analysis Methods (SWGDAM). Validation experiments were carried out to assess the functionality of the HID EVOlution™ scripts, and to assess the overall assay precision, accuracy, reproducibility, and potential for cross-contamination in qPCR/STR setup experiments automated by the instrument. The experimental results were compared to data generated from manually prepared samples. IMPORTANT! Laboratories should conduct their own validation studies with their own specific workflow and instruments to set their own standards for internal use. Importance of validation The HID EVOlution™ system was tested using the HID EVOlution™ Software v1.0; the Freedom EVOware® Software v1.4; and the Tecan Freedom EVO 150 Liquid Handling Workstation with a 4-channel LiHa, a PosID-3 barcode reader, and carriers and reagent blocks that were arranged according to the specific kit used and shown in this guide and in the HID EVOlution™ – qPCR/STR Setup System Application Manual. Freedom EVOware® v2.1 was validated on the HID EVOlution™ – Combination System with additional verification studies performed on the HID EVOlution™ - qPCR/STR Setup System. The Applied Biosystems kits that were validated include the Quantifiler® Human DNA Quantification kit, Quantifiler® Y Human Male DNA Quantification kit, AmpFlSTR® Identifiler® PCR Amplification kit, AmpFlSTR® MiniFiler™ PCR Amplification kit, AmpFlSTR® Yfiler® PCR Amplification kit, AmpFlSTR® SGM Plus® PCR Amplification kit, AmpFlSTR® Profiler Plus® Amplification kit, AmpFlSTR® COfiler® PCR Amplification kit, and AmpFlSTR® SEfiler™ PCR Amplification kit. The SEfiler Plus™ kit was validated separately; the results are not presented in this chapter, but are in line with the other kit validation results presented here. For kit part numbers, see “Supported kits” on page 5. The experimental data that were generated demonstrated that the HID EVOlution™ system v1.0 was functional and consistent in its ability to: • Produce accurate and reproducible results when used with the Quantifiler® Human and Quantifiler® Y Human Male kits • Import 7500 Results files generated with SDS software v1.2.3 • Normalize samples based on imported real-time PCR results • Provide accurate and reliable STR results when used with all supported Applied Biosystems 4- and 5- dye STR amplification kits • Generate Samples Reports and importable 7500 Setup and CE Setup files appropriate to each kit, instrument, and software configuration 104 HID EVOlution™ - qPCR/STR Setup System Getting Started Guide Appendix E Validation Experiments and Results Materials and methods E Materials and methods Samples Genomic DNA samples obtained from Biochain (Hayward, CA), Sigma Chemical Company (St. Louis, MO) and Serological Research Institute (Richmond, CA) were used in all studies. DNA standard dilution series were made using the Quantifiler® Human DNA Standard provided in the kit being tested. Reagents A single lot of each kit was used during the validation studies. TE buffer containing 0.1% EDTA was purchased from Teknova (Hollister, CA). Applied Biosystems POP-4™ (PN 4316355), GeneScan™ 500 LIZ® Size Standard (PN4322682), GeneScan™ 500 ROX™ Size Standard (PN 403039, for 50-µL reactions), Hi-Di™ Formamide (PN 4311320), and Running Buffer 1✕ (prepared from 310 Running Buffer, 10✕ (PN 402824)) were used for the CE run. Instrumentation, consumables, and software The Tecan Freedom EVO® 150 Liquid Handling Workstation, which is equipped with a 4-channel liquid handling arm, was used to set up the qPCR reactions, normalize DNA sample concentration, and to set up STR PCR reactions for STR analysis using the HID EVOlution™ Software v1.0, the Freedom EVOware® Software v1.4 SP1, the Tecan HID EVOlution™ driver v1.0.0.12, and the Tecan Sample Oriented EVOware Limited Edition SP1 (See “Tecan documentation” on page 149 for a list of Tecan manuals detailing required parts and configuration). The 100-mL troughs were purchased from Tecan (Durham, NC) and the 1.5-mL tubes were purchased from Ambion (Austin, TX). Prior to starting the validation, the Freedom EVO® 150 Liquid Handling workstation was installed and calibrated by Tecan. The recommended maintenance schedule (see the HID EVOlution™ qPCR/STR Setup System Application Manual) was followed. • Quantification: The Tecan Freedom EVO® 150 Liquid Handling Workstation was used to set up the real-time PCR reaction plates according to the protocol outlined in the Quantifiler Kits User Guide. For PCR amplification, up to three 7500 instruments were used, all running the SDS Software v.1.2.3. A 7500 Results file was generated after the analysis using the 7500 SDS RealTime Software export tool, then imported into the HID EVOlution™ Software for use during STR PCR amplification setup. • Amplification: The Tecan Freedom EVO® 150 Liquid Handling Workstation was used to set up the STR PCR reaction plates according to the kit-specific protocols described in the individual AmpFlSTR® PCR Amplification kit user guides. Positive amplification controls were manually diluted prior to amplification setup and the aliquot placed in the appropriate well of the reagent block. After importing the 7500 Results file(s) into the HID EVOlution™ Software, extracted DNA samples with concentrations < 0.1 ng/µL and negative controls were selected for direct transfer of the maximum allowable volume (10 or 20 µL) into the STR PCR reaction plate. Extracted DNA samples with concentrations between 0.1 ng/µL and 50 ng/µL were diluted according to the software parameters. See Appendix D, “Dilution Protocols” on page 93 for additional details about dilution protocols. PCR amplification was carried out in calibrated 9700 thermal cyclers. HID EVOlution™ - qPCR/STR Setup System Getting Started Guide 105 E Appendix E Validation Experiments and Results Materials and methods • Capillary electrophoresis: Capillary electrophoresis plates were prepared manually. Master mixes of Hi-Di™ Formamide and GeneScan™ 500 LIZ® Size Standard (GeneScan™ 500 ROX™ Size Standard for 50-µL reactions), PCR product, and kit-specific allelic ladder were prepared and added manually to the samples, according to the procedure described in each kit-specific user guide. The CE Setup file generated by the HID EVOlution™ Software during the STR PCR setup run was imported to the Data Collection Software v3.0 on a 3130xl Genetic Analyzer to create a plate record. Capillary Electrophoresis was performed on an ABI PRISM 3130xl Genetic Analyzer with Data Collection Software v3.0 using recommended protocols. Data analysis For analysis of the Quantifiler® kit results, the 7500 SDS Real-Time Software v.1.2.3 was used. All runs were analyzed using the Manual analysis mode, with the baseline set from 3 to 15 and the threshold set at 0.2. The R2 and slope values of the standard curve were calculated by the software and compared with previously observed ranges from the Quantifiler® kit validations. A slope value of −3.3 represents 100% efficiency of PCR. A slope range of −3.0 to −3.6 is typically observed for the different AB TaqMan® assays. Average tolerances for acceptable efficiency are from 90% to 110% with a variation ≤ 2%. After capillary electrophoresis, samples were analyzed with the 3130xl Genetic Analyzer using the Data Collection Software v. 3.0. All samples were genotyped using the GeneMapper® ID Software v.3.2 using standard analysis methods (see the GeneMapper ID Software v 3.1 User Guide, PN 4338775). For statistical analysis, box plot charts were created with the MiniTab Statistical Software, version 15, which graphically summarized the distribution of the average replicate peak height for each sample concentration. For other analysis, Microsoft® Excel® was used to calculate averages and standard deviations, and to produce bar charts. 106 HID EVOlution™ - qPCR/STR Setup System Getting Started Guide Appendix E Validation Experiments and Results Precision and reproducibility studies: DNA standard dilution series preparation and reaction setup E Precision and reproducibility studies: DNA standard dilution series preparation and reaction setup Experiment To evaluate the ability of the HID EVOlution™ system to precisely prepare and transfer a DNA standard dilution series, 40 DNA standard dilution series were prepared on the system. The plates were prepared using Quantifiler® Human and Quantifiler® Y Human Male DNA Quantification kits. The DNA standard dilution series consisted of eight concentrations: 50 ng/µL, 16.7 ng/µL, 5.56 ng/µL, 1.85 ng/µL, 0.62 ng/µL, 0.21 ng/µL, 0.068 ng/µL, and 0.023 ng/µL. Two replicates of each concentration from each of the 40 DNA standard dilution series were transferred by the system to a plate, creating a total of eight plates. Each plate also contained a manually-prepared DNA standard dilution series. The eight plates were then run on a single 7500 Real-Time PCR System. For qPCR, the standard thermal cycling protocol described in the Quantifiler® Kits User’s Manual, Chapter 3 (PN 4344790) was used for all 7500 instrument runs. To evaluate the reproducibility and precision of the automated DNA standard dilution series setup across multiple 7500 instruments, an additional 35 DNA standard dilution series were prepared by the HID EVOlution™ system and run on three different 7500 instruments, for a total of 75 DNA standard dilution series tested. After qPCR, the R2 and slope values calculated by the 7500 System SDS Software v1.2.3 were compared to the original Quantifiler® kit validation results for each kit type, as detailed in the Quantifiler® Kits User’s Manual, Chapter 6.4 (PN 4344790). Results Table 17 shows the observed slope and R2 ranges obtained from both the automated and the manual qPCR reaction setups. A slope value of −3.3 represents 100% efficiency of PCR and a slope range of −3.0 to −3.6 is typically accepted to account for stochastic variation in samples. The data indicate that the efficiency for Quantifiler® Y Human Male ranged from 97.4% to 104.5% with a variance from the standard curve ≤ 1.6%. The efficiency of the Quantifiler® Human samples ranged from 92.6% to 112.6% with a variance from the standard curve of ≤ 1.3%. Table 17 Slope and R2 values for Quantifiler Human and Y Human Male kits (ND = not determined). HID EVOlution™ system prepared standards: range observed for one 7500 instrument (n = 40) HID EVOlution™ system prepared standards: range observed for three different 7500 instruments (n = 75) Observed range published in the Quantifiler® Kits User’s Manual Quantifiler® Human kit Slope -3.052 to -3.370 -3.052 to -3.512 -2.9 to -3.3 R2 0.991 to 0.999 0.987 to 0.999 > 98% Quantifiler® Y Human Male kit Slope -3.217 to -3.386 ND 3.0 to -3.6 R2 0.984 to 0.991 ND > 98% HID EVOlution™ - qPCR/STR Setup System Getting Started Guide 107 E Appendix E Validation Experiments and Results Precision and reproducibility studies: qPCR reaction setup scripts Precision and reproducibility studies: qPCR reaction setup scripts Quantifiler® Human reaction setup precision and reproducibility study Experiment qPCR reaction setup precision and reproducibility studies were performed with a single female genomic DNA sample. The genomic DNA was quantified using the Quantifiler® Human DNA Quantification kit and based on the results, the original female genomic DNA stock was manually diluted to 0.025, 0.05, 0.1, 1.0, 5.0, and 25.0 ng/µL of DNA. Each concentration was then transferred either into microcentrifuge tubes or into a 96-well plate that served as a source DNA vessel. The Quantifiler® kit reagents, twelve replicates of each sample DNA concentration, and the DNA standard dilution series were dispensed by the HID EVOlution™ system into a qPCR reaction plate. qPCR was run on a single 7500 Real-Time PCR System. Each study (plates or tubes) was repeated three times. Automated setup of Quantifiler® Human kit reactions from a plate Samples containing 0.025, 0.05, 0.1, 1.0, 5.0, and 25.0 ng/µL of DNA in a 96-well source plate were quantified for 12 replicates in three runs. In Figure 22, the red boxes represent plate study 1 (P1), the green boxes represent plate study 2 (P2), and the blue boxes represent plate study 3 (P3). Figure 22 Precision and reproducibility study for the automated reaction setup of Quantifiler® Human kit reactions using extracted DNA from a 96-well plate. 108 HID EVOlution™ - qPCR/STR Setup System Getting Started Guide Appendix E Validation Experiments and Results Precision and reproducibility studies: qPCR reaction setup scripts Automated setup of Quantifiler® Human kit reactions from tubes E Samples containing 0.025, 0.05, 0.1, 1.0, 5.0, and 25.0 ng/µL of DNA in 1.5-mL microcentrifuge tubes were quantified for 12 replicates in three runs. In Figure 23, the red boxes represent tube study 1 (Tube1), the green boxes represent tube study 2 (Tube2), and the blue boxes represent tube study 3 (Tube3). Figure 23 Precision and reproducibility study for the automated setup of Quantifiler® Human kit reactions using extracted DNA from microcentrifuge tubes. Quantifiler® Human kit results Figure 24 below and Table 18 on page 110 show the average DNA concentration across a range of DNA concentrations and compare the results to those for samples set up manually. Figure 24 Quantification results comparing Quantifiler® Human kit reactions set up manually and with the HID EVOlution™ system (n =12). HID EVOlution™ - qPCR/STR Setup System Getting Started Guide 109 E Appendix E Validation Experiments and Results Precision and reproducibility studies: qPCR reaction setup scripts Table 18 Average quantity and standard deviation for quantification of human DNA using the Quantifiler® Human DNA Quantification kit. Sample No. of Replicates Tube 1 Tube 2 Tube 3 Plate 1 Plate 2 Plate 3 Manual Average quantity (ng/µL) 25 12 29.458 33.984 30.809 25.043 28.388 25.512 29.654 5 12 5.743 6.116 5.435 4.646 5.037 5.052 5.930 1 12 1.140 1.129 1.107 0.927 0.932 1.072 1.161 0.1 12 0.132 0.136 0.114 0.090 0.091 0.120 0.127 0.05 12 0.067 0.065 0.070 0.050 0.047 0.066 0.073 0.025 12 0.033 0.040 0.032 0.031 0.030 0.050 0.039 Standard deviation 25 12 0.793 1.342 0.701 2.538 1.336 1.238 1.488 5 12 0.177 0.232 0.198 0.201 0.132 0.146 0.330 1 12 0.075 0.057 0.037 0.050 0.054 0.062 0.063 0.1 12 0.016 0.015 0.022 0.011 0.012 0.021 0.014 0.05 12 0.015 0.013 0.010 0.009 0.010 0.011 0.018 0.025 12 0.010 0.009 0.006 0.010 0.011 0.018 0.016 Quantifiler® Y Human Male kit precision study Experiment Automated setup of Quantifiler® Y Human Male kit reactions from a plate and tubes Quantifiler® Y Human Male kit results The experiment described in “Quantifiler® Human reaction setup precision and reproducibility study” on page 108 was repeated with male genomic DNA using the Quantifiler Y Human Male Kit. The precision of the automated Quantifiler Y Human Male reaction setup was also tested across a range of DNA concentrations using both plate and tube configurations as source vessels. Figure 25 on page 111 (top) shows a box and whisker plot of the average DNA concentrations for extracted DNA samples transferred from a 96-well plate. Figure 25 (bottom) shows the same for samples transferred from microcentrifuge tubes. Table 19 on page 113 shows average concentration and standard deviation results. In determining the accuracy of automated Quantifiler® Y Human Male reaction setup using the HID EVOlution™ system, the greatest standard deviation in the samples at probable range ≥ 1 ng/µL varied ≤ 5% from the average for all three experiments, regardless of the source vessel. 110 HID EVOlution™ - qPCR/STR Setup System Getting Started Guide Appendix E Validation Experiments and Results Precision and reproducibility studies: qPCR reaction setup scripts E Figure 25 Precision study to verify Quantifiler® Y Human Male kit script; plate (top) and tube (bottom) (n=12). Combined Quantifiler® Human and Quantifiler® Y Human Male reaction setup precision study Experiment The HID EVOlution™ qPCR scripts (either Quantifiler_Human Y_plate.esc or Quantifiler_Human Y_tubes.esc), which run both the Quantifiler® Human and Y Human Male assays on the same plate, were tested for assay setup precision using different quantities of human DNA on the same 96-well optical plate. Samples containing about 0.025, 0.05, 0.1, 1.0, 5.0, and 25.0 ng/µL of DNA were quantified for 12 replicates in three runs. HID EVOlution™ - qPCR/STR Setup System Getting Started Guide 111 E Appendix E Validation Experiments and Results Precision and reproducibility studies: qPCR reaction setup scripts Figure 26 shows a box and whisker plot of the average DNA quantity for each input amount and quantification kit. The red boxes represent samples run with Quantifiler® Human Quantification kit reagents, and the green boxes represent DNA samples run with the Quantifiler® Y Human Male Quantification kit reagents. Figure 26 Precision study for automated Quantifiler® Human and Y Human Male kit reaction setup using extracted DNA from a 96-well plate. 112 HID EVOlution™ - qPCR/STR Setup System Getting Started Guide E Appendix E Validation Experiments and Results Precision and reproducibility studies: qPCR reaction setup scripts Results In determining the accuracy of the Quantifiler® Human and Y Human Male Quantification assay and reaction setup using the combined qPCR setup script on the HID EVOlution™ system, the average concentrations and standard deviations were calculated (see Table 19). Table 19 Average concentration and standard deviation for automated reaction setup using the Quantifiler® Human and Y Human Male DNA Quantification Kits and each of the following scripts: QuantifilerHuman_plate.esc, QuantifilerHuman_tubes.esc, QuantifilerY_plate.esc, QuantifilerY_tubes.esc, QuantifilerHumanY_plate.esc, and QuantifilerHumanY_tubes.esc. N= Human plate Human tube Y plate Y tube Combo plate Human Combo plate Y Combo tube Human Combo tube Y N = 36 N = 36 N = 12 N = 12 N=5 N=5 N=5 N=5 Average concentration (ng/µL) 0.025 ng/µL 0.037 0.035 0.024 0.038 0.029 0.033 0.025 0.028 0.125 ng/µL 0.054 0.067 0.062 0.097 0.056 0.080 0.057 0.074 0.1 ng/µL 0.100 0.127 0.115 0.161 0.092 0.144 0.113 0.167 1 ng/µL 0.977 1.125 1.143 1.467 0.933 1.154 1.156 1.554 5 ng/µL 4.911 5.765 5.003 6.433 4.990 5.314 6.116 7.038 25 ng/µL 26.314 31.417 23.637 28.493 28.608 25.590 36.960 35.120 Standard deviation 0.025 ng/µL 0.02 0.01 0.009 0.014 0.008 0.007 0.010 0.018 0.125 ng/µL 0.01 0.01 0.009 0.024 0.003 0.013 0.005 0.025 0.1 ng/µL 0.02 0.02 0.025 0.019 0.013 0.025 0.015 0.027 1 ng/µL 0.09 0.06 0.050 0.080 0.040 0.042 0.042 0.141 5 ng/µL 0.25 0.34 0.198 0.242 0.217 0.068 0.269 0.208 25 ng/µL 2.31 2.15 0.751 0.800 0.521 0.621 1.113 1.423 HID EVOlution™ - qPCR/STR Setup System Getting Started Guide 113 E Appendix E Validation Experiments and Results Precision and reproducibility studies: STR PCR amplification reaction setup scripts Precision and reproducibility studies: STR PCR amplification reaction setup scripts Identifiler® and SGM Plus® STR PCR amplification reaction setup precision and reproducibility studies Experiment Precision and reproducibility studies were conducted to evaluate the sample dilution and liquid transfer steps of the automated STR PCR amplification setup protocols. Each AmpFlSTR® kit script was verified for functionality, precision, and reproducibility. This study was performed using 0.025, 0.1, 0.5, 1, 2, 5, 10, and 50 ng/µL DNA samples that were prepared on the HID EVOlution™ system and quantified using the Quantifiler® Human kit on the 7500 Real-Time PCR System. Eleven replicates of each DNA concentration were prepared, and placed in either a plate or in tubes. The HID EVOlution™ system was then used to normalize the DNA concentration and prepare the STR PCR amplification reactions. The experiment was repeated three times for extracted DNA in tubes and three additional times for extracted DNA in a 96-well plate. Kit-specific positive-control and negative-control reactions were prepared by the HID EVOlution™ system. Peak height averages and standard deviations were calculated to evaluate the precision and reproducibility of the automated STR PCR setup. Box and whisker plots were generated from the Identifiler® data (Figure 27 on page 115) and the SGM Plus® data (Figure 28 on page 116) using peak height averages from all kit-specific loci amplified. Representative STR profiles and peak height average data from the remaining validated kits are detailed in “Other AmpFlSTR® kits: Supplemental precision and reproducibility studies” on page 117. Results Figure 27 on page 115 is data from the Identifiler® STR PCR setup. The Identifiler® kit assay setup is a 25-µL PCR reaction volume made up of 10 µL of normalized DNA and 15 µL of reaction mix. The overall peak height average for all Identifiler® PCR assay setup experiments, regardless of the source vessel (plate or tubes), was 1239 RFU with a standard deviation of 509, (not including the 0.025 ng samples). For tubes only, the peak height average was 1332 RFU ± 523, while for plates only, the peak height average was 1144 RFU ± 474. Genotype concordance was 100%. All samples with input amounts of 1.0 ng of DNA (DNA starting concentrations of ≥ 0.1 ng/µL) resulted in a peak height ratio of ≥ 70%. The variance in peak height averages was < 16% between source vessels. In conclusion, sample dilution and normalization was successful, regardless of the source vessel and starting DNA concentration (for DNA concentrations ≥ 0.1 ng/µL). The extracted DNA samples with a starting concentration of 0.025 ng/µL were not diluted; 10 µL of DNA was directly transferred to the PCR reaction plate. Samples with approximately 0.25 ng of DNA added to each PCR reaction displayed expected peak height averages that were smaller than the other samples due to the reduced mass of DNA. The average peak height for reactions prepared from 0.025 ng/µL DNA samples was 332.69 for samples in plates and 391.86 for samples in tubes. The combined peak 114 HID EVOlution™ - qPCR/STR Setup System Getting Started Guide Appendix E Validation Experiments and Results Precision and reproducibility studies: STR PCR amplification reaction setup scripts E height average for 0.25 ng input DNA samples in plates and tubes was 362.27, which is 29% of the average peak height for reactions with approximately 1.00 ng of input DNA (DNA starting concentrations of ≥ 0.1 ng/µL). This result is consistent with the reduced amount of input DNA. In conclusion, the direct transfer of extracted DNA samples during automated Identifiler® assay setup, using a concentration less than the desired target input amount, was successful regardless of whether the samples started in a plate or in a tube. Figure 27 Identifiler® kit precision and reproducibility studies depicting the average peak height distribution of each study. Samples were present either in plates (green) or in tubes (yellow). Studies were carried out on separate days, each represented by a separate box plot in the appropriate color. Figure 28 on page 116 is data from the SGM Plus® STR PCR setup. The SGM Plus® kit used a 50-µL PCR reaction volume, with a 20-µL volume for normalized DNA (diluted as necessary). The overall peak height average for all experiments using the SGM Plus® kit, regardless of the source vessel, was 938 RFU with a standard deviation of 354 (not including the 0.025 ng samples). For tubes, the peak height average was 958 RFU ± 344. For plates, the peak height average was 919 RFU ± 362. Genotype concordance was 100% and all samples with input amounts ≥ 0.1 ng/µL resulted in a peak height ratio of ≥ 70%. HID EVOlution™ - qPCR/STR Setup System Getting Started Guide 115 E Appendix E Validation Experiments and Results Precision and reproducibility studies: STR PCR amplification reaction setup scripts Figure 28 SGM Plus® kit reproducibility studies depicting the average peak height distribution of each study. Samples were either in a plate (brown) or in a tube (green). Studies were carried out on three separate days. In conclusion, sample dilution and normalization, including the direct transfer for automated SGM Plus® kit samples, was successful regardless of the DNA starting concentration and source vessel. 116 HID EVOlution™ - qPCR/STR Setup System Getting Started Guide Appendix E Validation Experiments and Results Precision and reproducibility studies: STR PCR amplification reaction setup scripts E Other AmpFlSTR® kits: Supplemental precision and reproducibility studies The remaining data from the precision and reproducibility study of the STR PCR amplification setup script validation are shown in the following figures (sample data from the Identifiler® and SGM Plus® kits were detailed in the preceding sections). Representative samples of STR profiles are also included. • • • • • • • • Precision studies for Profiler Plus® kit peak height averages Precision studies for COfiler® kit peak height averages Precision studies for SEfiler™ kit peak height averages Precision studies for Yfiler® kit peak height averages Precision studies for MiniFiler™ kit peak height averages SGM Plus® kit STR profiles Profiler Plus® kit STR profiles COfiler® kit STR profiles Figure 29 below and Figures 30 and 31 on page 118 show average peak height across different starting concentrations. Positive refers to the positive control used in the experiment. Red bars represent sample data generated when processing DNA extracts from a 96-well plate (source vessel) and green bars represent sample data generated when processing DNA extracts from tubes (source vessels). Figure 29 Precision studies for the Profiler Plus® kit. HID EVOlution™ - qPCR/STR Setup System Getting Started Guide 117 E Appendix E Validation Experiments and Results Precision and reproducibility studies: STR PCR amplification reaction setup scripts Figure 30 Precision studies for the COfiler® kit. Figure 31 Precision studies for the SEfiler™ kit. Figures 32 and Figure 33 on page 119 show peak height averages across different starting concentrations. (Male) Control refers to the positive control used in the experiment. Green bars represent sample data processed from a plate (-P) and yellow bars represent sample data processed from tubes (-T) (the source vessels). 118 HID EVOlution™ - qPCR/STR Setup System Getting Started Guide Appendix E Validation Experiments and Results Precision and reproducibility studies: STR PCR amplification reaction setup scripts Figure 32 Precision studies for the Yfiler® kit. Figure 33 Precision Studies for the MiniFiler™ kit. E Figure 34 on page 120 shows representative STR profiles from a range of extracted DNA concentrations. 10 µL of the 0.025 ng/µL extracted DNA samples was transferred by the HID EVOlution™ system directly to the PCR reaction plate. For extracted DNA samples with concentration > 0.025 ng/µL, the concentration of each DNA sample was normalized to 0.1 ng/µL, and 10 µL of normalized sample was transferred by the HID HID EVOlution™ - qPCR/STR Setup System Getting Started Guide 119 E Appendix E Validation Experiments and Results Precision and reproducibility studies: STR PCR amplification reaction setup scripts EVOlution™ system to the PCR reaction plate. The x-axis of plot indicates base pair size and the y-axis indicates the RFU. The source DNA concentration is as follows: Panel A = 50 ng/µL, Panel B = 10 ng/µL, Panel C= 5 ng/µL, Panel D = 2 ng/µL, Panel E = 1 ng/µL, Panel F = 0.5 ng/µL, Panel G = 0.1 ng/µL, and Panel H = 0.025 ng/µL. Figure 34 SGM Plus® kit electropherograms. Figure 35 on page 121 and Figure 36 on page 121 show representative STR profiles from a range of extracted DNA concentrations. 10 µL of the 0.025 ng/µL extracted DNA samples was transferred by the HID EVOlution™ system directly to the PCR reaction plate. For extracted DNA samples with concentration > 0.025 ng/µL, the sample concentrations were normalized to 0.1 ng/µL by the HID EVOlution™ system, and 10 µL of normalized sample was transferred to the PCR reaction plate. 120 HID EVOlution™ - qPCR/STR Setup System Getting Started Guide Appendix E Validation Experiments and Results Precision and reproducibility studies: STR PCR amplification reaction setup scripts Figure 35 Profiler Plus® kit STR profiles. Figure 36 COfiler® kit STR profiles. HID EVOlution™ - qPCR/STR Setup System Getting Started Guide E 121 E Appendix E Validation Experiments and Results Identifiler® and SGM Plus® STR PCR amplification reaction setup accuracy study Identifiler® and SGM Plus® STR PCR amplification reaction setup accuracy study Experiment The AmpFlSTR® kits were grouped based on the PCR reaction volume: • 25 µL for Identifiler®, Yfiler®, and MiniFiler™ kits • 50 µL for SGM Plus®, Profiler Plus®, COfiler®, and SEfiler™ kits Each script was verified for functionality. One kit-specific script from each group was selected to test for further validation: Identifiler® and SGM Plus® kits. The accuracy studies were performed using 0.025, 0.1, 0.5, 1, 2, 5, 10, and 50 ng/µL DNA samples that were quantified using the Quantifiler® Human kit on the HID EVOlution™ system. Eleven replicates of each DNA concentration were prepared, and placed in either a plate or in tubes. The HID EVOlution™ system was then used to normalize the DNA concentration and prepare the STR PCR amplification reactions. The experiment was repeated three times for extracted DNA in tubes and three additional times for extracted DNA in a 96-well plate. Peak height averages were calculated and compared for samples prepared on the HID EVOlution™ system and samples prepared manually. Results 122 For Identifiler®, the peak height variation was comparable to data generated from manually prepared samples (see Figure 37 and Table 20 on page 123). The peak heights observed for samples with less than 0.1 ng/µL had lower peak heights, as expected, and the reduction correlated with the DNA input amount. HID EVOlution™ - qPCR/STR Setup System Getting Started Guide Appendix E Validation Experiments and Results Identifiler® and SGM Plus® STR PCR amplification reaction setup accuracy study E Figure 37 Average peak heights at varying starting DNA concentrations. Results from Identifiler® PCR amplification reactions prepared by the HID EVOlution™ system are shown in yellow and those prepared manually are shown in green. Table 20 Summary of Peak Height Averages for Identifiler® from samples (n=11) with different starting DNA concentrations before normalization, diluted and prepared either manually or with the HID EVOlution™ system (automated). Peak Height Averages (RFU) Starting DNA Concentration (ng/uL) Manual (RFU) Manual Average Automated (RFU) Automated Average Percent Difference (Manual vs. Automated) 0.025 250.66 1074 ± 128 250.99 1005 ± 63 100% 0.05 561.20 493.50 114% 0.1 852.30 985.80 86% 0.5 986.70 873.00 113% 1 1160.60 977.40 119% 2 1125.70 1000.50 113% 5 1224.80 1061.80 115% 10 1025.00 1072.50 96% 25 1008.30 1041.90 97% 50 1211.30 1033.40 117% HID EVOlution™ - qPCR/STR Setup System Getting Started Guide 123 E Appendix E Validation Experiments and Results Identifiler® and SGM Plus® STR PCR amplification reaction setup accuracy study Figure 38 below and Table 21 on page 125 show data from the SGM Plus® kit STR PCR setup. The STR PCR setup was run using a 50-µL PCR reaction script. The peak height variation is analogous to the data generated from the manually prepared samples. The combined average peak height for all samples ≥ 0.1 ng/µL was 983 RFU ± 80 for the manual setup, and 1066 RFU ± 174 for the automated setup. Figure 38 Average peak heights at varying starting DNA concentrations. Results from SGM Plus® PCR amplification reactions prepared by the HID EVOlution™ system are shown in yellow; those prepared manually are shown in green (Positive = Positive Amplification Control). 124 HID EVOlution™ - qPCR/STR Setup System Getting Started Guide Appendix E Validation Experiments and Results Identifiler® and SGM Plus® STR PCR amplification reaction setup accuracy study E Table 21 Summary of peak height averages for SGM Plus® from samples (n=11) with different starting DNA concentrations before normalization, diluted and prepared either manually or with the HID EVOlution™ system (automated). Peak Height Averages (RFU) Starting DNA Concentration (ng/uL) Manual (RFU) 0.025 234.13 0.1 1000.70 0.5 1139.10 1412.90 81% 1 992.80 952.30 104% 2 956.40 963.10 99% 5 947.00 989.20 96% 10 977.40 1146.80 85% 25 874.30 904.40 97% 50 234.13 278.13 84% Manual Average Automated (RFU) Automated Average 278.13 983 ± 80 1093.50 HID EVOlution™ - qPCR/STR Setup System Getting Started Guide Percent Difference (Manual vs. Automated) 84% 1066 ± 174 92% 125 E Appendix E Validation Experiments and Results Complete system check and precision study Complete system check and precision study Experiment To evaluate the precision of the entire HID EVOlution™ system workflow, genomic DNA was diluted with T10E0.1 buffer to obtain concentrations of 50.0, 10.0, 5.0, 2.0, 1.0, 0.5, and 0.025 ng/µL. Ten replicates of each concentration were quantified (80 samples in total) using the Quantifiler® Human kit. The quantification standards were prepared by the HID EVOlution™ system. 1. A qPCR/STR Setup file containing sample names and information was created, then imported to the HID EVOlution™ - qPCR/STR Setup System software for use in qPCR reaction setup. 2. The 7500 Setup file generated by the HID EVOlution™ software (output in .txt format) was used as the 7500 Setup file (input) for the 7500 instrument to perform qPCR. 3. The SDS software performed data analysis and produced a 7500 Results file (output in .csv format). 4. The qPCR/STR Setup file containing sample names and information that was created in step 1 was imported to the HID EVOlution™ - qPCR/STR Setup System software for use in STR PCR amplification reaction setup. 5. The 7500 Results file (output) was used as the 7500 Results file (input) to dilute and normalize the samples on the HID EVOlution™ system. All samples with concentrations < 0.1 ng/µL (0.025 ng/µL) were identified by the HID EVOlution™ system to receive 10 µL of DNA extract. The HID EVOlution™ system generated a CE Setup file (output in .txt format) and a STR Samples report. 6. The samples were then prepared for AmpFlSTR® Identifiler® kit amplification on the 9700 thermal cycler. 7. The CE Setup file (output) generated by the HID EVOlution software (step 5) was imported to create a plate record into the 3130/3130xl Genetic Analyzer Data Collection software for capillary electrophoresis/fragment analysis. Figure 39 on page 127 shows the steps used during HID EVOlution™ system check and precision validation. 126 HID EVOlution™ - qPCR/STR Setup System Getting Started Guide Appendix E Validation Experiments and Results Complete system check and precision study Q0#23423AMPLE FILEINPUT 3ETUPFILE INPUT Q0#2SETUPONTHE()$%6/LUTION©3YSTEM Q0#23423AMPLE FILEINPUT Q0#23AMPLES2EPORTOUTPUT 3ETUPFILEOUTPUT 0ERFORMREALTIMEQ0#2ONTHEINSTRUMENT 0ERFORMDATAANALYSISUSINGTHE3$3SOFTWARE 2ESULTSFILE INPUT E $ILUTIONANDNORMALIZATIONOFSAMPLECONCENTRATIONS 3420#2AMPLIFICATIONREACTIONSETUP ONTHE()$%6/LUTION©3YSTEM 2ESULTSFILE OUTPUT 3423AMPLES2EPORTOUTPUT #%3ETUPFILEOUTPUT 0ERFORM3420#2ONTHETHERMALCYCLER #%3ETUPFILE INPUT 0ERFORM#%ONTHEXL'ENETIC!NALYZER 0ERFORMDATAANALYSISUSING THE'ENE-APPER3OFTWARE 342RESULTS Figure 39 HID EVOlution™ system process. HID EVOlution™ - qPCR/STR Setup System Getting Started Guide 127 E Appendix E Validation Experiments and Results Complete system check and precision study Results The quantification results obtained (Figure 40) were similar to the expected results across a range of concentrations from 50 ng/µL to 25 pg/µL. Quantification results were as expected for the sample DNA concentrations. Sample-to-sample reproducibility was observed among all ten replicates in each of the eight sample concentrations. A maximum standard deviation was observed at the 50 ng/µL concentration of 1.104. Other standard deviations were < 0.2 indicating minimal sample-to-sample variation. Figure 40 Quantitative results from complete system check study. Figure 41 on page 129 shows the results of the STR PCR amplification analysis. Extracted DNA samples were first quantified using the Quantifiler® Human script, then normalized for the Identifiler® PCR reaction setup (n=176). The figure shows the average allele peak height for all the replicates normalized across a range of DNA concentrations. The peak height averages were within the acceptable range of 1000-3000 RFU. 128 HID EVOlution™ - qPCR/STR Setup System Getting Started Guide Appendix E Validation Experiments and Results Complete system check and precision study Figure 41 E Identifiler® kit complete system study. The following figures show the Identifiler® kit intralocus balance and intracolor balance profiles. The profiles were evaluated as a measure of the relative changes across the loci and the dye sets. The intralocus balance for almost all samples containing ≥ 0.1 ng/µL DNA concentrations was > 70% (Figure 42 on page 130) and within the acceptable threshold. The intracolor balance was > 40% (Figure 43 on page 130). HID EVOlution™ - qPCR/STR Setup System Getting Started Guide 129 E 130 Appendix E Validation Experiments and Results Complete system check and precision study Figure 42 Intralocus balance for Identifiler® kit complete system study. Figure 43 Intracolor balance for Identifiler® kit complete system study. HID EVOlution™ - qPCR/STR Setup System Getting Started Guide Appendix E Validation Experiments and Results Concordance and position ID confirmation study E Concordance and position ID confirmation study Experiment For simplicity and consistency during qPCR and STR analyses, the controls and allelic ladder positions on a PCR plate are predetermined. As a result, sample positions in the source and PCR plates may be inconsistent. Sample positions during qPCR and STR PCR amplification may also be inconsistent because of the different control types being used. This inconsistency is compounded by the sample dilution transfers that are required for normalization. As a result, tracking the location of the samples as they are transferred into the PCR reaction plates is imperative. The HID EVOlution™ Software tracks sample names and positions during processing and generates a final report summarizing this information. This precise information is required to properly process the samples. Positional integrity of the samples was demonstrated by processing 80 previously typed human samples using the HID EVOlution™ system for quantification, normalization, and STR PCR set up. For the quantification workflow, the Quantifiler® Human kit was used. For STR analysis, the Identifiler® kit samples were in tubes and the SGM Plus® kit samples were in a 96-well plate. Both the sample tubes and the plate were labeled with barcodes. For additional information about various plate layouts, see “About the qPCR reaction plate layout” on page 36 for qPCR layouts and “About the STR PCR plate layout” on page 62 for STR PCR layouts. Results The resulting STR profile for each sample was compared with the known profile. A 100% concordance was observed. The position of each profile was compared with its expected location in the qPCR and STR PCR plates and with the sample report generated by the software. A 100% comparison was observed. In conclusion, the HID EVOlution™ Software tracked the sample name and position correctly during processing. HID EVOlution™ - qPCR/STR Setup System Getting Started Guide 131 E Appendix E Validation Experiments and Results Contamination study Contamination study Experiment The potential for contamination in the automated quantification and STR protocols (including normalization) was evaluated. Samples that contained 100 µL of 100 ng/µL of DNA were alternated with samples that contained TE buffer only. On each 96-well plate, 40 replicates of the DNA and TE buffer were set up in a checkerboard or vertical stripe pattern. These plates served as source plates for a qPCR reaction that used the Quantifiler® Human kit and script. The negative samples were evaluated for a CT value < 40. If a negative sample had a CT value < 40, it was evaluated manually for an STR profile using the MiniFiler™ kit. A separate set of similarly patterned source plates were used to test the STR PCR setup operations. Samples were processed for quantification using the Quantifiler® Human kit, diluted to normalize DNA concentrations, and then prepared for STR PCR amplification using the Identifiler® kit. Results All TE wells in the striped-pattern layout exhibited CT values > 40, indicating that there was no cross-contamination during the qPCR reaction setup. Of the 40 TE wells in the checkerboard layout, one well exhibited a CT value of 38. This sample was amplified using MiniFiler™ and standard HID analysis methods. It showed no STR profile. The absence of a profile confirmed that the CT value of 38 was a result of stochastic variation in the qPCR reaction and not due to a cross-contamination of the sample during automated setup. A separate set of source plates, with the same source DNA as above and the same layout patterns, was used to test the STR PCR setup operations for crosscontamination. The 80 wells containing TE (40 from each pattern) were evaluated for profiles after fragment analysis. This set of TE studies also showed no STR profile. 132 HID EVOlution™ - qPCR/STR Setup System Getting Started Guide Appendix E Validation Experiments and Results Conclusion E Conclusion Automated protocols were developed for and validated on the HID EVOlution™ System for the following: Quantifiler® Human, Quantifiler® Y Human Male, Identifiler®, Yfiler®, MiniFiler™, SGM Plus®, Profiler Plus®, SEfiler™, and COfiler® kits. Validation studies demonstrated that the liquid handling protocols provided robust and reliable results, using a range of DNA quantities. In conclusion, the following observations were made. • Quantification scripts: – Quantification scripts produced standard-curve results that were within acceptable limits as defined by PCR efficiency and extensive Applied Biosystems experience manually preparing Quantifiler® kits. – Variation between scripts employing either tubes or plates was minimal, as was the variation between automation and manually prepared samples. • STR PCR amplification scripts: – STR PCR amplification scripts produced average peak-height results that were within acceptable limits, as defined by instrument-specific parameters, with results within the desired peak height range of 1000-3000 RFU. – Variation between scripts employing either tubes or plates was minimal, as was the variation between automation and manually prepared samples. • Entire workflow – Sample names and information were accurately tracked and reported throughout the workflow. – Quantification data was properly integrated, and sample normalization was accurately defined. – STR electropherograms exhibited desired peak-height averages, intralocus balance, and intracolor balance, resulting in acceptable STR profiles. HID EVOlution™ - qPCR/STR Setup System Getting Started Guide 133 E Appendix E Validation Experiments and Results References References • Scientific Working Group on DNA Analysis Methods. 2004. Revised Validation Guidelines (approved July 2003). Forensic Science Communications Volume 6, Number 3. Available at: www.fbi.gov/hq/lab/fsc/backissu/july2004/standards/2004_03_standards02.htm • DNA Advisory Board. 2000. Quality Assurance Standards for Forensic DNA Testing Laboratories (approved October 1998). Forensic Science Communications Volume 2, Number 3. Available at: www.fbi.gov/hq/lab/fsc/backissu/july2000/codispre.htm 134 HID EVOlution™ - qPCR/STR Setup System Getting Started Guide Appendix F F Automation Guidelines This appendix contains general guidelines to assist you with automating qPCR reaction setup, DNA normalization, and STR PCR amplification reaction setup on other liquid-handling platforms: ■ qPCR reaction setup automation guidelines . . . . . . . . . . . . . . . . . . . . . . . . . . . 135 ■ STR PCR reaction setup automation guidelines. . . . . . . . . . . . . . . . . . . . . . . . 137 qPCR reaction setup automation guidelines The following are general guidelines for automating the preparation of DNA standards and PCR reaction Master Mix, and the aliquoting and mixing the Reaction Mix standards and samples for the Quantifiler® reaction setup assays. Before the automated process Prepare reagents and standards as described in the Quantifiler® and AmpFlSTR® kits. 1. If using plates, be sure to arrange samples in a way that is compatible with the system. 2. If preparing standards, prepare T10E0.1 buffer: • 10 mM Tris-HCl (pH 8.0) • 0.1 mM Na2 EDTA • 20 µg/mL glycogen (optional) Prepare a DNA standard dilution series (optional) Prepare the reactions Prepare a DNA standard dilution series according to recommendations in the Quantifiler® Kit User’s Manual. Calculate the volume of each component needed to prepare the reactions based on the following volumes: • Quantifiler® Human Primer Mix or Y Human Male Primer Mix - 10.5 µL • Quantifiler® PCR Reaction Mix - 12.5 µL Note: Include excess reactions in the calculations to compensate for the loss that occurs during reagent transfers. HID EVOlution™ - qPCR/STR Setup System Getting Started Guide 135 F Appendix F Automation Guidelines qPCR reaction setup automation guidelines To prepare the reactions: 1. Dispense the required volume of primer mix into a separate, empty tube for Master Mix preparation. 2. Dispense the required volume of PCR reaction mix into the Master Mix tube, then mix well. 3. Dispense 23 µL of Master Mix into each reaction well. 4. Add 2 µL of DNA standard or sample to each well. IMPORTANT! As you add standards or samples, be sure to mix the components of the reaction thoroughly. Applied Biosystems recommends running duplicates of the eight DNA quantification standards for each assay and on each reaction plate. For plate setup examples, see “About the qPCR reaction plate layout” on page 36. Upon completing the automated process 136 When you are done with the automated process: • Seal the reaction plate with the clear adhesive film. • Centrifuge the plate at 3000 rpm for about 20 seconds in a tabletop centrifuge with plate holders to remove any bubbles. • Run the PCR reaction as described in the Quantifiler Kits User's Manual. • Remove all reagents from worktable. • Close the sample tubes to prevent contamination and evaporation. • Flush the liquid system. • Clean the worktable and carriers to avoid cross contamination. HID EVOlution™ - qPCR/STR Setup System Getting Started Guide F Appendix F Automation Guidelines STR PCR reaction setup automation guidelines STR PCR reaction setup automation guidelines The following are general guidelines for automating the dilutions for normalization, mixing the STR PCR reaction mix for amplification, and dispersing diluted samples and reaction mix into a reaction plate for the STR kits. Before the automated process Extract DNA, then: 1. Quantify the concentration of each sample. 2. Identify the target concentration and sample input volume for the STR kit to be used. Target concentrations and input volumes STR kit COfiler® Sample input volume (µL) Reaction volume (µL) 0.5 to 1.25 20 50 Identifiler® 0.5 to 1.25 10 25 ™ MiniFiler 0.5 to 0.75 10 25 Profiler Plus® 0.5 to 1.25 20 50 SEfiler Plus™ 0.5 to 0.75 10 25 0.5 to 1.25 20 50 0.5 to 1.0 10 25 SGM Plus ® Yfiler® Prepare the worktable Target mass (ng) After extracting DNA: 1. Place the DNA samples on the worktable. 2. Place empty tube or vial for preparation of Master Mix on worktable. Place two new 96-well plates on the worktable for use in dilutions. 3. Place thawed STR PCR reagents on the worktable. Centrifuge reagents before placing on worktable for maximum volume accessibility. 4. Place T10E0.1 buffer on the worktable. 5. Place a new 96-well plate for the PCR reaction on the worktable. Normalize the DNA samples Dilute samples according to the exact concentration determined for each individual sample. For the Tecan Freedom EVO series DNA dilution protocols and a description of dilution ratios, volumes of sample used, and volumes of TE used for dilution, see Appendix D, “Dilution Protocols” on page 93 or the Tecan HID EVOlution™ Application Guide – Automation for Applied Biosystems Human Identification Kits (Section 10, Appendix C). HID EVOlution™ - qPCR/STR Setup System Getting Started Guide 137 F Appendix F Automation Guidelines STR PCR reaction setup automation guidelines For instruments other than the Tecan Freedom EVO series, use the description below to construct a dilution protocol within the parameters of your specific instrument. • Add TE buffer to the predilution plate, then dilute the first dilution step samples in well X. For a two-step dilution, dilute with a second step in well X+8. • Mix thoroughly in all steps to assure a homogeneous solution. • Vary the volumes for the TE buffer and the volume of sample transferred from the tube for dilutions of 1:23 to 1:4000. Single-step dilutions require a dilution ratio between 1:1 to 1:22.9, while two-step dilutions require a higher dilution ratio. • Use the minimum recommended final volume recommended by the instrument manufacturer for an individual dilution, to ensure liquid handling precision. IMPORTANT! If the concentration of the original control DNA needs to be diluted, dilute a portion of the control DNA with low TE buffer and place the diluted control tube into the reagent rack for amplification setup. Ensure that the final volume of the diluted control DNA is at least 50 µL. Prepare the reactions Calculate the volume of each component needed to prepare the reactions, using the table below. Note: Include at least 10% excess reactions in the calculations to compensate for the loss that occurs during reagent transfers. For MiniFiler™ and SEfiler Plus™ kits, add the required volume of Master Mix and Primer Mix only. No additional polymerase is needed. Target concentrations and input volumes Volume Per Reaction (µL) Component COfiler® Identifiler® MiniFiler™ Profiler Plus® SEfiler Plus™ SGM Plus® Yfiler® Primer Mix 11.0 5.5 5.0 11.0 5.0 11.0 5.0 PCR Reaction Mix 21,0 10.5 NA 21.0 NA 21.0 9.2 AmpliTaq Polymerase 1.0 0.5 NA 1.0 NA 1.0 0.8 MiniFiler™ or SEfiler Plus™ Master Mix NA NA 10.0 NA 10.0 NA NA Gold® To prepare the reactions: 1. Dispense the required volume of primer mix into a separate, empty tube for Master Mix preparation. 2. Dispense the required volume of PCR reaction mix into the Master Mix tube, then mix well. 3. Dispense the required volume of AmpliTaq Gold® Polymerase into the Master Mix tube, then mix well. 138 HID EVOlution™ - qPCR/STR Setup System Getting Started Guide Appendix F Automation Guidelines STR PCR reaction setup automation guidelines F 4. Dispense the required volume of Master Mix into each reaction well. See the table below. Master Mix for reaction wells Master Mix COfiler® Identifiler® MiniFiler™ Profiler Plus® SEfiler Plus™ SGM Plus® Yfiler® 30.0 15.0 15.0 30.0 15.0 30.0 15.0 5. Dispense the required volume of DNA sample into each reaction mix, then mix well. See the table below. DNA sample volume for reaction wells DNA sample volume (minimum) COfiler® Identifiler® MiniFiler™ Profiler Plus® SEfiler Plus™ SGM Plus® Yfiler® 20.0 10.0 10.0 20.0 10.0 20.0 10.0 6. Add DNA controls (PTC and NTC) as specified in the particular kit in use. Note: Remember that the Yfiler® kit uses an extra PTC. Upon completing the automated process When you are done with the automated process: • Seal the reaction plate with clear adhesive film. • Centrifuge the plate at 3000 rpm for about 20 seconds in a tabletop centrifuge with plate holders to remove any bubbles. • Run the PCR reaction as described in the kit-specific User's Manual. • Remove all reagents from worktable. • Close the sample tubes to prevent contamination and evaporation. • Flush the liquid system. • Clean the worktable and carriers to avoid cross contamination. HID EVOlution™ - qPCR/STR Setup System Getting Started Guide 139 F 140 Appendix F Automation Guidelines STR PCR reaction setup automation guidelines HID EVOlution™ - qPCR/STR Setup System Getting Started Guide Appendix G G Safety This appendix covers: ■ Chemical safety. . . . . . . . . . . . . . . . . . . . . . . . . . . . . . . . . . . . . . . . . . . . . . . . . 142 General chemical safety . . . . . . . . . . . . . . . . . . . . . . . . . . . . . . . . . . . . . . . . . . 142 MSDSs . . . . . . . . . . . . . . . . . . . . . . . . . . . . . . . . . . . . . . . . . . . . . . . . . . . . . . . 143 Chemical waste safety. . . . . . . . . . . . . . . . . . . . . . . . . . . . . . . . . . . . . . . . . . . . 144 Biological hazard safety . . . . . . . . . . . . . . . . . . . . . . . . . . . . . . . . . . . . . . . . . . 145 ■ Safety alerts . . . . . . . . . . . . . . . . . . . . . . . . . . . . . . . . . . . . . . . . . . . . . . . . . . . 146 HID EVOlution™ - qPCR/STR Setup System Getting Started Guide 141 G Appendix G Safety Chemical safety Chemical safety General chemical safety Chemical hazard warning WARNING! CHEMICAL HAZARD. Before handling any chemicals, refer to the Material Safety Data Sheet (MSDS) provided by the manufacturer, and observe all relevant precautions. WARNING! CHEMICAL HAZARD. All chemicals in the instrument, including liquid in the lines, are potentially hazardous. Always determine what chemicals have been used in the instrument before changing reagents or instrument components. Wear appropriate eyewear, protective clothing, and gloves when working on the instrument. WARNING! CHEMICAL HAZARD. Four-liter reagent and waste bottles can crack and leak. Each 4-liter bottle should be secured in a low-density polyethylene safety container with the cover fastened and the handles locked in the upright position. Wear appropriate eyewear, clothing, and gloves when handling reagent and waste bottles. WARNING! CHEMICAL STORAGE HAZARD. Never collect or store waste in a glass container because of the risk of breaking or shattering. Reagent and waste bottles can crack and leak. Each waste bottle should be secured in a lowdensity polyethylene safety container with the cover fastened and the handles locked in the upright position. Wear appropriate eyewear, clothing, and gloves when handling reagent and waste bottles. Chemical safety guidelines 142 To minimize the hazards of chemicals: • Read and understand the Material Safety Data Sheets (MSDSs) provided by the chemical manufacturer before you store, handle, or work with any chemicals or hazardous materials. (See “About MSDSs” on page 143.) • Minimize contact with chemicals. Wear appropriate personal protective equipment when handling chemicals (for example, safety glasses, gloves, or protective clothing). For additional safety guidelines, consult the MSDS. • Minimize the inhalation of chemicals. Do not leave chemical containers open. Use only with adequate ventilation (for example, fume hood). For additional safety guidelines, consult the MSDS. • Check regularly for chemical leaks or spills. If a leak or spill occurs, follow the manufacturer’s cleanup procedures as recommended in the MSDS. • Comply with all local, state/provincial, or national laws and regulations related to chemical storage, handling, and disposal. HID EVOlution™ - qPCR/STR Setup System Getting Started Guide Appendix G Safety Chemical safety G MSDSs About MSDSs Chemical manufacturers supply current Material Safety Data Sheets (MSDSs) with shipments of hazardous chemicals to new customers. They also provide MSDSs with the first shipment of a hazardous chemical to a customer after an MSDS has been updated. MSDSs provide the safety information you need to store, handle, transport, and dispose of the chemicals safely. Each time you receive a new MSDS packaged with a hazardous chemical, be sure to replace the appropriate MSDS in your files. Obtaining MSDSs The MSDS for any chemical supplied by Applied Biosystems is available to you free 24 hours a day. To obtain MSDSs: 1. Go to www.appliedbiosystems.com, click Support, then select MSDS. 2. In the Keyword Search field, enter the chemical name, product name, MSDS part number, or other information that appears in the MSDS of interest. Select the language of your choice, then click Search. 3. Find the document of interest, right-click the document title, then select any of the following: • Open – To view the document • Print Target – To print the document • Save Target As – To download a PDF version of the document to a destination that you choose Note: For the MSDSs of chemicals not distributed by Applied Biosystems, contact the chemical manufacturer. HID EVOlution™ - qPCR/STR Setup System Getting Started Guide 143 G Appendix G Safety Chemical safety Chemical waste safety Chemical waste hazards CAUTION! HAZARDOUS WASTE. Refer to Material Safety Data Sheets and local regulations for handling and disposal. WARNING! CHEMICAL WASTE HAZARD. Wastes produced by Applied Biosystems instruments are potentially hazardous and can cause injury, illness, or death. WARNING! CHEMICAL STORAGE HAZARD. Never collect or store waste in a glass container because of the risk of breaking or shattering. Reagent and waste bottles can crack and leak. Each waste bottle should be secured in a lowdensity polyethylene safety container with the cover fastened and the handles locked in the upright position. Wear appropriate eyewear, clothing, and gloves when handling reagent and waste bottles. Chemical waste safety guidelines Waste disposal To minimize the hazards of chemical waste: • Read and understand the Material Safety Data Sheets (MSDSs) provided by the manufacturers of the chemicals in the waste container before you store, handle, or dispose of chemical waste. • Provide primary and secondary waste containers. (A primary waste container holds the immediate waste. A secondary container contains spills or leaks from the primary container. Both containers must be compatible with the waste material and meet federal, state, and local requirements for container storage.) • Minimize contact with chemicals. Wear appropriate personal protective equipment when handling chemicals (for example, safety glasses, gloves, or protective clothing). For additional safety guidelines, consult the MSDS. • Minimize the inhalation of chemicals. Do not leave chemical containers open. Use only with adequate ventilation (for example, fume hood). For additional safety guidelines, consult the MSDS. • Handle chemical wastes in a fume hood. • After emptying a waste container, seal it with the cap provided. • Dispose of the contents of the waste tray and waste bottle in accordance with good laboratory practices and local, state/provincial, or national environmental and health regulations. If potentially hazardous waste is generated when you operate the instrument, you must: • Characterize (by analysis if necessary) the waste generated by the particular applications, reagents, and substrates used in your laboratory. • Ensure the health and safety of all personnel in your laboratory. 144 HID EVOlution™ - qPCR/STR Setup System Getting Started Guide Appendix G Safety Chemical safety G • Ensure that the instrument waste is stored, transferred, transported, and disposed of according to all local, state/provincial, and/or national regulations. IMPORTANT! Radioactive or biohazardous materials may require special handling, and disposal limitations may apply. Biological hazard safety General biohazard WARNING! BIOHAZARD. Biological samples such as tissues, body fluids, infectious agents, and blood of humans and other animals have the potential to transmit infectious diseases. Follow all applicable local, state/provincial, and/or national regulations. Wear appropriate protective equipment, which includes but is not limited to: protective eyewear, face shield, clothing/lab coat, and gloves. All work should be conducted in properly equipped facilities using the appropriate safety equipment (for example, physical containment devices). Individuals should be trained according to applicable regulatory and company/institution requirements before working with potentially infectious materials. Read and follow the applicable guidelines and/or regulatory requirements in the following: • U.S. Department of Health and Human Services guidelines published in Biosafety in Microbiological and Biomedical Laboratories (stock no. 017040-00547-4; bmbl.od.nih.gov) • Occupational Safety and Health Standards, Bloodborne Pathogens (29 CFR§1910.1030; www.access.gpo.gov/ nara/cfr/waisidx_01/29cfr1910a_01.html). • Your company’s/institution’s Biosafety Program protocols for working with/handling potentially infectious materials. Additional information about biohazard guidelines is available at: www.cdc.gov HID EVOlution™ - qPCR/STR Setup System Getting Started Guide 145 G Appendix G Safety Safety alerts Safety alerts For the definitions of the alert words IMPORTANT, CAUTION, WARNING, and DANGER, see “Safety alert words” on page ix. 146 HID EVOlution™ - qPCR/STR Setup System Getting Started Guide Documentation This appendix covers: ■ Related documentation . . . . . . . . . . . . . . . . . . . . . . . . . . . . . . . . . . . . . . . . . . . 148 Applied Biosystems documentation . . . . . . . . . . . . . . . . . . . . . . . . . . . . . . . . . 148 Tecan documentation . . . . . . . . . . . . . . . . . . . . . . . . . . . . . . . . . . . . . . . . . . . . 149 ■ Obtaining information from the Help system . . . . . . . . . . . . . . . . . . . . . . . . . . 150 ■ Send us your comments . . . . . . . . . . . . . . . . . . . . . . . . . . . . . . . . . . . . . . . . . . 150 HID EVOlution™ - qPCR/STR Setup System Getting Started Guide 147 Documentation Related documentation Related documentation Applied Biosystems documentation The following related documents are available for use with the system: Document 148 Part number Description HID EVOlution™ qPCR/STR Setup System Getting Started Guide 4426903 Provides brief, step-by-step procedures for setting up qPCR and STR PCR. It is designed to help you quickly learn to use the HID EVOlution™ - qPCR/STR Setup System. Quantifiler® Kits (Quantifiler® Human DNA Quantification Kit and Quantifiler® Y Human Male DNA Quantification Kit) User's Manual 4344790 Includes information about manual quantitation specific to your kit. AmpFlSTR® COfiler® PCR Amplification Kit User’s Manual 4306116 Includes information about normalization and amplification specific to your kit. AmpFlSTR® Identifiler® PCR Amplification Kit User’s Manual 4323291 Includes information about normalization and amplification specific to your kit. AmpFlSTR® MiniFiler™ PCR Amplification Kit User’s Manual 4374618 Includes information about normalization and amplification specific to your kit. AmpFlSTR® Profiler Plus® PCR Amplification Kit User’s Manual 4303501 Includes information about normalization and amplification specific to your kit. AmpFlSTR® SEfiler Plus™ PCR Amplification Kit User’s Manual 4385739 Includes information about normalization and amplification specific to your kit. AmpFlSTR® SGM Plus® PCR Amplification Kit User’s Manual 4309589 Includes information about normalization and amplification specific to your kit. AmpFlSTR® Yfiler® PCR Amplification Kit User’s Manual 4358101 Includes information about normalization and amplification specific to your kit. 3130xl Getting Started Guide 4352715 Includes information about using the 3130xl genetic analyzer. GeneMapper® ID v 3.1 User Guide 4357520 Includes information specific to AmpFlSTR® data analysis. GeneMapper ID Software Version 3.2 User Bulletin 4352543 Includes detailed information on the features and capabilities of GeneMapper ID Software version 3.2, including support of the AmpFlSTR® Yfiler® PCR Amplification Kit. 7300/7500 Real-Time PCR System Installation and Maintenance Guide 4347828 Includes information on the 7500 System and SDS Software v1.2.3. HID EVOlution™ - qPCR/STR Setup System Getting Started Guide Documentation Related documentation Tecan documentation Refer to the Tecan documents in the following table for details relating to the Tecan Freedom EVO® instrument and software, and the HID EVOlution™ system. References to the appropriate Tecan documentation are also provided throughout this guide. For information on... Refer to... The HID EVOlution™ system application Tecan HID EVOlution™ qPCR/STR Setup System Application Manual (PN 394918) Installing and setting up the Freedom EVO instrument Tecan HID EVOlution™ Installation Manual Tecan Software Manual Instrument Software V6.1 Part 1 Freedom EVOware® Getting Started Guide Comprehensive safety information, operating, maintenance, and troubleshooting procedures for the Freedom EVO instrument Tecan Freedom EVO® Operating Manual (PN 392886) Tecan Freedom EVO® Maintenance and Service Logbook (PN 392185) Tecan Freedom EVO® Daily/Weekly Maintenance Checklist (PN 392818) Installing, setting up, running, and programming the Freedom EVOware® software Tecan Freedom EVOware® Standard 2.1/Plus 2.1 Software Manual Tecan Freedom EVOware® Standard 2.1/Plus 2.1 Software Getting Started Guide Freedom EVOware® Software Manual Extended Device Support (Research Use Only) (PN 393172) Freedom EVOware® Software Manual Limited Dev. Support (General Purpose) (PN 393804) Running scripts and troubleshooting scriptrelated error messages Tecan Freedom EVOware® Standard 2.1/Plus 2.1 Software Runtime Controller Manual (PN 394329) Note: For additional documentation, see “How to obtain support” on page x. HID EVOlution™ - qPCR/STR Setup System Getting Started Guide 149 Documentation Obtaining information from the Help system Obtaining information from the Help system The Tecan Freedom EVOware® v2.1 has a Help system that describes how to use each feature of the user interface. Access the Help system by doing one of the following: • Click in the toolbar of the Tecan Freedom EVOware® 2.1 window. • Select HelpContents and Index. • Press F1. You can use the Help system to find topics of interest by: • Reviewing the table of contents • Searching for a specific topic • Searching an alphabetized index Note: The Help system is specifically for the Tecan Freedom EVOware® 2.1 system, not the HID EVOlution™ - qPCR/STR Setup System. Changing the Freedom EVOware® 2.1 system parameters could lead to problems running qPCR/STR PCR scripts. Consult with a system administrator before making any system changes. Send us your comments Applied Biosystems welcomes your comments and suggestions for improving its user documents. You can e-mail your comments to: [email protected] IMPORTANT! The e-mail address above is for submitting comments and suggestions relating only to documentation. To order documents, download PDF files, or for help with a technical question, see “How to obtain support” on page x. 150 HID EVOlution™ - qPCR/STR Setup System Getting Started Guide Index Numerics 1.5-mL tubes for extracted DNA samples 15 3130/3130xl Genetic Analyzer results group and instrument protocol 11 7500 Real-Time PCR System detectors 10 7500 Results file export from SDS software 42 in HID workflow 3 location of file 42 7500 Setup file import to SDS software 41 in HID workflow 3 location of file 40 96-well plate for extracted DNA samples 14 A AmpFlSTR® PCR Amplification Kits reagent block configurations 82 required reagent volumes 48, 49, 50, 51 supported for use with HID EVOlution™ - qPCR/STR Setup System 5 AmpliTaq Gold® DNA Polymerase, preparing 52 Applied Biosystems customer feedback on documentation 150 Information Development department 150 automation on other liquid-handling platforms 135 qPCR scripts 34 STR PCR scripts 58 B barcodes, scan for sample information 17, 59 biohazardous waste, handling 145 C calculate reagent volumes AmpFlSTR® kits 47 Quantifiler® DNA Quantification Kits 26 CAUTION, description ix CE Setup file import for CE analysis 68 in HID workflow 3 location of file 67 prerequisites for importing 11 HID EVOlution™ - qPCR/STR Setup System Getting Started Guide CE signal troubleshooting high 72 troubleshooting low 73 chemical safety 142 chemical waste safety 144 COfiler® kit reagent block configuration 82 required reagent volumes 51 combining tubes of reagents 52 configured volume, in Sample Normalization window 94 contamination, guidelines for preventing 20 control DNA, preparing diluted 52 cooling reagent block 24, 46 create detectors for 7500 Real-Time PCR System 10 instrument protocol 11 qPCR/STR Sample file 18 results group 11 customer feedback, on Applied Biosystems documents 150 D DANGER, description ix diluting control DNA 52 dilution guidelines 94 original sample volume used in 98 protocol tables 99 protocols 93 Sample Normalization Adjustment window 59 dilution ratio determining 98 examples 99 DNA extraction procedures 2 DNA samples in a 96-well plate 14 in tubes 15 DNA standard dilution series glycogen 24 volumes for pre-prepared series 26 volumes for system-prepared series 27 DNA yield troubleshooting absence of DNA 71 troubleshooting low volume 71 151 Index enter sample information in EVOware software 17 export 7500 Results file 42 extracted DNA in a 96-well plate 14 in tubes 15 extraction, procedures for 2 import 7500 Setup file to SDS software 41 CE Setup file to Data Collection software 68 sample information into EVOware software 17, 59 IMPORTANT, description ix Information Development department, contacting 150 instrument protocol, create 11 instrumentation for use with AmpFlSTR® kits 6 for use with Quantifiler® kits 6 IPC CT, troubleshooting 72 F L file name and location 7500 Setup file 40 CE Setup file 67 forensic workflow overview vii, 2 labware for qPCR reaction setup 30 for STR PCR reaction setup 54 G maintenance scripts, run 12 manually enter sample information 17, 59 maximum samples per run qPCR reaction setup 13 STR PCR reaction setup 13 MiniFiler™ kit reagent block configuration 84 required reagent volumes 50 MSDSs about ix description 143 obtaining x, 143 documentation Applied Biosystems 148 Tecan 149 E glycogen, in DNA standard dilution series preparation 24 guidelines chemical safety 142 chemical waste disposal 144 chemical waste safety 144 dilution 94 normalization 94 preventing contamination 20 H hazards. See safety Help system, accessing 150 HID EVOlution™ – Extraction System in HID workflow 3 using qPCR/STR Sample file from 17 HID EVOlution™ - qPCR/STR Setup System configuration 4 detailed workflow 89 in HID workflow vii, 2 instruments used with 6 materials required for use with 6 prerequisites viii sample information files 3 software used with 6 supported kits 5 I M N normalization adequate sample volume for 94 examples 99 guidelines 94 limits 95 original sample volume used in 98 Sample Normalization Adjustment window 59 O online Help. See Help system output file from qPCR reaction setup 40 from qPCR run 42 from STR PCR reaction setup 67 Identifiler® kit reagent block configuration 83 required reagent volumes 48 152 HID EVOlution™ - qPCR/STR Setup System Getting Started Guide Index P plate layout qPCR reaction plate 36 STR PCR reaction plate 62 plate setup files export 7500 Results file 42 import 7500 Setup file 41 import CE Setup file 68 preparing AmpliTaq Gold® DNA Polymerase 52 control DNA 52 PrepFiler™ Automated Forensic DNA Extraction Kit 2, 89 Profiler Plus® kit reagent block configuration 85 required reagent volumes 51 Q qPCR 7500 Results file 42 reaction plate layout 36 qPCR reaction setup about reagent volumes 25 maximum samples per run 13 required materials 24 run a script 34 set up extracted DNA in a 96-well plate 14 set up extracted DNA in tubes 15 set up reagent block 29 worktable layout 30 qPCR/STR Sample file create 18 in HID workflow 3 Qty, in Sample Normalization Adjustment window 94 Quantifiler® DNA Quantification Kits reagent block configuration 76, 77, 78, 79, 80, 81 reagent volumes 26, 28 scripts 34 supported for use with HID EVOlution™ - qPCR/STR Setup System 5 R radioactive waste, handling 145 reaction plate layout qPCR 36 STR PCR 62 reagent block configuration COfiler® kit 82 Identifiler® kit 83 MiniFiler™ kit 84 Profiler Plus® kit 85 HID EVOlution™ - qPCR/STR Setup System Getting Started Guide reagent block configuration (continued) Quantifiler® Human and Quantifiler® Y Human Male kits (combined setup) 80, 81 Quantifiler® Human kit 76, 77 Quantifiler® Y Human Male kit 78, 79 SEfiler Plus™ kit 86 SGM Plus® kit 87 Yfiler® kit 88 reagent block, cooling 24, 46 reagent volumes about 25, 47 COfiler® kit 51 Identifiler® kit 48 MiniFiler™ kit 50 pre-prepared DNA standard dilution series 26 Profiler Plus® kit 51 Quantifiler® DNA Quantification Kits 26, 28 SEfiler Plus™ kit 50 SGM Plus® kit 51 system-prepared DNA standard dilution series 27 Yfiler® kit 49 reagents, combining tubes 52 required amount of DNA 94 required materials qPCR reaction setup 24 STR PCR reaction setup 46 results group, creating 11 S safety biological hazards 145 chemical 142 chemical waste 144 guidelines 142, 144 sample files create 18 export 7500 Results file 42 import 7500 Setup file 41 import CE Setup file 68 in HID workflow 3 sample information import, manually enter, and/or scan from barcodes 59 options for entering in EVOware software 17 Sample Normalization Adjustment window 59 scripts for maintenance 12 for qPCR reaction setup 34 for STR PCR amplification reaction setup 58 SDS software create detectors 10 export 7500 Results file 42 import the 7500 Setup file 41 153 Index SEfiler Plus™ kit reagent block configuration 86 required reagent volumes 50 SGM Plus® kit reagent block configuration 87 required reagent volumes 51 STR PCR amplification reaction plate layout 62 STR PCR reaction setup maximum samples per run 13 required materials 46 scripts 58 set up extracted DNA in a 96-well plate 14 set up extracted DNA in tubes 15 worktable layout 56 worktable setup 54 SWGDAM validation experiments and results 103 system configuration 4 T training, information on x troubleshooting CE signal 72, 73 entering or importing sample name and information 59 high sample IPC CT 72 low DNA yield 71 tubes, for extracted DNA samples 15 V validation experiments and results 103 W WARNING, description ix waste disposal, guidelines 144 waste profiles, description 144 workflow detailed 89 overview vii, 2 worktable layout qPCR reaction setup 30 STR PCR reaction setup 56 Y Yfiler® kit reagent block configuration 88 required reagent volumes 49 154 HID EVOlution™ - qPCR/STR Setup System Getting Started Guide Part Number 4426903 Rev. B 08/2010 Headquarters 5791 Van Allen Way | Carlsbad, CA 92008 USA Phone 650.638.5800 | Toll Free 800.345.5224 www.appliedbiosystems.com International Sales For our office locations please call the division headquarters or refer to our Web site at www.appliedbiosystems.com/about/offices.cfm