1
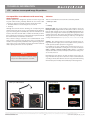
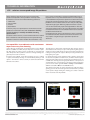
TECHNICAL INFORMATION CFV – solutions to corrupted image file problems Under specific circumstances the CFV can occasionally produce corrupted files. These problems normally show themselves as one or several of the following anomalies: 1. Colour casts 2. Lines or marks 3. Textures 4. Posterization In virtually every case reported, these anomalies have been produced in connection either with continuous shooting / very fast shooting or manually-controlled extra long exposure times. As with all camera sensors, a certain amount of time is needed for the electronics to be able to process the captured image and store it on the CF card/ hard disk. The CFV-50 has a very large sensor and therefore a great deal of information has to be processed in a very short amount of time. If a new capture is initiated before the previous capture has had the time to be processed and stored correctly (in the case of fast shooting), problems can occur because the sensor is not yet ready to be exposed to light again. With long exposure times the sensor can also be inadvertently exposed to light before or after the actual time setting made. In all cases if this happens, the digital read-out from the sensor is disturbed which in turn causes the problems mentioned here. If corrupt files occur in these circumstances, there is normally no technical fault with either the CFV unit or the camera and only requires a slight change in operational practice to eliminate. Corrupted files in combination with continuous exposure or very fast shooting Solution If these kinds of corrupted files are produced when you use a Winder CW on a 503CW/D or an ELD, then you may have to consider a problem with either the camera or back. Technically it is not likely that either will produce these problems as there is an integral timing safeguard to prevent such occurences. The CFV-50 has a small power indicator lamp that changes colour to show that the back is ready to accept a new capture. It glows green to signify it is in the standby mode and orange to indicate that the back is busy processing the new capture. When processing is finished, the lamp glows green again. If, however, the problem occurs when shooting very fast – making a capture, immediately winding on and immediately making a new capture – then there is almost certainly no technical fault with the CFV unit or the camera. It is during the ‘busy’ period, when the lamp is glowing orange, that the back is susceptible to disturbance. If you make another capture during this period then the new signals being read off the sensor can scramble the currently processing capture with the consequence of corrupted files. If it is inconvenient to check the indicator lamp then you can use the audio signal. Go Menu > Settings > User Interface > Sound to select On or Off as well as Volume choice. The solution is therefore to ensure that either the indicator lamp is glowing green or that the audio signal has sounded before you make a new capture. Simply slowing the shooting pace a little is often all that is needed to solve this problem. Power indicator lamp Settings method ! The information in this document is furnished for informational use only, is subject to change without notice, and should not be construed as a commitment by Victor Hasselblad AB & Hasselblad A/S. The text and images in this document cannot be reprinted or reused without the express permission of Victor Hasselblad AB & Hasselblad A/S. Victor Hasselblad AB & Hasselblad A/S assume no responsibility or liability for any errors or inaccuracies that may appear in this document. Victor Hasselblad AB & Hasselblad A/S assume no responsibility or liability for loss or damage incurred during or as a result of using Hasselblad products. Copyright © 2013 - Victor Hasselblad AB & Hasselblad A/S. All rights reserved. www.hasselblad.com 1/2 Document ID: CFV corrupt image files_INF_V1_2013 TECHNICAL INFORMATION CFV – solutions to corrupted image file problems Corrupted files in combination with extra long exposure times Solution The CFV digital back is designed to operate across the range of all V-system camera bodies, preferably without the use of extra cable connections. This it does with the exception of just two models: There are two methods to choose from to avoid this problem: 1. Flash sync cable or 1. Unmodified 200 series models using CF lenses in C-mode 2. Settings 2. Flexbody Flash sync cable: The easiest and most secure solution is to use the Flash sync cable (supplied with the CFV). If this cable is connected from the flash terminal on the lens to the Flash sync IN terminal on the back, you can bypass the need for any specific long exposure time settings on the back. This also has the advantage of allowing you to change exposure times without having to make any new exposure settings on the back (maximum exposure time: 128 seconds on the CFV-50). Although the CFV unit has the advantage of encompassing most models irrespective of type or age, it consequently has the disadvantage of not being able to automatically cater for all variables in all instances. Therefore the CFV offers a number of manually set variations regarding user settings to accommodate the requirements from the various models, as listed in the user manual. These advised settings, restrictions and recommendations cover most instances except for long exposures (over 1/8 second) where variables can lie beyond the possibilities of the original design parameters. In this case it is the variables caused by the manual control of shutter opening times that can cause problems. Settings: This solution involves increasing the exposure time setting on the back. A roughly 10-20% increase (but no more), relative to actual exposure (shutter open) time is suggested. For example, if you have calculated the exposure time to be 5 seconds, then you should make a setting of 6 or 7 seconds on the back (Menu > Settings > Camera > Exposure Time. Likewise, a calculated exposure time of 25 seconds, for example, would need a setting of ca. 30 seconds, and so on. Note Remember that you still have to make an initial correct model setting and follow the respective restrictions and/or recommendations according to model, but otherwise the correctly synchronized timing will now take place invisibly and automatically in the background. Exposures longer than the maximum setting for your CFV model require the use of film. yreviled htiw dedulcni smeti yrosseccA Flash sync cable method Settings method elbac cnys tupni hsalF elbac eriWeriF VFC revoc noitcetorP lbac cnys tuptuo hsalF The information in this document is furnished for informational use only, is subject to change without notice, and should not be construed as a commitment by Victor Hasselblad AB & Hasselblad A/S. The text and images in this document cannot be reprinted or reused without the express permission of Victor Hasselblad AB & Hasselblad A/S. Victor Hasselblad AB & Hasselblad A/S assume no responsibility or liability for any errors or inaccuracies that may appear in this document. Victor Hasselblad AB & Hasselblad A/S assume no responsibility or liability for loss or damage incurred during or as a result of using Hasselblad products. Copyright © 2013 - Victor Hasselblad AB & Hasselblad A/S. All rights reserved. www.hasselblad.com 4 x 63 neercs gnisucoF 2/2 sepiw-E drac yerG Document ID: CFV corrupt image files_INF_1L_V1_2013 drac hsalF-FC