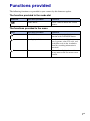
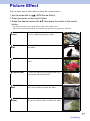
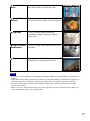
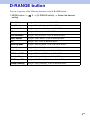
1
SLT-A33/SLT-A55/SLT-A55V
The new functions provided by this firmware update and their respective
operations are described here.
Please refer to the “Instruction Manual.”
© 2011 Sony Corporation
A-E1K-100-11(1)
Functions provided
The following functions are provided to your camera by this firmware update.
The function provided to the mode dial
Mode dial
New items provided
Functions
Picture Effect
Selects a filter to obtain the various
textures.
The functions provided to the menu
Menu
New items provided
Functions
3
D-RANGE button
Allows you to assign the desired
function to the D-RANGE button.
2
Sets display in finder
Sets the indication of the shutter
speed, aperture value, EV scale, and
SteadyShot scale in the viewfinder
when the recording information is
turned off.
2
Menu start
Selects a first-displayed menu from
the top menu or the last menu screen
selected.
2GB
Picture Effect
You can shoot with an effect filter to obtain the various textures.
1 Set the mode dial to
(SCN/Picture Effect).
2 Press the center of the control button.
3 Select the desired mode with v/V, then press the center of the control
button.
• To change the effect, press the Fn button, then select another effect.
• The items used for Picture Effect are indicated after the items used for Scene Selection.
Posterization
(Color)
Creates a high contrast, abstract look by
heavily emphasizing primary colors.
Posterization
(B/W)
Creates a high contrast, abstract look in black
and white.
Pop Color
Creates a vivid look by emphasizing color
tones.
Retro Photo
Creates the look of an aged photo with sepia
color tones and faded contrast.
Partial Color
(Red)
Creates an image which retains the color red,
but converts others to black and white.
Partial Color
(Green)
Creates an image which retains the color
green, but converts others to black and white.
3GB
Continued r
Partial Color
(Blue)
Creates an image which retains the color blue,
but converts others to black and white.
Partial Color
(Yellow)
Creates an image which retains the color
yellow, but converts others to black and white.
High-key
High Contrast
Monochrome
Toy Camera
Creates an image with the indicated
atmosphere: bright, transparent, ethereal,
tender, soft.
Creates an image with high contrast in black
and white.
Creates the look of a Toy Camera photo with
shaded corners and pronounced colors.
Notes
• If you select a Picture Effect item, with [RAW] or [RAW & JPEG] selected, [Quality] is temporarily set
to [Fine].
• When [Partial Color (Red)], [Partial Color (Green)], [Partial Color (Blue)], or [Partial Color (Yellow)] is
selected, images may not retain the selected color, depending on the subject or shooting condition.
• Since the camera judges the settings automatically, many features will be unavailable, such as ISO,
creative style function.
• When you select a Scene Selection item, you cannot adjust the exposure and white balance. When you
select a Picture Effect item, you can adjust them.
4GB
D-RANGE button
You can assign one of the following functions to the D-RANGE button.
1 MENU button t
setting
3 t [D-RANGE button] t Select the desired
Drive Mode
Assigns “Drive Mode” to the D-RANGE button.
Flash Mode
Assigns “Flash Mode” to the D-RANGE button.
Autofocus Mode
Assigns “Autofocus Mode” to the D-RANGE button.
AF area
Assigns “AF area” to the D-RANGE button.
Face Detection
Assigns “Face Detection” to the D-RANGE button.
Smile Shutter
Assigns “Smile Shutter” to the D-RANGE button.
ISO
Assigns “ISO” to the D-RANGE button.
Metering Mode
Assigns “Metering Mode” to the D-RANGE button.
Flash Comp.
Assigns “Flash Comp.” to the D-RANGE button.
White Balance
Assigns “White Balance” to the D-RANGE button.
DRO/Auto HDR
Assigns “DRO/Auto HDR” to the D-RANGE button.
Creative Style
Assigns “Creative Style” to the D-RANGE button.
SCN/Picture Effect Assigns “SCN/Picture Effect” to the D-RANGE button.
Sweep Shooting
Assigns “Sweep Shooting” to the D-RANGE button.
5GB
Sets display in finder
When you turn off the recording information, you can also turn off the indication of the
shutter speed, aperture value, EV scale, and SteadyShot scale.
• For details on how to switch the recording information display, refer to “ Screen
indicators” in the “Instruction Manual.”
1 MENU button t
setting
2 t [Sets display in finder] t Select the desired
Always
The shutter speed, aperture value, EV scale, and SteadyShot scale
will be always displaeyd.
When operating
The shutter speed, aperture value, EV scale, and SteadyShot scale
will be displayed only while the exposure is being adjusted.
6GB
Menu start
This item allows you to select whether to always display the first screen of the menu or
to display the screen of the item you select the last time.
1 [Menu] t
2 t [Menu start] t Select the desired setting
Top
Always displays the first screen of the menu.
Previous
Displays the last item selected. This will make it easier to quickly
reset the last item you selected previously.
7GB