1
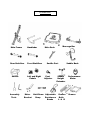
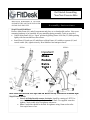
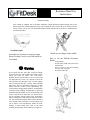
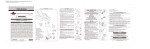
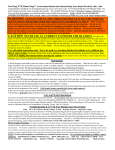
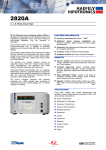
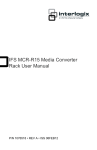
Owner’s Manual: FDX 2.0 - 002 Assembly Instructions Operations Manual CAUTION! READ ALL INSTRUCTIONS. TAKE THE TIME TO READ THE SAFETY TIPS AND MAINTENANCE SECTIONS. NO EXERCISE EQUIPMENT IS SAFE UNLESS YOU LEARN HOW TO SAFELY OPERATE THE EQUIPMENT. REGULAR MAINTENANCE IS VERY IMPORTANT! THIS PRODUCT HAS MOVING PARTS. TAKE ALL PRECAUTIONS WHEN CHILDREN, PETS AND OTHER OBJECTS NEEDING CARE ARE IN THE AREA OF THIS PRODUCT. USE RESPONSIBLY, MACHINE CAN TIP, ITEMS CAN GET CAUGHT IN THE PEDALS. TAKE EXTRA CARE WHEN FOLDING, TRANSPORTING, UNFOLDING AND MAKING ANY ADJUSTMENTS TO PRODUCT. WHEN USING DESK AREATO PLACE ITEMS ON – ALWAYS USE SAFETY STRAP TO HOLD ITEM DOWN. IF YOU DO NOT HAVE A STRAP. CONTACT US. WE CAN HELP. WE WANT YOU TO SAFELY USE THIS PRODUCT. PLEASE DO NOT HESITATE TO EMAIL, CALL OR TEXT IFYOU HAVEANYQUESTIONS. EMAIL: CUSTOMERSERVICE @FITDESK.NET PHONE: 615-669-9004 Where Productivity and Health Converge BEFORE RETURNING PLEASE CONTACT US FOR REPACKAGING INSTRUCTIONS OR FOR ASSEMBLY INSTRUCTIONS, MISSING PARTS, OR FOR HELP WITH A QUESTION at : [email protected] Also we have a detailed FAQ section at our website www.FitDesk.net Or call Monday to Friday 9am to 5pm CST 615-669-9004 For fastest possible service please have: - Model # (refer to this manual) - Serial # (located on stabilizer bar sticker) Technical Specs Table of Contents Technical S pecifications Recommended User Height Range = 4’10” to 6’5” (147cm to 199cm) Recommended Max User Weight = 250lbs (113kgs) Weight of Bike: 47lbs Foot Print in OPEN position = 16” wide X 26” long X 45” high T a b l e o f C o n t e n t s [] Precautions [] Parts and Maintenance [] Get to know your FitDesk 2.0 [] Assembly Instructions [] Meter Instructions [] Contact Information Precautions Safety Please read this section Precautions Precautions…Please read before assembly or operations 1. Read the entire manual before assembling and using the equipment. Safe use can only be achieved if the equipment is assembled, maintained and used properly. All users of the equipment must be informed of all warnings and precautions. 2. Before starting or using this equipment including massage roller you should consult your doctor to determine if you have any health conditions that could create a risk to your health and safety, or prevent you from using the equipment properly. Before using massage roller it is your responsibility to learn if use of this can cause or aggravate conditions regarding your health. Your doctor's advice is essential if you are taking any medication. 3. Be aware of your body's signals. Incorrect or excessive exercise can damage your health. Stop exercising if you experience any of the following symptoms: Pain, tightness in your chest, irregular heartbeat, extreme shortness of breath, feeling light headed, dizzy or nauseous. If you do experience any of these conditions you should consult your doctor before continuing with your exercise program. 4. Fingers can get pinched when picking up the bike. Lift by seat and handlebar only. 5. The frame must be in the closed and locked position prior to transport. Frame locks in closed position. 6. Read and heed the warning stickers on the FitDesk. 7. Warm-up stretching is recommended before exercise. ALWAYS USE GOOD POSTURE 8. Make sure your laptop, kindle or other devices are tightly secured to the desk top by the strap provided. Keep wires from getting tangled while pedaling. 9. Mount and dismount carefully. - Extreme movements CAN TIP MACHINE - INJURY AND EQUIPMENT DAMAGE CAN OCCUR - Do not use while standing on pedals 10. Keep pets and young children away from the equipment. 11. Use the equipment on a solid, level surface with a protective cover for your floor or carpet. The equipment should have at least one yard of free space all around it. Safety Precautions Continued Precautions…Please read before assembly or operations 12. Inspect and tighten all parts often. Replace any worn parts immediately. The safety level of the equipment can only be maintained if it is regularly examined for damage and/or wear and tear. 13. Always use the equipment as indicated. If you find any defective components while assembling or checking the equipment, or if you hear any unusual noises coming from the equipment during use, stop immediately. Do not use the equipment until the problem has been rectified. 14. Wear suitable clothing while using the equipment. Avoid wearing loose clothing that may get caught in the equipment or clothing that may restrict or prevent movement. 15. Do not exceed maximum recommended user weight of : 250 lbs, 113 kg 16. The equipment is suitable for home and office use only. Do not use in commercial or rental settings. This item was not intended or designed for use in commercial or public places. 17. Keep wires from getting tangled in pedals. Suggestion is to wrap computer charging wires over meter holder to keep away from pedals and in center of desk, NOT on side. 18. Do not stand while pedaling. For light use only 19. SADDLE COMFORT We here at Revo Innovations LLC love cycling and try to ride everyday. But we do remember how painful it was to “adjust” to cycling saddles. There is no “magic” way to ease the discomfort caused when spending time on a saddle. The good news is it can be a “one time” event. As a safety precaution we recommend you consult with a doctor if you feel pain or are concerned about issues that are outside the explanation here about saddle comfort. We recommend these tips to help make adjusting easier. - Wear padded cycling shorts - When you feel pain exit cycle and walk around for a few minutes before getting back on - Use padded saddle cover (we like the sheepskin type) - Try different saddles (we have adapter available for lowest possible costs) with free return shipping. Parts and Maintenance Tips TIP: Check Pedal tightness WHEN NEW THEN AFTER 30 miles. KEEP VERY TIGHT Tighten Crank Arms with 14mm socket after initial 100 miles use. Check Crank Arm and Pedal tightness every 300 miles Check Base Stabilizers for tightness every 300 miles FitDesk uses a low maintenance twin belt drive mechanism and rarely ever needs adjusting. However if belt slipping is noticed remove gearbox covers, loosen Idle wheel nuts (21) and tighten adjuster nuts (22) till slipping stops. Re-tighten and Re-assemble Check frame, seat mount, handlebar mounting areas for wear. Do not use if any sign of frame cracking. Contact us here at Revo Innovations LLC. Co mp let e Ex plo de d Vi ew Pa rts Di agr am Detailed Parts List Get to know your New FitDesk 2.0 Precautions…Please read before assembly or operations SEE OUR COMPLETE LINE OF ACCESSORIES TO CUSTOMIZE YOUR NEW FITDESK AT www.fitdesk.net Cycle computer tracks Time, Speed, Distance, Calories and Total miles Seat Back for multi-position use Resistance Bands provides convenient and effective upper body exercise Easy and safe folding frame design Sliding Desk for comfortable daily use PRESS MODE BUTTON AT VERY BOTTOM Under desk storage drawer. Resistance knob adjusts pedal tension with plenty of room to grow into Pedal straps keep feet in place FRAME UNLOCK OPERATION TIP: Make Pedals EXTRA Tight during Assembly This model FitDesk uses a Quick release frame unlock design. As a safety precaution please use the technique shown here to Open and Close To Open: pull pin on frame support while placing foot on base. Then release To Close: 1. Remove any items on desk and in drawer. 2. Pull pin and close frame by lifting on bottom of saddle and desk. Frame is locked when PULL PIN clicks in. 2.0 PARTS LIST Main Frame Handlebar Rear Stabilizer Front Stabilizer Saddle Assembly Tools Left and Right Pedals Massage Bar Main Desk Saddle Post Post Adjuster Meter Hold Down Adjustable Bracket Strap Resistance Bands Saddle Back Saddle Height Extender Drawer Rails L & R Performance Meter Drawer Get Started Assembling Your New Exercise Bike MOUNTING HARDWARE IS LOCATED ON PARTS THEY ARE TO BE INSTALLED ON FOR EASY IDENTITY Assembly Instructions Step #1 Install Stabilizers Remove Main Frame (01) and all components and place on a clean durable surface. Note: most mounting hardware is pre-installed for easy matching during assembly. Tools are provided Unlock Main Frame (01) to “Open” position by pulling Frame Lock Pin (55) while pushing lightly with foot on stabilizer, then release. Install front (59) and rear (62) stabilizers to Main Frame (01) with hex cap nuts (61) and curved washer (06), tighten securely. Rear Stabilizer has transport wheels. STEP#1 STEP#2 Important! Make Pedals Extra Tight ! Note: Pedals must be made extra tight. USE 5/8” Wrench and tap with Hammer till EXTRA Tight. Step #2 Install Pedals Note: Left Pedal installs counter clockwise. Install by rotating to LEFT. Use care that Pedal Shaft is Perpendicular to Crank Shaft. Use supplied wrench to tighten. Check pedals often for tightness when new. Note: Crank arms should be checked for tightness using 14mm socket after first couple hours of use. Assembly Get to know Instructions your NewContinued Exercise Bike Step#3 Install Saddle Tube and Saddle Install Saddle Tube Adjuster Knob (104) Assemble Saddle (98) to Seat Tube (66) using Nut (100) and Washer (99) Note: FitDesk is supplied with optional saddle height extender (71) for increased leg extension if needed. Height is adjusted using Knob (104). You do not have to remove to adjust. Loosen and Pull. Saddleback Cushion (101) can be set in low or high position for comfort by setting back in proper holes. Tilt can be adjusted here for more comfort. STEP#4 Install Saddle Back and Resistance bands Mount Saddle Back Assembly (67) to Saddle Post (66) with Carriage Bolt (68), Nuts (70), Washers (69) Choose High or Low Position and Mount Saddle Back Cushion (101) to Saddle Back (72) using bolt (05) and washer (07). Pass Resistance Band (102) Handle through frame support opening, pull strap inside of Resistance Band Holder. Hang handles on hooks under saddle Assembly Get to know Instructions your NewContinued Exercise Bike STEP#5 Assemble Drawer and Meter Holder to Bottom of Desk Place Desk on its top surface with rails facing you. Install Left Drawer Slider (96-1) using 2 screws (91) – located in separate plastic bag Install Drawer (96) with handle facing rider side Install Right Drawer Slider (96-2) so that pins in Drawer sides fit in slot in rail. Tighten all screws (91), Test for smooth operation Screw (91) parts bag in Install Meter holder and connect meter Slide Meter Holder (105) through opening in top center Install and tighten 2 screws (91) through Meter Holder (105) and Back of Meter has a Slot to slide Meter (97) over. Plug Meter Wire (92) into Rear of Meter STEP#6 Install Desk Assembly to bike frame Locate and remove 2 handlebar mounting bolts (05) with washers (07,06) in bike main frame. Place Desk over frame and install the 2 bolts with washers in to threaded holes as shown to right. Tighten with 5mm hex wrench to a snug fit. Do NOT over tighte Connect Meter wire to wire from frame STEP#7 Assemble Massage Bar Arm Rests Bolt Massage Bar (80) to Desk using Knob Bolts (85) Massage Bar (80) can be set in 3 positions above Horizontal. Choose a desired height. Align each Support Arm in same position on each side. Tighten Knob Bolt (85) 3 position armrest height adjustment Assembly Instructions Get to know your Continued New Exercise Bike STEP#8 Adjust for comfort Massage Bar has 3 positions for supporting arms while in use. Remove knob (85) and lift or lower to best position. Re-install and Tighten Knob Desk and ride position can be adjusted by loosening Knobs (89) located on underside of Desk. Slide to comfortable position and Tighten Knobs. Saddle Height can be adjusted for comfortable use while pedaling. Loosen Knob (104), Pull to release pin, adjust to height, release and tighten Knob. Adjust Saddle Back Tilt Forward or Backward Here Use 5mm Hex Key Loosen knobs (89) to slide desk. Raise or Lower Massage Bar with Knob (85) Easy adjust seat height knob Loosen, pull, adjust, retighten Use upright or semi-recumbent Hold Down Strap Thread Hold Down Strap Through Openings in Desk and around device. Wrap Thru “D” rings and pull tight Saddle Back can be set lower or high by choosing mounting hole. Resistance Band Use Instructions Resistance Bands Your FitDesk is supplied with a Premium Adjustable Length Resistance Band. Having this proven fitness staple near you throughout the day is a great option for more exercise. Here we want you to take a look at ways you can use your FitDesk Resistance Bands and also show you how to maintain them for maximum safety. To Adjust Length: Handle rest on Hanger Under Saddle Pull Band Out of Handle to Shorten Length. Rotate Locking Cam In as you Pull Handle to Lock Band How to use the FitDesk Resistance Bands: - Warning - Never stretch the tube more than 2 times its length. Always inspect the tube, handle and locking device before use. Look for cracks, cuts, wear marks. Handles must be checked they are free of cracks and all components are secure. Use caution to assure the tube is passing only through “Loop” in frame support tube. Do not use bands in a “sawing” motion through frame loop. Take care of bands to assure they are safe before each use. Contact us for replacements. Use caution when reaching under saddle to mount handles on hanger. Stop pedaling, drop handles on floor and dismount and put handles on. Do not pedal bike and do arm exercises at the same time. Use caution not to get the resistance bands caught in the pedal arms. Fitness training can result in serious injury or death if not done safely and properly. Risk can be reduced if take common safety measures to avoid injuring your self or others. Over stretching the bands can cause damage to band which may result in the band breaking unexpectedly. These bands are for light use. Stop pedaling Reach under saddle and grab hold of both handles. Raise 1 arm at a time while holding the other arm in position. Repeat the other side. Meter Instructions Performance Monitor Operation Manual and Troubleshooting Specifications: Speed = Miles per hour Distance = Mi Calories = Kcal Odometer = Mi Button Functions: Mode: (Select/Reset) Press BELOW THE PRINTING “MODE” Clear (Reset) Set: Toggles data IMPORTANT! MODE BUTTON WORKS BEST WHEN PRESSED AT VERY BOTTOM. PRESS HERE OPERATION PROCEDURES: 1. AUTO ON/OFF ◆ The system turns on when any key is pressed or when it senses input from the speed sensor. ◆ The system turns off and RESETS automatically when there is no signal input for approximately 4 minutes. 2. RESET The unit can be reset by pressing the RESET key for 3 seconds. 3. MODE To choose a function, press the MODE key when the pointer is on the function you want. It will begin blinking. Press MODE key in lower area of button. FUNCTIONS: 1. TIME: Press the MODE key until the pointer is on TIME. The time of the workout will be displayed. 2. SPEED: Press the MODE key until the pointer advances to SPEED. The current speed will be shown. 3. DISTANCE: Press the MODE key until the pointer advances to DISTANCE. The distance of each workout will be displayed. 4. CALORIE: Press the MODE key until the pointer advances to CALORIE. The calories burned will be displayed. 5. ODOMETER Press the MODE key until the pointer advances to ODOMETER. The total accumulated distance will be displayed. SCAN: Automatically display changes every 4 seconds. Trouble Shooting BATTERY: If there are problems with the display try reinstalling the battery. Connection: If no reading when pedaling disconnect, clean and reconnect link. Now you can turn your computer time in to the healthiest part of your day. See our complete line of products designed to merge your productive time with your health goals. See our latest products and accessories at Our website: www.fitdesk.net Or Friend us on Facebook for latest discounts and news www.facebook.com/fitdesk Tell others how we are doing we will be sure to thank you and maybe more… Please write a review at your favorite shopping site Email: [email protected]