1
Diagnostic Software for Porsche Instruction Manual
INSTALLING THE SOFTWARE ........................................................................... 3 UPDATING THE SOFTWARE.............................................................................. 3 PRODUCT VERSIONS ......................................................................................... 4 SCREEN LAYOUT ............................................................................................... 4 Menu:............................................................................................................................................................. 4 GENERAL USE .................................................................................................... 5 Selecting Language ....................................................................................................................................... 5 Fault Codes ................................................................................................................................................... 6 Erase Fault Codes ......................................................................................................................................... 6 ECU ID/Information .................................................................................................................................... 7 Actual values ................................................................................................................................................. 9 Input Signals ............................................................................................................................................... 10 Drive links ................................................................................................................................................... 10 Reset Service Reminder ............................................................................................................................. 11 System Check .............................................................................................................................................. 11 OBD Status.................................................................................................................................................. 12 Options Screen ............................................................................................................................................ 12 Work Log .................................................................................................................................................... 13 Firmware Update........................................................................................................................................ 13 Factory Race Cars ...................................................................................................................................... 13 Diagnostic connector locations .................................................................................................................. 13 COMMON PROBLEMS AND SOLUTIONS ....................................................... 14 Computer Performance Suggestions......................................................................................................... 16 2
Installing the software
Install the software before plugging in the cable. The current version of the software can
be downloaded from http://www.durametric.com. To install the software run the setup
program “Durametric.msi” and follow the on screen instructions. The last step of the
setup program will launch the “Device Driver Wizard”. Follow the steps on the screen to
install the driver. Once the software has been installed, plug the cable into the computer
and the software is ready to use.
This software requires the Microsoft .NET Framework Version 2.0. If you do not have
this version of the .NET Framework already on your computer, you will get an error
message instructing you to install it. The .NET Framework can be downloaded for free
from Microsoft and is also included on the installation CD. The file is named
“dotnetfx.exe” and is contained in the “dotnetfx” directory on the CD. It is important to
install .NET 2.0 as the program is not compatible with .NET 1.0 or 1.1.
If there are any errors while installing the device driver using the wizard, the device
driver can be installed manually. The device driver files are stored in the “C:\Program
Files\Durametric Software\Durametric Diagnostic Tool” directory. Also the device driver
installation wizard can be run directly by running the program “C:\Program
files\Durametric Software\Durametric Diagnostic Tool\dpinstx86.exe”.
For your protection our installation package is digitally signed by Durametric Software
and our device driver included with the software has passed Microsoft’s WinQual testing
and is digitally signed by Microsoft.
Updating the software
We often release new versions of our software; when we release a new version we make
it available as a Beta version before general release. The latest version of our software
can be downloaded for free from our website at http://www.durametric.com. The current
general release (non-beta) version of our software can be downloaded from the
“download” page and the current Beta version can be downloaded on the ‘Version
History’ page. The “Version history” page also displays a list of all the changes and
improvements made to the software. All software updates are complete, so there is no
need to update to each version, you can simply install the latest version. For example, if
you have version 4.3.0 installed and you want to install 5.0.0 you do not need to install
4.4 first.
3
Product versions
We offer three version of diagnostic software for Porsche
Enthusiast Version
The enthusiast version is limited to 3 cars, this is done by storing the VIN numbers of the
cars it is used on in the cable itself. After the cable has been used on three cars it will
only function on these three cars.
Professional version
The professional version has no vehicle limitations and also includes an adapter for the
round diagnostic connector, and an extension cable that can extend the diagnostic cable
by up to 50 feet long.
Screen Layout
The software features can be accessed from a series of menus.
Menu:
File
Start Over (go back to the welcome screen)
Exit (closes the program)
Diagnostics (not all sub items available on all control modules)
Fault Memory - see “Fault codes” section
Actual Values - see “Actual values” section
Log Data (saves actual values data to a log)
Vehicle Information - see “ECU Id / Information” section
Drive Links - see “Drive Links” section
Reset Service Reminder - see “Reset Service reminder section
System Check - see “System Check” section
OBD Status - see “OBD Status” section
View
Options
(displays options) - see “Options” section
Work Log
(displays work log) - see “Work Log” section
Help
Durametric Website (Links to our website)
About Durametric (Application information)
Documentation (This document)
Model Navigation
When the program starts it lists all of the vehicle models that the software supports, first
select the type of vehicle you are connected to then select the control module you would
like to work with.
Function tabs
Once a control module has been selected the functions tabs allow you to select the
various functions that are available for each control module.
4
Sub commands
After a function tab has been selected the sub commands allow you to do additional
functions associated with the function selected. For example, on fault codes the sub
functions are “Fault memory” to refresh the list, “Erase fault memory” to clear the codes,
and “Print” to print the list of fault codes.
Status Bar
The status bar will show the current status of the program; it will show if the cable is
ready as well as information about the current connection.
General Use
Select the model of vehicle on the left side of the screen, then select from the individual
control modules in the list. Once you select a control module the software will
automatically check for fault codes, after the fault codes are displayed you can select the
other functions by clicking on the various tabs that are available.
Selecting Language
The displayed language can be selected from the “View-Options” Screen. By default the
language displayed will be the language in use on the computer. If this language is not
available then the software will default to English.
5
Fault Codes
The fault codes that are displayed are the same fault codes that you would see using the
factory tools 9288 (hammer), PST2, or PIWIS. This is different than a generic OBD2 tool
that only shows emissions related engine problems. When displaying fault codes,
additional information is displayed if it is available in the control module. The software
has fault information on approximately 8500 different fault conditions.
Some fault codes are known by more then one number. For example, late model cars
have a P-code and a Porsche fault code. Both values are useful as some factory
documentation uses P-codes and others use the Porsche fault code.
To find additional information, troubleshooting steps and repair information you will
need to reference the fault code displayed in the factory service manuals. As of the 2005
model year Porsche no longer publishes a diagnostics manual so information on these
cars can be difficult to find.
Erase Fault Codes
To erase the fault memory click on “Erase fault codes” button. When fault codes are
erased all of the codes stored are erased. It is not possible to only erase one fault code.
If the fault codes are still displayed after erasing fault codes then the problem the fault
code is displaying still exists. For example, if the fault code you see is for “Seat belt
buckle receptacle” and you have not repaired the problem, you will not be able to clear
the fault.
6
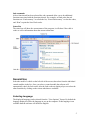
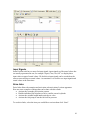
ECU ID/Information
The ECU ID / Information tab displays data that is stored in the control module. On most
control modules this information is very basic and only contains the part number or
software version number. Some other control modules store lots of interesting
information.
On Boxster (986) and 996 the following information is available:
Porsche part number: The part number of the control module.
Supplier part number: The Bosch part number of the control module.
Software version number: The major version of the software installed on the control
module.
Data version number: this is the major and minor version of the software installed on the
control module
Number of ignitions range 1: This value is displayed in two parts. For example 1524 /
283h: the first value is the number of individual spark ignitions at the rev limiter, the
second value is the operating hours of the last time a spark ignition was registered. So in
this case there have been a total of 1524 spark ignitions the last one occurred at 283
hours.
7
Number of ignitions range 2: This value is displayed in two parts. For example 125 /
153h: the first value is the number of individual spark ignitions above the rev limiter the
second value is the operating hours of the last time the rev limiter was exceeded. In this
example there have been 125 ignitions above the rev limiter the last time it occurred was
at 153 hours.
Ignitions are cumulative, for the life of the control module. Every time the rev limiter is
used the values are incremented until they reach the maximum stored value of 65535.
Once 65535 is reached the value will always read 65535 regardless of how many time the
rev limiter is used.
Operating hours: operating hours is the cumulative time the engine has been running
VIN: vehicle identification number
Type ID DME control unit: Control unit configuration
Order Type: This the main vehicle type that is used by Porsche when ordering or
specifying the type of car and contains information about the model and country and
steering orientation. For example, 996420 is a 996 Turbo ROW left hand drive
Country code: The country that car was intended for C01= Germany, C02 = USA, etc…
Engine Type: The engine model code (this number is often not supplied)
Engine Number: The engine serial number (this value is often not supplied)
Transmission Type: The transmission model code (this value is often not supplied)
Transmission Number: The serial number of the transmission (this value is often not
supplied)
Radio Code: The security code for the radio, this value is typed in at the factory, but is
sometimes not supplied. Radio codes are automatically interchanged with the instrument
cluster starting with Motronic 7.8, also if the radio or DME has been replaced this value
is often not updated.
Body color /Convertible top color: contains the color codes of the car if supplied when
car was assembled.
Interior equipment: Contain additional information about special equipment if supplied.
997, Boxster (987), and Cayman contain the same information as 996 with the exception
of ignitions ranges. The ignition ranges on these cars are broken down as follows
Number of ignitions Range 1: 7300 – 7500 RPM
8
Number of ignitions Range 2: 7500 – 7700 RPM
Number of ignitions Range 3: 7700 – 7900 RPM
Number of ignitions Range 4: 7900 – 8400 RPM
Number of ignitions Range 5: 8400 – 9500 RPM
Number of ignitions Range 6: 9500 – 11000 RPM
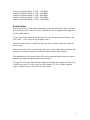
Actual values
With actual values you can monitor individual sensors and calculated values calculated
by the control module, in near real time. The data can also be graphed and/or logged to a
file for further analysis.
To use actual values select the actual values tab, select the desired actual value(s), and
click “Start.” Click “Stop” to stop sampling values.
The actual values that are available are the same values available in the latest Porsche
factory tools.
When using actual values you should not select more actual values then you need as this
becomes very resource intensive for both the control module and the laptop.
The sampling rate of the actual values will vary by control modules, the newest control
modules can sample much faster than earlier versions.
To log a file click on the Export button and the data that has been sampled will be saved
to the file you select. You can choose two file formats: CSV for “Comma separated
values” and Excel for the Microsoft Excel file format.
9
Input Signals
Some Porsche tools have a menu for input signals, input signals are like actual values but
are usually represented in text, for example “Open, Close, On, Off” we display these
input values as part of actual values. We do this so input signals can be recorded on the
same screens and logs as actual values. As sometimes it is useful to see input signals and
actual values at the same time.
Drive links
Drive links allows the actuation and activation or deactivation of various apparatus.
Here are some examples of things that can be done with drive links:
• Activate the secondary air injection system
• Disable individual fuel injectors to force a misfire on each cylinder
• Activate the variable length intake switch over valve
• Activate the fuel pump to test the fuel rail for pressure
To use drive links, select the item you would like to activate then click “Start”.
10
Look for messages about the current drive link in the status bar. Some drive links require
conditions that must be met before the drive link can be started. These conditions can be
seen in the status bar.
Drive links are intended to be used for trouble shooting a particular problem and testing a
car. They should be used with caution and knowledge of their function. For example, it
is not a good idea to activate the coolant shutoff valve on a hot car.
Reset Service Reminder
Service reminders only exist on 2005+ Boxster, 997, Cayman and 2003+ Cayenne. These
cars will display “Service Now” when the service reminder needs to be reset.
To reset the service reminder, select “Instrument Cluster” then click on “Diagnostics Æ
Reset Service Reminder”.
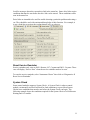
System Check
Some control modules support a System Check. A System Check is when a control
module can internally test itself and look for fault conditions to report. Most System
Checks have conditions that must be met before the System Check can begin. The
following example shows the conditions required for the System Check of a 996/Boxster
Heating and A/C module:
11
Once these conditions are met then the System Check can proceed. Once the System
Check is completed the software will return to displaying fault codes.
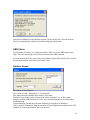
OBD Status
On US market 993s there is a certain procedure to follow to set the OBD ready status
flags. The ready status flags can be seen by selecting the OBD status tab.
For other models the ready status values are included as part of the actual values, and can
be seen in the bottom part of the list of actual values.
Options Screen
The options screen displays:
The version of cable, “Enthusiast” or “Professional”
How many times the cable has been used to clear codes.
The device type displays what version of the cable is attached. As we have made
different versions of the hardware over the years this information may be useful when
troubleshooting.
Current language: Default uses the same language as configured in Windows.
If the version is “Enthusiast” then the software will also display the last digits of the VIN
numbers of each car the software has been used on.
12
Work Log
The software automatically keeps track of all information accessed and displayed. It
stores this information in a simple text file stored at “C:\Program Files\Durametric
Software\Durametric Diagnostic Tool” directory. The files are named
“VehicleLog{data}.txt”. There is one log stored for each day the tool is used. If the tool
is used on more then one vehicle in the same day the information for all vehicles will be
stored in the same day’s log.
Firmware Update
The firmware in the interface cable can be updated by selecting View->Options then
clicking on “Firmware Update”. Updating the firmware takes about 45 seconds. Do not
unplug the cable while the firmware is being updated. If the “Firmware Update” button
does not display then your cable is a first generation cable and it is not updateable.
Factory Race Cars
Factory race cars can be accessed using the Durametric software select the model type
996 or 997 and then select Motronic, the motorsports DME will automatically be
identified.
The list of actual values, on racing cars covers most models, but not all actual values are
available on all cars. There may be actual values in Durametric that the car does not
support.
The factory race cars require a special cable and version of Durametric cable that is
different for our normal Enthusiast and professional versions.
The diagnostic connector on race cars can be found on the roll cage on the passenger side
of the car. Cup cars before 2001 have a normal diagnostic connector and do not need a
special cable.
Diagnostic connector locations
Most cars diagnostic connectors are under the dash on the driver side. Here are some
common connector locations:
944 / 968
Under the dash on the passenger side
964
The diagnostic connector is located on the passenger side kick panel behind a round
diagnostic connector.
13
993
1995 993 models can have either a 16 pin OBD2 connector, or a 19 pin round diagnostic
connector.
1994-1995 993 models with the round 19 pin connectors the connector is located on the
passenger side kick panel and is covered by a round plastic cover
1995-1998 993 with OBD2 type diagnostic connectors the connector is located on the
side of the center console on the drivers side, it is covered by a plastic cover that says
OBD.
996 / Boxster (986)
Under the dash on the left side
997 / Boxster (987)
Under the dash on the left side
Cayenne
Under the dash on the driver side behind a hinged plastic cover.
Common Problems and Solutions
Cannot reset the instrument cluster on 997, Cayman, Boxster (987)
Sometimes the instrument cluster does not accept the reset command. To clear the
instrument cluster remove the fuse for the instrument cluster after using the software to
reset the reminder. Simply removing the fuse will not clear the service reminder; it will
only reset the instrument cluster.
Cannot connect to 2005 – 2006 Cayenne
If the instrument cluster says “press brake pedal” this means the CAN network is asleep
and you need to wake up the network by pressing the brake pedal.
The CAN gateway may need to be reset. If VAG-Com has been used on this car it is
likely that the CAN gateway will need to be reset. To reset the CAN gateway take the key
out of the ignition and remove fuse #40 for at least 10 seconds. The fuse panel is on the
left side of the dashboard where the dashboard meets the door panel.
Receiving errors while running actual values
Start actual values with the car already running, do not start the car when actual values
are currently running as this resets the interface and may cause application errors.
14
Select as few actual values as possible. Each actual value must be processed separately,
so the more actual values that are selected, the slower each one will be updated. While
the software is capable of capturing unlimited actual values, most laptop computers are
not and will suffer from performance problems as more actual values are selected.
15
Module failed to initialize
The “module failed to initialize” message is displayed if the software cannot connect to
the control module.
This can be caused by the following problems:
The cable is not plugged into the computer; check the status of the cable in the status bar
at the lower left corner of the screen.
The module is not installed in the car. For example, choosing seat memory in a car that
does not have seat memory will give you this error.
There is a wiring problem in the car. If the wiring to the individual control modules has
been damaged, on 993 models it is very common to find wiring problems with the
diagnostic connector.
Electronics interference can also cause communications problems. Cars with aftermarket
stereo or radar detecting equipment may also have communications problems. Make sure
any stereo and amplifiers are off while performing diagnostics.
The computer too slow to communicate, some control modules communicate at 500 kbps
and require timing windows as small as 5 milliseconds. This can be difficult for some
slower computers. See the section below for computer performance suggestions for more
information.
Computer Performance Suggestions
Some slower computers may have trouble connecting to some control modules. Here are
some suggestions to help improve the performance of the computer:
Close out all other running programs.
Remove any CD from the CD drive.
Plug laptops into a power supply, most laptops will run at reduced speeds when running
on battery, and you can improve the performance by plugging the laptop into a power
supply.
Defragment the disk drive. When a laptop hard disk drive becomes heavily fragmented
the computer will run very slow.
Some virus protection software can stop or slow down the communications ports so if
you are experiencing performance problems try disabling the virus software temporarily.
16