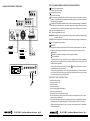
1
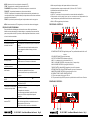
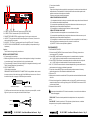
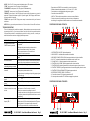
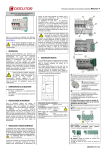
Equipson, S.A.
www.equipson.es
[email protected]
PA 150 CD MP3
User Manual / Instrucciones de Usuario
PA 150 CD MP3
Mixer power amplifier with CD/MP3
Amplificador de potencia con CD/MP3
ENGLISH
Page 1
CASTELLANO Página 9
This symbol on the product or on its packaging indicates that this product
shall not be trated as household waste. Instead it shall be handed over to
the applicable collection point for the recycling of electrical an electronic
equipment. By ensuring this product is disposed of correctly, you will help
prevent potential negative consequences for the environment and human
health, which could otherwise be caused by inappropriate waste handling
of this product. The recycling of amterials will help to conserve natural
resources. For more detailed information sabout recycling of this product,
please contact your local city office, your household waste disposal service
or the shop where you purchased the product.
Este símbolo en su equipo o embalaje, indica que el presente producto
no puede ser tratado como residuos domésticos normales, sino que deben
entregarse en el correspondiente punto de recogida de equipos electrónicos
y eléctricos. Asegurándose de que este producto es desechado
correctamente, Ud. está ayudando a prevenir las consecuencias negativas
para el medio ambiente y la salud humana que podrían derivarse de la
incorrecta manipulación de este producto. EL reciclaje de materiales
ayuda a conservar las reservas naturales. Para recibir más información,
sobre el reciclaje de este producto, contacte con su ayuntamiento, su
punto de recogida más cercano o el distribuidor donde adquirió el producto.
THE FOLLOWING SYMBOLS ARE USED ON THIS APPARATUS
EJEMPLO DE POSIBLES CONEXIONES
0
0
0
25V
0
25V
0
70V
0
70V
100V
0
0
100V
0
Protective grounding terminal.
~ Alternating current/voltage
Hazardous live terminal.
Direct current/voltage.
! The exclamation point within an equilateral triangle is intended to alert the user to he
presence of important operating and maintenance (servicing) instructions in the literature
accompanying the appliance.
The lightning flash with arrowhead symbol, within an equilateral triangle, is intended to
alert the user to the presence of uninsurable "dangerous voltage" within the product's
enclosure that ma y be of sufficient ma gnitude to constitute a risk of electric shock to persons.
ON Denotes the apparatus turns on
100V
70V
25V
CAUTION:
WARNING
ELECTRIC SHOCK HAZARD, DO NOT REMOVE COVER.
FOR CONTINUED PROTECTION AGAINST RISK OF FIRE-REPLACE ONLY WITH
SAME TAPE 3A 250V.
REFER SERVING TO QUALIFIED PERSONNEL SEE INSTRUCTION MANUAL.
NO-OUTDOOR USE.
DO NOT BLOCK ANY OF THE VENTILATION OPENINGS.
OFF Denotes the apparatus turns off.
OUT PUT
L
L
R
R
COM 4£
8£
16£
25V
70V 100V
WARNING Describes precautions that should be observed to prevent the danger of injury
or death to the user.
CAUTION Describes precautions that should be observed to prevent danger of the apparatus.
risk of fire-replace fuse as marked.
GND
Use only with a 250V fuse
LINE
OUT
T
AUX
3A AC 250V
RATED SUPPLY VOLTAGE:
115V~60Hz
INPUT: 115V~60Hz
AC FUSE: T 3A 250V
RATED INPUT: 260W
CLASS ¢ WIR E
CLASS ¢ WIR E
RE-APPLY THE TERMIN AL COVER AND FASTEN THE SCREWS
T
5A AC 250V
DC24V
OUTPUT
FM ANT
! CAUTION
LINE OUT
L
R
DC FUSE
4WW
OFF
COM 70V 100V
Monitor TEL.
VOL. VOL.
Z2
Z3
F
CAUTION:
ELECTRIC SHOCK HAZARD
DO NOT REMOVE COVER.
REFER SERVICING TO
QUALIFIED PERSONNEL.
SEE INSTRUCTION MANUAL.
1 2 3 4
1: for CD
2: for Tuner
3: for Tape
4: for AUX IN
Z1
E
FUSE
COM
E
-
US
FUS
DC POWER
ON
+
COM COM COM COM
PRE
OUT
LINE MIC
PHANTOM
24V
LINE MIC
PHANTOM
24V
LINE MIC
PHANTOM
24V
LINE MIC
PHANTOM
24V
INPUT 1
INPUT 2
INPUT 3
INPUT 4
R
The apparatus should be placed on a solid surface with a minimum distance of 1m from
the back or side top plate to the wall and not in the following environments of cases:
Use only with a 250V fuse
L
LINE
230V~50Hz
GND
+
-
1W 8£
T
Priority
R
G
Tel. Paging
MAIN
IN
BALANCED
Reproductor de CD
Amplificador opcional
Sintonizador AM/FM
Moist place;
Under direct radiation of sunlight or other strong heat radiation;
No air ventilation.
Grabador
Pletina Cassette
MASTER
OUTPUT
BASS
TREBLE
STOP
B.SKIP/REW
F.SKIP/FF
PLAY/PAUSE
PROG
REPEAT
To prevent the risk of fire or electrical shock, the apparatus shall not be exposed to
dripping moisture or splashing and that no objects filled with liquids, such as vases, shall
be placed on the apparatus.
Please read the notes proceeded by the symbol ! with the special attention, as they
provide important safety information.
These servicing instruction are for use by qualified personnel only. To reduce the risk of
electric shock do not perform any servicing other than that contained in the operating
instructions unless you are qualified to do so.
-10
+10
-10
AUX
MIC3
MIC2
MIC1
MIC-3
MIC-2
MIC-1
+10
LEVEL
0
PLAY
01
OPEN/CLOSE
0
COMPACT DISC PLAYER
10
PL
10
POWER
IMPORTANT SAFETY INSTRUCTIONS
-Read these instructions.
-Keep these instructions.
-Heed all warnings..
-Follow all instructions.
-Do not use this apparatus near water.
-Clean only with a damp cloth.
-Do not block any of the ventilation openings.
-Do not install near any heat source such as radiator, heat registers, stoves, or other
apparatus that produce heat.
-Do not defeat the safety purpose of the grounding-type plug. A grounding type plug has
two blades and a third grounding prong. The third prong are provided for your safety.
When the provided plug does not fit Into your outlet, consult an electrician for replacement
of the obsolete outlet.
PA 150 CD MP3 User Manual /Manual de Usuario
Pag 16
PA 150 CD MP3 User Manual /Manual de Usuario
Pag 1
+/-Protect the power cord from being walked on or pinched particularly at plugs, convenience
receptacles, and the point where they exit from the apparatus.
+/-Only use attachments/accessories specified by the manufacturer.
+/-Unplug this apparatus during lightning storms or when unused for long periods of time.
+/-Refer all servicing to qualified service personnel. Servicing is required when the apparatus
has been damaged in any way, such as power-supply cord or plug is damaged, liquid has
been spilled or objects have fallen into the apparatus, the apparatus has been exposed
to rain or moisture, does not operate normally, or has been dropped.
+/-This handbook is an integral part of the product and must accompany it when changing
owner, to allow the new owner to get to know the installation, operating, and safety
instructions.
SAFETY PRECAUTIONS
The following general safety precautions must be observed during all phases of operation,
service and repair of this apparatus. If this apparatus is used in a manner not specified in
this manual, the protection provided by this apparatus may be impaired. Also, our
company assumes no liability for the customer's failure to comply with these requirement.
POWER SUPPLY
+/-Ensure the source voltage matches the voltage of the power supply before turning ON
the power.
POWER CORD AND PLUG
+/-To prevent an electric shock or fire ,be sure to use the power cord supplied by our company.
+/-The main power plug must be plugged in an outlet with protective grounding terminal.
Do not invalidate protection by using an extension cord without protective grounding.
+/-You shall hold the plug firmly to avoid the pull-out of power cord and risk occurring when
you pull the power cord out from AC outlet .
+/-If the apparatus is not to be used for long periods of time .turn it off and disconnect the
power supply cord.
FUSE
To prevent a fire, make sure to use fuses with specified standard (current, voltage, type)
Before replacing the fuse, turn OFF the power and disconnect the power source. Do not
use a different fuse or short-circuit the fuse holder.
CLEANING
When the apparatus needs a cleaning, you can blow off dust from the apparatus with a
blower of clean with rag etc. Don't use solvents such a benzol, alcohol, or other fluids
with very strong volatility and flammability for cleaning the apparatus body.
OTHER
+/-If the apparatus gives off any strange smoke switch it off immediately and disconnect
The power from the supply cable.
+/-Do not obstruct the ventilation grilles of the apparatus.
+/-Avoid having the apparatus work on overload for a long time.
+/-Do not force command parts (buttons, controls, etc.)
+/-If connecting interference takes place in source circuit, THD will be more than 10%.
ESPECIFICACIONES
Tipo
Modelo
Potencia de salida
Mixer power amplifier
150W CD series
Rated: 150W
max: 210W
Regulac. de salida
Menos de 2dB sin cargar a plena carga
Salidas
Salidas de altavoz
4 ohm (24.5V)
8 ohm (34.7V)
16 ohm (49V)
25V
70V
100V
Line out : 1V +/-0.3V
Respuest. frecuencia 50~15,000Hz
Distorsión armónica
Menos de 1% a 1KHz,
Relación S/N
AUX
:80dB por debajo de la potencias nominal
Con trol es ton o al cen tro
Todos los controles
:80dB por debajo de la potencias nominal
Micrófono
al mínimo
Controles de tono
BASS
: +/-10dB at 100Hz
TREBLE : +/-10dB at 10KHz
Entradas
AUX : 20K Ohms, -18+/-2dB
MIC1-3 : 600 ohms, -54+/-3dB(desbalanceado)
Controles
MIC1-3 volumen
AUX volumen
CD volumen
Controles de tono (BASS, TREBLE)
MASTER volumen
Indicador
Indicador de potencia (LED)
Medidor de salida con LED
Alimentación AC
Ver panel trasero
380 W
Consumo de potencia
a potencia nominal
Dimensiones
Peso
Color
450mm(An) 100mm(Al) 335mm(D)
12.35kg
Negro
* Precaución:
El selector de voltaje debe ser sustituido por el fabricante
FEATURES AND GENERAL DESCRIPTION
The CD series have 100W,150W output RMS, CD series with a compact disc player.
+/-High quality design and construction.
+/-Full frequency response: 50Hz to 15,000 Hz at +/-3dB.
+/-Low distortion and noise level.
+/-3 unbalance microphone inputs; 1auxiliary inputs and 1 line out (Placed on the rear panel).
PA 150 CD MP3 User Manual /Manual de Usuario
Pag 2
PA 150 CD MP3 User Manual /Manual de Usuario
Pag 15
LEVEL: Muestra el nivel con el ajuste de volumen del CD
"STOP", Al presionarlo, se detiene la reproducción del CD
"B.SKIP/REW", Al presionarlo, el CD retrocede una pista o a través de ella
"F.SKIP/FF", al presionarlo avanza un a pista o a través de ella.
“REPEAT” Al presionarlo, el reproductor repite la misma canción, presionando otra
vez repite todos el disco, otra presión hace que el reproductor vuelva a las condiciones
normales de funcionamiento.
"PROG" Al presionarlo puede configurar las pistas de acuerdo a sus gustos
NOTA: Antes de encender el CD, asegúrese que el control de volumen está apagado
+/-With compact disc player with power switch and volume control.
+/-Isolated transformer outputs complete with 4,8,16 ohms, 25V, 70V,100V.
+/-Individual bass and treble tone controls.
+/-Master volume control.
+/-LINE OUT : send output for a tape recorder or connected other rear Amplifier.
+/-Self-protection circuitry design.(over load, over current and over heat protection; the
output, subsequent, power transformer all have auto-reset thermostat.)
+/-Built-in LED bar graph output level meter.
FRONT PANEL CONTROLS
RESOLUCION DE PROBLEMAS
9
8
7
6
5
3
Esta unidad ha sido diseñada para funcionar sin errores. Mucho problemas son
debidos a errores de manejo.Así si detecta alguno, compruebe primero en esta lista
para ver su posible solución. Si persiste, no trate de repararlo usted mismo, consulte
al servicio tecnico autorizado.
2
SI EL PROBLEMA ES --No se ilumine el LED al
encender la unidad.
El ventilador no funciona.
No se oye sonido
Salida intermitente o
zumbidos continuos
MAKE SURE THAT THE --1. La unidad está conectada a red pero el fusible está
fundido.
2. El termostato interno del transformador está en
marcha, apague la unidad un tiempo y vuelva a
encenderla.
La unidad está conectada a red pero el fusible está
fundido
Compruebe si se ha pulsado el botón de selector de
entrada correcto o el volumen es el adecuado.
Compruebe si la alimentación es correcta
No hay salida en uno o
más canales
Los cables no están estropeados:
Compruebe los cables de altavoz o linea.
La fuente de señal funciona y suministra la señal
adecuada.
No se muestra el reproductor Compruebe que el interruptor de red “ “ va bien
de CD
No hay salida del CD
Compruebe que el disco no está rayado o sucio
Limpie la lente del CD
La barra de LED indica modo 1. La autoprotección se ha puesto en marcha, apague
la unidad por un tiempo.
normal pero no hay salida
2. Compruebe los conectores
3. La sobrecarga puede haber fundido el fusible,
contacte con un técnico especializado para su
sustitución.
El reproductor de CD
1. Abra la bandeja de CD y pulse otra vez
muestra "ER..."
2. Gire el volumen al mínimo y encienda de nuevo la
unidad, presione PLAY otra vez
3. El reproductor falla, consulte a su distribuidor
10
Pag 14
12
4
1
1.POWER ON-OFF SWITCH: Applies line power. Two-position button switch for on-off
modes.
2. PL INDICATE LAMP: Power indicate lamp.
3. OUTPUT LEVEL METER: Indicates output level.
4. MIC1-3: unbalance mic input terminal with 6.3£.
5. MIC1-3 VOLUME CONTROL: Adjust gain of mic1-3 respectively.
6. AUX VOLUME CONTROL: Adjust gain of AUX VOL.
7. BASS CONTROL: Adjust BASS respectively, tone is flat at center.
8. TREBLE CONTROL: Adjust TREBLE respectively tone is flat at center
9. MASTER VOLUME CONTROL: Adjust overall gain of unit.
10.COMPACT DISC PLAYER: DIGITAL DISPLAY.
11. CD volume control: Adjust gain of CD vol.
12. CD power switch: Applies CD power, two-position button switch for on-off modes.
REAR PANEL CONTROLS
2
1
PA 150 CD MP3 User Manual /Manual de Usuario
11
3
4
5
6
PA 150 CD MP3 User Manual /Manual de Usuario
Pag 3
2
1
3
4
5
6
1. AC INPUT: AC main connects to AC power source (with AC FUSE).
2. AC SELECTOR: AC selector switch (100V-120V/220V-240V).
3. CONNECT GROUND SCREW : supply the usage of functionary connect ground.
4. LINE OUT : This output terminal that mixed audio signals of all sources, connect to the
other's real Amplifier or recorder.
5. AUX INPUT : The "R"and"L" sockets permit input of the right"R" and left "L"channels.
6. OUTPUT LOW & HIGH IMPEDANCE : connects to speakers (low impedance & high
impedance.)
Caution:
The AC selector changed only by manufacturer.
INSTALL AND CONNECTIONS
1. AC power supply's connections
+/-Before using this unit for the first time, be sure that the appliance's voltage is in accordance
to your mains supply. Connecting this unit only to ground mains outlet.
+/-If your mains supply is other this unit work voltage, don't changed the selector by yourself.
The AC selector changed only by manufactory.
2. INPUT CONNECTIONS
(1) Microphone connections
UNBALANCED MICROPHONE INPUT CONNECTIONS: Using shielded cable, connect
the center conductor of the cable to prong #2 of the A3M Microphone connector. Connect
the shield of the cable to prong #1 of A3M Microphone connector.
MIC
Unbalanced microphone
Single pole phone pug
(2) AUX connections a radio tuner, tape player, chime mixer pre-amplifier, or other
high level input sources may be connected to the AUX input.
L
Cassette
R
PA 150 CD MP3 User Manual /Manual de Usuario
FUNCIONAMIENTO
FUNCIONAMIENTO BASICO
1. Presione la tecla POWER a ON, entonces se ilumina el LED testigo, pulsando otra
vez se apaga el LED y la unidad.
2. Control BASS, modifica las frecuencias graves en los canales derecho e izquierdo
en +/- 10 dB. Configure el mando teniendo en cuenta la respuesta en la sala
3. Control TREBLE, modifica las frecuencias agudas en los canales derecho e izquierdo
en +/- 10 dB. Configure el mando teniendo en cuenta la respuesta en la sala.
4. MIC 1-3, CD, AUX tienen controles de volumen independientes, gire en sentido horario
para incrementar el volumen y antihorario para reducir.
5. Control de volumen MASTER gire en sentido horario para incrementar el volumen y
antihorario para reducir. Esto cambia la totalidad de la salida.
6. Ejecutar el CD
Cuando presione la tecla de encendido del CD, la pantalla se enciende indicando el estado
del lector.
A. Presione la tecla open/close, la bandeja se abre, coloque un CD y pulse de nuevo para
cerrar la bandeja. Espere unos 5 segundos y pulse PLAY/PAUSE en ese momento el CD
comienza a ejecutarse.
B. Botones de función del CD
Interruptor de encendido del CD. Antes de encenderlo, el control de volumen Master
debe estar apagado.
“OPEN/CLOSE” Presione la tecla para abrir la bandeja de inserción, otra pulsación lo
cierra.
“PLAY/PAUSE” Cuando lo presiona, el CD se ejecuta, al pulsarlo otra vez, se detiene
a la espera de volver a pulsar a reanudar la ejecución.
AUX
AM/FM
3.Conexiones de salida.
Precaución.
Para evitar el riesgo de descarga eléctrica, nunca toque los conductores ni terminales de
salida durante su funcionamiento. Al retirar la cubierta de los terminales podrá ver las
posibles conexiones de los altavoces de salida.
Vuelva a poner la tapa y atornille fuertemente
LINEAS DE IMPEDANCIA CONSTANTE
(1) La impedancia total de los altavoces conectados debe corresponder a los seleccionado
en los terminales de salida del amplificador.
(2) La suma de las capacidades de potencia de los altavoces no debe ser menor que la
capacidad de potencia de salida del amplificador.
(3) La longitud de los cables de conexión debe ser lo más corta posible
LINEAS DE TENSION CONSTANTE
(1) Cada altavoz debe estar equipado con un transformador de línea
(2) La suma de las capacidades de potencia de los altavoces no debe ser menor que la
capacidad de potencia de salida del amplificador.
(3) La longitud de los cables de conexión debe ser lo más corta posible, de todas formas, a
mayor longitud hay que aumentar la sección y trenzar los conductores.
(4) LINE OUT: Conecte otro amplificador o grabador
Pag 4
PA 150 CD MP3 User Manual /Manual de Usuario
Pag 13
2
1
3
4
5
6
1. ENTRADA AC: Conecte la unidad a la toma de red adecuad
2. SELECTOR AC: Seleccione el voltaje de entrada (115V/230 V AC)
3. TORNILLO DE CONEXION DE TIERRA
4. LINE OUT: Este terminal de salida mezcla todas las fuentes y permite la conexión
a otro amplificador o grabador.
5. AUX INPUT: Las tomas “L” y “R” permiten introducir señal por ambos canales
6. SALIDAS DE ALTA Y BAJA IMPEDANCIA: Conecte los altavoces de baja o
alta impedancia de acuerdo a las necesidades de la instalación.
Precaución:
El selector AC sólo debe ser cambiado por el fabricante.
OPERATION
INSTALL AND CONNECTIONS
1. Conexión del cable de alimentación
Antes de usar la unidad por primera vez, asegúrese que la toma suministra el voltaje
adecuado. Conecte la unidad sólo a una clavija con toma de tierra.
Si la alimentación es otra a la usada por la unidad, no cambie usted el selector, debe
hacerlo el fabricante.
2. CONEXIONES DE ENTRADA
(1) Conexión de micro
CONEXIONES DE ENTRADA DE MICRO DESBALANCEADOS: Use un cable apantallado
conectando el conductor a pin central del conector y la malla al chasis.
MIC
Micrófono desbalanceado
3.Output connections.
Caution.
+/-To avoid the risk of electrical shock, never touch the bare conductors leading to the
output terminals of the amplifier when it is in operation. Show the possible connections
of the "output" speaker terminal accessible by removing the protective cover. Bear in
mind the following rules:(see following).
+/-Re-apply the output terminal cover and fasten the screws after
+/-Constant the low impedance lines.
(1) The total impedance of the speakers connected must correspond to that selected
on the amplifier's output terminals.
(2) The sum of the power capacities of the speakers must be no lower than the amplifier's
power capacity.
(3) The length of the connecting cables must be short as possible; with equal of line
that CLASS ¢ wire .
+/-Constant the high voltage lines.
(1) Each speaker must be equipped with a line transformer that with an input voltage,
with equal of the line that CLASS¢wire .
(2) The sum of the power capacities of the speakers must not exceed the output power
capacity of the amplifier.
(3) The length of the connecting cables must be short as possible; in any case, the cables
of long-distance must be covered in cross-section.
(4) LINE OUT: connected other rear Amplifier or recorder.
Conector mono
(2) AUX IN: Una pletina de cassette, un sintonizador de radio, mezcladores u otros
elementos de alto nivel de entrada pueden ser conectados a la entrada auxiliar.
AUX
AM/FM
L
Cassette
R
PA 150 CD MP3 User Manual /Manual de Usuario
Pag 12
BASIC OPERATION
1.Press the POWER button to ON, then the power lights up; press again to turn the power
off, then the power lights extinct.
2.Bass control, modifies the low-frequency sound of the left and right channels as much
as +/- 10dB. Set this control at a suitable position for your taste and room acoustics.
3.Treble control, modify the high-frequency sound of the left and right channels as much
as +/- 10dB. Set this control at a suitable position for your taste and room acoustics.
4.MIC1-3, CD, AUX all have independent volume control, turn the VOLUME clockwise
to increase the volume and counter clock wise to decrease it.
5.Master volume control, turn the VOLUME clockwise to increase the volume and counter
clockwise to decrease it, the volume of the front, center, and rear channels is changed
at the same time.
6.Play the CD tape.
When you press the CD power switch's button to on, then the compact disc player will
display, at the same time, tell you that the CD player at the state of ready work.
a. Press the open/close button, the CD window will push out, then take a CD tape in it.
Next, press the same button again and after wait about for 5seconds press the play/Pause
button, at this time, the CD player was working at the normal conditions.
b. CD function buttons.
" "CD power switch with two-position for on-off modes. Before press it, please turn off
the master volume.
"OPEN/CLOSE", Press the open/close button, the CD window will push out; press the
same button again the CD window will push in.
"PLAY/PAUSE", when press it, the CD player will playback; press the same button again,
the CD player will pause play.
PA 150 CD MP3 User Manual /Manual de Usuario
Pag 5
LEVEL: The VR is CD volume control with adjust gain of CD volume.
"STOP", when press it, the CD player will stop playback;
"B.SKIP/REW", when press it, the CD player will backward skip;
"F.SKIP/FF", when press it, the CD player will forward skip;
"REPEAT", when press it, the CD player will repeat to play the same song ,press it
again the CD player will repeat to play all. If press it again, the CD player will return to
normal conditions of playing.
"PROG" when press it, the CD player can setup in accordance with your favoured
selections.
NOTE: Before you press the power button to on. Be sure to the all volume VR to minimum.
- Reproductor de CD/MP3 con encendido y control de volumen
- Salidas de transformador aisladas : 4, 8, 16 ohm, 25, 70, 100 V
- Controles de tono individualizados de graves, agudos
- Control de volumen MASTER
- LINE OUT: Envía señal a una pletina o conecta a otro amplificador
- Circuito de protección (sobrecarga, sobre corriente y temperatura,
la salida y por consiguiente el transformador con termostato autorearmable
CONTROLES DEL PANEL FRONTAL
TROUBLE SHOOTING
9
8
7
6
5
3
This unit is designed for trouble-free operation. Most problems users encounter are due
to operating errors. So, if you have a problem, first check this list for a possible solution.
If the problem persists, do not attempt to service this unit by yourself, consult your
authorized service centers or a highly qualified personnel.
2
IF THE PROBLEM IS --No lights illuminate when
POWER button is pressed.
The fan no work.
No sound is heard.
Unit output is intermittent or
continuously buzzing or screech
No output from one or more
channels.
No display of compact disc
player
No output of compact disc
player
The LED bar graph that output,
indicate is normal, but no output
at load.
The compact disc player
display "ER..."
MAKE SURE THAT THE --1.Unit is plugged into a live outlet, was the AC
fuse opened.
2. Perhaps the power transformer internal autoreset thermostat was worked. If that, please
press the power button to off for a time and
check this unit and connections.
Unit is plugged into a live outlet, was the AC fuse
opened.
Correct input function selector button has been pressed
volume is turned up speakers are connected properly
Check the AC power supply is proper
Cables are not defective:
Check/replace speaker cables or line.
The signal source is operating and providing proper signal
output to this unit
Check the" "CD power switch, is normal.
Check the CD tape clearing or damage, Clear the laserhead
1. The unit self-protection was worked, please press the
power button to off wait for a time, is normal?
2. Check you connector's anything is normal?
3. Perhaps over load or deviant operation, cause this unit's
DC fuse open, please call a qualified technician or consult
an authorized.
1. Open the CD window and play it again, is normal?
2. Please turn all VR to minimal and press the CD power
switch's button off, then press it again, is normal?
3. The CD player was failure, consult an authorized.
10
Pag 6
12
4
1
1. INTERRUPTOR ON/OFF: Aplica alimentación.
2. INDICADOR PL: Indicador de encendido de la unidad
3. MEDIDOR DE NIVEL DE SALIDA:Vúmetro para indicar el nivel en la salida
4. MIC 1-3: Terminal de entrada de micro desbalanceado Jack 6.3 mm
5. VOLUME MIC 1-3: Ajusta la ganancia de las tomas de micro
6. CONTROL AUX VOLUME: Ajusta la ganancia del volumen auxiliar
7. CONTROL BASS: Ajusta la ganancia de las frecuencias graves, plano al centro.
8. CONTROL TREBLE: Ajusta la ganancia de las frecuencias agudas, plano al centro.
9. CONTROL DE VOLUMEN MASTER: Ajusta la ganancia total
10. REPRODUCTOR DE CD/MP3 Y PANTALLA
11. Control de volumen CD: Ajusta la ganancia del CD
12. Interruptor de encendido CD: Enciende o apaga el reproductor.
CONTROLES DEL PANEL TRASERO
2
1
PA 150 CD MP3 User Manual /Manual de Usuario
11
3
4
5
6
PA 150 CD MP3 User Manual /Manual de Usuario
Pag 11
Proteja el cable de red se pisadas o pinzamientos, especialmente en los conectores
y en el punto donde salga de la unidad.
Use únicamente accesorios y repuestos especificados por el fabricante.
Desconecte la unidad durante tormentas eléctricas o periodos largos de tiempo sin
usar.
Diríjase a un servicio técnico con personal cualificado. Se requiere este servicio si se
ha dañado el cable, han caído líquidos u objetos en la unidad o ha sido expuesto a la
lluvia, humedad, etc o no opera normalmente.
Este manual es parte integral de la unidad y debe acompañarla durante un cambio
de propietario para que este pueda familiarizarse con la unidad.
PRECAUCIONES DE SEGURIDAD
Las siguientes precauciones deben ser observadas durante todas las fases de uso
y reparación de la unidad. Si se usa de manera distinta a la marcada en el manual,
podría eliminar la protección del mismo. Además el fabricante no asumiría los daños
causados por este mal uso.
ALIMENTACION
Asegúrese que la alimentación es la correcta antes de encender la unidad.
CABLE DE RED Y CONECTOR
Para prevenir el riesgo de descarga y fuego, utilice el cable de red suministrador por el
fabricante.
Debe conectar a una toma de red con terminal de tierra. No elimine el pin de tierra.
Conectele con firmeza para evitar su desconexión
Si la unidad no va a ser usada durante un periodo prolongado de tiempo, apage la
unidad y desconéctela de su toma de red.
SPECIFICATIONS
Type
Model
Power output
Output regulation
Outputs
Frequency Response
Total harmonic distortion
Signal to noise radio
(Ton e con trol cen ter ed )
All volume controls
C.C.W
Tone controls
Input
Controls
FUSIBLE
Para prevenir fuego, asegúrese de usar el mismo tipo de fusible(corriente, tamaño)
Antes de sustituirlo, apague la unidad y desconéctela de la red. No use un fusible
diferente ni cortocicuite el portafusible.
LIMPIEZA
Cuando la unidad necesite limpiarse, puede utilizar un aspirador de polvo. No utilice
disolventes como benceno, alcohol u otro fluidos con alta volatilidad o inflamables
para la limpieza del aparato.
OTROS
- Si el aparato muestra u humo extraño apague inmediatamente y desconecte el
cable de red.
- No obstruya las salidas de ventilación
- Evite sobrecargar la unidad durante largos periodos de tiempo
- No fuerce los mandos (botones, controles, etc.)
Indicator
AC power supply
AC power consumption
Dimensions
Weight
Color
Mixer power amplifier
150W CD series
Rated: 150W
max: 210W
Less than 2dB no load to full load
Speaker output
4 ohm (24.5V)
8 ohm (34.7V)
16 ohm (49V)
25V
70V
100V
Line out : 1V+/-0.3V
50~15,000Hz
Less than 1% at 1KHz, rated power
AUX
:80dB below
rated power
Microphone
:80dB below
rated power
BASS
: +/-10dB at 100Hz
TREBLE : +/-10dB at 10KHz
AUX : 20K Ohms, -18+/-2dB
MIC1-3 : 600 ohms, -54+/-3dB(unbalanced)
MIC1-3 volume control
AUX volume control
CD volume control
Tone controls (BASS, TREBLE)
MASTER volume control
Power indicator (LED)
LED output level meter
see rear panel's marked.*
220 WATTS
380 WATTS
at rated output
at rated output
450mm(W) -100mm(H) -335mm(D)
12.35kg
Black
* Caution:
The AC selector changed only by manufacturer.
CARACTERISTICAS Y DESCRIPCION GENERAL
Esta serie dispone de 150 W de salida RMS y dispone de un reproductor de CD/MP3
- Frecuencia de respuesta: 50 Hz a 15000 Hz +/- 3dB
- Alta calidad de diseño y construcción
- Baja distorsión y nivel de ruido
- 3 entradas de micro desbalanceadas, 1entrada auxiliar y 1 salida LINE (Panel trasero)
PA 150 CD MP3 User Manual /Manual de Usuario
Pag 10
PA 150 CD MP3 User Manual /Manual de Usuario
Pag 7
LOS SIGUIENTES SIMBOLOS SE USAN EN ESTE APARATO
EXAMPLE OF POSSIBLE CONNECTIONS
0
0
0
25V
0
25V
0
70V
0
70V
100V
0
0
100V
0
Terminal de protección de masa.
~ Voltaje/Corriente alterna
Terminal cargado eléctricamente.
Voltaje/Corriente continúa.
! La exclamación dentro de un triángulo equilátero, nos alerta de la presencia de una
instrucción importante de mantenimiento o uso en la literatura que acompaña a la
unidad.
El rayo dentro de un triángulo equilátero, nos alerta de un tensión peligrosa de la
suficiente magnitud como para constituir un riesgo de descarga eléctrica.
100V
70V
25V
CAUTION:
ON
WARNING
ELECTRIC SHOCK HAZARD, DO NOT REMOVE COVER.
FOR CONTINUED PROTECTION AGAINST RISK OF FIRE-REPLACE ONLY WITH
SAME TAPE 3A 250V.
REFER SERVING TO QUALIFIED PERSONNEL SEE INSTRUCTION MANUAL.
NO-OUTDOOR USE.
DO NOT BLOCK ANY OF THE VENTILATION OPENINGS.
L
COM 4£
8£
16£
25V
70V 100V
GND
R
Use only with a 250V fuse
LINE
OUT
T
R
AUX
3A AC 250V
RATED SUPPLY VOLTAGE:
115V~60Hz
INPUT: 115V~60Hz
AC FUSE: T 3A 250V
RATED INPUT: 260W
CLASS ¢ WIR E
Denota que el aparato se enciende
OFF Denota que el aparato se apaga
WARNING Describe precauciones que deben ser observadas para prevenir daños en
la unidad o muerte en el usuario.
OUT PUT
L
CLASS ¢ WIR E
RE-APPLY THE TERMIN AL COVER AND FASTEN THE SCREWS
CAUTIONS Describe precauciones que deben observarse para prevenir daños en la unidad.
Riesgo de fuego, sustituya el fusible por otro del mismo tipo y valor
T
5A AC 250V
DC24V
OUTPUT
FM ANT
! CAUTION
LINE OUT
L
R
DC FUSE
4WW
OFF
COM 70V 100V
Monitor TEL.
VOL. VOL.
Z2
Z3
F
CAUTION:
ELECTRIC SHOCK HAZARD
DO NOT REMOVE COVER.
REFER SERVICING TO
QUALIFIED PERSONNEL.
SEE INSTRUCTION MANUAL.
1 2 3 4
1: for CD
2: for Tuner
3: for Tape
4: for AUX IN
Z1
E
FUSE
COM
E
-
US
FUS
DC POWER
ON
+
COM COM COM COM
PRE
OUT
LINE MIC
PHANTOM
24V
LINE MIC
PHANTOM
24V
LINE MIC
PHANTOM
24V
LINE MIC
PHANTOM
24V
INPUT 1
INPUT 2
INPUT 3
INPUT 4
El aparato debe ser situado sobre una superficie sólida con una distancia mínima de
1m desde la parte trasera o lateral hasta la pared y debe ser instalada en:
R
Use only with a 250V fuse
L
LINE
230V~50Hz
GND
+
-
1W 8£
T
Priority
R
G
Tel. Paging
MAIN
IN
BALANCED
Other AMPLI FI ER'S rear-amplifier.
CD player
- Lugares húmedos
- Bajo la luz directa del sol o fuerte radiación calórica
- Sin ventilación
Para prevenir el riesgo de descargas eléctricas, la unidad no debe ser expuesta a la
humedad o salpicaduras, ni objetos que puedan derramas líquidos, pueden colocarse
junto al aparato.
Lea las notas precedidas del símbolo ! con especial atención, le suministran
importante información de seguridad.
Esas instrucciones de seguridad son para uso exclusivo de personal cualificado. Para
reducir el riesgo de descargas, no utilice la unidad de modo distinto al contenido en
las instrucciones de usuario a menos que esté cualificado para ello.
AM/FM tuner
Recorder
Speaker Speaker
Speaker
Cassette
4£
8£
16£
MASTER
OUTPUT
BASS
TREBLE
STOP
B.SKIP/REW
F.SKIP/FF
PLAY/PAUSE
PROG
REPEAT
-10
+10
-10
AUX
MIC3
MIC2
MIC1
MIC-3
MIC-2
MIC-1
+10
LEVEL
0
PLAY
01
OPEN/CLOSE
0
COMPACT DISC PLAYER
10
PL
10
POWER
IMPORTANTES INSTRUCCIONES DE SEGURIDAD
- Lea estas instrucciones
- Conserve estas instrucciones para futuras referencias
- Tenga en cuenta todos los avisos
- Sigua todas las instrucciones
- No use la unidad cerca del agua
- Limpie la unidad sólo con un paño seco
- No bloquee las aperturas de ventilación
- No lo instale cerca de fuentes de calor como radiadores, registros de calor, estufas u
otros aparatos que produzcan calor.
- No elimine el pin de conexión de toma de tierra. Un conector de este tipo dispone de
las dos tomas de fase y neutro y de un tercero de toma de tierra, el cual es por su
propia seguridad. En caso de que su toma de red no sea adecuada, consulte con un
electricista para sustituir la toma obsoleta.
PA 150 CD MP3 User Manual /Manual de Usuario
Pag 8
PA 150 CD MP3 User Manual /Manual de Usuario
Pag 9