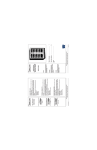
1
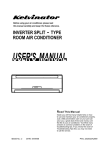
USER’S MANUAL
FOR YOUR SAFETY: Read these instructions carefully before operating the unit.
POUR VOTRE SÉCURITÉ: Lire attentivement ces instructions avant d'utiliser l'appareil.
• Owner’s Use and Care Guide
• Guide d’utilisation et soins de Propriètaire
Model • Modèle
DPA120DHB1GP
ENGLISH
FRANÇAIS
AIR CONDITIONER
Owner’s Use and Care Guide.............1-12
• Welcome
• Important Safety Information
• Features
• Installation
• Operation Instructions
• Care and Maintenance
• Troubleshooting
• Warranty
CLIMATISEUR
Guide d'utilisation et d'entretien .......13-24
• Bienvenue
• Consignes de Sécurité Importantes
• Caractéristiques
• Installation
• Consignes d’utilisation
• Soins et Entretien
• Dépannage
• Garantie
CAUTION:
Read and follow all safety rules and operating instructions before first use of this product.
PRECAUTION:
Veuillez lire attentivement les consignes de
sécurité et les instructions d’utilisation avant
l’utilisation initiale de ce produit.
V2.11.10.DM
WELCOME
Thank you for choosing a Danby appliance to provide you and your family with all of the “Home
Comfort” requirements of your home, cottage, or office. This Owner’s Use and Care Guide will
provide you with valuable information necessary for the proper care and maintenance of your new
appliance. If properly maintained, your Danby appliance will give you many years of trouble free
operation. Please take a few moments to read the instructions thoroughly and familiarize yourself
with all of the operational aspects of this appliance.
Your Danby Portable Air-Conditioner is a multi-functional room air-exchanging, air-processing
appliance, designed to offer you the functions of; Air Conditioning, Dehumidifying, and Independent
Fan. Each individual mode is featured with “oscillating” air swing capabilities. This unit can be
conveniently moved from room to room within your home and set up in just minutes. Imagine the
convenience of 4 Season Home Comfort at your fingertips, anywhere, anytime.
For easy reference, may we suggest you attach a copy of your sales slip/receipt to this page, along
with the following information, located on the manufacturers nameplate on the rear panel of the unit.
Model Number:
Serial Number:
Date of Purchase:
This information will be necessary if your unit requires servicing and/or for general inquiries. To contact a
Customer Service Representative, call Danby TOLL FREE: 1-800-26-
1
(1-800-263-2629)
IMPORTANT SAFETY INFORMATION
READ ALL SAFETY INFORMATION BEFORE USING
ELECTRICAL
SPECIFICATIONS
TABLE 1
1) Check available power supply and resolve any wiring problems
BEFORE installation and operation of this unit. All wiring must
comply with local and national electrical codes and be installed by
a qualified electrician. If you have any questions regarding the
following instructions, contact a qualified electrician.
Suggested Individual Branch Circuit
Nameplate Amps
*AWG Wire Size
11.7
14
AWG- American Wire Gauge
*Based on copper wire at 60°C temperature rating.
2) This appliance draws 11.7 amps under Cooling Mode and may
be used in any properly wired, general purpose 15 amp
household grounded receptacle.
TABLE 2
Receptacle and Fuse Types
3) For your safety and protection, this unit is grounded through the
power cord plug when plugged into a matching wall outlet. If you
are not sure whether the wall outlets in your home are properly
grounded, please consult a qualified electrician.
Rated Volts
125
Amps
Wall Outlet
15
WARNING: Improper connection of the grounding plug can
result in risk of Fire, Electric Shock, and/or injury to Persons
associated with the appliance. Check with a qualified service
representative if in doubt that the appliance is proplery grounded.
Fuse Size
15
4) DO NOT USE PLUG ADAPTERS OR EXTENSION CORDS
WITH THIS UNIT. If it is necessary to use an extension cord with
this unit, use an approved “air conditioner” extension cord only
(available at most local hardware stores).
5) To avoid the possibility of personal injury, always disconnect the
power supply to the unit before installing and/or servicing.
Time Delay Fuse
Plug Type
(or Circuit Breaker)
CAUTION: Do not leave this unit
unattended in a space where people or
animals cannot react to a failed unit are
located. A failed unit can cause extreme
overheating or death in such an enclosed,
unattended space.
POWER
The power cord supplied with this air conditioner contains a device that senses damage to
SUPPLY CORD the power cord. To test if your power cord is working properly, you must do the following:
NOTE: The power cord supplied with this air
conditioner contains a current leakage detection
device designed to reduce the risk of fire. In the event
the power supply cord is damaged, it cannot be
repaired and must be replaced with a new cord from
the product manufacturer.
1) Connect the power supply cord to an electrical
outlet.
2) The power supply cord has two buttons located on
the head of the plug. One button is marked
“TEST”, and the other is marked “RESET”. Press
the “TEST” button; you will hear a click as the
“RESET” button pops out.
• Under no circumstances should this device be used
to turn the unit on or off.
3) Press the “RESET” button; you will hear a click
as the button engages.
• The “RESET” button must always be pushed in
(engaged) for correct operation.
4) The power supply cord is now energized and
supplying electricity to the air conditioner (on
some products this is also indicated by a light on
the plug head).
• The power supply cord must be replaced if it fails to
reset when the “TEST” button is pushed in.
2
IMPORTANT SAFETY INFORMATION (cont’d)
ENERGY-SAVING
TIPS
Your Danby appliance is designed to be highly efficient in energy savings. Follow these
recommendations for greater efficiency.
2) The air filter is very efficient in removing
airborne particles. Keep the air filter clean at all
times.
4) Start your air conditioner before the outdoor air
becomes hot and uncomfortable, to avoid an initial
period of discomfort while the unit is cooling off
the room. Use of the automatic start/stop
programmable TIMER feature can be a major asset
in this regard if utilized to the fullest extent.
3) Use drapes, curtains or shades to keep direct
sunlight from penetrating and heating room, but do
not allow drapes or curtains to obstruct the air flow
around the unit.
5) When outdoor temperatures are cool enough, turn
the air conditioner off and use the FAN MODE.
This circulates indoor air, providing some cooling
comfort while utilizing less electricity.
1) Select a thermostat setting that suits your comfort
needs and leave at that chosen setting.
To prevent injury to the user and other people, and to prevent property damage, the
following instructions must be followed. incorrect operation due to ignoring these
instructions may cause harm or damage.
ALWAYS DO THE FOLLOW:
• This unit should be used in such a way that it is protected from moisture; for example, condensation,
splashed water, etc. Do not place or store the unit where it can fall or come into contact with water or other
liquids.
SAFETY
PRECAUTIONS
• Always transport the unit in its upright position, and stand it on a stable, level surface during use.
• Always use the switch on the control panel to start or stop the unit.
• Turn off the unit when it is not in use.
• Always contact a qualified service technician to carry out repairs.
• Keep at least 30cm (1 foot) of free space around the unit (e.g. from walls, furniture, etc.) to allow for proper
air circulation.
NEVER DO THE FOLLOWING
• Do not operate your air conditioner in a wet room, such as a bathroom or laundry room.
• Do not touch the unit with wet or damp hands or when barefoot (i.e. without socks on).
• Do not press the buttons on the control panel with anything other than your fingers.
• Do not remove any fixed covers. Never use this appliance if it is not working properly or if it has been
dropped or damaged.
• Do not cover or obstruct the inlet or outlet grills.
• Do not use hazardous chemicals to clean, or allow them to come in contact with, the unit. Do not use the
unit in the presence of flammable substances such as alcohol, insecticides, gas, petrol, etc.
• Do not allow unsupervised operation of the unit by children
• Do not use this product for functions other than those described in this manual.
3
FEATURES
FRONT
1) Control Panel.
1
2) Louver Adjustment Handle.
3
3) Vertical Louver Blades.
2
4) Horizontal Louver Blades.
5) Carrying Handles (both sides).
5
6) Castors (4).
4
6
1
2
3
REAR
1) Air Filter.
2) Air Inlet.
4
3) Air Outlet.
5
4) Upper Drain Outlet.
5) Vent Control.
CLO SE
6
OPEN
7
6) Power Cord Hooks.
7) Lower Drain Outlet.
INSTALLATION INSTRUCTIONS
ACCESSORIES
Check to ensure that all accessories are included in the package (Fig. A).
Description
Quantity
1
1) Intake / Exhaust Hose (with collars)
2 / set
2) Window Intake / Exhaust Adapter B
2 / set
3) Window/Patio Slider Kit
1 / set
from 72cm (28-6/16in.) up to 203cm ( 79-15/16in.)
4) Foam Seal
3 pcs
5) Remote Control
1 pc
6) Batteries
1 / set
4
4
2
5
3
6
Fig. A
INSTALLATION INSTRUCTIONS
• The air conditioner should be placed on a firm foundation to
minimize noise and vibration. For safe and secure positioning,
place the unit on a smooth, level floor that is strong enough to
support the unit.
LOCATION
• The unit has castors to aid placement, but if should only be rolled
on smooth, flat surfaces. Use caution when rolling on carpet
surfaces. Do not attempt to roll the unit over any objects.
30cm/
1 ft
30cm/
1 ft
• Never place any obstacles around the air inlet or outlet of the
unit.
• Give at least 30 cm (1 ft) of free space between the wall and the
unit to allow for efficient air-conditioning.
WINDOW KIT
INSTALLATION
The window kit has been designed to fit most standard “vertical” and “horizontal” window applications;
however, it may be necessary to improvise or modify some aspects of the installation procedures for unique
window types.
Horizontal Windows: Minimum & Maximum
Vertical Windows: Minimum & Maximum
Horizontal
window
Vertical
window
Window Slider Kit:
Min: 72.0cm (2.36ft)
Max: 203cm (6.66ft)
Fig. B
Window Slider Kit:
Min: 72.0cm (2.36ft)
Max: 203cm (6.66ft)
Fig. C
NOTE: If the window opening is less than the stated minimum length of the window slider kit, cut the
exhaust slider (the one with the oval shaped hole) shorter in order to fit it to the window. If you are going to
cut, do not compromise the integrity (shape) of the factory cut hole in the slider, as this would make proper
ventilation impossible.
Horizontal / Vertical Window Installation
1) Select a suitable location, making sure you have access to an electrical outlet.
2) Install the intake / exhaust hoses to the rear of the unit (Accessories #1) as shown in Fig. A, page 4 .
3) Install the window slider kit (Accessories #3) as shown in Fig. B or Fig. C depending on window type.
4) Attach the two intake / exhaust hose adapters (Accessories #2) to the end of each hose.
5) Attach the intake / exhaust adapters to the holes in the window kit, making sure the window kit is securely
in place.
NOTE: For vertical window installation, ensure that the exhaust hose adapter is above the intake hose adapter
(to prevent the unit from taking in hot exhaust air).
6) Plug power cord into a 115 V / 60 Hz grounded electrical outlet.
5
INSTALLATION INSTRUCTIONS (cont’d)
PATIO KIT
INSTALLATION
The patio kit has been designed to fit most standard patio doors. Please note that when the patio kit is installed,
the patio door will require a locking bar or other security mechanisms; the patio door cannot be locked
when the patio kit is installed.
Patio door: Minimum & Maximum
NOTE: The patio slider is a slider accompanying the window
kit, that has a series of factory cut holes along its sides: use
these holes to screw the patio slider kit securely into position,
as depicted in Fig. 3.
Patio
door
Fig. 3
Patio Slider Kit:
Min: 72cm (2.36ft)
Max: 203cm (6.66ft)
Patio Door Installation
Refer to Fig. 3 while following the below instructions:
1) Select a suitable location, making sure you have access to an electrical outlet.
2) Install the intake / exhaust hoses to the rear of the unit (Accessories #1)as shown in Fig. A, page 4.
3) Install the window slider kit (Accessories #3).
4) Attach the two intake / exhaust hose adapters (Accessories #2) to the end of each hose.
5) Attach the intake / exhaust adapters to the holes in the patio door kit, making sure the patio door kit is
securely in place.
NOTE: Ensure that the exhaust hose adapter is above the intake hose adapter (to prevent the unit from taking
in hot exhaust air).
6) Plug power cord into a 115 V / 60 Hz grounded electrical outlet.
6
OPERATING INSTRUCTIONS
CONTROL
PANEL
FEATURES
Left Side:
1) Display Window: Shows the set temperature (in °C or °F) and the
Auto-timer settings.
1
2
2) Timer On (left) & Timer Off (right) indicators.
3) Remote receiver.
F
C
3
4
5
4) Timer On (left) & Timer Off (right) buttons: Press the Timer On
button to initiate the Auto-On program, or the Timer Off button to
initiate the Auto-Off program, and is also used to make
adjustments to the Auto-On and Auto-Off timer settings.
5) °F (left) / °C (right) indicators: Indicates which scale of
temperature is being shown in the display window.
Right Side:
1) Temp. Increase (top), Temp. Decrease (bottom) buttons: Press
to increase or decrease the set temperature by one degree.
1
2
4
5
ION
2) Mode Indicators: Indicates which operation has been selected.
From left to right: Cool, Dry, Fan, or Heat.
3) Mode Selection Button: Pressing rotates through the available
operations.
3
MODE
TEMP
4) Ionizer Indicator: Press the Fan Speed button continuously for
Ionizer Indicator:(3 seconds) when lit the ionizer is energized
and operational.
5) Power Supply Indicator: When lit, the machine is recieving
power; if blank, the machine is not receiving power.
6
7
8
6) Fan Speed Indicators: Indicate which fan speed is in use.
Options are between High, Medium, or Low fan speed (varies
between operations).
7) Fan Speed Selection Button: Pressing alternates between
available fan speeds (some operations only).
8) Power On Off Button: Pressing activates or deactivates
operation of the machine.
Note: To disconnect power completely, the
power cord must be removed after
deactivating the machine.
DIRECT DRAIN Before proceeding with dry mode (on following page), it is required that you set up a
direct drain for the unit.
Draining the Unit:
To direct drain the unit:
1) Stop, unplug and then locate the unit near 1) Stop, unplug and then locate the unit near
a floor drain (if available; if not see
a floor drain.
below note).
2) Connect a standard garden hose to the
2) Place the open end of a garden hose over
upper drain outlet (for location see Part
the floor drain.
Identification: Rear # 4).
3) Place the open end of the hose over a
floor drain.
4) Reconnect power to the unit.
3) Remove the lower drain outlet plug (for
location, see Part Identification: Rear # 7)
and quickly connect a garden hose to the
lower drain outlet.
NOTE: If a floor drain is unavailable, turn the unit off and place a pot or pan directly beneath the
lower drain outlet and then remove the lower drain outlet’s plug (this will cause any stored water to exit
the drain outlet). Do not leave the unit unattended while it is draining in case the pot or pan fills and
needs to be replaced.
7
REMOTE CONTROL
PART IDENTIFICATION:
1) Display Window: Shows the set
temperature (in °C or °F) and the
Auto-timer settings.
7) Lock: When pressed in, all current
settings become locked in (cannot be
adjusted) until the lock button is
pressed again.
2) Temp. Increase: Press to increase
the set temperature by one degree.
8) Timer Off: Press the Timer Off
button to initiate the Auto-Off
program. Also used to adjust the
Auto-Off timer settings.
3) Temp. Decrease: Press to decrease
the set temperature by one degree.
1
2
3
10
4) Mode selection button: Pressing
rotates through the available
operations.
9) Timer On: Press the Timer On
4
button to initiate the Auto-On
program. Also used to adjust the
5
Auto-On and Auto-Off timer settings.
9
5) Fan Speed Selection button:
Pressing alternates between available
fan speeds (some operations only).
10) Power On Off button: Pressing
activates or deactivates operation of
the machine.
6
7
6) Reset: When pressed in, all settings
are cancelled and the control returns
to its default (factory) settings.
NOTE: To disconnect power
completely, the power cord must be
removed after deactivating the machine.
3
2
REMOTE DISPLAY WINDOW:
1) Digital Display Area: Shows the set temperature (in °C or °F). When
the Auto-timer is being programmed, the display also shows the Autotimer settings.
2) Transmission Indicator: This indicator flashes when the remote
signals the unit.
3) Mode Display: Indicates which operation is currently selected.
4) Lock Display: This indicator appears when the remote control has
4
been locked.
5) Timer Display: If the Auto-On or Auto-Off operations have been activated,
the words “TIMER ON’,TIMER OFF’, or “TIMER ON OFF” appear in this area.
6) Fan Display: Indicates 1) when the fan mode is in use, and 2) fan speed.
7) ON/OFF Display: This indicator appears when the unit is operating
8
1
7
6
5
NOTE: To disconnect power completely, the power cord must be unplugged after deactivating the machine.
REMOTE OPERATING INSTRUCTIONS: Operations work the same way with the remote control buttons
as they do when using the unit’s control panel (refer to Operating Instructions for more details).
WARNING: Keep the remote control away from all liquids.
Important Notes on the Remote Control:
• Be sure there are no barriers between the remote control and the receiver (signal interceptor) on the unit’s
control panel.
• Protect the remote control from high temperatures, and keep it away from radiation exposure.
• Keep the control panel receiver out of direct sunlight.
• Keep the remote control away from Electro-Magnetic-Interference (EMI) generated by other household
appliances.
• Do not mix old and new batteries.
• Do not mix alkaline,standard (carbon-zinc), or rechargeable (ni-cad,ni-mh,etc) batteries.
• To operate the hand held remote control you will require two “AAA” Alkaline batteries (included).
• Insert (2) batteries (AAA) following the same orientation (polarity) depicted inside the battery chamber (+ / -).
• This Class B digital apparatus complies with canadian ICES-003.
9
CARE AND MAINTENANCE
WARNING:
• Be sure to unplug the unit before cleaning or servicing.
• Do not use gasoline, thinner, or any other chemicals to clean the unit.
• Do not wash the unit directly under a tap or by using a hose; it can cause electric shock or start a fire.
• If the power cord is damaged, it must be repaired only by the manufacturer or by one of its service agents.
THE AIR FILTER:
Because the filter accumulates and extracts dust, it should be cleaned once every two weeks to maintain high
quality fan operation.
Removing the Air Filter:
1) Grasp the air filter’s tab with your fingers.
2) While grasping the tab, pull the filter outward (away from the unit) and then
upward to remove it.
Washing the Air Filter:
1) Wash the air filter by immersing it gently in warm water, at about 40°C (104°F)
using a neutral detergent.
2) Rinse the filter and then dry it in a shaded location.
Reinstalling the Air Filter:
1) Attach the air filter to the filter cover using the attachment hooks located on the inner surface of the filter
cover.
2) Return the air filter to the rear of the unit.
THE UNIT ENCLOSURE:
Cleaning the unit enclosure:
1) Use a lint-free cloth, soaked with a neutral detergent, to clean the outside of the unit.
2) Finish cleaning the enclosure by wiping it with a dry, clean cloth.
Storing the Unit or Leaving It Idle:
If you plan to leave the unit idle for a log period of time (e.g., putting it away for a season, going on vacation,
etc.) follow the proceeding instructions:
Note: The unit must be drained of any water that has been collected inside. The water is drained from the unit
with the assistance of gravity (there is no pump); either a drain hose or a pan or pot (placed under the lower
drain outlet) will have to be used to collect the water as it is drained. A garden hose (locally purchased) can
also be used if a floor drain is available.
Airing Out the Unit:
To prevent the formation of mold or odor while the unit is not being used:
1) Place the unit in a warm room.
2) Run the unit in fan mode for half a day.
Putting the Unit Away:
1) Stop the appliance and unplug it.
2) Wind the power cord around the hooks provided on the bottom rear of the unit.
3) Clean the air filter (See instructions above).
4) Disconnect the exhaust and intake hoses and store them safely by the unit for future use.
10
TROUBLESHOOTING
Occasionally you may encounter some problems that are of a minor nature, and a service call may not be
necessary. Use this troubleshooting guide to identify possible problems you may be experiencing. If the unit
continues to operate improperly, call your local Danby service depot or 1-800-26(1-800-263-2629)
PROBLEM
• Unit does not start when
pressing power button.
• The room is not cool
enough.
• Power shuts off during
heating mode.
• Nose or vibrations
• Gurgling sound
POSSIBLE CAUSE
SOLUTION
• Room temperature is higher than the
set temperature (heating mode).
• Room temperature is lower than the
set temperature (cooling mode).
• Reset the temperature.
• Reset the temperature.
• Windows/doors in room are open.
• There are heat sources nearby.
• Exhaust air duct is not connected or is
blocked.
• Temperature setting too high.
• Air filter blocked by dust.
• The automatic over heat protection
function. When the temp. at the air
outlet exceeds 70°C (158°F) the unit
will stop.
• The floor is not level, or the unit is on
an incline.
• The sound comes from the flowing of
refrigerant inside the air conditioner.
• Close all windows/doors.
• Remove heat source if possible
• Connect the duct and make sure it
can function properly.
• Decrease the set temperature.
• Clean the air filter.
• Compressor does not work
and the display window is • The bottom pan is full.
showing “P1”.
11
• Switch on again after the unit has
cooled down.
• Place the unit on a flat, level
surface.
• This is normal.
• Remove the bottom drain plug and
drain the water out.
LIMITED IN-HOME APPLIANCE WARRANTY
This quality product is warranted to be free from manufacturer’s defects in material and workmanship, provided that the unit is used under the normal operating
conditions intended by the manufacturer.
This warranty is available only to the person to whom the unit was originally sold by Danby Products Limited (Canada) or Danby Products Inc. (U.S.A.) (hereafter
“Danby”) or by an authorized distributor of Danby, and is non-transferable.
TERMS OF WARRANTY
Plastic parts, are warranted for thirty (30) days only from purchase date, with no extensions provided.
First 24 Months
During the first twenty four (24) months, any functional parts of this product found to be defective, will be repaired or replaced, at warrantor’s option, at no charge to the ORIGINAL purchaser.
To obtain
Service
Danby reserves the right to limit the boundaries of “In Home Service” to the proximity of an Authorized Service Depot. Any appliance
requiring service outside the limited boundaries of “In Home Service” ,it will be the consumer’s responsibility to transport the appliance
(at their own expense) to the original retailer (point of purchase) or a service depot for repair. See “Boundaries of In Home Service”
below. Contact your dealer from whom your unit was purchased, or contact your nearest authorized Danby service depot, where service
must be performed by a qualified service technician.
If service is performed on the unit by anyone other than an authorized service depot, or the unit is used for commercial application, all
obligations of Danby under this warranty shall be void.
Boundaries of
In Home Service
If the appliance is installed in a location that is 100 kilometers (62 miles) or more from the nearest service center your unit must be
delivered to the nearest authorized Danby Service Depot, as service must only be performed by a technician qualified and certified for
warranty service by Danby. Transportation charges to and from the service location are not protected by this warranty and are the
responsibility of the purchaser.
Nothing within this warranty shall imply that Danby will be responsible or liable for any spoilage or damage to food or other contents of this appliance, whether
due to any defect of the appliance, or its use, whether proper or improper.
EXCLUSIONS
Save as herein provided, Danby, there are no other warranties, conditions, representations or guarantees, express or implied, made or intended by Danby or its
authorized distributors and all other warranties, conditions, representations or guarantees, including any warranties, conditions, representations or guarantees
under any Sale of Goods Act or like legislation or statue is hereby expressly excluded. Save as herein provided, Danby shall not be responsible for any damages
to persons or property, including the unit itself, howsoever caused or any consequential damages arising from the malfunction of the unit and by the purchase of
the unit, the purchaser does hereby agree to indemnify and hold harmless Danby from any claim for damages to persons or property caused by the unit.
GENERAL PROVISIONS
No warranty or insurance herein contained or set out shall apply when damage or repair is caused by any of the following:
1) Power failure.
2) Damage in transit or when moving the appliance.
3) Improper power supply such as low voltage, defective house wiring or inadequate fuses.
4) Accident, alteration, abuse or misuse of the appliance such as inadequate air circulation in the room or abnormal operating conditions
(extremely high or low room temperature).
5) Use for commercial or industrial purposes (ie. If the appliance is not installed in a domestic residence).
6) Fire, water damage, theft, war, riot, hostility, acts of God such as hurricanes, floods etc.
7) Service calls resulting in customer education.
8) Improper Installation (ie. Building-in of a free standing appliance or using an appliance outdoors that is not approved for outdoor application).
Proof of purchase date will be required for warranty claims; so, please retain bills of sale. In the event warranty service is required, present this document to our
AUTHORIZED SERVICE DEPOT.
Warranty Service
In-home
Danby Products Limited
PO Box 1778, Guelph, Ontario, Canada N1H 6Z9
Telephone: (519) 837-0920 FAX: (519) 837-0449
1-800-263-2629
04/09
Danby Products Inc.
PO Box 669, Findlay, Ohio, U.S.A. 45840
Telephone: (419) 425-8627 FAX: (419) 425-8629
USER’S MANUAL
FOR YOUR SAFETY: Read these instructions carefully before operating the unit.
POUR VOTRE SÉCURITÉ: Lire attentivement ces instructions avant d'utiliser l'appareil.
AIR CONDITIONER
The model number can be found on the serial plate located on the
back panel of the unit.
All repair parts are available for purchase or special order when you
visit your nearest service depot. To request service and/or the location of the service depot nearest you, call the TOLL FREE NUMBER.
When requesting service or ordering parts, always provide the following information:
•
•
•
•
Product Type
Model Number
Part Number
Part Description
CLIMATISEUR
Le numéro de modèle se trouve sur la plaque d'information sur le
panneau arrière de l’appareil.
Tel: 1-800-26(1-800-263-2629)
Toutes les pièces de rechange ou commandes spéciales sont
disponibles à votre centre de service régional autorisé.
Pour obtenir le service et/ou la localité de votre centre de
service régional, signalez le NUMÉRO D’APPEL SANS FRAIS.
Ayez les renseignements suivants à la portée de la main lors de la
commande de pièce ou service:
•
•
•
•
Type de produit
Numéro de modèle
Numéro de pièce
Description de la pièce
• Owner’s Use and Care Guide
• Guide d’utilisation et soins de Propriètaire
Model • Modèle
Danby Products Limited, Ontario, Canada N1H 6Z9
Danby Products Inc., Findlay, Ohio, USA 45840
DPA120DHB1GP