1
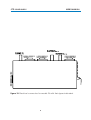
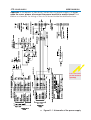
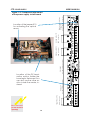
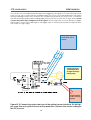
-PS
POWER SUPPLY FOR PROCESS SENSORS
USER'S MANUAL
Model PS
with additional notes for AK40 and AK91 users
Unit information:
Model & Rev:
Serial number:
-
Rev:
PCB's:
Made in Finland
Manual printed in Pukkila, Finland
PART #700178
Visilab Signal Technologies Oy
Address:
Tel.:
Keskustie 15
+358-45-635 4885
FI-07560 Pukkila
Y 0631208-0 ALV Rek.
FINLAND
VAT FI06312080
2015-06
1
Mäntsälä Reg. 365.258
Copyright (c) 2014 Visilab
Signal Technologies Oy
e-mail:
[email protected]
AAA-rated
www.visilab.fi
-PS
USER'S MANUAL
POWER SUPPLY
CONDITIONS OF GUARANTEE, COPYRIGHT NOTICE AND LIABILITIES OF THE MANUFACTURER
The manufacturer (Visilab Signal Technologies Oy) grants a guarantee of two years for the buyer of
the power supply -PS meter from the date of purchase. The guarantee covers all faults and
misalignments which are in the equipment at the moment of purchase including those which appear
during the guarantee period. The manufacturer is liable of repairing the instrument without cost to the
buyer. The manufacturer can ship a new instrument of equivalent value and status if considered as
a better solution than repairing. The buyer is liable of paying the freight costs to the factory of the faulty
unit. The unit must not be sent to the manufacturer without a permission from the manufacturer. Units
sent without a permission will be repaired at the cost of the buyer.
The guarantee does not cover wearing parts, like batteries, lamps or motors. The guarantee does not
cover faults caused by errors or neglects of the user nor those faults which are caused by deliberate
damaging. The guarantee does not cover faults caused by incorrectly installed cables or conductors. The guarantee does not cover any damages to the user or to any third party independently of
the way how the instrument has been used. The guarantee does not cover faults caused by natural
phenomena like lightnings or floods, nor user errors like dropping or hitting the unit. The guarantee
is void if the unit is sold to any third party. All faults which are not covered will be repaired at the cost
of the buyer.
If opening of the instrument has been attempted at those parts which are not intended for the user,
the manufacturer can refuse to repair or service the instrument. Then the instrument will be shipped
back to the buyer at the cost of the buyer. Such parts are the light source, the optical head and parts
on the electronics boards. The instrument can be opened only strictly according to the instructions
in this manual and should not be disassembled unnecessarily. Also, if some parts can not be opened
with a reasonable force, they should be left to avoid any damage.
Copyright (c) 1994 - 2015 Visilab Signal Technologies Oy, All Rights Reserved
Visilab Oy reserves all rights to changes and modifications in the looks, specifications, optical and
electronic design, electronic and software interfaces and computer programs, and also the right to
change the retail prices of the instrument or its parts without any notice to present or potential
customers. All copyrights and design rights belong to Visilab Oy. The PC programs, which have been
sold to the buyer, can be used and copied freely for his own use but can not be sold to any third party.
The manufacturer is not responsible for any casualties, damages or accidents which the user has
caused directly or indirectly with this instrument, either to himself or to any third party, independent
on the instrument being used correctly or not.
Important warnings are highlighted in this manual with red color.
Recommendations are in blue and important instructions are in brown.
2
-PS
USER'S MANUAL
POWER SUPPLY
EC Declaration of Conformity
We
Visilab Signal Technologies Oy
Keskustie 15
FI-07560 Pukkila
FINLAND
declare that the
AK50 Process Moisture Logger and the power supply
-PS
meet the intent of the EMC directive 89/336/EEC. Compliance is based on the following harmonized
standards:
Emissions:
EN 50 081 part 2 (industrial environment):1993 referring to :
EN 55 011 radiated, Class A, Group 1
EN 55 011 conducted, Class A, Group 1
Immunity:
EN 50 082 part 2 (industrial environment):1992 referring to (both radiated and
conducted fields):
EN 61000-4
IEC 1000-4
ENV 50140
ENV 50141
ENV 50204
I certify that the apparatus identified above conforms to the requirements of Council Directive 89/
336/EEC.
--------------------------------------------------------Henrik Stenlund
managing director
5th May 1997
Note for users:
When the apparatus identified above is connected by someone to become a part of an industrial
control system, he is also responsible for the EMC compatibility of the resulting system. He is also liable
of providing the necessary optical or galvanic isolations for signals and transient absorbers for other
lines to conform to the EMC directives. This declaration covers also models DL, Di and WAND as they
are identical in all electrical respects to the model D. The expansion modules to be attached to the
meter electrically and mechanically are designed and implemented in the same fashion and are
claimed to be compatible with the EMC directive without individual testing.
The meters and the power source apparatus have been individually tested according to DIN
VDE0701 and DIN VDE0702 for electrical safety.
3
-PS
USER'S MANUAL
POWER SUPPLY
EC Declaration of Conformity
We
Visilab Signal Technologies Oy
Keskustie 15
FI-07560 Pukkila
FINLAND
declare that the products which are put on the EU market:
Portable Surface Moisture Logger, model AK30/40 and its derivatives
On-line Moisture Logger, model AK50 and its derivatives
power supply, model PS and its derivatives
meet the intent of the RoHS directive 2002/95/EC and the WEEE directive 2002/96/EC. Compliance is
based on the following.
The instruments belong to Category 9 "Monitoring and Control Instruments" of the WEEE directive and
thus are not required to fulfill the said directives.
I certify that the apparatus identified above conforms to the requirements of Council Directives 2002/
95/EC and 2002/96/EC.
--------------------------------------------------------Henrik Stenlund
managing director
3rd February 2006
Note:
In spite of the fact that the products are not required to fulfill the directives, we make every effort to
comply with the directives in practice. When the Category 9 is moved to be covered the same
requirements as other categories do, we are ready to certify that these products comply with the
directives.
Specifications of the power source, model -PS:
Operating -10 to +60 C 20 - 90 %RH noncondensing ambient, max 40 W continuously.
Output 24.0V 2 A, peak 3 A. Input 90 VAC to 264 VAC, 127 to 370 VDC, 47 - 440 Hz.
Safety and EMC compliance with UL60950, TÜV EN60950-1, EN55022 (CISPR22) CLASS B,
EN61000-3-2,-3, EN61000-4-2,3,4,5,6,8,11, ENV50204, EN55024, LIGHT INDUSTRY LEVEL, CRITERIA A. Tested for electrical safety according to DIN VDE0701 and VDE0702.
4
-PS
USER'S MANUAL
POWER SUPPLY
Contents
1. Introduction and Taking into Use...6
Connecting the Cables and Starting the Meter...6
2. Basic Features of the Power Source Unit...10
Signals...10
Appendix 1. Schematic of Electrical Connections for power supply -PS. If you open the
cover, please, disconnect the power lead first to avoid a shock! Find below a schematic
for wiring of the circuit board inside the distribution box. ...11
Appendix 2. Use of the optional optical sensor interface connector....13
Index...15
5
-PS
USER'S MANUAL
POWER SUPPLY
1. Introduction and Taking into Use
The PS power supply is designed for use with your moisture logger. It provides your meter with electrical
power and has a number of connectors for various user and process interfaces. In the following find
the proper use of each connector. For any details of use of the meter itself, refer to the User's Guide.
PS is taken out of its package carefully and it should be inspected for any damage during shipping.
If any damage is visible, contact the manufacturer or the representative from which the unit was
bought. The following items should be available:
1. PS supply
2. User's guide (this)
3. Connection cables with connectors according to your meter
4. Wall supply cable with an IEC320 socket at one end
5. DIN rail mounting kit
6. Other optional items ordered
If something is missing, inform your dealer and he will ship any missing parts. The instrument is ready
for use after connecting the cables and power.
PS is a power supply giving 24 V 2 A continuously for your meter. It can supply 3 A temporarily for
starting the meter. Some power supplies are equipped with a 12 V output with double the current
capacity to better match requirements of the meter. The casing has a number of venting holes for
air circulation. The supply is intended for installation into either electrical cabinets or as an office
accessory. It has rubber feet for comfortable desktop operation too. It is not watertight in any degree
and should not be installed into such conditions where there is a risk of letting water inside. The supply
accepts any AC voltage between 85 and 240 Volts of 50/60 Hz. Also DC voltage is acceptable.
Check the unit's label for certifications and valid approvals. For wall power inlet, there is an IEC320
connector at one end of the supply. A suitable cable with the proper wall plug at the other end is
supplied. Minor variations may exist in this respect as conditions vary from country to country and the
plugs are often very different. There is also a cable fixed to the box which is for the moisture meter.
The other end of the cable carries an ITT Cannon 12 pin connector (model D). In some cases, there
may be two of the Bulgin connectors and two cables, especially if the TEAK-30 display module is
supported. The rest of the cables for various interfaces are to be connected to the specific
connectors in the supply's box. This is described in the following. Note that the power supply itself is
identical for all models. Only the use of each of these specific connectors may differ or the connector
is not used at all. Also, the cables and connectors are matched according to your meter model.
Connecting the Cables and Starting the Meter
Notice that the cable connectors in PS may have caps which protect them against dirt, depending
on the type of connector. The connectors are splash water proof. To keep them that way for the
operating life of the instrument and cables we ask the user to handle them carefully and to avoid
too much force while opening or closing. Else the sealing rings may be lost or threads or contact pins
may fail. Refer to Figures 1A to 1B for various cable connections in typical applications. In practice,
there are more possible combinations than these.
6
-PS
USER'S MANUAL
POWER SUPPLY
Profibus DP
slaves
RS232
Profibus DP
master
PC or an ANSI
terminal
Figure 1A. Assembly of electrical cables in AK50 for use via RS232 with a PC or a
terminal and Profibus DP simultaneously. The drawing is not to scale. This same
guide is valid for other process sensors as well. Note that some meters do not have
the Profibus DP option. That connector may be in a different use.
7
-PS
USER'S MANUAL
POWER SUPPLY
Figure 1B. Electrical connectors for model -PS with their types indicated.
8
-PS
USER'S MANUAL
POWER SUPPLY
The cables are connected as follows. The box has a D9 female connector for the PC serial cable
(RS232 or RS485 for LAN) and another for the Profibus DP. Note that to obtain the maximum operating
speed 12 Mbauds for the RS485 termination should be correctly done at both ends of the cable. Also
the intermediate cable should be properly selected for high-speed operation. A twisted-pair cable
with shielding is usually sufficient. There are termination resistors available, one inside the meter and
another inside the -PS. Refer to the meter's own User's Guide for details and to Appendix 1 for finding
the other. Sometimes the DP D9 connector cases include a resistor with a switch which activates it.
This is the easiest way of testing for the need of the termination and of taking it into immediate use.
9
-PS
USER'S MANUAL
POWER SUPPLY
2. Basic Features of the Power Source Unit
Signals
The power source generates nominal 24 V 2 A for the meter for regular consumption. The communication cable brings out the signals in analog and digital form and those signals are distributed with
the connectors at the front panel of the -PS. The serial port RS232 can be used for direct connection
to a PC or to a LAN232 unit which is used as a LAN for supporting the simultaneous use of up to eight
meters. The serial port can be configured as RS485 to be used as a wider LAN with long legs (up to
1200 meters). The LAN232 can again be used here as the bridge to the PC after configuring it to be
a member of the RS485 network. The regular D9 female connector has been used for this purpose
for simplicity. Check each meter's manuals to see the baud rates it is capable of using. Note that using
the highest baud rate 115200 bauds is possible only with rather short cables. If long cables ( > 10
meters) is required, please use the lowest baud rate 9600 bauds for secured communications.
The Profibus DP is a standardized fieldbus for mill automation and is capable of very high speed
operation. It is usually built up with a twisted-pair cable connecting each of the DP slaves and the
DP masters. The D9 female is used here on the front panel for direct acceptance to the DP network.
The meter's GSD file or equivalent information needs to be fed to the master before it tries to identify
the slave.
The analog signals (a voltage) are led to the BNC connectors on the front panel, marked as Signal
1 and 2. The first one is for the signal selectable as moisture, web temperature, head temperature,
expansion module or extra temperature signals. The meter's own scaling may affect this and the
basic voltage range can be selected as 0-10 V, +/-5 V or 0-5 V as selected in the meter. The second
channel is only available if the meter has the proper option.
The third BNC connector is for direct connection to the triggering input (TTL levels, falling edge
sensitive). A microswitch or some transistor (e.g. an optotransistor) can be directly connected to it.
The last D9 female connector is for applying either the SICK optical sensor module WT18-2P112 or
equivalent or some tailored sensor system. Refer to Appendix 2 for details.
There are two indicator lights on the front panel. The one marked as POWER indicates the presence
of 24 V at the cable end. The second one (CABLE SENSE) indicates the connection of the cable to
the meter. However, this indicator is active only in model D meters and only if you have either the 12pin cable in use or you have both of the two 8-pin cables connected. The indicator is fed by the
isolated 5 V source from the meter and tells you that most likely the meter should be running OK.
A Note for AK40 and AK91 Users
Please be aware that the meter AK40 does not have the Profibus DP but does have the analog output
of 4-20 mA for the moisture signal. It is scaled as 100 % / 20 mA and 0 % at 4 mA unless otherwise noted.
The signal comes out of the D9 female connector marked for DP (X1) and the pin ordering is the
following.
X1 pin
3
8
original purpose
PB B
PB A
signal
4-20 mA out active
4-20 mA return (ground)
You can connect this output to your DCS as an active source. Note that the usual cable mounting
feedthrough is replaced with a 12-pin Cannon connector. The PS may be delivered with other
optional connectors depending on the particular application.
10
-PS
USER'S MANUAL
POWER SUPPLY
Appendix 1. Schematic of Electrical Connections for power supply -PS. If you
open the cover, please, disconnect the power lead first to avoid a shock! Find
below a schematic for wiring of the circuit board inside the distribution box.
Disconnect
power before
opening!
11
Figure L1-1 Schematic of the power supply
-PS
USER'S MANUAL
POWER SUPPLY
Disconnect
power before
opening!
12
BNC connector
Trigger input (TTL)
D9 sub female connector
Profibus DP
D9 sub female connector
Location of the DP termination resistor. Solder the
loose leg to the board. You
can also use the other resistor inside the meter, instead.
Visilab Signal Technologies
BNC connector
BNC connector
RS232/485
Analog output V1
Analog output V2
Location of the jumper X10
for activating the optical
sensor
D9 sub female connector
Optical sensor interface
for triggering
Figure L1-2 Component placement
of the power supply circuit board
-PS
USER'S MANUAL
POWER SUPPLY
Appendix 2. Use of the optional optical sensor interface connector.
The schematic L2-1 below shows in detail the connectors for the triggering of the moisture meter's
autotimer, through hardware. It has options which are described here. A typical triggering device
would be an optical sensor capable of detecting the incoming edge of an object or for detecting
the correct position of an object to start actual measurements either to the memory banks or in the
BURST mode. For details refer to the meter's User's Guide. Microswitches and tailored special devices can be used as well. Microswitches can be connected directly to the BNC connector on the
front panel. A closing action is required for triggering (falling edge sensitive).
One way of using it is to apply a standard optical sensor. As an example is a module made by SICK
(Germany) WT18-2P112 or equivalent. The sensor is mechanically installed so that it can detect the
incoming edge of the objects. For connecting this kind of sensor, use the pins 1 (+24 V from the
power supply), 3 (inverted output logic from the sensor), 5 (output logic from the sensor) and 8 (0V
ground) only. See the Figure L2-1 for connector pins. The connector is of standard D9 female type.
Do not connect the other pins at all to avoid any mistakes and shorts. You need also to close the
jumper plug to jumper post X10. Else, the transistor is floating and no triggering actually happens.
These components are already in the power supply. Refer to Appendix 1 for schematics and other
details.
Figure L2-1 Schematics of the optical sensor interface. Note that the voltage is
usually 24 V, not 12 V!
13
-PS
USER'S MANUAL
POWER SUPPLY
You can also use some different kind of device for triggering, see Figure L2-2 in the following. In that
case you can only connect the pins 4 (trigger signal TTL), 6 (+5V 50 mA max pulled from the meter)
and 9 (isolated ground) in the connector. Do not apply the jumper at X10 in this case. Your device
may be anything that generates a falling edge pulse to the TRIG_IN wire with TTL logic levels. Do not
connect any other logic voltage levels to this signal. The 3V3 logic does not work and any voltages
higher than 5 V may cause damage to the trigger input. It has been protected, though but does
not sustain too high surges.
SICK WT18-2P112
sensor
a tailored sensor,
operating with 5V
and generating a
falling edge
a microswitch
with a closing
action
Figure L2-2 Connecting various devices to the optical sensor interface. Do not apply more than one type of device at the same time. Observe the colour coding for
the SICK sensor.
14
-PS
USER'S MANUAL
POWER SUPPLY
Index
A
Appendix 1. Schematic of Electrical Connections 11
Appendix 2. Use of the optional optical sensor int 13
Assembly of electrical cables 7
B
Basic Features of the Instrument
10
C
Cables 6
Conditions of Guarantee 2
Connecting the Cables and Starting the Meter 6
E
EC Declaration of Conformity 3, 4
I
Introduction and Taking into Use 6
S
Schematic 11
15